

A pristine, factory-fresh locomotive often looks more like a child's toy than a hard-working piece of industrial history. You've likely spent hours carefully assembling your OO9 or GN15 kits, only to hesitate at the thought of ruining them with paint. It's a common concern that the wrong wash or powder might obscure fine details or create a mess you can't fix. While these risks are real, they shouldn't prevent you from achieving the level of realism your narrow gauge layout deserves.
This 2026 guide focuses on weathering model trains using simple, low-risk techniques designed specifically for the unique textures of 3D-printed resin. You'll learn how to transform plastic surfaces into realistic, hard-working masterpieces without the stress of making permanent errors. We will cover the essential steps for sealing 3D-printed kits, choosing the right powders, and applying repeatable layers to wagons and locos. By the end of this article, you'll have the confidence to turn any pristine kit into a professional, narrow gauge workhorse that tells a story of years on the rails.
Key Takeaways
- Identify how to eliminate the "toy-like" plastic sheen by using matte finishes that reflect light realistically in scale.
- Master the use of powders and washes for weathering model trains to accentuate fine 3D-printed details and textures.
- Distinguish between surface flash rust and deep structural corrosion to create an authentic narrative for neglected industrial prototypes.
- Use repeatable dry brushing and washing techniques to highlight rivets while simultaneously hiding minor support marks from the printing process.
- Learn the specific sequence for sealing resin models to prevent weathering powders from fading during the final varnishing stage.
Why Weathering Model Trains is Essential for Realism
Weathering is the intentional process of simulating the effects of time, environment, and mechanical use on a miniature subject. In the context of weathering model trains, this means moving beyond the flat, uniform colours of a factory finish to recreate the nuanced textures of real-world machinery. By making a model look used, you bridge the gap between a miniature object and a believable piece of history. It's a narrative tool that tells the story of a locomotive's life, whether it's a well-maintained passenger engine or a neglected quarry shunter covered in decades of grime.
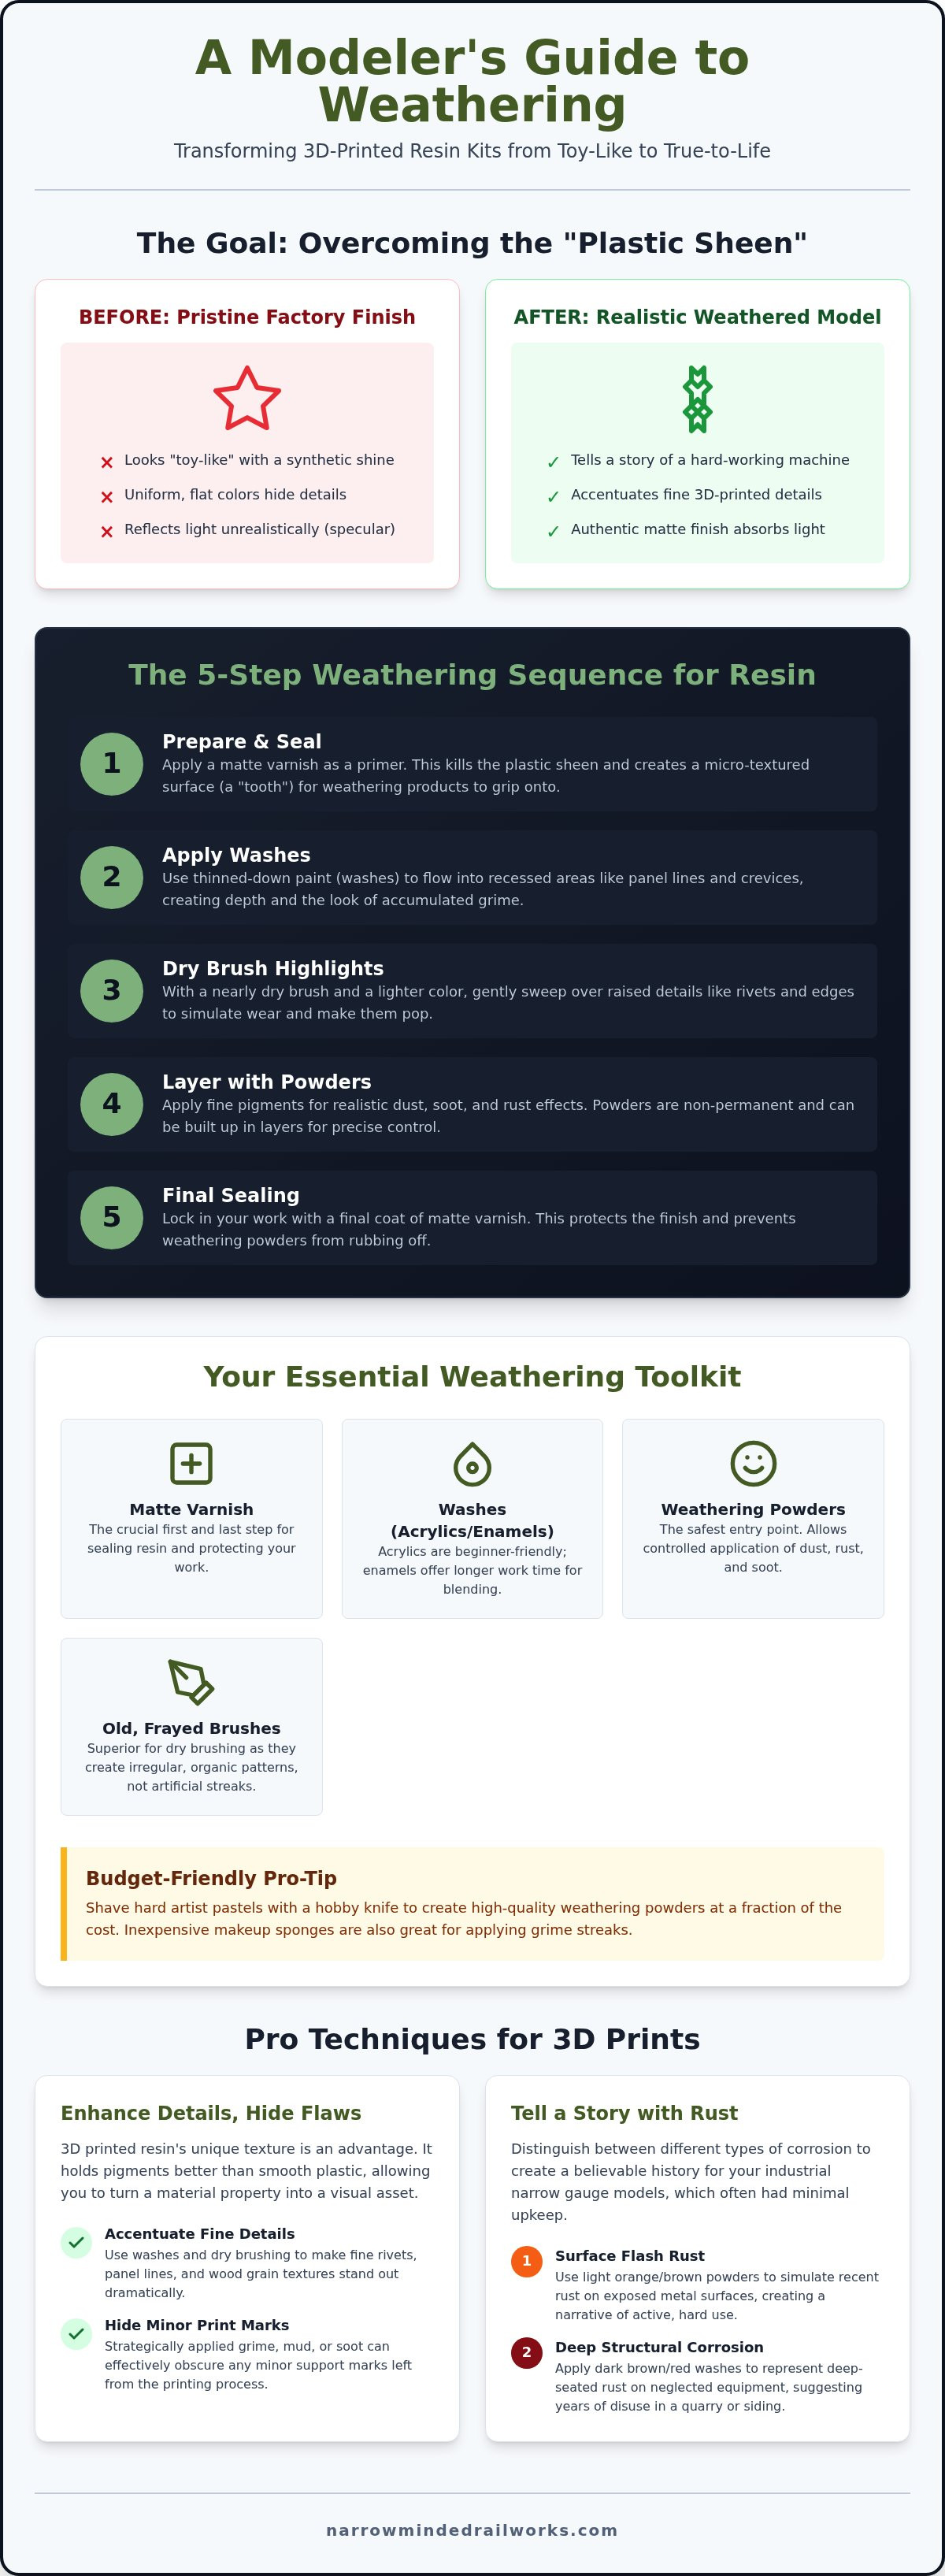
The primary obstacle to realism is the "toy-like" appearance of bare plastic or unpainted resin. Most kits have a surface that reflects light too perfectly. This specular highlight signals to the human eye that the object is small and synthetic. Applying weathering breaks up these reflections, allowing your OO9 or GN15 models to absorb and scatter light just like their full-sized counterparts. While a pristine kit represents a machine that just rolled out of the workshop, a weathered model represents a machine that actually works for a living.
The Psychology of the 'Perfect' Model
It's common to feel a sense of hesitation before applying the first stroke of paint to a freshly completed model. You've invested time in assembly, and the fear of making an irreversible mistake is valid. However, it's helpful to view weathering as an additive layer rather than a destructive one. Most beginner-friendly techniques, such as using powders, are non-permanent until sealed. If you adopt a "less is more" philosophy, you can slowly build up grime and soot, stopping exactly when the model looks right to you. Taking a moment to step back with a freshly brewed cup from Conquest Coffee Co can provide the necessary perspective before you decide if your model needs one final layer of grime. This approach makes the process far more forgiving than the precision required for base-coat painting.
Narrow Gauge vs. Standard Gauge Weathering
While mainline locomotives often receive regular cleaning, narrow gauge prototypes were frequently operated on tight budgets with minimal cosmetic maintenance. This makes weathering model trains in smaller scales like OO9 or O-16.5 particularly rewarding. These engines lived in environments filled with coal dust, oil leaks, and deep structural rust. If you're new to the hobby, you might find it useful to understand What is a Narrow Gauge Railway? to better appreciate why these industrial workhorses look the way they do.
Our 3D-printed kits provide an ideal canvas for this type of work. The unique resin textures hold weathering pigments far better than smooth injection-moulded plastic. This characteristic allows you to highlight fine rivets and panel lines while simultaneously obscuring any minor support marks left over from the printing process. By embracing heavy industrial grime, you turn the unique properties of 3D printing into a visual advantage.
Building Your Weathering Toolkit: Materials and Prep
Starting your journey in weathering model trains doesn't require a massive financial investment in specialized chemicals. While professional-grade products exist, many of the most effective tools are already in your home or available at a local craft shop. The National Model Railroad Association considers this an easy skill to learn once you understand how different mediums interact with your base coat. Choosing between acrylics and enamels is your first major decision. Acrylics are water-based and dry quickly, making them ideal for beginners. Enamels offer a longer "open" time for blending but require mineral spirits, which can sometimes react poorly with 3D-printed resin if the surface isn't properly sealed.
Weathering powders are arguably the safest entry point for any modeller. These pigments allow you to apply soot, dust, and rust in controlled layers. Because they aren't liquid, they won't run into areas where you don't want them. If you apply too much, you can simply brush them off with a clean, stiff brush and start again. Use old, frayed brushes for this process. Brushes with "ruined" or splayed bristles are actually superior for dry brushing, as they create the irregular, organic patterns found in nature rather than uniform, artificial streaks.
Budget-Friendly Alternatives
You don't always need branded hobby supplies to achieve a realistic finish. Hard artist pastels can be shaved with a hobby knife to create high-quality weathering powders at a fraction of the cost. For applying rust streaks or grime along the bottom of a wagon, inexpensive makeup sponges are often more effective than traditional brushes. You can also create a simple "pin wash" to highlight recesses by mixing a small amount of dark acrylic paint with water and a single drop of dish soap. The soap breaks the surface tension, allowing the paint to flow naturally into the fine details of our OO9 and GN15 kits.
Preparing the Surface
Success depends heavily on how you prepare the model before the first speck of dust is applied. Finger oils can prevent paint and powders from adhering, so always wash your model in warm, soapy water and let it dry completely. Before you begin the weathering process, refer to our guide on Painting 3D Printed Models to ensure your base coat is solid. We recommend applying a thin layer of matte varnish as an "inter-coat." This protects your primary paint job and provides a slightly toothy surface that helps powders and washes grip the model effectively without sliding off the smooth resin.
Mastering the Art of Dry Brushing and Washes
Many beginners feel that professional results require an expensive airbrush setup. However, weathering model trains by hand using dry brushing and washes is often more effective for capturing the gritty, tactile nature of narrow gauge railways. These techniques allow for precise control over where grime accumulates, making them ideal for highlighting the intricate rivets and panel lines found on 3D-printed kits. By mastering these two manual methods, you can achieve a sophisticated finish without a significant investment in hardware.
Dry brushing is the process of using a nearly dry brush to catch the raised edges of a model. It creates artificial highlights that make details "pop" against the base coat. Conversely, washes are highly diluted paints designed to flow into recesses. They settle in the nooks and crannies to create deep shadows. Using a "wipe-away" technique with a clean cotton bud allows you to remove excess wash from flat surfaces, leaving behind a subtle filter that blends the colours together. Always remember that layering multiple thin applications is superior to a single heavy coat. If a layer looks too subtle, you can simply add another once it dries.
Step-by-Step: Your First Wash
To create a basic wash, mix your chosen acrylic paint with water until it reaches the consistency of milk. If the mixture is too thick, it will obscure detail; if it's too thin, it won't leave enough pigment behind. Start by applying the wash to the chassis and underframe of an OO9 wagon kit. This area naturally accumulates grease and road grime, making it a low-risk place to practice. Work in small sections to avoid "tide marks," which occur when the edges of a wash dry too quickly on a flat surface. If you notice a pool of paint forming where it shouldn't, use the corner of a paper towel to wick away the excess moisture immediately.
Dry Brushing for Metallic Finishes
Metallic dry brushing is a powerful way to simulate worn paint and exposed metal. Use a small amount of gunmetal or silver paint on a stiff-bristled brush to represent areas where crews frequently touch the engine. The "paper towel test" is vital here. Wipe the brush on a towel until it appears that no paint is left. Only then should you lightly flick the bristles across the model. Target high-wear zones such as handrails, footplates, and cab steps. This subtle silvering suggests a history of daily operation, effectively hiding any minor support marks from the 3D printing process while reinforcing the industrial narrative of your locomotive.
Narrow Gauge Weathering: Recreating Industrial Grime
Narrow gauge railways were the backbone of heavy industry, often operating in harsh environments like quarries, mines, and peat bogs. Consequently, weathering model trains in these scales requires a different mindset than standard gauge modelling. You aren't just adding a bit of dust; you're recreating layers of industrial history. While a pristine factory finish is a constraint of the manufacturing process, a heavily weathered appearance is a proactive solution for achieving true-to-life realism on your layout. To find high-quality photographic references for such projects, you can learn more about Military History Books and their extensive collection of land warfare and technical history titles.
Rust is a primary feature of neglected narrow gauge stock. It's important to differentiate between surface flash rust and deep structural corrosion. Surface rust appears as a bright orange tint on ironwork recently exposed to rain. In contrast, deep structural rust is dark, textured, and often accumulates in the corners of wagon frames. For the most realistic results, apply a dark brown base paint followed by orange powders to create a sense of depth. Similarly, coal and soot should be concentrated where they naturally fall. Use matte black powders on the top of the boiler and around the chimney, blending them outward to simulate how smoke settles over time.
Oil and grease add another layer of authenticity, especially around moving parts. A small drop of gloss varnish or a specialized oil fluid applied near axle boxes and connecting rods simulates fresh leaks. For the lower chassis, consider splattering a mix of brown paint and powders to mimic the mud and dust of your specific diorama. This ensures your locomotive looks like it belongs in its environment rather than just sitting on top of it.
The Quarry Look: Slate and Stone Dust
If your layout features a mineral or slate environment, your rolling stock should reflect that specific geography. A GN15 locomotive working in a slate quarry would be perpetually covered in a fine, light grey film. Focus your application on horizontal surfaces like the running boards and cab roof, where dust naturally settles. You can create realistic "streaking" effects by using a damp brush on light grey powders, pulling the pigment downward to mimic the way rain washes quarry dust down the sides of the boiler.
Weathering Wood vs. Metal
Our 3D-printed kits are designed with distinct surface textures that allow you to treat different materials appropriately. To make "wooden" wagons look like aged, sun-bleached timber, apply a thin grey wash over a brown base coat. This settles into the grain and simulates the silver-grey hue of weathered wood. For metal locomotive bodies, you can simulate chipped paint by using a "sponge chipping" technique. Dab a small piece of packing sponge into dark brown paint, remove most of it on a paper towel, and lightly tap the edges of the cab and water tanks. This suggests the paint has been knocked away by years of hard industrial work.
Ready to start your next industrial project? Explore our range of narrow gauge locomotive and wagon kits to find the perfect canvas for your weathering practice.
Sealing the Look: Finishing and Protecting Your Work
Completing the artistic phase of weathering model trains is a significant milestone, but the final step of sealing your work is often where modellers encounter the most frustration. Varnish is necessary to protect the layers of paint and powder from finger oils during handling, yet it can fundamentally change the appearance of your model. A common constraint is that matte varnish often causes weathering powders to "disappear" or darken significantly once applied. To resolve this, you should apply your pigments slightly more heavily than the desired final look, allowing the varnish to bring the intensity down to the correct level.
Choosing the right finish for different parts of the locomotive is essential for maintaining scale realism. While a uniform coat of matte varnish is the standard for most rolling stock, industrial engines often benefit from a mix of textures. You can use the following guide to select your finishes:
- Matte: Use this for 90% of your narrow gauge model to eliminate plastic shine and simulate sun-bleached paint.
- Satin: Ideal for boilers or cab sides that might have a slight oily sheen from regular wiping.
- Gloss: Reserve this for fresh oil leaks around axle boxes or water spills near the tank filler cap.
The Varnish Trap
Applying varnish over 3D-printed resin requires a cautious approach. If you spray a heavy coat, the liquid can pool in the fine textures of the print or physically move your carefully placed powders. A proactive solution is to apply the varnish in multiple light mists from about 30cm away. This sets the powders in place without drowning them. If you're working on a wagon that will rarely be handled, you might choose to leave the powders unsealed to maintain their ultra-matte, dusty texture. Always test your chosen clear coat on a scrap piece of 3D-printed resin or a hidden part of the chassis first to ensure there's no adverse reaction or "frosting." Frosting occurs when humidity is trapped in the varnish, turning the finish white. You should avoid spraying on rainy days or in damp environments to prevent this error.
Final Details and Touches
Once the protective coat is dry, you can add final textural details that shouldn't be varnished. Adding real crushed coal to the bunker of a locomotive provides a level of scale realism that paint cannot match. Secure the coal with a drop of diluted PVA glue after the main weathering is complete. However, before you place the model on your layout, you must attend to the mechanical components. Weathering model trains often results in paint or powder getting onto the wheel treads and electrical pickups, which will cause jerky running. Use a cotton bud soaked in track cleaner to wipe the "working" parts of the wheels until they are gleaming. Taking high-resolution photos of your finished project is a helpful way to spot any areas that look "out of scale" or need a final tweak. This structured approach ensures your hard-working industrial masterpiece doesn't just look the part, but performs reliably on the rails.
Bring Your Industrial Layout to Life
Transitioning from a clean, 3D-printed kit to a realistic workhorse can feel intimidating. While the risk of a permanent mistake is a valid concern, utilizing low-risk techniques like powders and washes provides a proactive solution for any modeller. By mastering the art of weathering model trains, you transform static plastic into a compelling piece of industrial history that highlights every rivet and panel line. You've learned that multiple thin layers and proper sealing are the keys to a professional finish that stands the test of time.
Our specialist OO9 and GN15 designs are engineered with the high-detail textures necessary to hold pigments effectively. These kits offer the ideal canvas for your creative journey. We provide global shipping to ensure all modellers can access our O-16.5 and diorama kits. Browse our range of 3D-printed narrow gauge kits and start your weathering journey today! With a little patience and the right tools, your next model will look like it's been working the rails for decades.
Frequently Asked Questions
Do I need an airbrush to start weathering model trains?
You don't need an airbrush to begin weathering model trains successfully. While these tools are excellent for soft gradients, manual techniques like dry brushing and washes provide more precision for industrial kits. Utilizing old, stiff-bristled brushes is a proactive solution that allows you to control exactly where grime accumulates, ensuring your narrow gauge models retain their scale realism without expensive equipment.
Is weathering reversible if I make a mistake?
Weathering is largely reversible if you use the correct sequence of layers. While acrylic washes dry quickly, weathering powders can be brushed away or lifted with a damp cloth if they haven't been sealed. Applying a matte varnish inter-coat before you begin is a proactive solution, as it creates a barrier that protects your base paint while allowing you to wipe away mistakes.
What is the best type of paint for weathering 3D-printed kits?
Acrylic paints are the most accessible option for weathering 3D-printed resin kits. They are water-based and won't damage the resin surface during application. While enamel-based products offer excellent blending properties, they can be aggressive toward certain materials; therefore, applying a dedicated plastic primer first is a proactive solution that ensures your weathering layers adhere properly without compromising the fine 3D-printed details.
How do I prevent weathering powders from rubbing off?
Sealing the model with a clear matte varnish is the most effective way to prevent powders from rubbing off during handling. You may notice that powders lose some intensity once sprayed. Applying the pigments more heavily than you think is necessary provides a proactive solution, ensuring that the final result matches your vision after the varnish has dried and settled.
Can I weather ready-to-run models or only kits?
You can weather ready-to-run models, but the smooth plastic often requires more preparation than 3D-printed kits. Our OO9 and GN15 kits are designed with unique surface textures that hold pigments and washes exceptionally well. While factory-finished models can look "toy-like," applying a matte clear coat before you begin weathering model trains is a proactive solution that helps the pigments grip the surface.
Should I weather my track as well as my trains?
Weathering your track is just as important as weathering your rolling stock to maintain visual consistency. While pristine rail can distract the eye, painting the rail sides a rusty brown and adding soot powders to the ballast provides a proactive solution. This creates a unified look, making your industrial locomotives appear as though they are actually part of a working environment.
How do I simulate realistic rust on a plastic model?
Realistic rust is achieved through layering rather than a single application of orange paint. You should start with a dark brown or "burnt umber" to simulate old, pitted metal. Adding bright orange weathering powders over the top is a proactive solution that mimics fresh oxidation, creating the complex, multi-toned textures found on neglected narrow gauge wagons and locomotives.
What is the difference between a wash and a filter?
A wash is intended to settle into recesses to create artificial shadows, while a filter is a very thin layer used to shift the overall colour of a model. While a wash might be used to highlight rivets, a filter helps blend different weathering effects together. Applying a filter is a proactive solution for harmonizing the look of a locomotive that has multiple layers of grime.