

Fascinated by the charm of narrow gauge railways but feeling lost in a world of jargon like 'chassis', 'N-gauge donors', and 'etched plates'? You're not alone. The dream of building your own locomotive can quickly feel overwhelming, especially when faced with the huge variety of options for a first kit-009 project. It’s easy to worry about picking a model that’s too difficult, or buying a body kit only to find you have no idea which chassis it needs. The fear of making a costly mistake can often stop a brilliant hobby before it even begins.
This guide is here to change all that. We'll demystify the entire process, breaking down exactly what's inside a typical OO9 loco kit and what isn't. You'll learn how to confidently choose a beginner-friendly model, understand the crucial relationship between a body and its chassis, and get a clear list of the essential tools you'll need to start. By the end of this article, you'll have a clear roadmap to purchase your first kit and begin your narrow gauge journey with excitement, not anxiety.
What is an OO9 Locomotive Kit? Unpacking the Basics
Welcome to the wonderfully rewarding world of OO9 model railways! This fascinating scale involves modelling narrow-gauge prototypes in 4mm scale (the same as standard OO gauge) but running them on 9mm track (the same as N gauge). This clever combination allows you to model charming, characterful railways in a relatively small space. For a deeper dive into its origins, it's worth understanding what is OO9 scale? in more detail.
Unlike a 'ready-to-run' (RTR) model that comes complete out of the box, a locomotive kit provides you with a set of parts to build the model yourself. This hands-on approach is the heart of the hobby for many enthusiasts, offering a deeper connection to your models and a huge sense of achievement.
The Body Kit & Chassis Concept Explained
Most beginner-friendly OO9 kits are 'body kits'. The best analogy is buying a custom body shell for a standard car; you provide the engine and wheels separately. The kit gives you the parts to build the distinctive locomotive body, but the powered mechanism-known as the chassis-is sourced separately. A typical kit-009 will contain the main cosmetic parts, but you'll need to source the rest.
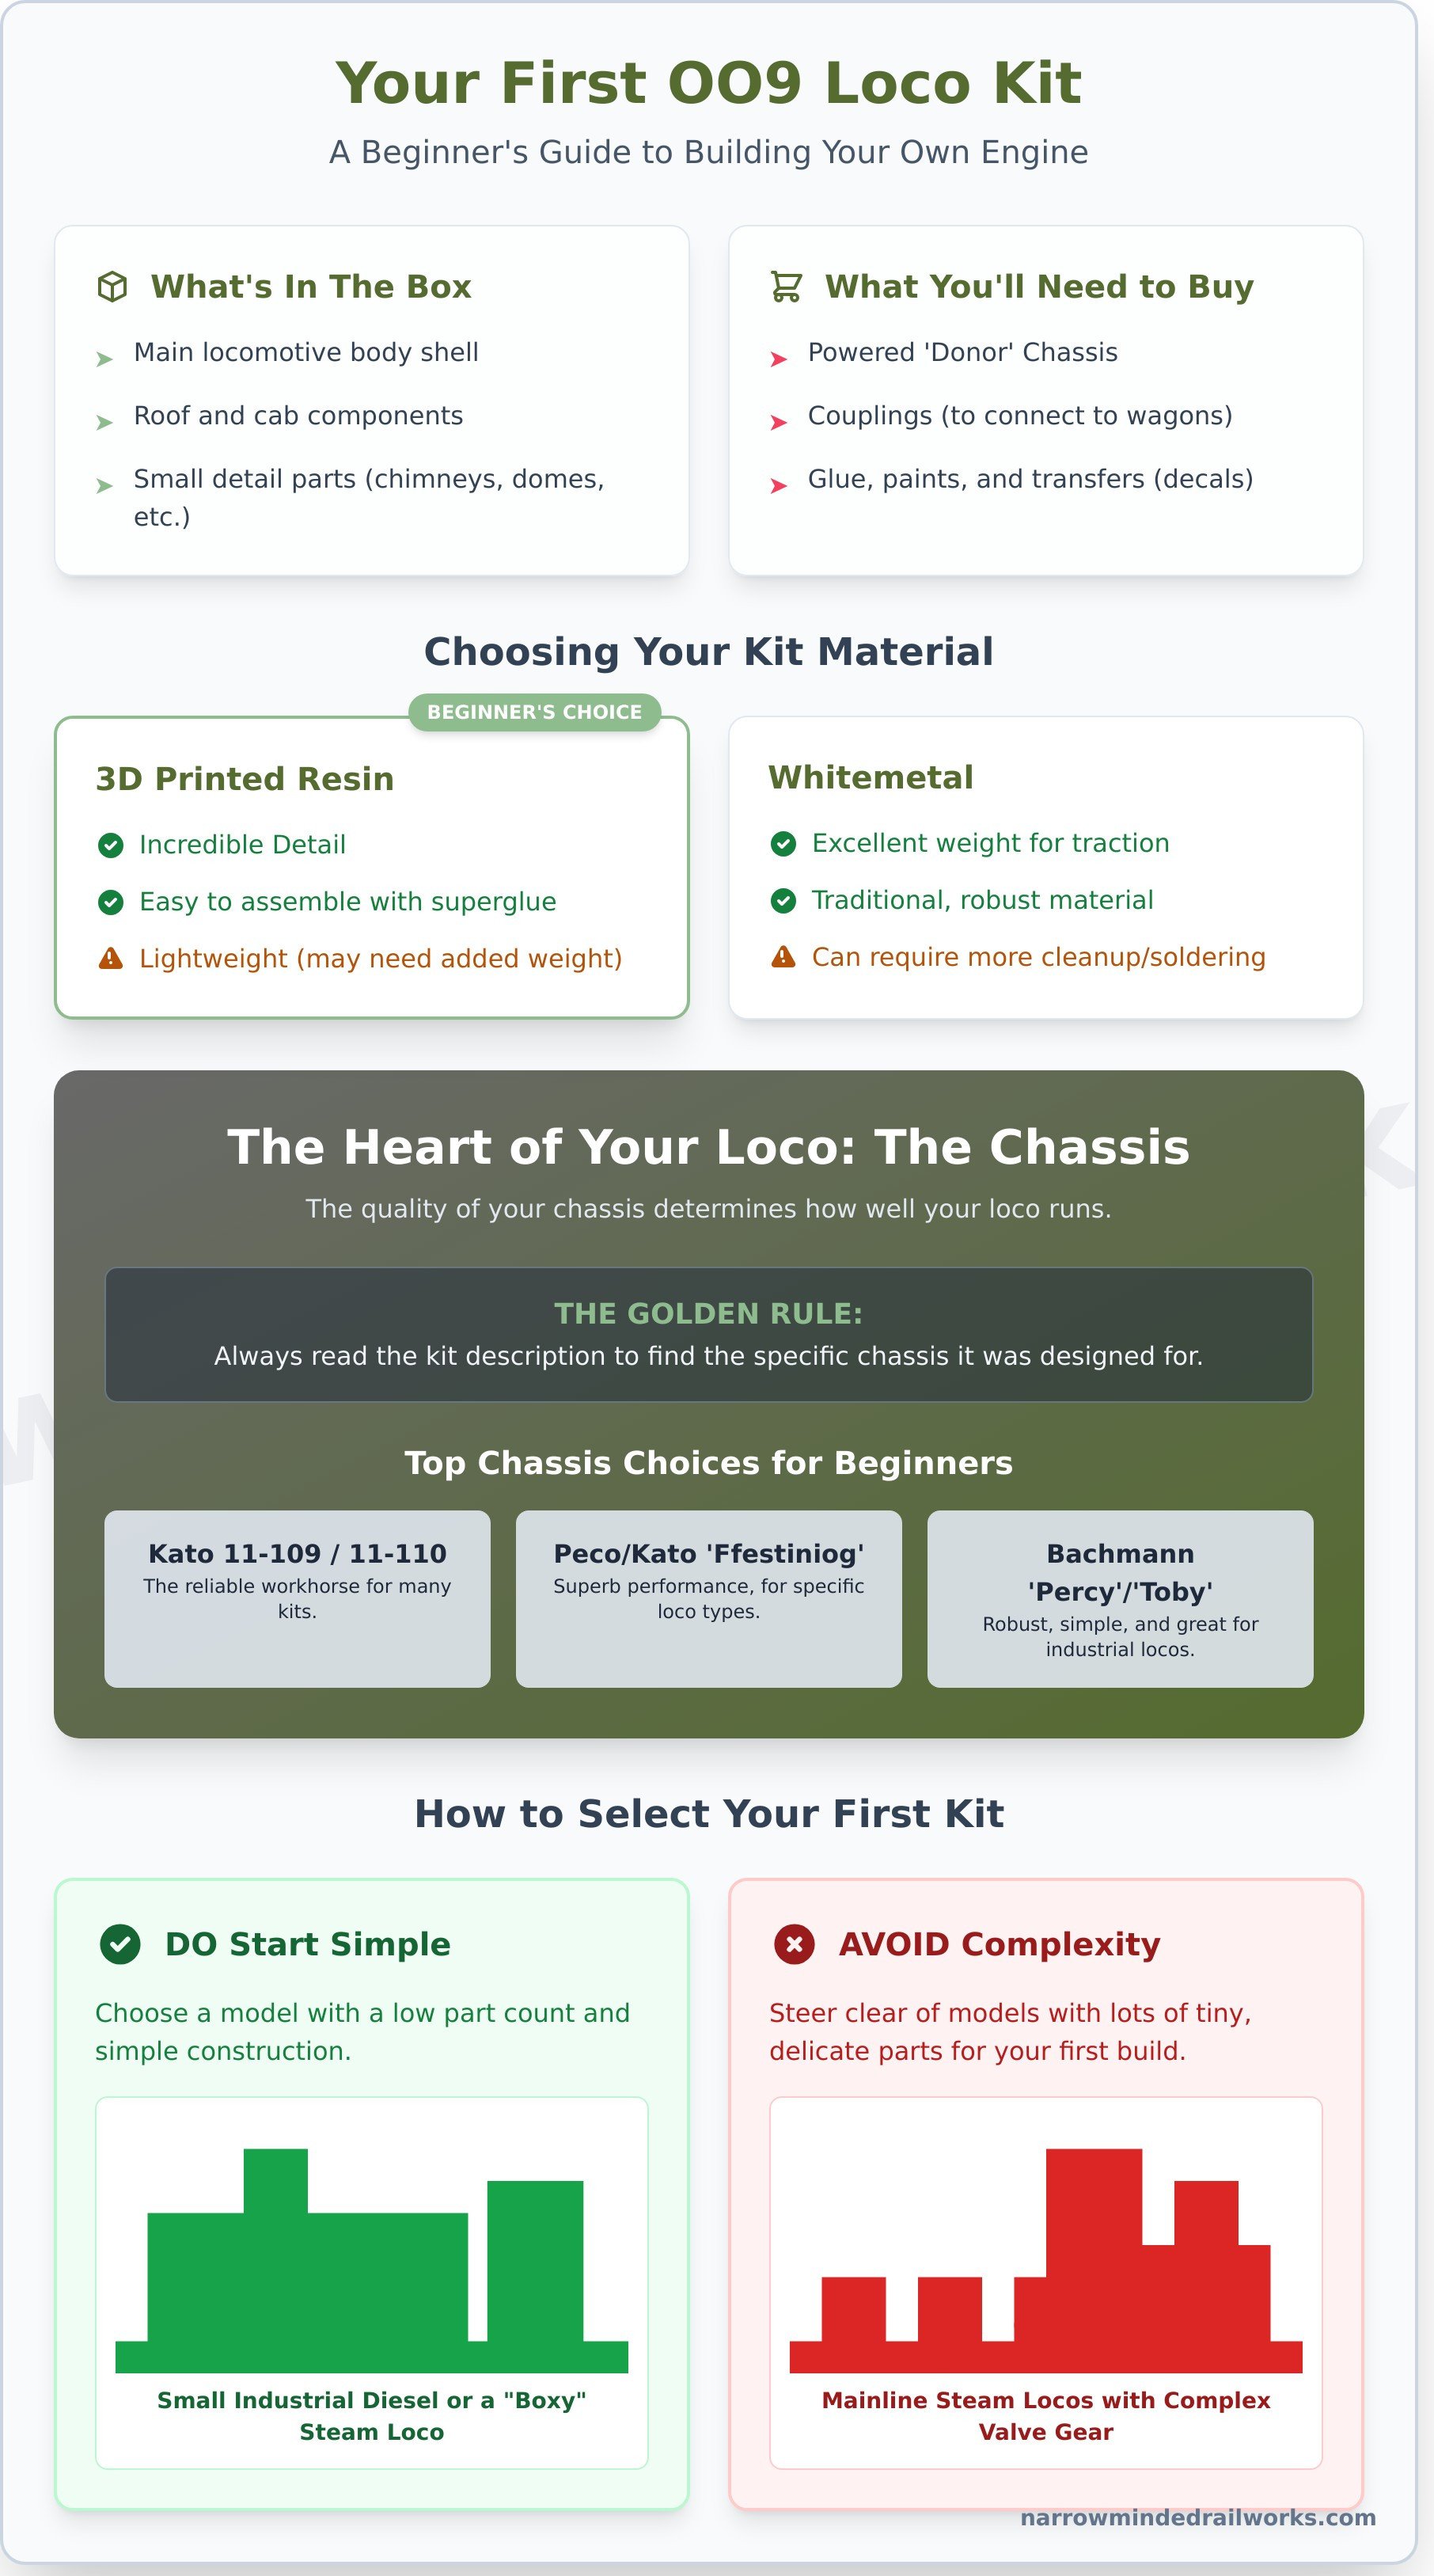
- What's usually in the box: The main locomotive body shell, roof, cab, and small detail parts like chimneys, domes, and handrails.
- What you'll need to buy separately: A compatible powered chassis (motor and wheels), couplings, glue, paint, and transfers (decals).
This approach gives you immense creative freedom to finish your model exactly how you want, choosing liveries and weathering effects to make it uniquely yours.
Common Kit Materials: 3D Resin vs. Whitemetal
Your first kit will likely be made from one of two common materials, each with its own characteristics for a beginner to consider.
- 3D Printed Resin: A modern choice offering incredible detail straight from the printer. These kits are lightweight and generally easy to clean up and assemble with superglue. Their lightness can be a drawback, sometimes requiring additional weight for reliable running.
- Whitemetal: The traditional material for kits. This is a low-melt metal alloy that is relatively soft and easy to work with. Its key advantage is its inherent weight, which provides excellent traction and smooth performance on the track.
While you may also see more advanced plastic or etched brass kits, it's best to master resin or whitemetal first. For a complete beginner, a modern 3D resin kit is often the most accessible and forgiving starting point.
The Heart of Your Loco: Choosing the Right 'Donor' Chassis
When building your first kit-009 locomotive, the most important decision you'll make isn't about the paint or the glue-it's about the chassis. Think of the chassis as the engine, drivetrain, and wheels all in one. It is the mechanical heart of your model, and its quality will single-handedly determine how well your finished locomotive runs. Most kits are simply a static body shell; the chassis provides the power and smooth motion. Critically, kits are almost always designed to fit one or two specific, commercially available chassis. Using the wrong one will lead to frustration and a model that may never run properly.
The Most Popular & Reliable Chassis for Beginners
For those starting out, a few tried-and-tested options provide a reliable foundation. These are popular because they are widely available in the UK, run smoothly, and are relatively easy to work with.
- Kato 11-109 / 11-110: This compact, Japanese-made N-gauge chassis is the unofficial workhorse of OO9. It's incredibly reliable, runs smoothly straight out of the box, and is used as the basis for a huge number of kits.
- Peco/Kato 'Ffestiniog' (GR-105): A superb ready-to-run chassis ideal for kits of England or Welsh Princess locos. Its design reflects a key part of the history of narrow-gauge railways in Britain and offers excellent performance.
- Bachmann 'Percy' or 'Toby': Often sourced second-hand, the chassis from these Hornby 'Thomas & Friends' characters are robust, simple, and have a wheelbase that suits many characterful industrial locomotives.
How to Match a Kit to a Chassis
The golden rule is simple: always read the kit description first. The designer will explicitly state which chassis the kit was designed for. For example, a Narrow Minded Railworks product page might say, "Designed to fit the Kato 11-109 chassis." This is your definitive guide. Be aware that even a 'designed-for' chassis might require minor modifications, such as trimming a small piece of plastic. For your first kit-009 project, we strongly recommend choosing one that states "no chassis modification required" to ensure the build is as straightforward as possible.
Where to Buy Your Chassis
It's important to understand that the company making the body kit (like us) does not manufacture or sell the chassis. These are produced by other major model railway brands like Kato, Peco, and Bachmann. You can purchase them from most major UK model railway retailers, both online and in-store, as well as on marketplaces like eBay. Prices can vary, so it's worth shopping around. Remember to factor in the cost of the chassis, typically between £25 and £50, when budgeting for your project.
How to Select Your First Kit: A Beginner's Checklist
Now that you have a grasp on the chassis that will power your locomotive, it’s time to choose the fun part: the body. Your first build should be an enjoyable learning experience, not a source of frustration. The goal is to choose a project with a high chance of a successful, satisfying result that you can be proud of. To help you make the right choice, we'll focus on four key areas: kit complexity, prototype choice, and the essential tools you'll need.
Start Simple: Assessing Kit Complexity
For your first project, simplicity is your best friend. We strongly recommend starting with a small industrial diesel or a simple steam 'box' design, like those often found working in quarries or on industrial lines. These models typically have a low part count and straightforward, slab-sided construction. Crucially, they lack the delicate and complex valve gear of a mainline steam locomotive, which can be tricky for a novice. When you choose your first kit-009, look for a simple 'shunter' - it's the perfect way to master core skills like cleaning parts, folding etches, and gluing accurately.
Prototype vs. Freelance: Fact or Fun?
In the world of model railways, kits are generally either 'prototype' or 'freelance'. A prototype kit is a scale model of a real-life locomotive. A freelance kit, on the other hand, is an imaginative but plausible design not based on a specific real-world engine. For a beginner, a freelance kit is often the better choice. It completely removes the pressure of matching paint colours and tiny details to historical photographs. You can be creative and enjoy the process, as there’s no 'wrong' way to finish it!
Essential Tools for Your First Build
You don't need a workshop full of expensive equipment to build your first kit-009. A small, initial investment of under £20 can get you everything you need to start. Before you buy, it's worth exploring the different manufacturers. Forums and community hubs like The 009 Society are invaluable for seeing what other modellers have built and can offer inspiration. Your basic toolkit should include:
- Must-Haves: A sharp craft knife (like a Swann-Morton), a small set of needle files, and a good quality superglue.
- Helpful Extras: A pair of fine-pointed tweezers for handling small parts, a self-healing cutting mat to protect your work surface, and a can of aerosol primer (grey is a great all-rounder).
With these simple tools and a well-chosen kit, you'll be well on your way to building a locomotive that runs beautifully on your layout.
Beginner-Friendly Kits from Narrow Minded Railworks
Choosing your first locomotive kit can be daunting, but we're here to help you get started on the right track. We've highlighted a couple of our kits that are perfect for first-time builders. These have been carefully selected for their straightforward construction, low part count, and compatibility with common, reliable chassis. They provide a fantastic introduction to the techniques used in preparing and finishing 3D printed models, giving you the confidence to tackle more complex projects in the future.
KIT-009 'The Brick' Shunter: An Ideal First Project
Our most popular starting point is the freelance industrial shunter, kit-009 'The Brick'. This simple, robust locomotive is designed to fit the readily available and excellent-running Kato 11-109 chassis. The body is a single-piece print with separate buffer beams, making assembly incredibly easy. Its simple design is forgiving to build and offers a perfect canvas for learning basic painting and weathering techniques. Finishing this kit will give you a charming and reliable shunter for your layout.
A finished 'Brick' shunter, showing what can be achieved with this simple starter kit.
KIT-015 'The Terrier': A Classic Quarry Engine
If you'd prefer a classic steam outline, 'The Terrier' is an excellent next step. While slightly more detailed than 'The Brick', it remains a very manageable project. Designed for the popular Peco GR-102 Ffestiniog Railway 'England' chassis, this kit captures the spirit of a quarry Hunslet engine. Its enclosed design with a full footplate cleverly conceals the chassis block and wheels, meaning you don't have to worry about complex valve gear or fitting fiddly cosmetic parts on your first build. It’s a rewarding project that results in a characterful loco.
Feeling inspired? Browse all our beginner-friendly OO9 loco kits and find your perfect first project today.
Why Our 3D Printed Kits are Great for Newcomers
We design our kits with the modeller in mind, especially those new to 3D printed models. Here’s what makes them an ideal choice for your workbench:
- Simple Construction: Most of our beginner kits feature one-piece body prints, which dramatically reduces complex assembly steps and potential alignment issues.
- Incredible Detail: We use high-resolution resin printing to capture fine detail like rivets and panel lines, so you get a highly detailed model without needing to attach dozens of tiny, fiddly parts.
- Clear Guidance: Every kit comes with clear, illustrated instructions to guide you through the handful of assembly steps required.
- Support from Modellers: We are passionate OO9 modellers ourselves. If you get stuck or have a question, we're always happy to help you through the process.
Beyond the Build: What's Next on Your OO9 Journey?
Congratulations on completing your first OO9 locomotive! That is a significant achievement in the world of railway modelling, and you should be proud of your work. But as any seasoned modeller will tell you, finishing the build is just the first stop. Now the real fun begins: bringing your creation to life and building a world for it to inhabit.
Couplings, Paint, and Finishing Touches
To operate as part of a train, your loco needs couplings. Popular choices in OO9 include Greenwich or BEMO-style couplings, which you'll need to purchase and fit. Next is painting, which transforms your model from a kit into a characterful locomotive. The process typically involves:
- Primer: A light coat for good paint adhesion.
- Main Colours: Applying your chosen livery.
- Varnish: A final layer (matt, satin, or gloss) to protect your hard work.
For future projects, you might even explore weathering to add realistic grime and wear, truly making the model your own.
Building Your First Train: Adding Wagons
A locomotive needs something to pull! Your next logical step is to build some rolling stock, and a simple open wagon or van kit is the perfect follow-up project. You'll find that wagon kits are generally simpler and quicker to assemble than a full loco kit-009, making them a fantastic way to build your confidence and expand your fleet. Before you know it, you'll have a complete train ready for your layout. Start your first freight train with our OO9 wagon kits.
This is a hobby of continuous learning and creativity. Don't be afraid to try new techniques. A great way to develop your skills is by connecting with fellow enthusiasts. Consider joining the OO9 Society or engaging with online forums where you can share your progress, ask for advice, and see the incredible work of others. Your journey with this first kit-009 is just the beginning of a rewarding adventure in narrow gauge modelling.
Your OO9 Journey Starts Here
Embarking on your first OO9 locomotive kit is an exciting step into the rewarding world of narrow gauge modelling. Remember, the key to a successful build lies in choosing the right donor chassis and selecting a beginner-friendly kit that matches your skill level. This isn't just about assembling parts; it's about creating a unique piece of rolling stock that will bring your layout to life.
Now that you're equipped with the knowledge to make a confident choice, your first kit-009 project is within reach. At Narrow Minded Railworks, we offer a fantastic selection of unique freelance and prototype designs, all produced with high-resolution 3D printed quality for exceptional detail. With worldwide shipping for modellers everywhere, you're ready to get started. Explore our full range of OO9 Locomotive Kits and start your adventure! We can’t wait to see what you build.
Frequently Asked Questions
Can I use N gauge track for my OO9 models?
Yes, absolutely. This is the fundamental principle of OO9 modelling. The 'OO' refers to the 4mm:1ft scale of the models, while the '9' refers to the 9mm gauge of the track. This means your British-style 4mm scale narrow gauge models are designed specifically to run on standard N gauge track. This makes getting started much easier, as N gauge track from brands like Peco and Hornby is widely available across the UK.
Do your OO9 kits come with wheels, motors, or couplings?
Our kits typically include the 3D printed resin body, chassis block, and any separate detailing parts like chimneys or domes. However, they do not include the motorised chassis, wheels, or couplings. This common practice allows you to choose a donor chassis that suits your budget and performance expectations, such as the popular Kato 11-109. It also gives you the flexibility to fit your preferred type of coupling to match the rest of your rolling stock.
How much does it cost to build a complete locomotive from a kit?
The total cost can vary, but a good estimate for a beginner is between £70 and £120. The body kit itself might cost between £25 and £45. A suitable motorised chassis, which you purchase separately, typically costs around £30 to £50. You should also budget an additional £15 to £25 for essentials like primer, paints, glue, and transfers to complete your model to a high standard.
Is it hard to get a smooth finish on a 3D printed resin kit?
Achieving a smooth finish is very manageable with the right preparation. While high-resolution 3D prints have minimal layer lines, a little work makes a big difference. Start by gently sanding the main surfaces with a fine-grit sanding stick or paper. Afterwards, applying a couple of light coats of automotive grey primer from a spray can will fill any tiny imperfections. This simple process on your kit-009 creates a perfect, smooth base for your final paint colours.
What is the difference between OO9 and HOn30?
Both OO9 and HOn30 use the same 9mm (N gauge) track, but the models themselves are a different scale. OO9 is the British standard, representing narrow gauge prototypes in 4mm:1ft scale (a ratio of 1:76). HOn30 is more common for American and European modelling, representing prototypes in 3.5mm:1ft scale (a ratio of 1:87). This means an OO9 locomotive will look slightly larger than an HOn30 one running on the same track.
What kind of glue and paint should I use for 3D printed resin?
For assembling your kit-009, standard superglue (cyanoacrylate) is the best choice for bonding resin parts quickly and securely. For paints, almost any model paint will work well, provided you prime the model first. We recommend water-based acrylic paints from brands like Humbrol, Vallejo, or Games Workshop, as they are easy to use for beginners and clean up with water. A good quality spray primer is essential to ensure the paint adheres properly to the resin.