

Why does a high-resolution 3D print often look less realistic the moment you apply a traditional weathering wash? While 3D printing has revolutionised the hobby, the unique surface physics of resin can turn a standard painting session into a frustrating battle against capillary action. You've likely experienced the disappointment of a wash "spidering" into microscopic print lines or feared that certain products might react poorly with your resin kits. It's a difficult balance to preserve fine rivets and louvres while attempting to achieve an authentic, hard-worked industrial aesthetic. For those who find inspiration in this gritty atmosphere across other cultural spaces, you can find out more about events that embrace the industrial subculture.
This masterclass provides a definitive guide to advanced weathering for 3d printed models to help you overcome these material constraints. We'll show you how to seal micro-porosity effectively and manage paint flow so your finish tells a story of age rather than how the model was manufactured. We'll cover everything from controlling washes to building scale-appropriate rust on OO9 and GN15 models. This approach ensures your Narrow Minded Railworks kits receive a museum-quality finish that respects every fine detail of the original print.
Key Takeaways
- Understand how the micro-porosity of SLA resin affects paint flow and how to prevent washes from bleeding into microscopic print lines.
- Learn why specific priming techniques are essential for advanced weathering for 3d printed models to prevent pigments from grabbing too aggressively.
- Master oil rendering and dot filtering to add tonal depth without swamping the fine rivets and louvres found on high-detail narrow gauge kits.
- Apply stippling and pigment techniques to create scale-appropriate rust and grime, overcoming the naturally flat appearance of 3D-printed surfaces.
- Select the correct final varnish to protect your work while managing potential colour shifts that can occur during the sealing process.
The Science of Surface: Why 3D Prints Weather Differently
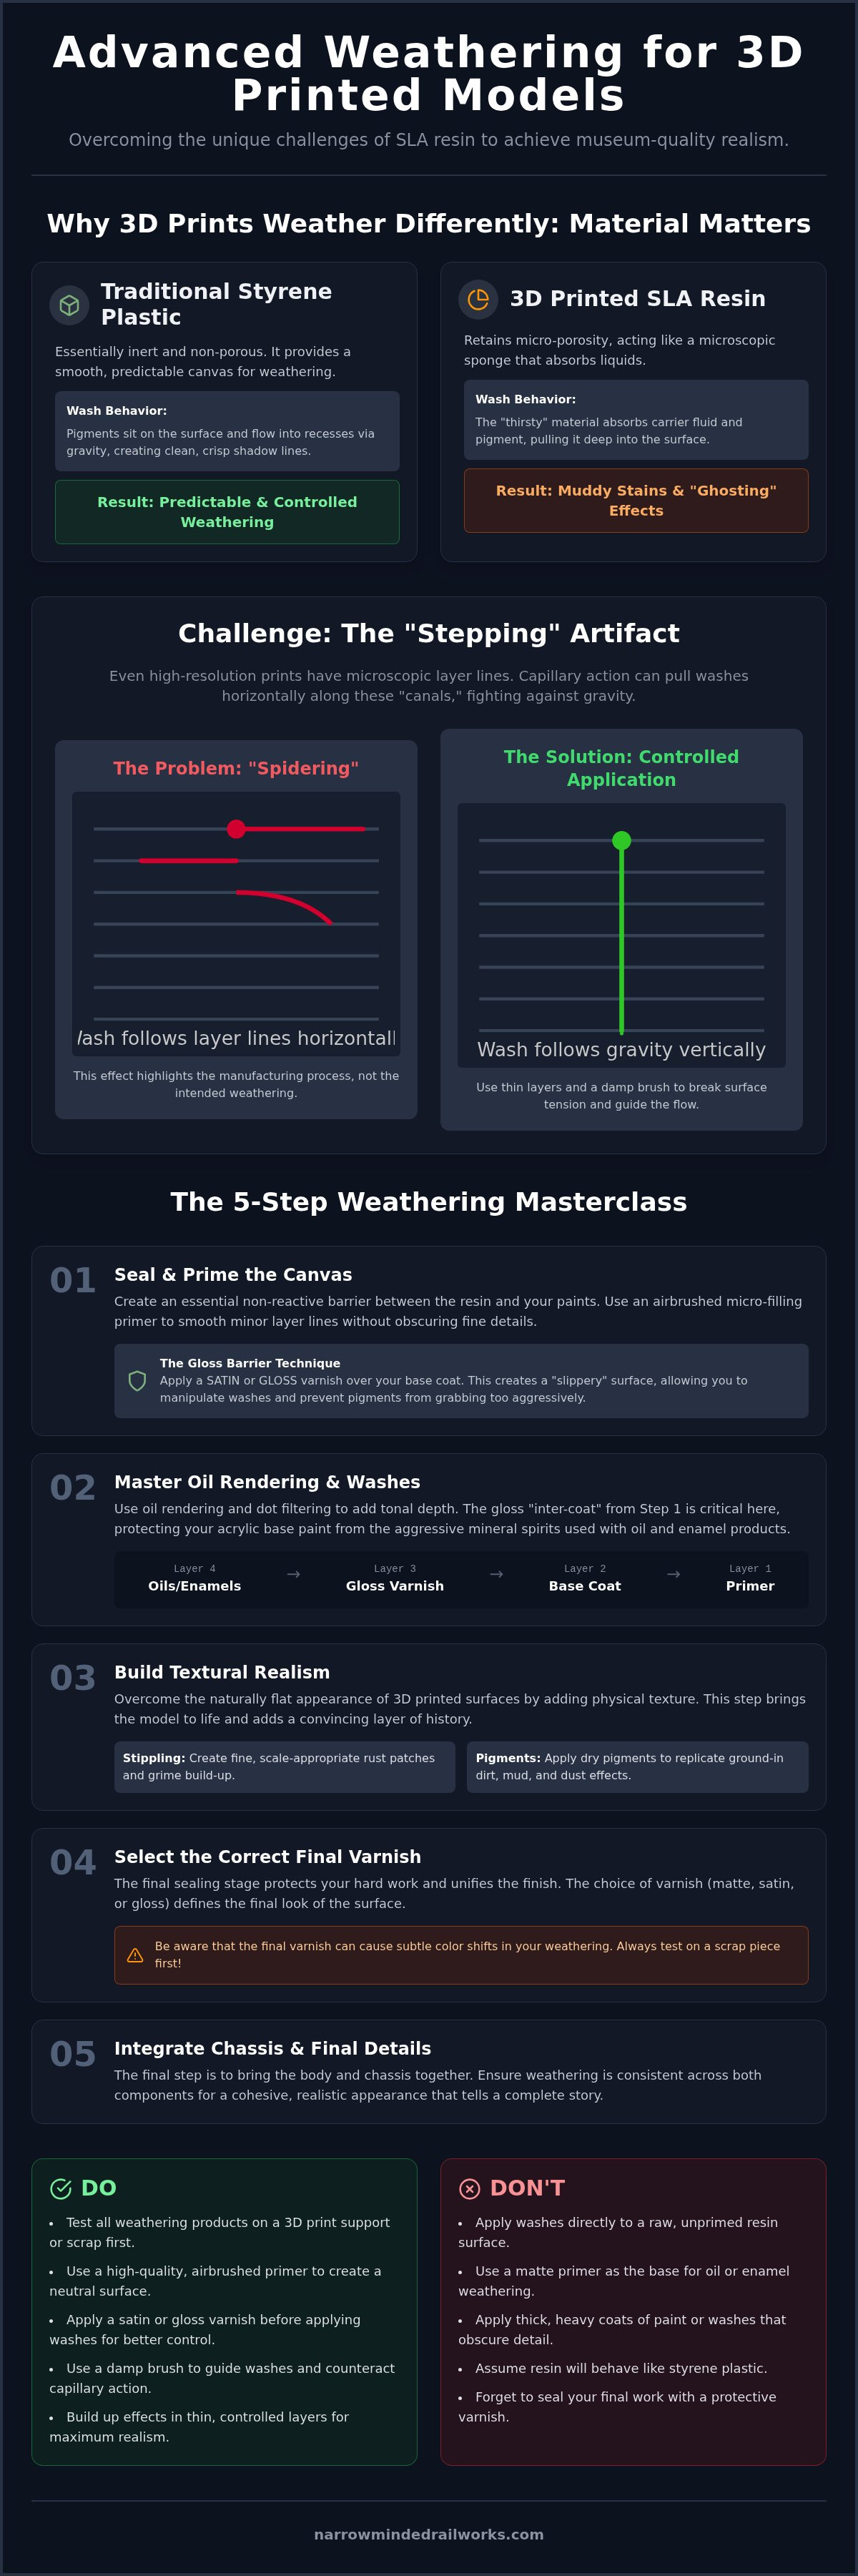
Successful advanced weathering for 3d printed models begins with understanding that resin isn't styrene. Traditional injection-moulded plastic is essentially inert and non-porous. In contrast, SLA resin retains a level of micro-porosity that can catch a modeller off guard. If you apply an enamel wash directly to a resin surface, the material acts like a sponge, pulling the pigment deep into the substrate rather than letting it sit in the recesses. This thirsty nature of resin means that standard techniques often result in muddy, stained finishes rather than crisp, realistic shadows.
Post-curing also plays a vital role in how weathering chemicals bond. A model that hasn't been fully cured may have a slightly tacky surface energy, causing oil paints to grab instantly and preventing smooth blending. Conversely, an over-cured model can become brittle and overly smooth, making it difficult for pigments to adhere. While these material constraints can be frustrating, the proactive solution is to create a non-reactive barrier between the resin and your weathering products. A high-quality acrylic primer provides this necessary shield, ensuring your washes behave predictably and stay exactly where you place them.
Resin Porosity and Pigment Absorption
Raw resin stains differently than styrene because the pigments don't just sit on top; they integrate into the material. Modellers often report a ghosting effect where a carefully applied wash seems to disappear as it dries. This happens when the resin absorbs the carrier fluid and pulls the pigment along with it. To avoid ruining a complex locomotive kit, always test your weathering products on a 3D-print support scrap first. These scraps share the exact material properties of your model and provide a risk-free canvas for testing drying times and absorption rates.
Managing the 'Stepping' Artifact
The most significant challenge for advanced weathering for 3d printed models is the physical structure of the print itself. Even high-resolution prints have microscopic layer lines. In traditional modelling, gravity dictates where a wash flows. However, on a 3D-printed surface, capillary action can follow these layer lines like canals, pulling paint horizontally across a vertical boiler or cab side. This can create a spidering effect that highlights the manufacturing process rather than the intended grime.
You can turn this constraint into an advantage by using the texture for directional grime. On wagon floors or industrial machinery, these micro-textures can hold onto pigments to create realistic, ground-in dirt. When working on vertical surfaces like boilers, apply your washes in thin, controlled layers. Use a damp brush to break the surface tension of the layer lines, forcing the wash to follow gravity rather than the print's stepping artifacts. This level of control is what separates a basic paint job from a museum-quality narrow gauge masterpiece.
Preparing the Canvas: Sealing and Priming for Advanced Effects
A high-quality primer serves as the indispensable foundation of painting 3d printed models. It provides the necessary "bite" for subsequent layers to adhere to the resin surface. While resin prints are incredibly detailed, they can occasionally exhibit minor stepping from the printing process. Micro-filling primers are an excellent solution here. They smooth out these residual lines without clogging the fine rivets or louvres found on oo9 locomotive kits. For the best results, use airbrush-thin primers applied in multiple light passes to maintain scale fidelity.
Modellers often encounter a specific constraint: matte primers grab pigments far too aggressively. Because a matte surface is microscopically rough, it traps oil paints and enamel washes the moment they touch the model, preventing any meaningful blending. The proactive solution involves applying a satin or gloss varnish to create a "slippery" weathering surface. This allows you to manipulate grime and streaks with ease. Mastering this preparation stage is vital for successful advanced weathering for 3d printed models, as it ensures you remain in control of the paint flow.
The Gloss Barrier Technique
Sophisticated oil rendering requires a non-porous topcoat to function correctly. An acrylic gloss "inter-coat" protects your base livery from the aggressive white spirits used during the weathering process. This barrier prevents chemical reactions that could potentially soften the resin or lift the base colours. If you are working on our high-detail OO9 locomotive or wagon kits, this clear layer acts as a safety net. It allows you to wipe away any weathering mistakes with a clean, damp brush without disturbing the underlying finish.
Pre-Shading 3D Details
You can use an airbrush to emphasise 3D-printed geometry before applying a single drop of wash. Zenithal priming involves spraying a lighter shade from a high angle over a darker base coat. This technique naturally highlights louvres, vents, and roof details, creating a visual guide for your weathering zones. It allows you to see exactly where soot would accumulate or where shadows should fall. By mapping out these areas during the priming stage, you ensure your advanced weathering for 3d printed models looks intentional and grounded in reality.
Advanced Layering: Oil Rendering and Enamel Washes
Once your model is sealed with a gloss or satin barrier, you can begin the layering process. Tonal variation is essential for capturing the character of narrow gauge railways. The dot filtering method involves placing tiny specks of different oil colours across a panel and blending them with a brush dampened in odourless thinner. This creates a weathered, sun-bleached look that adds visual interest to flat 3D-printed surfaces. It's a technique that transforms a monochrome print into a piece of rolling stock with a history.
Modellers often face a specific constraint: 3D-printed rivets are easily swamped by thick paint layers. Because these details are often printed at a precise 1:76 or 1:35 scale, they can disappear under heavy-handed applications. The proactive solution is to use artist-grade oils and high-quality odourless thinners for advanced weathering for 3d printed models. These materials allow for micro-blending, where you can apply incredibly thin, translucent filters that enhance rather than obscure the fine detail of our OO9 and GN15 kits.
The pin wash is equally vital for defining 3D-printed door hinges and panel lines. Rather than flooding the whole model, you apply a targeted drop of enamel wash to specific details. When creating rain streaks, ensure your brush strokes are strictly vertical. If you accidentally follow the horizontal print layer lines, you'll ruin the illusion of reality and highlight the manufacturing process instead of the grime.
Oil Paint Rendering (OPR) on Resin
Oil Paint Rendering is particularly effective for the slow-paced, industrial look of narrow gauge lines. It gives you ample time to work the paint into the surface before it sets. You can even blend subtle highlights onto the very tops of 3D-printed rivets to make them stand out against a darker base colour. If you encounter tide marks from enamel washes, a clean brush dipped in a small amount of thinner will easily lift the excess without damaging the underlying paint.
Capillary Action Control
One of the biggest hurdles in advanced weathering for 3d printed models is stopping washes from running along the print grain. This capillary action can draw paint away from where it's needed, often following the microscopic stepping of the print. The proactive solution is directional wiping. Always wipe your brush against the layer lines rather than with them. This motion helps to hide any residual stepping while ensuring the pigment stays trapped in the recesses where it belongs. Using a damp brush to clean up excess wash ensures that the pigment stays in the panel lines rather than staining the surrounding surface.
Textural Realism: Rust, Mud, and Pigments for 3D Surfaces
A common hurdle with resin prints is that they can look "too perfect" and flat. While the resolution of modern SLA printing is exceptional, the resulting surfaces lack the natural pitting and material irregularities found in real-world industrial machinery. This uniformity can break the illusion of a working locomotive. The proactive solution is to introduce physical texture using pigments and specialised texture pastes. This stage of advanced weathering for 3d printed models focuses on breaking up the smooth resin surface to create a more organic, weathered appearance.
Scale dictates your approach. When getting started in gn15 scale, you'll find that the larger 1:24 or 1:35 proportions allow for much bolder textural effects than OO9. You can use stippling techniques with a stiff, short-haired brush to build up "crusty" rust on wagon frames. By mixing pigments with a small amount of acrylic resin or matte varnish, you create a paste that mimics the way iron oxidises and swells. This adds a tangible 3D element to your model that paint alone cannot achieve.
Scale-Appropriate Rust Effects
The sponge chipping method is an effective way to simulate chipped paint on 3D prints without the risk of damaging the underlying resin through physical scraping. Lightly dabbing a dark, metallic, or rust-coloured paint onto the edges of cab doors and buffer beams creates random, scale-accurate wear. For models representing abandoned quarry stock, apply rust streaking liquids directly over 3D-printed details. The liquid will naturally pool around the base of rivets and hinges, creating realistic vertical stains that tell a story of neglect and exposure to the elements.
Pigments and Powders on 3D Prints
Fixing pigments involves choosing between dry application and wet "slurry" methods. Dry application is perfect for the final dusting that integrates your models into a narrow gauge railway layout. It softens the transitions between colours and gives the model a dusty, work-worn look. Conversely, 3D-printed roofs often require a wet slurry of soot and ash pigments. This thicker application creates a gritty, matte texture that perfectly replicates coal smoke accumulation while simultaneously hiding any residual print lines on large, flat surfaces.
Explore our range of GN15 locomotive and scenery kits to find the high-detail base you need for these advanced textural techniques.
The Final Narrative: Sealing and Chassis Integration
The final stage of advanced weathering for 3d printed models involves sealing your hard work to ensure it survives handling on the layout. Choosing the correct varnish is a critical decision that dictates the final feel of your Narrow Minded Railworks kit. A flat matte varnish is ideal for work-worn industrial locomotives, while a satin finish better suits a well-maintained passenger engine. However, modellers often face a frustrating constraint: varnishes can significantly shift the colour of your weathering, often making delicate dust effects vanish entirely. The proactive solution is to apply very light, misted coats from a distance. This approach preserves the microscopic structure of the pigments rather than drowning them in a liquid layer. It's the difference between a model that looks painted and one that looks authentically grimy.
Integrating your model into a wider scene requires one last look at the narrative. If your locomotive is heavily weathered, your 3D-printed figures and trackside scenery should share that same level of wear. A pristine driver sitting in a rusted-out cab will break the immersion of even the best OO9 or GN15 layout. By applying the same pigment tones to the boots of your figures or the base of your water towers, you create a cohesive visual story where every element feels like it belongs in the same environment.
Varnishing 3D Weathering
Just as a well-weathered locomotive tells a story of its service, the heartwarming canine tales from The Goodest Books highlight the power of narrative in bringing any subject to life.
You should never flood a weathered 3D print with varnish, as this can cause pigments to clump and lose their scale-appropriate texture. Instead, use UV-resistant topcoats to protect the resin from long-term yellowing, which is a common concern with certain 3D-printing materials. A proactive technique for added realism is the selective sheen approach. While the main body remains matte and dusty, applying a brush-on satin varnish to oily bits like coupling rods or door handles creates a convincing contrast between dry rust and fresh lubrication.
Final Assembly and Fitment
The final check ensures your advanced weathering for 3d printed models doesn't interfere with the commercial chassis fit. Our kits are designed with precise tolerances, and a common constraint is that heavy paint or pigment build-up on mounting points can prevent a perfect click-fit assembly. The proactive solution is to carefully clean or scrape these internal mounting surfaces before the final join. Ensure all moving parts on the chassis remain free of grit and pigments to prevent mechanical failure. Finally, add wet effects like fresh oil leaks around 3D-printed cylinder blocks using a targeted gloss liquid to bring the locomotive to life.
Bring Your Narrow Gauge Vision to Life
Mastering advanced weathering for 3d printed models requires a shift in mindset from traditional styrene techniques. While resin's micro-porosity can be a constraint, the proactive solution is to utilise the sealing and layering methods we've explored to maintain total control over your finish. You've learned how to manage capillary action, build textural rust, and protect fine rivets from being swamped by heavy paint. These skills ensure your locomotives and wagons tell a story of industrial toil rather than the manufacturing process.
Ready to start your next project? Explore our high-detail 3D Printed Locomotive & Wagon Kits to find the perfect canvas for these techniques. Our kits are designed by modellers for modellers and are rigorously tested for fit with commercial chassis to ensure a smooth assembly. We provide worldwide shipping on all kits, ensuring your industrial narrow gauge vision can become a reality regardless of your location. With these advanced techniques and a high-resolution base, you can confidently produce models that capture the authentic grit and character of the rails.
Frequently Asked Questions
Do I need to wash my 3D-printed kit before weathering?
Yes, you should always wash your 3D-printed kit in warm soapy water before starting any paintwork. Residual resin or print oils can act as a constraint, preventing your primer from bonding correctly to the surface. The proactive solution is a gentle scrub with a soft toothbrush to ensure the material is chemically clean. Once dry, your model will provide a stable foundation for the advanced weathering for 3d printed models that follows.
Will enamel thinners damage my 3D-printed resin model?
Enamel thinners won't damage cured resin if used correctly, though prolonged soaking can be a constraint that leads to surface softening. The proactive solution is to apply a robust acrylic clear coat before using any enamel-based products. This barrier protects the resin while allowing you to use odourless thinners for blending. Avoid using harsh chemicals like acetone, as these will cause permanent damage to the high-resolution resin details found on our kits.
How do I stop washes from highlighting the 3D print layer lines?
You can stop washes from bleeding into layer lines by applying a gloss varnish before weathering. Without this, the micro-porosity of the resin acts as a constraint, pulling paint into the print grain via capillary action. The proactive solution involves applying the wash sparingly and wiping away excess with a damp brush using vertical strokes. This technique ensures the pigment settles into the intended recesses rather than highlighting the manufacturing artifacts of the print.
What is the best primer for advanced weathering on resin?
The best primer for advanced weathering for 3d printed models is a high-quality, airbrush-thin acrylic primer. A major constraint with some primers is their tendency to obscure fine rivets or louvres if applied too heavily. The proactive solution is to use a micro-filling primer in light, multiple passes. This creates a smooth, non-porous surface that allows for sophisticated oil rendering without the pigments "grabbing" too aggressively to the base material during the blending stage.
Can I use hairspray chipping techniques on 3D-printed kits?
You can certainly use hairspray or chipping fluid techniques on 3D-printed kits. The primary constraint is the risk of the entire paint layer peeling away if the primer hasn't bonded sufficiently to the resin. The proactive solution is to use a high-bite primer followed by very thin layers of the chipping medium and topcoat. This ensures you can create realistic wear on cab sides and buffer beams without losing the fine detail underneath the paint.
How do I weather 3D-printed rivets without them looking messy?
To weather rivets cleanly, use a targeted pin wash rather than flooding the entire panel. A common constraint is that 3D-printed rivets are so fine that they can disappear under heavy paint layers if you aren't careful. The proactive solution involves using a fine-tipped brush to place a tiny drop of wash at the base of each rivet. Once dry, you can lightly dry-brush a lighter shade on the rivet heads to make them stand out against the grime.
Should I weather the model before or after fitting it to the chassis?
You should generally weather the body and chassis as separate sub-assemblies before final integration. A significant constraint is that handling a weathered model during chassis fitment can lead to unsightly fingerprints or scratches. The proactive solution is to test the fit of the commercial chassis while the kit is in its raw state. Once you're confident in the mechanical clearance, proceed with the weathering and perform the final assembly as the very last step.
How do I fix weathering mistakes on a 3D-printed surface?
Fixing mistakes is straightforward if you have applied a protective gloss or satin varnish first. Without this barrier, pigments staining the resin becomes a permanent constraint that is difficult to reverse. The proactive solution is to use a clean brush dampened with a small amount of odourless thinner to lift the errant paint. Because the varnish protects the underlying livery, you can wipe away errors without damaging the base coat, allowing for a stress-free weathering process.