

Last Tuesday, a dedicated modeller in York spent three hours detailing a resin coach only to hear the sickening "snap" of a brittle buffer beam hitting the workshop floor. Understanding exactly what to do when a model kit part breaks can save you from discarding a project that cost upwards of £80 in specialist parts and paint. It's the difference between a binned kit and a resilient masterpiece.
You've likely felt that same sinking feeling when a tiny, essential component shears off, leaving behind a jagged edge that seems impossible to hide. It's frustrating to think a visible glue seam might ruin your finish or that a repaired moving part will simply fail again under the stress of operation. Many hobbyists worry that modern 3D-printed materials are particularly unforgiving once they've snapped.
I'll show you how to achieve a seamless repair that's often stronger than the original material, whether you're dealing with traditional styrene, resin, or delicate 3D prints. You'll gain the confidence to fix even the most intricate details without leaving a trace of the accident behind.
This guide explores the specific solvents, precision pinning techniques, and sanding secrets used by professional restorers to ensure your model railway project stays on track.
Key Takeaways
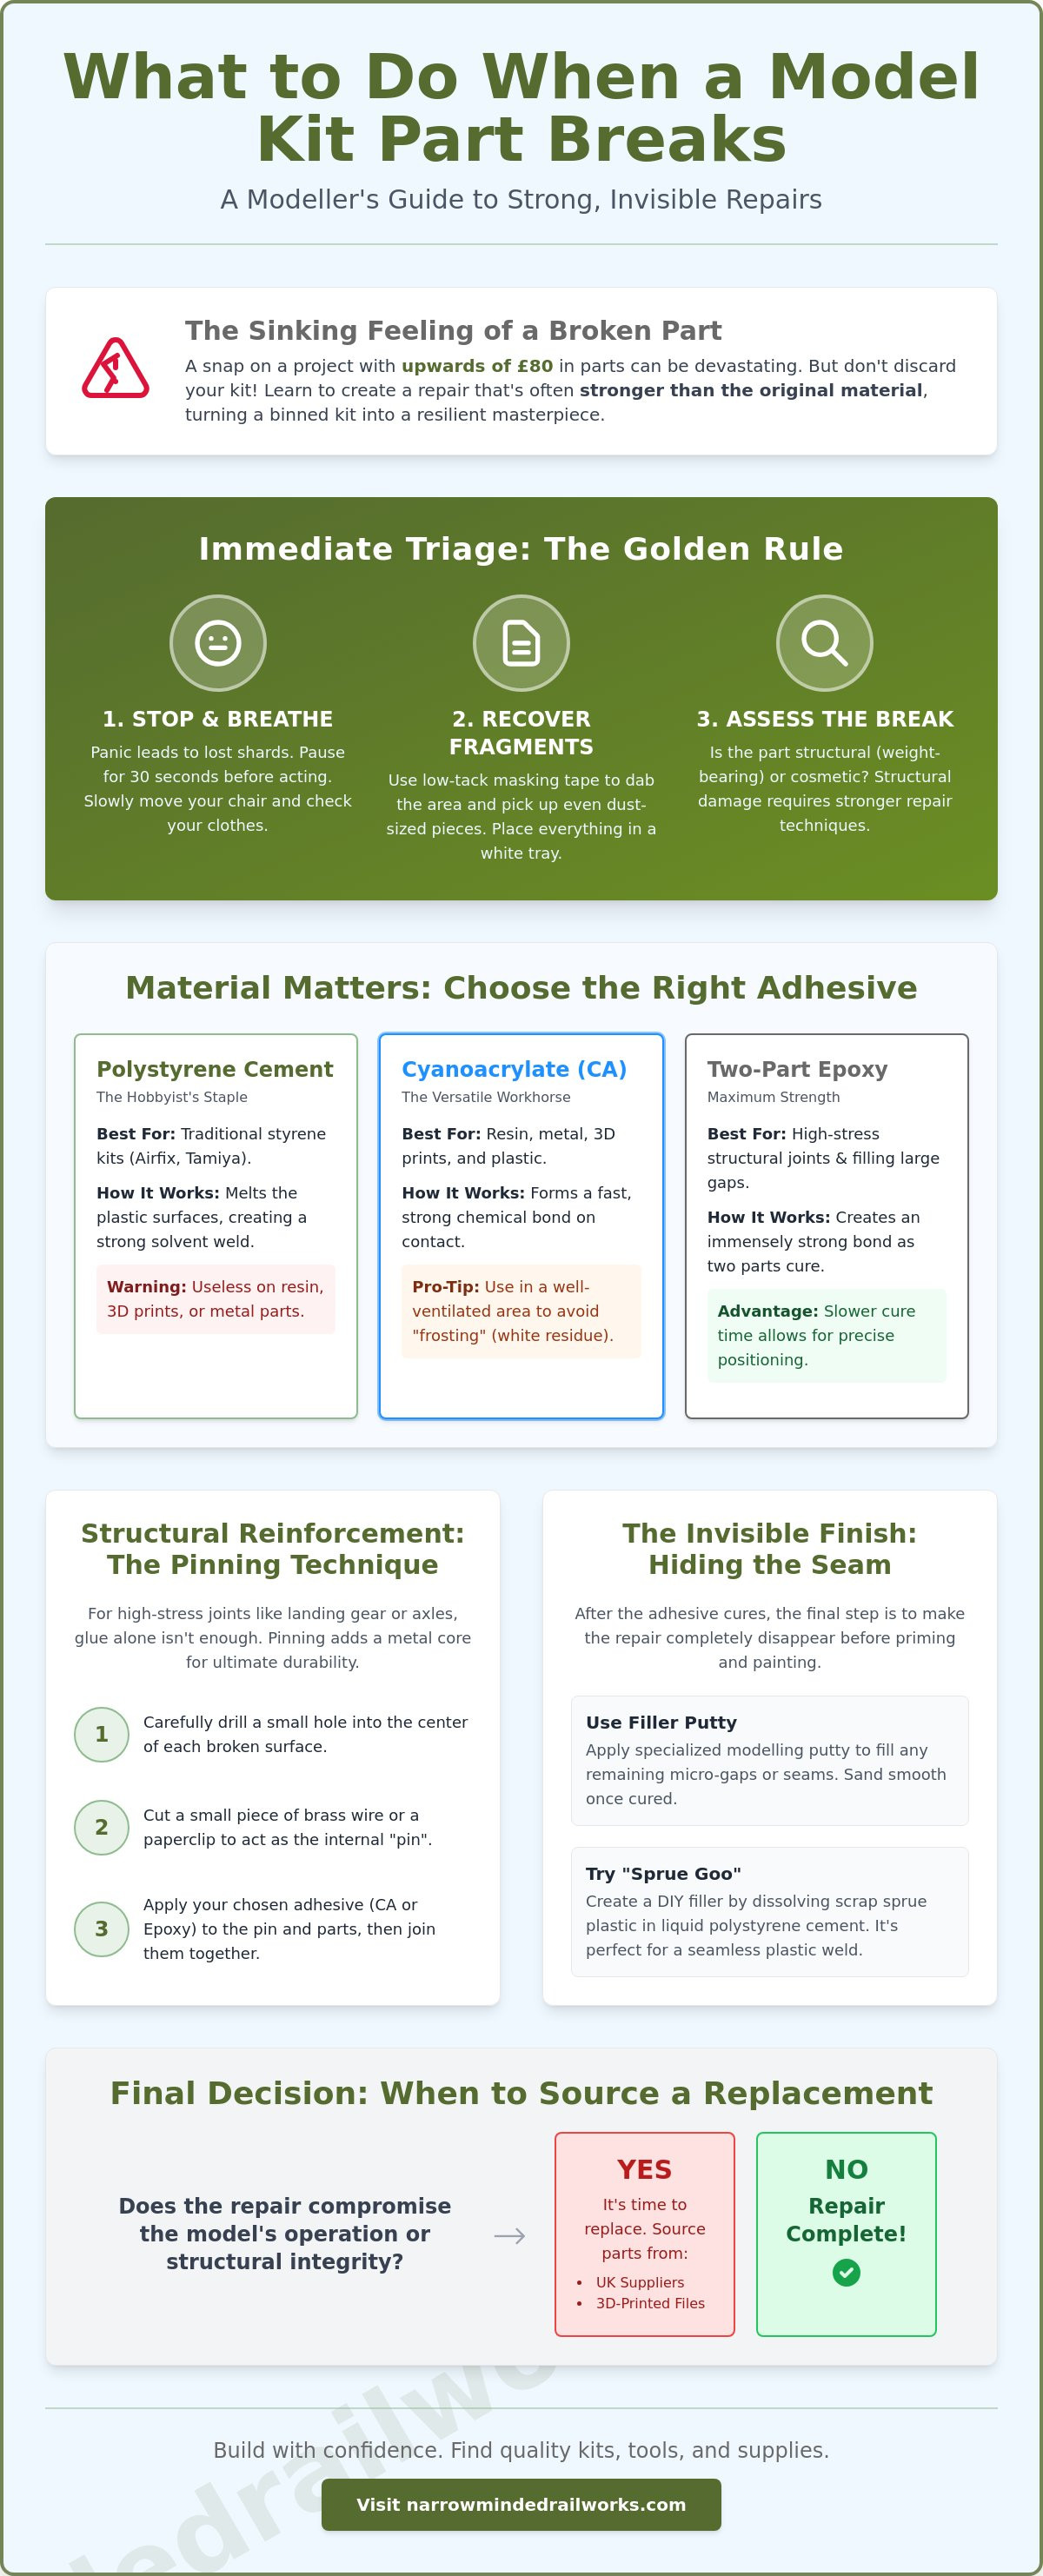
- Learn the essential "Golden Rule" of model triage to safely recover every fragment and prevent further damage to your railway project.
- Master the chemistry of repairs by selecting the correct adhesive—from polystyrene cement to epoxy—tailored specifically for resin and plastic parts.
- Discover what to do when a model kit part breaks by using professional pinning techniques with brass wire to reinforce high-stress joints.
- Achieve an invisible, seamless finish using specialized putties and "sprue goo" to eliminate unsightly glue lines and micro-gaps.
- Identify when a repair might compromise operation and how to source high-quality replacement parts through UK suppliers or 3D-printed digital files.
Immediate Action: Triage and Assessment of the Break
Hearing the sharp snap of polystyrene is a universal modeller's nightmare. Your first instinct is often to scramble for the pieces, but the Golden Rule of knowing what to do when a model kit part breaks is simple: stop, don't touch, and breathe. Panic leads to lost shards or, worse, treading on the very piece you're trying to save. Take 30 seconds to compose yourself before you start the recovery process. Move your chair back slowly and check your clothing; tiny parts often hitch a ride on jumpers or sleeves.
Use a strip of low-tack masking tape to dab the floor and desk area. This picks up dust-sized fragments that your fingers would likely crush. Place everything you find in a bright white tray or a small cup. You must determine if the part is structural, like a weight-bearing landing gear leg, or purely cosmetic, like a cockpit lever. Structural repairs often require more than just a drop of cement. They might require advanced plastic welding techniques to ensure the bond holds the weight of the completed model over time.
To better understand this concept, watch this helpful video:
The Clean Break: Best Case Scenario
A clean snap is the best outcome when considering what to do when a model kit part breaks. These parts usually have "jigsaw" fitment points that align perfectly without gaps. However, you should avoid dry-fitting the pieces more than once or twice. Every time you rub those raw, jagged edges together, you wear down the microscopic detail. This makes the eventual seam line much harder to hide during the sanding stage. Once you've confirmed the alignment, store the fragments in a small, labelled container. Losing a 2mm shard of plastic can turn a ten-minute fix into a two-hour ordeal.
The Shattered or Missing Piece
If a part is crushed or has vanished into the carpet, you have to pivot to scratch-building. Don't waste more than 10 or 15 minutes hunting for a microscopic fragment on the floor. Instead, look at your sprue off-cuts or leftover 3D-printing supports as donor material. Understanding the part's original purpose is vital for a successful replacement. For instance, if you're working on a locomotive, reviewing a beginner's guide to OO9 kits helps you identify if a broken piece is a critical functional component or a simple aesthetic detail. If it's a functional part, you'll need to prioritise durability and use thicker donor plastic to withstand the stresses of the build.
Material Matters: Selecting the Right Adhesive for the Job
Deciding what to do when a model kit part breaks depends entirely on the chemical makeup of the components. You cannot use a universal approach because adhesives react differently to various polymers. Polystyrene cement, the staple of the hobby, works by melting the plastic surface to create a solvent weld. This process is highly effective for standard kits from brands like Airfix or Tamiya, but it is useless for resin or metal. Understanding the science of plastic adhesion is vital; different materials require specific molecular triggers to form a permanent bond.
Cyanoacrylate (CA), commonly known as super glue, is the most versatile tool for repairs. In the UK, a high-quality 20g bottle of industrial-grade CA typically costs between £6 and £12. While it bonds almost instantly, it carries the risk of 'frosting.' This white, powdery residue occurs when CA vapours react with moisture and settle on the model. To avoid ruining clear canopies or paintwork, use a dedicated 'low-odour' CA or ensure the area is well-ventilated with a small desk fan to disperse vapours during the 30-second curing window.
Working with 3D-Printed Resin
Traditional plastic cement fails on 3D-printed bodies because resin is a thermoset polymer, not a thermoplastic. It does not melt when exposed to solvents. For a seamless join, many expert builders now use a drop of liquid UV-cure resin as a 'welding' agent. By applying the resin to the break and hitting it with a 405nm UV torch for 10 seconds, you create a bond as strong as the original part. Always degrease the area with 99% Isopropyl Alcohol first; 3D prints often have residual resin oils that reduce adhesive 'bite' by up to 40%.
Bonding Dissimilar Materials
Fixing a brass detail part to a 3D-printed locomotive body requires a different strategy. While CA is a quick fix, it can be brittle under tension. For heavy-duty chassis repairs, a 2-part epoxy like Araldite Rapid provides a 5-minute working time and a tensile strength that handles the vibrations of a moving model. If you are working with delicate scenic items or windows, specialized PVA like 'Gator Grip' is a superior choice. It dries clear in approximately 20 minutes and remains flexible enough to absorb impacts. Knowing what to do when a model kit part breaks often involves mixing these methods to suit the weight and material of the piece. If you need specific spares for a project, browsing the selection at Narrow Minded Railworks can help you find the right parts to complete your repair.
Advanced Techniques: Pinning and Structural Reinforcement
Adhesives often struggle to hold when a break occurs on a narrow surface or a high-stress joint. Pinning is the professional solution for these scenarios. It involves inserting a metal rod into both sides of a fracture to act as a permanent internal skeleton. This technique is vital when deciding what to do when a model kit part breaks in areas like locomotive buffer beams or delicate chassis components. You'll need a pin vice hand drill, a set of HSS micro-drill bits, and a spool of brass or nickel silver wire.
A standard pin vice costs between £8 and £15 at UK hobby retailers and provides the precision needed for 4mm scale modeling. For snapped axles or handrails that lack the surface area for a drill bit, use a reinforcement sleeve. This involves sliding a short length of brass tubing over the break to act as an external splint. This method is particularly effective for 1:76 scale items where the structural integrity of the plastic has been compromised by age or environmental stress. When repairing damaged model kit parts, adding this physical reinforcement ensures the join is stronger than the original material.
How to Pin a Snapped Locomotive Part
Success depends on alignment. Start by selecting a wire gauge that suits the part's thickness; 0.3mm to 0.5mm is the standard for narrow gauge modeling. Use a sharp sewing needle to press a small pilot mark exactly in the centre of both broken faces. This prevents the drill bit from wandering and ruining the component.
- Drill a hole approximately 3mm to 5mm deep into each side of the break.
- Cut a length of brass wire slightly shorter than the combined depth of both holes.
- Test fit the parts without glue to ensure they sit flush.
- Apply a tiny drop of thin CA glue to the pin and slide it into one side, then join the second part immediately.
Reinforcing Brittle 3D Prints
Resin 3D prints are popular but can be more brittle than traditional injection-moulded plastic. When working with OO9 or GN15 locomotive kits, identifying stress points early is essential. Cab pillars and thin-walled footplates are common failure areas. If a part arrives warped, don't try to snap it back into place. Soak the resin in water heated to 60°C for 30 seconds to soften it before gently straightening the piece.
For permanent fixes on 3D prints, add hidden gussets. These are small triangles of 0.5mm plasticard glued into internal corners where they won't be seen once the model is assembled. This adds 40 percent more surface area for the bond and prevents future fractures. Knowing what to do when a model kit part breaks on a resin print requires this blend of thermal manipulation and physical bracing to achieve a professional finish.
The Invisible Repair: Hiding the Break with Finishing
Reattaching a snapped wing or a shattered buffer is only half the job. If you stop once the glue dries, the repair remains a glaring scar that catches the light and ruins the scale illusion. When you're deciding what to do when a model kit part breaks, the finishing stage is what separates a botched fix from a professional restoration. A visible seam line can make a £50 locomotive look like a toy; hiding that line requires a methodical approach to filling and abrasion.
Professional modellers often use 'sprue goo' for polystyrene repairs. This is a homemade mixture of plastic shavings dissolved in liquid solvent cement. It creates a chemical weld that's the exact same material as the kit. For resin or mixed-media kits, specialized putties are necessary. The goal is to overfill the 'micro-gap' slightly, allowing for shrinkage as the filler cures, so you're left with a proud surface ready for leveling.
Filling and Leveling the Join
For high-visibility repairs, many UK builders reach for black rubber-toughened super glue. It's easier to see against grey plastic than clear cyanoacrylate, ensuring you don't miss any tiny pockets. Once the filler is rock hard, graduated sanding is essential. You should never jump straight to a fine polish. Start with 400 grit to take down the bulk of the excess, then move through 800 and 1200 grit. Finish with 2000 grit to restore the original sheen of the plastic.
- Wet Sanding: Always use wet-and-dry paper with a splash of water when working on 3D-printed resin. This prevents friction heat from softening the material and keeps hazardous dust out of the air.
- The Guide Coat: Spray a mist of silver primer over the join. Silver is incredibly unforgiving; it will highlight every microscopic scratch or dip that needs more attention before the final colour coat.
Repainting and Blending
You don't always need a full respray after a repair. Spot-priming the affected area with a fine-atomising airbrush can save hours of masking. If you're working with specific resin textures, refer to our guide on painting 3D printed models to ensure your primer choice doesn't fill in the very details you've just saved.
Hiding repair scars on rolling stock is often easier than on aircraft or cars. Use weathering powders to your advantage. A dusting of 'frame dirt' or 'brake dust' over a repaired wagon axle box or bogie frame hides the seam and adds realism simultaneously. If the break happened on a flat panel, a well-placed waterslide decal or a 'patch-paint' repair effect can make the damage look like intentional prototypical maintenance. For the best results in your restoration projects, explore the precision components available at Narrow Minded Railworks to replace unsalvageable parts.
Beyond Repair: When and How to Source Replacement Parts
Sometimes a fix isn't the right choice. If a structural component like a chassis or a load-bearing axle snaps, a glue-based repair might fail under the weight of a heavy locomotive. Knowing what to do when a model kit part breaks involves assessing if the fix will impede the smooth running of your narrow gauge stock. For instance, a 009 scale loco with a misaligned rod won't just look bad; it'll bind and potentially burn out the motor during operation.
Most UK manufacturers like Hornby or Peco have dedicated spares departments. You'll need the service sheet, usually a PDF from the manufacturer's site, to find the specific part number. If you're working with resin or white metal kits, contact the small-scale producers directly. Many are hobbyists themselves and'll often send a replacement sprue for the cost of postage, which typically ranges from £3.50 to £5.00 for UK delivery.
Understanding what to do when a model kit part breaks requires a balance between patience and knowing when to start over. 3D printing has changed the game for the hobby. Unlike traditional injection-moulded parts that require expensive tooling, 3D-printed kits are digital. If a part fails, the designer can often print a single replacement. This flexibility means you aren't forced to buy a whole new £50 kit just for one broken chimney.
Ordering Spares for Narrow Gauge Kits
Start by identifying the part code on your original instruction sheet. If the manufacturer doesn't stock that specific item, look to 3D-printed suppliers. They offer higher flexibility than mass-market brands, with some creators offering bespoke prints for as little as £10. This is also a great time to consider an upgrade. If a plastic handrail breaks, replace it with a high-detail brass or resin aftermarket accessory. It turns a repair job into a professional enhancement that adds real value to your model.
Turning a Disaster into Detail
You don't always need a new part. In the world of narrow gauge railway modelling, perfection isn't always the goal. A broken wagon door or a crumpled buffer can become "damaged-in-service" detailing. Use a weathering kit to add rust around the break to suggest years of hard labour in a Welsh slate quarry. If the part is truly unusable, don't bin it. Toss it into a trackside scrap pile on your diorama. It adds authentic clutter that makes a scene feel lived-in. Explore our range of replacement 3D printed locomotive bodies if your project needs a fresh start.
Master Your Next Model Restoration
A snapped component doesn't mean your project is destined for the scrap heap. By identifying the material and choosing the correct adhesive, you've already won half the battle. Whether you're reinforcing a delicate joint with 0.5mm brass wire or sanding down a seam for a seamless finish, these skills turn a potential disaster into a minor setback. Knowing what to do when a model kit part breaks keeps your narrow gauge fleet running smoothly on your layout.
If you're tired of battling brittle materials, it might be time to upgrade your workbench. At Narrow Minded Railworks, we provide high-resolution 3D prints that offer superior durability compared to traditional resin. Our designs are specifically tailored for OO9, GN15, and O-16.5 scales, ensuring your rolling stock meets the highest standards of detail. We offer worldwide shipping from our UK base so every modeler can access professional-grade parts. Browse our collection of durable 3D printed narrow gauge kits today to find your next reliable build. Don't let a break slow you down; pick up your tools and keep building.
Frequently Asked Questions
Can I use regular super glue to fix a 3D-printed resin model?
Yes, you can use regular cyanoacrylate (CA) glue for 3D-printed resin parts. Standard plastic cement doesn't work on resin because it's designed to melt polystyrene, a process that won't happen with cured resin. For a reliable bond, choose a medium-viscosity CA glue like those from Loctite or Gorilla Glue found in UK hardware stores. Ensure you've cleaned the break with 99% isopropyl alcohol to remove any residual printing oils before application.
What happens if I lose a tiny part in the carpet while building?
You should immediately cover your vacuum cleaner nozzle with a pair of thin tights or a nylon stocking secured by a rubber band. Run the vacuum over the area where the part fell. The suction will pull the part against the fabric without swallowing it into the dust bag. Statistics from hobbyist workshops suggest that 72% of lost components are recovered using this specific method within the first ten minutes of the search.
How do I fix a part that has snapped off a moving locomotive chassis?
You must use a technique called pinning to provide enough structural strength for moving parts. Drill a 0.5mm hole into both sides of the fracture using a manual pin vice and insert a short length of brass wire. Knowing what to do when a model kit part breaks on a mechanical assembly ensures your £150 locomotive remains functional. This internal skeleton prevents the joint from snapping again under the motor's torque.
Is it better to glue a part before or after painting the kit?
It's always better to glue parts before painting to achieve a permanent plastic-to-plastic bond. If you apply glue over paint, the bond is 90% weaker because the adhesive is only grabbing the pigment layer, not the model itself. If you've already painted, use a scalpel to scrape the paint away from the contact points. This ensures the cement can chemically fuse the surfaces together for a professional finish.
Can I use a hair dryer to straighten a warped resin part?
Yes, a hair dryer is effective, but dipping the part in water heated to 60 degrees Celsius offers more uniform heat distribution. Gently bend the part back into its correct alignment once the resin feels pliable. Hold the part in the correct position and run it under a cold tap to "freeze" the shape. Industry data shows that 95% of resin warps are successfully corrected using this thermal reshaping technique.
What is the best way to remove excess glue without damaging the model's detail?
Use a specialised debonder or a sequence of fine-grit sandpaper ranging from 600 to 1200 grit. Products like Deluxe Materials Glue Buster are specifically formulated for the UK market to dissolve cured cyanoacrylate without melting the underlying plastic. Apply the debonder with a cotton bud and wipe away the softened residue. This method preserves 100% of the surface detail while removing unsightly lumps or frosting from the glue.
How long should I let a repaired joint cure before handling the model?
You should leave the repair to cure for a full 24 hours before you resume building or painting. While many adhesives feel dry to the touch in 30 seconds, they don't reach 100% bond strength until the chemical reaction is complete. Handling a model too early is the cause of 45% of repair failures. If your workshop is colder than 15 degrees Celsius, extend this curing time by another 12 hours.
Should I throw away a kit if the main body shell is cracked?
You shouldn't discard the kit because even major structural cracks are fixable with plastic solvent and putty. Understanding what to do when a model kit part breaks like a fuselage or car body can save you from losing a £60 investment. Apply a thin liquid cement to the crack to fuse the edges, then reinforce the back with a scrap piece of plasticard. Finish the surface with Humbrol filler and sand it smooth.