

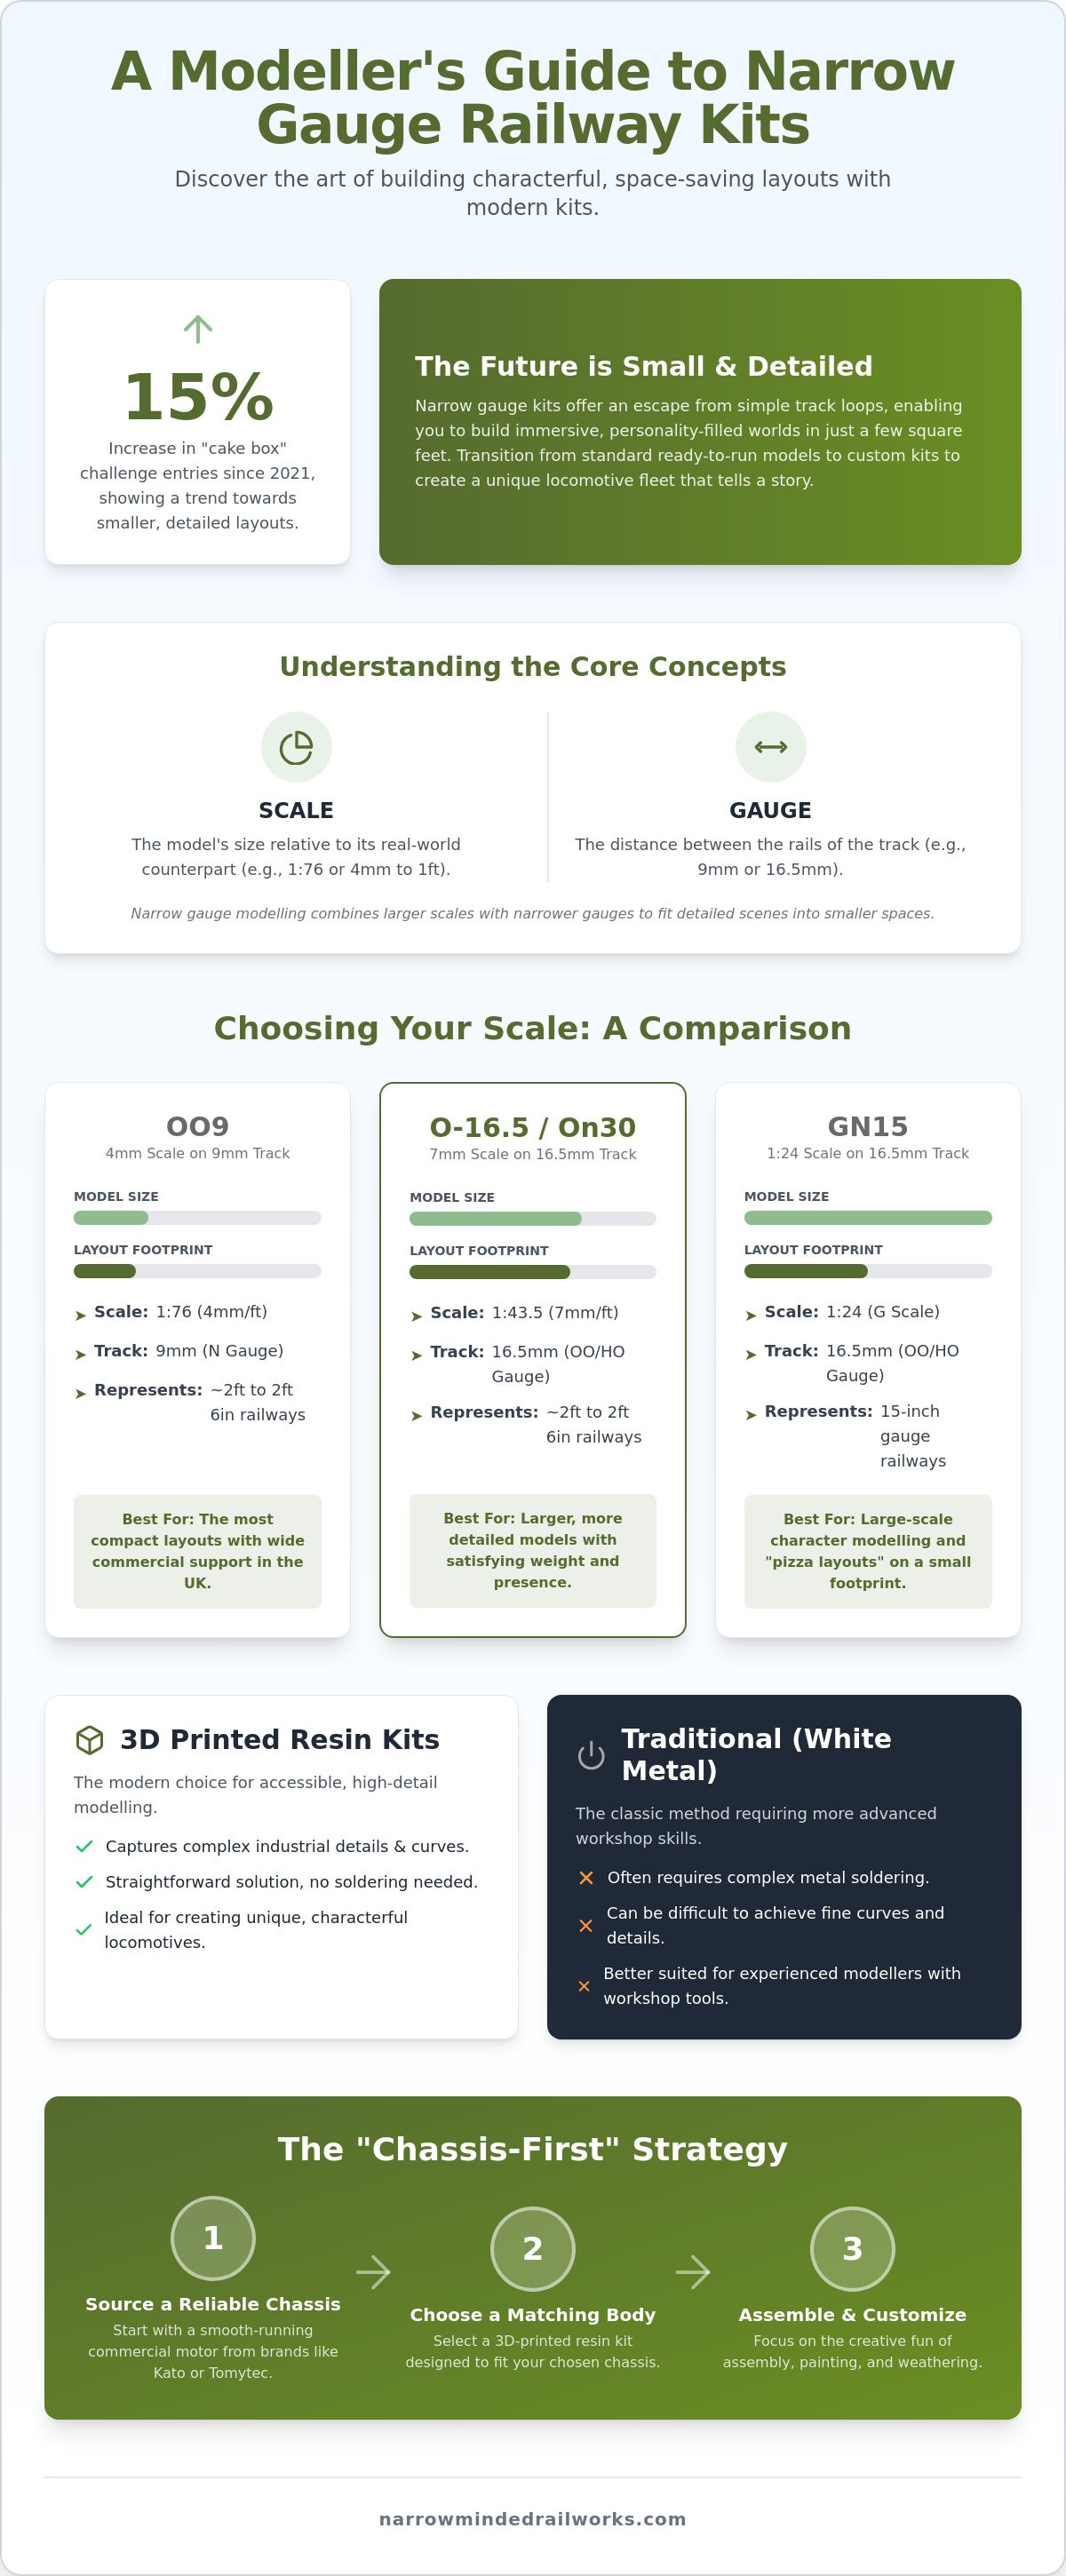
Since 2021, UK exhibition entries for A4-sized "cake box" challenges have increased by 15%, proving that the future of the hobby is small, detailed, and full of personality. You might feel that your limited space restricts you to a simple loop of track, but narrow gauge model railway kits offer a way to build an immersive world in just a few square feet. It's understandable if you're confused by the technical gap between OO9 and N gauge, or if you're hesitant to tackle complex metal soldering.
While traditional kits often require advanced workshop skills, modern 3D-printed resin provides a straightforward solution for creating characterful locomotives. This guide will help you master the art of narrow gauge modelling by discovering the right scales, materials, and kits to build a unique railway. We'll look at how to fit high-detail bodies to reliable commercial chassis like the KATO 11-109 and compare popular scales such as GN15 and O-16.5 to find your perfect fit.
Key Takeaways
- Understand the vital distinction between scale and track gauge to select the right OO9, GN15, or O-16.5 project for your available space.
- Choose 3D-printed resin narrow gauge model railway kits to capture complex industrial details and curves that are difficult to achieve with traditional white metal.
- Implement the "chassis-first" strategy by sourcing a reliable commercial motor unit from brands like Kato or Tomytec before beginning your locomotive body assembly.
- Focus on narrative and character by using specialized scenery and weathering techniques to bring the rugged charm of industrial lines to your layout.
- Transition from standard ready-to-run models to custom kits to create a unique locomotive fleet that reflects the quirky history of rural railways.
Why Narrow Gauge Model Railway Kits are the Future of the Hobby
Narrow gauge modelling captures the essence of industrial and rural railways that standard gauge often overlooks. These lines were the workhorses of quarries, mines, and remote villages, where tracks were laid quickly and on a budget. Essentially, narrow gauge model railway kits consist of specialized locomotive bodies and wagon parts designed to represent 2ft or 3ft prototypes while running on standard model track widths. While ready-to-run models are convenient, they often lack the unique personality found on real-world industrial lines. Building from a kit allows you to move beyond mass-produced items and create something truly your own.
The hobby has shifted toward personalization because enthusiasts want their layouts to tell a specific story. Standard gauge models can feel repetitive, but narrow gauge offers a solution through its sheer variety of shapes and purposes. Whether it's a tiny "vertical boiler" engine or a rugged timber wagon, these models stand out because they weren't built to a single corporate standard.
To see how much character can be packed into a tiny space, watch this demonstration of a micro-layout in action:
Character Over Uniformity: The Narrow Gauge Appeal
Standard gauge railways prioritize efficiency and uniformity, which can sometimes feel sterile in miniature. Narrow gauge is different. It embraces the "ugly" and the unconventional. You'll find asymmetrical cabs, oversized boilers, and improvised repairs. This aesthetic freedom allows you to model fictional or "might-have-been" railways without the strict prototypical constraints of mainline modelling. If you are new to these concepts, you can explore our introductory guide to narrow gauge railways for more historical context.
Space-Saving Without Sacrificing Detail
Many hobbyists face the constraint of limited square footage. Narrow gauge provides a proactive solution by allowing larger scales to operate on narrow track. For example, GN15 uses 1/24 scale figures and details but runs on 16.5mm track, the same as standard OO or HO gauge. This has led to the "pizza layout" phenomenon where entire scenes are built on a circular board. By consulting a comprehensive list of narrow-gauge model railway scales, you can see how these combinations make large-scale modelling achievable in a small bedroom or workshop, making narrow gauge model railway kits a versatile choice for any home.
2026 is an ideal time to start this journey. While finding specific motors was once a challenge, the current market offers more reliable commercial chassis options than ever before. Brands like Kato and Tomytec provide smooth-running foundations that fit perfectly under modern 3D-printed resin bodies. This accessibility removes the technical barriers that once made kit building feel daunting for beginners, allowing you to focus on the creative aspects of the craft.
Choosing Your Scale: OO9, GN15, and O-16.5 Kits Compared
Selecting a scale is often the first hurdle for new modellers because the terminology of scale and gauge frequently overlaps. Scale refers to the size of the model relative to the real thing, while gauge refers specifically to the distance between the rails. Narrow gauge modelling is unique because it uses track gauges from smaller scales to represent the narrow tracks of industrial or mountain railways. While this might seem complex, it provides a proactive solution for building high-detail layouts in restricted spaces. Understanding these relationships is the key to choosing the right narrow gauge model railway kits for your project.
The choice between scales usually comes down to a balance of available space and the level of detail you want to achieve. OO9 offers the most compact layouts, while GN15 and O-16.5 allow for larger, more tactile models that run on standard track. By comparing these options from a builder's perspective, you can avoid the frustration of starting a project that doesn't fit your workshop or your vision.
OO9 Locomotive Kits: The Mainstream Choice
OO9 is the most widely supported scale in the UK, using a 4mm scale (1:76) for the body while running on 9mm track. This combination allows you to model famous prototypes like the Quarry Hunslets or small industrial diesels on track that is commercially available as N gauge. Because it's the mainstream choice, you'll find extensive community support and a vast range of parts to suit any era. If you're just starting, it's helpful to review our beginner's guide to OO9 loco kits to see which prototypes fit your vision. Organizations like the Narrow Gauge Railway Society provide invaluable historical data to ensure your 4mm models remain authentic to their industrial roots.
GN15 and O-16.5: Scaling Up for Detail
If you prefer larger models but have limited space, GN15 or O-16.5 are excellent alternatives. GN15 uses a 1:24 scale on 16.5mm track, which is the same width as standard OO or HO gauge. This scale is perfect for those who enjoy "large scale" detail and character but want to keep the overall layout footprint small. It's an ideal entry point for kit-bashing and creating quirky industrial scenes. You can find more details in our complete guide to GN15 scale.
O-16.5, or 7mm scale, also runs on 16.5mm track but represents a slightly different prototype ratio of 7mm to the foot. It acts as a bridge between narrow gauge and traditional O gauge modelling, offering a "heavyweight" feel that smaller scales can't match. While finding ready-to-run models in these scales is difficult, 3D-printed kits provide a reliable way to build a unique fleet. You can explore our latest range of locomotive and wagon kits to see how these larger scales can transform a small diorama into a detailed miniature world.
3D Printed Resin vs. Traditional Kit Materials
Historically, building narrow gauge model railway kits meant wrestling with heavy white metal or sharp etched brass. While these materials served the hobby for decades, they demand high technical proficiency and specialized soldering tools that can be intimidating. 3D printing has evolved to provide a proactive solution through high-definition resin models that arrive with complex curves and microscopic bolt-head details already integrated into the design. This shift significantly reduces the part count, allowing you to focus on the creative aspects of finishing rather than the stress of structural assembly.
One primary advantage of resin is the "one-piece" body. Unlike plastic kits that require gluing dozens of small panels together, a resin body often comes as a single, highly detailed unit. It's true that 3D-printed parts require specific preparation, such as cleaning off support residue and using a high-quality resin primer. However, following a structured cleaning routine ensures that your paint adheres perfectly, resulting in a professional finish that rivals any mass-produced model.
The Benefits of 3D Printed Locomotive Bodies
Resin bodies are notably lightweight yet sturdy. This improves the running characteristics of small locomotives by reducing the strain on the motor, which is vital for the compact chassis used in narrow gauge. Since there's no soldering required, these kits are the perfect entry point for beginners who want a unique fleet without investing in expensive metalworking gear. Organizations like the Association of 16mm Narrow Gauge Modellers have seen a growing acceptance of these modern materials because they make the hobby more accessible to everyone. For the best results, you should refer to our guide on painting 3D printed models for specialized finishing tips.
Durability and Detail: What to Expect in 2026
By 2026, modern engineering resins have largely overcome the brittleness associated with early 3D prints. These materials now offer a durability that stands up to regular layout operation and frequent handling. Surface finishes have also improved, making prominent print lines a thing of the past for high-quality narrow gauge model railway kits. High-definition resin is the superior choice for replicating industrial textures like splintered wood and pitted, rusted metal because it captures microscopic variations that traditional injection molding misses. This level of detail allows you to achieve a realistic, weathered appearance that reflects the rugged nature of industrial prototypes with minimal effort.
How to Match a Kit to a Reliable Chassis
The "Chassis-First" Rule is a fundamental principle for anyone working with narrow gauge model railway kits. While it is tempting to start painting and detailing a beautiful 3D-printed body immediately, doing so without a motor can lead to significant assembly issues later. Securing your chassis first allows you to verify dimensions and ensure the internal cavity of the kit accommodates the motor's height and wheelbase. This proactive approach prevents the frustration of finishing a model only to find that the required power unit is out of stock or requires extensive modification to fit.
While some specific chassis can be difficult to source during peak production periods, identifying suitable alternatives like Tomytec power units ensures your project remains on track. In 2026, the Kato 11-109 remains the standard replacement for the older 11-103 model and serves as the primary workhorse for OO9 and many GN15 projects. These units are prized for their reliability and smooth slow-speed crawling, which is essential for industrial shunting. When a specific Kato unit is unavailable, Bachmann donor units or even "ready-to-run" standard N gauge locomotives provide excellent alternatives. While removing the original N gauge body might seem daunting, it provides a high-quality, pre-assembled mechanism that is often more reliable than building a chassis from scratch.
Common Donor Chassis for OO9 and GN15
The Kato 11-109 is often the first choice due to its compact size and consistent availability. If you're modelling larger industrial prototypes, using a standard N gauge diesel chassis can offer a more robust power block. While these donor units were designed for standard gauge, their 9mm wheel spacing is perfect for OO9. This allows you to benefit from modern motor technology while creating a unique narrow gauge appearance. For steam prototypes, 0-4-0 and 0-6-0 mechanisms from smaller N gauge locomotives are frequently utilized to provide the correct wheel arrangement and motion.
Fitting and Securing the Body
Initial testing should always be performed using a temporary adhesive like Blu-Tack. This allows you to check that the body sits level and that there is sufficient clearance for moving parts, such as external cranks or coupling rods. Once you're satisfied with the fit, permanent screw mounting or specialized adhesives can be used. It's vital to check that the wheels don't foul the internal wheel arches, especially when navigating tight curves. Proper weight distribution ensures consistent electrical pickup and prevents stalling on uneven narrow gauge track.
If you're ready to start your next build, you can browse our locomotive kits designed for commercial chassis to find a perfect match for your motor unit.
Essential Tools and Scenery for Your Narrow Gauge Layout
Building a fleet of narrow gauge model railway kits is only the first step in creating a convincing miniature world. While a standard hobby knife is essential for any modeller, it isn't sufficient for the delicate task of removing 3D print supports without damaging fine details. A proactive solution is to invest in a pair of high-quality flush cutters and a set of fine-grit sanding sticks specifically for resin finishing. These tools allow you to clean your models to a professional standard before moving to the painting stage. Narrow gauge modelling thrives on the "lived-in" look, where grime and rust tell the story of a hard-working industrial line. Weathering isn't just an optional extra; it's a vital technique for blending your pristine resin kits into a rugged, realistic landscape.
At Narrow Minded Railworks, we support your build from the initial assembly to the final scenery placement. While the technical side of kit building can seem daunting, our 3D-printed designs simplify the process by providing high-detail components that require minimal cleanup. We prioritize clarity in our instructions to set realistic expectations for your project, ensuring you have a smooth path from a box of parts to a finished locomotive.
Beyond the Locomotive: Wagon Kits and Rolling Stock
A railway consisting only of locomotives lacks purpose and narrative. While ready-to-run wagons are available, they often lack the quirky, mismatched appearance typical of narrow gauge lines. A proactive solution is to build a diverse fleet using 3D-printed wagon kits, which allow for a consistent level of detail across your entire layout. Choosing the right couplings is also a critical decision. While standard loop couplings are reliable, many modellers prefer Greenwich or Bemo styles for a more prototypical appearance. We recommend testing your chosen coupling system on a small length of track to ensure smooth shunting before committing to your entire rolling stock fleet.
Bringing the Scene to Life
The sense of place on a narrow gauge layout comes from the details surrounding the track. While generic scenery items are widely available, they often lack the specific industrial character required for a quarry or timber line. Our range includes unique figures scanned from real people, providing a level of anatomical realism that traditional molded figures cannot match. Adding industrial accessories like period-accurate petrol pumps, slate structures, or weathered phone boxes helps ground your railway in a specific era. These small touches transform a simple track plan into a characterful diorama that tells a story of industrial heritage.
To complete your miniature world, browse our full range of narrow gauge kits and accessories and discover how 3D-printed detail can elevate your layout.
Build Your Unique Miniature World
While space constraints often limit your layout plans, narrow gauge modelling provides a proactive solution to create immersive, detailed environments in compact dioramas. You've seen how modern 3D-printed resin kits offer a more accessible entry point than traditional white metal assembly. By matching these high-detail bodies with reliable Kato or Tomytec chassis, you ensure your custom fleet runs as smoothly as it looks. Transitioning to narrow gauge model railway kits allows you to move beyond mass-produced models and embrace the quirky, industrial charm of rural railways.
Our kits are expertly designed for Kato and Tomytec chassis, utilizing high-detail resin prints that require minimal assembly. We provide worldwide shipping for all locomotive and wagon kits to ensure you can start your project wherever you are located. It's time to take the next step in your hobby and build a railway that reflects your creative vision. Explore our range of 3D-printed narrow gauge kits and start your build today. Your journey into the characterful world of industrial narrow gauge starts with a single, well-chosen project. We look forward to seeing the unique railway you create.
Whether you are building a detailed layout or looking to explore E-commerce retail of vaping hardware and nicotine salts from specialized shops like UK Vape Sales, the key to success is finding a trusted supplier that understands your specific needs.
Frequently Asked Questions
Do your narrow gauge kits include the motor and wheels?
Our kits do not include the motor, chassis, or wheels. While we specialize in high-detail 3D-printed bodies, we don't supply the internal mechanisms or rolling components. A proactive solution is to purchase a recommended commercial chassis, such as a Kato or Tomytec unit, which our kits are specifically designed to fit. This ensures you have a reliable, smooth-running foundation for your model without the complexity of building a chassis from scratch.
What is the best scale for a beginner in narrow gauge modelling?
OO9 is generally considered the best entry point for beginners because it offers the widest range of community support and track availability. While the small size of 4mm scale can be challenging, using 3D-printed narrow gauge model railway kits simplifies the process by providing a one-piece body. This allows you to focus on painting and detailing rather than the complex structural assembly required by traditional white metal or etched brass kits.
Can I use standard N gauge track for my OO9 model railway?
You can technically use standard N gauge track for an OO9 layout because both systems utilize a 9mm gauge. However, the sleeper spacing on N gauge track is designed for standard gauge prototypes and may look unrealistic in a narrow gauge setting. A proactive solution is to use specialized narrow gauge track, which features wider sleeper spacing and a more rugged appearance that better suits the character of industrial prototypes.
How do I remove the support marks from a 3D-printed resin kit?
Support marks are a standard part of the resin printing process, but they are easy to remove with careful preparation. We recommend using sharp flush cutters to snip the supports away and then smoothing the area with fine-grit sanding sticks. Always sand gently to protect fine details like rivets. If a small pit remains after sanding, a tiny amount of model filler provides a proactive solution to achieve a perfect surface before priming.
What kind of glue should I use for 3D-printed model kits?
Traditional plastic cement does not bond with resin, so you'll need to use cyanoacrylate, commonly known as super glue, or a two-part epoxy instead. Super glue provides a fast, strong bond for most components, while epoxy is useful for parts that require more adjustment time. We suggest using a medium-viscosity or gap-filling glue to ensure a secure fit between the 3D-printed body and the commercial chassis during assembly.
Is GN15 scale compatible with standard OO gauge track?
GN15 scale is fully compatible with standard OO or HO gauge track because both use a 16.5mm gauge. This compatibility allows you to model in a large 1:24 scale while utilizing affordable, off-the-shelf track systems. It is a proactive choice for modellers who enjoy high levels of detail and characterful figures but want to avoid the higher cost or complexity of specialized large-scale narrow gauge rail systems.
How do I know if a specific chassis will fit a locomotive body kit?
We design each kit to fit a specific commercial motor unit, and these requirements are clearly listed in our product descriptions. While we recommend units like the Kato 11-109, you should verify the wheelbase and height dimensions before purchasing your chassis. If your preferred motor is unavailable, checking the physical dimensions allows you to find a proactive alternative that fits the internal cavity of the 3D-printed locomotive body.
Do I need to prime 3D-printed resin before painting it?
You must prime 3D-printed resin to ensure that your topcoat adheres properly to the surface of the model. Resin has a very smooth finish that can cause acrylic paints to bead or flake if applied directly. A proactive solution is to use a dedicated hobby primer, which provides a durable key for your paint and highlights any remaining surface imperfections that need sanding before you finish your narrow gauge model railway kits.