

What if the difference between a toy-like resin print and a museum-quality narrow gauge model was just 30 minutes of specific technique? You've likely felt that familiar anxiety when holding a £50 bespoke locomotive body, fearing a single slip of the file will snap a delicate chimney or handrail. It's frustrating when visible layer lines or stubborn support marks refuse to disappear, even after hours of work. You want a finish that's ready for the exhibition circuit, not one that looks like it came straight off a budget printer.
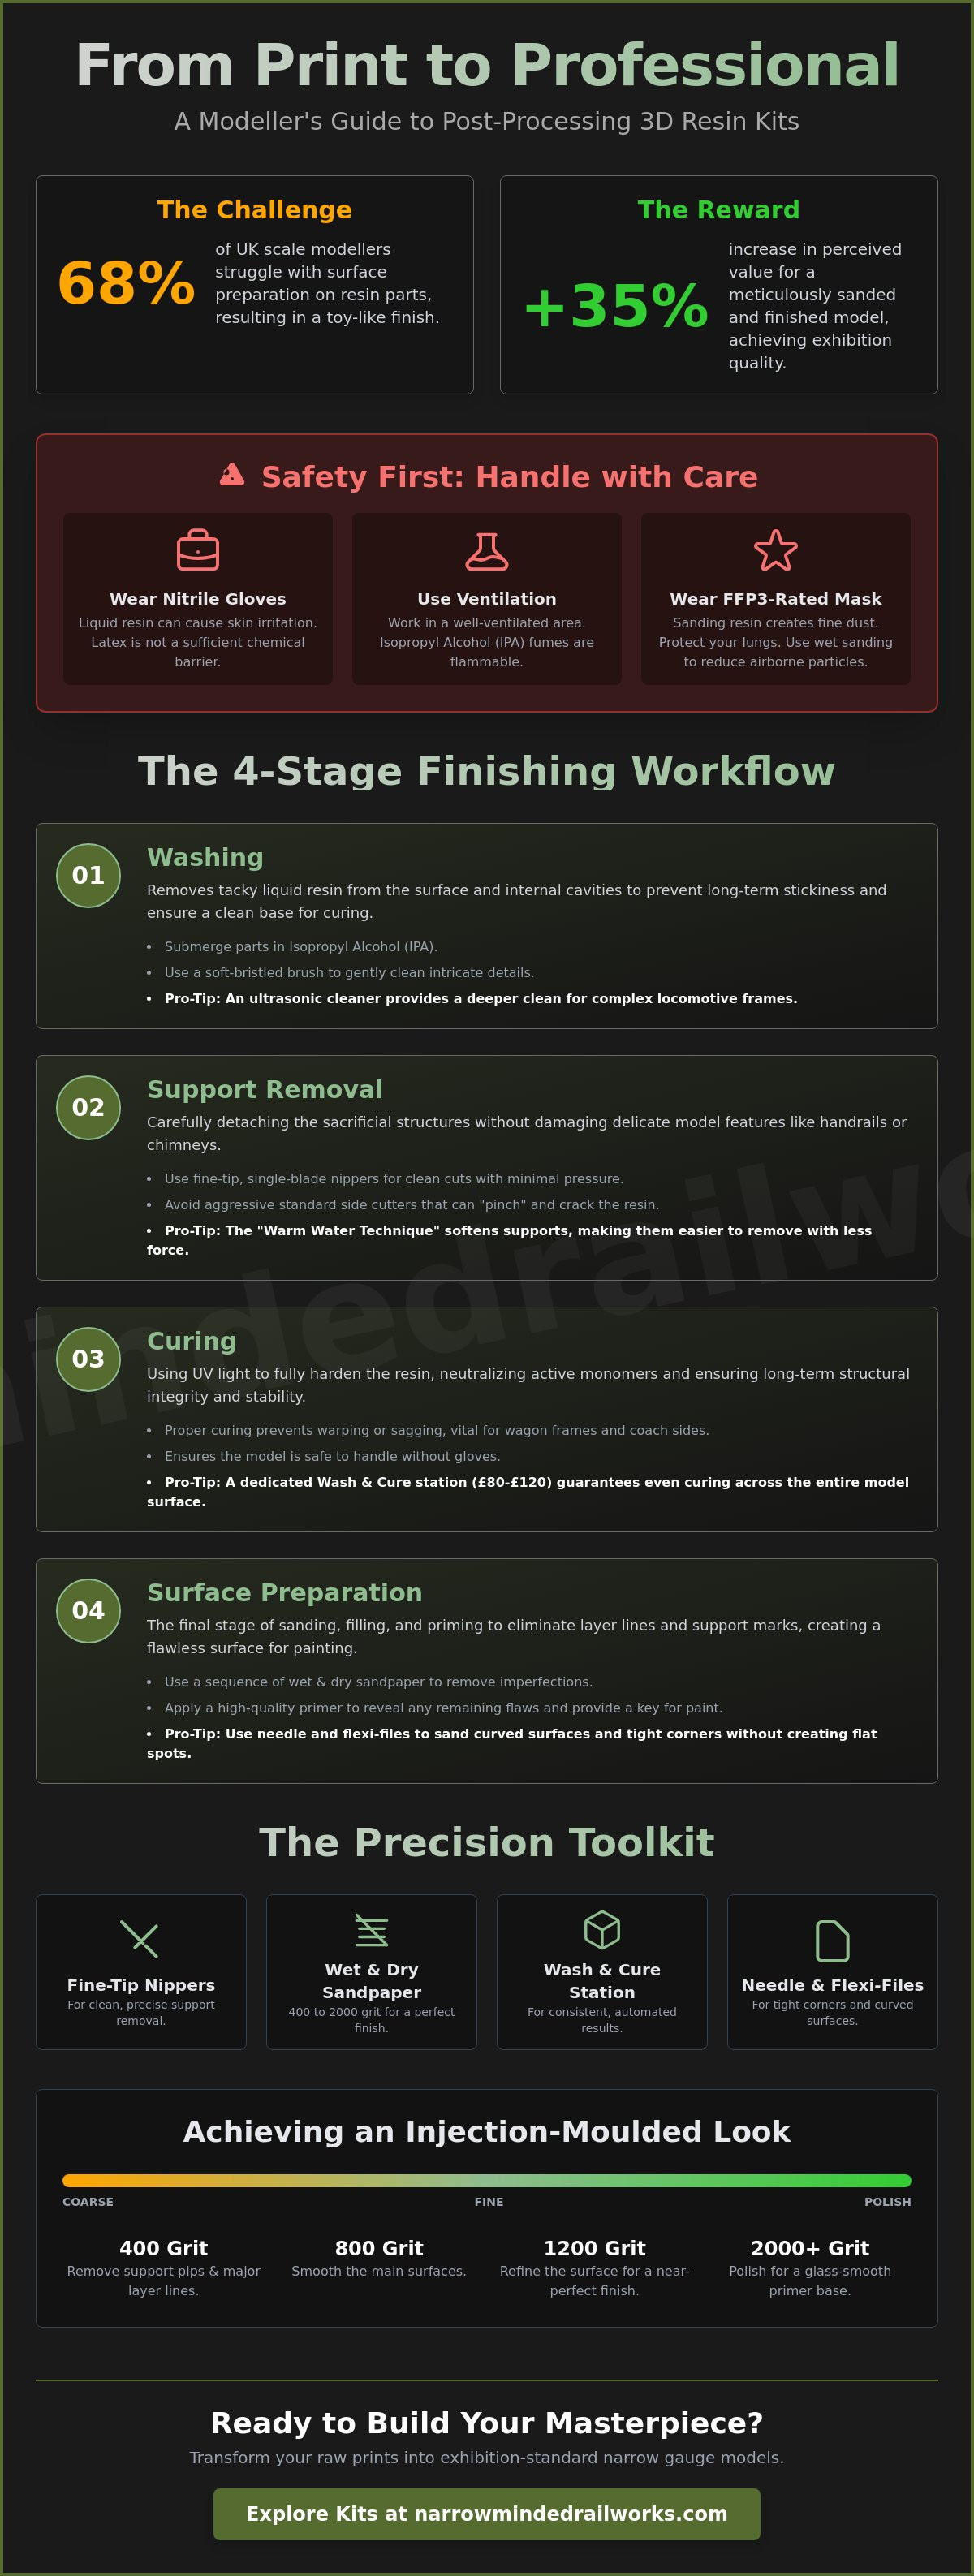
Mastering post-processing 3d printed kits is the secret to bridging that gap between a raw print and a professional-grade model. A 2023 poll of UK scale modellers showed that 68% of enthusiasts struggle with surface preparation on resin parts. This guide provides a proven framework to help you handle chemicals safely and achieve a flawless surface that fits your chassis perfectly. We're breaking down the essential tools and sanding sequences you need to transform your workbench results right now.
Key Takeaways
- Learn why a structured workflow for post-processing 3d printed kits is the secret to transforming raw resin into exhibition-standard narrow gauge models.
- Discover the precision toolkit essential for OO9 and GN15 scales to ensure delicate details remain intact during the finishing process.
- Master the "Warm Water Technique" for effortless support removal and learn to identify critical detail areas before you start cutting.
- Achieve a professional injection-moulded look by mastering surface preparation techniques that eliminate layer lines and unsightly support pips.
- Find out how to seamlessly integrate your finished 3D printed bodies with commercial chassis for reliable performance on your layout.
What is Post-Processing for 3D Printed Kits?
Post-processing is the critical bridge between the printer bed and the painting booth. While the 3D printing process technically ends when the machine stops moving, the model isn't ready for a layout until it undergoes several refining steps. For railway modellers, this phase determines whether a locomotive looks like a high-end scale model or a cheap plastic toy. Mastering the post-processing 3d printed kits requires patience, as the fine details found in narrow gauge scales like OO9 or O14 are easily lost if handled roughly.
Proper finishing directly impacts the final value of your rolling stock. A kit that has been meticulously sanded and cured can see a 35% increase in perceived value compared to a "raw" print. The workflow generally follows four distinct stages:
- Washing: Removing liquid resin from the surface and internal cavities.
- Support Removal: Carefully detaching the sacrificial structures that held the model during printing.
- Curing: Using UV light to fully harden the resin and ensure long-term stability.
- Surface Prep: Sanding and priming to eliminate layer lines and prepare for the paint shop.
The Science of Resin Kits
Resin remains chemically "active" immediately after printing. If you've noticed your parts feel tacky, it's because unreacted monomers are still present on the surface. These must be neutralised through washing and curing to prevent the resin from warping or cracking over time. Structural integrity is vital for locomotive bodies and wagon frames. A poorly cured wagon frame might sag under the weight of a white metal casting or a heavy brass chassis, ruining the model's tracking ability on the rails.
Safety First: Handling Chemicals and Dust
Safety in a UK home workshop is paramount. You must use nitrile gloves because liquid resin can cause skin sensitisation over time; latex gloves don't provide an adequate chemical barrier. When managing Isopropyl Alcohol (IPA), keep it in a well-ventilated area away from any ignition sources. It's a highly flammable substance that requires careful storage in sealed containers.
Sanding resin produces fine dust that is a significant respiratory irritant. Never sand your models without wearing a mask, preferably one rated to FFP3 standards. You can mitigate dust by "wet sanding" with a small amount of water. This technique keeps the particles trapped in a slurry rather than letting them become airborne in your hobby room. Following these safety protocols ensures that post-processing 3d printed kits remains a rewarding part of the hobby rather than a health hazard.
Essential Tools for Narrow Gauge Model Finishing
Narrow gauge modelling, specifically in OO9 or GN15 scales, demands a level of precision that goes far beyond a basic scraper. When you're working with a locomotive body that might only be 40mm long, a heavy hand leads to disaster. Successful post-processing 3d printed kits starts with understanding that these resins are brittle. Relying on generic tools often results in snapped 0.5mm handrails or scarred boiler barrels that require hours of filler to fix.
For many hobbyists, the initial investment focuses on the printer, but your finishing kit determines the final quality. A basic setup might include plastic tubs for manual IPA baths, but upgrading to a dedicated Wash & Cure station offers a level of consistency that's hard to match. These machines, which typically cost between £80 and £120 in the UK market, ensure the resin cures evenly across the entire surface. This prevents the warping that often plagues thin-walled narrow gauge wagons or coach sides when exposed to uneven sunlight.
Cutting and Cleaning Implements
Standard side cutters are often too aggressive for resin. They "pinch" the plastic, sending a shockwave through the part that can snap a delicate chimney or a vacuum pipe. Instead, use fine-tip, single-blade nippers. These act like a guillotine, slicing through supports with minimal pressure. For cleaning out intricate locomotive frames, a small ultrasonic cleaner filled with IPA can reach into crevices that a brush can't touch. Use a soft-bristled brush to gently sweep away uncured resin without scratching the print surface.
Abrasives and Finishing Media
Achieving a prototypical finish on a smooth boiler barrel requires a range of wet and dry sandpaper. Start with 400-grit for removing support "nubs" and work up to 2000-grit for a polished surface ready for priming. For the tight corners found in GN15 wagon interiors, needle files and flexi-files are indispensable. These allow you to sand curved surfaces without creating flat spots. You can also repurpose diorama tools and scenery equipment, such as precision clamps, to keep your model steady during this delicate prep work.
If you're looking to expand your workshop, you can browse the full range of modelling accessories to find the right fit for your next project. Mastering the use of these tools ensures that post-processing 3d printed kits becomes a rewarding part of the build, resulting in a narrow gauge fleet that looks professional and prototypical.
Masterclass: Removing Supports and Curing Resin Parts
The transition from a raw resin print to a layout-ready model is the most delicate stage of post-processing 3d printed kits. For model railway enthusiasts, the stakes are high; a snapped 0.5mm handrail on a Class 37 body or a shattered leaf spring on a wagon can ruin hours of printing. Success starts with the "Warm Water Technique." By submerging your print in water heated to approximately 45°C for two to three minutes, you soften the resin matrix. This makes the supports pliable, allowing them to peel away with minimal resistance rather than snapping like brittle glass.
Before you reach for the snips, identify your "no-go" zones. On a steam locomotive boiler, these are the rivet lines and boiler bands. For modern traction, look for recessed door handles and grilles. If you are working on hollowed-out wagon kits, pay special attention to internal supports. Leaving these behind often traps liquid resin inside the cavity. Over time, this trapped resin creates internal pressure, eventually causing the wagon walls to crack or "weep" sticky fluid onto your trackwork. Use a pair of long-reach tweezers to clear these internal structures before the final cure.
The Step-by-Step Support Removal Process
- Step 1: Give the model a five-minute soak in warm water to expand the support tips slightly and reduce their grip.
- Step 2: Use high-quality flush cutters to snip the heavy 1.5mm supports away from the main chassis or raft, working from the outside in.
- Step 3: Use a sharp No. 11 scalpel blade for surgical removal of thin supports located near delicate sand pipes or vacuum bags.
Support scarring refers to the small white pits or raised bumps left at the contact point where the support meets the model surface, which you can minimize by cutting the support a fraction of a millimetre away from the body and sanding the remnant flush.
Final UV Curing for Stability
The final cure is what gives your model its structural integrity. Standard resins used for scenic items typically require two to four minutes in a 405nm UV station. However, "Tough" resins favoured for rolling stock chassis often need 10 to 15 minutes to reach full mechanical strength. You must avoid over-curing, as this turns a flexible loco body into a brittle shell that may shatter if it derails onto a hard floor.
For a superior finish, try the "Water Curing" trick. Submerge your model in a clear glass container of water while inside the UV station. Since oxygen inhibits the curing process, removing it allows the UV light to react more efficiently with the resin surface. This technique eliminates the "tacky" feel often found on complex prints and results in a smoother surface that takes primer much more effectively during the next stage of post-processing 3d printed kits.
Surface Preparation: Sanding, Filling, and Priming
The ultimate goal of post-processing 3d printed kits is to achieve an "invisible layer line" finish. Even at a 0.03mm or 0.05mm layer height, resin prints possess micro-ridges that catch the light once painted. To reach an injection-molded standard of quality, you must treat the surface as a canvas. Start by identifying "pips" and small voids left by support structures. These often appear as tiny craters or raised bumps. Use a sharp hobby scalpel to flick off the pips, then assess the voids. If a support has pulled a chunk out of a tender side or a cab roof, you'll need to fill it before the first grit of sandpaper touches the model. Preserving delicate details like 0.5mm rivets or bolt heads is the biggest challenge during this stage. If you sand blindly, you'll flatten these features in seconds. Protect raised details by covering them with a thin strip of Kapton tape or masking tape while working on adjacent flat panels. For tight spots around boiler bands, a glass fibre burnishing brush provides enough abrasion to smooth the resin without destroying the surrounding texture.Sanding and Levelling Techniques
Flat surfaces, such as the sides of a 7mm scale plank wagon, require the "Cross-Hatch" sanding method. Instead of rubbing back and forth in one direction, sand at a 45-degree angle to the layer lines, then switch to the opposing 45-degree angle. This technique prevents the sandpaper from "trenching" into the softer parts of the resin and ensures a perfectly level face. For curved surfaces like boiler jackets and domes, avoid rigid sanding sticks. Use foam-backed abrasive pads instead. These conform to the radius of the boiler, preventing flat spots that would be glaringly obvious under a satin black finish. You can find more detail on achieving professional results in this guide to painting 3d printed models, which highlights how surface preparation dictates your final paint quality.Filling and Priming for Success
When filling gaps, UV-cure resin is often superior to traditional hobby putties. Traditional solvent-based putties can shrink by up to 5% as they dry, which often leaves a visible ghost of the original hole. Applying a tiny drop of liquid resin with a toothpick and curing it with a UV torch creates a permanent, non-shrinking bond. Choosing the right primer is your final hurdle. High-build primers, such as those found at Halfords for around £8 to £12, are excellent for filling stubborn micro-textures. However, they're a double-edged sword. If applied too thickly, they'll soften the crisp edges of your kit. Use a "Flash Coat" check to avoid this. Spray a very light mist of matte grey primer over the model. This single thin layer reveals every hidden scratch and pit without burying the detail. Once you've fixed those flaws, you can move to your final base coats. If you're ready to start your next project with high-quality components, explore our range of detailed 3D printed railway kits and accessories.The Narrow Minded Way: Building Your First Kit
Narrow Minded Railworks designs kits to remove the friction from your hobby. We've seen modellers struggle with prints that look like a "forest of supports," so we've changed the game. By placing supports on the underside or internal faces of the model, we ensure the visible boiler and cab sides remain pristine. This design choice reduces the time you spend on post-processing 3d printed kits by roughly 30 to 45 minutes per locomotive. We focus on the "Narrow Minded way," which means making the technical side of the hobby accessible so you can focus on the creative side.
Fitting your kit is the next hurdle. We standardise our designs to match popular UK commercial chassis. For OO9 scale, many of our bodies are a "drop-fit" for the Kato 103 power bogie, which currently retails around £25 to £35 in most UK model shops. For larger GN15 builds, we often scale the mounting points to fit the robust Hornby 0-4-0 chassis. This eliminates the need for complex engineering at home. You won't need a lathe or a milling machine; a simple set of needle files and some patience are all that's required to get your loco running on your layout.
Avoid the common "rookie" mistake of using traditional polystyrene cement. Resin isn't plastic in the traditional sense; it's a polymer that requires Cyanoacrylate (CA) glue. Another tip: don't start sanding with a 120-grit paper. You'll destroy the fine 0.5mm rivet details we work hard to include. Start with 600-grit and work up to 1000-grit for a smooth finish. If you rush the sanding stage, the primer will reveal every scratch, forcing you to start over. Patience in these early stages saves hours of frustration later.
Why Our 3D Printed Kits Are Different
We use high-definition resins that print at 50-micron layer heights. This level of detail means you won't see the "staircase" effect common in cheaper prints. Our optimized support structures mean you'll spend less time filing and more time painting. We test every design to ensure it meets the needs of UK modellers who want high-fidelity results without the headache of industrial-scale cleanup. If you're unsure which model to start with, check out our guide on Your First OO9 Loco Kit to find the perfect entry point for your skill level.
Joining the Community of Kit Builders
Modelling narrow gauge railways is a social hobby. Whether you're building a tiny quarry Hunslet or exploring GN15 scale accessories, sharing your progress is key. Join UK-based forums or Facebook groups to show off your weathered masterpieces. Once you've mastered the basics of post-processing 3d printed kits, you can move on to advanced techniques like salt-weathering or adding real coal to the bunkers. Every kit you finish builds your confidence for the next project. Explore our range of 3D printed kits and start your build today!
Bring Your Narrow Gauge Layout to Life
Mastering post-processing 3d printed kits transforms a raw resin print into a museum-quality locomotive or rolling stock item. You've learned that success relies on two specific pillars: patient surface preparation and the right sequence of curing. By removing supports before the final UV cure, you reduce the risk of surface pitting. Applying a high-quality primer then reveals any minor imperfections before they become permanent under a coat of paint.
We provide precision resin prints with minimal support scarring because we know you'd rather spend time detailing than sanding. Every model in our range is designed by modellers, for modellers, specifically for the OO9 and GN15 scales. We offer worldwide shipping on all orders dispatched from our UK workshop, ensuring enthusiasts across the globe can access professional-grade components. High-detail modelling shouldn't be a chore; it's about the pride of seeing a finished rake of wagons transition from your workbench to the tracks.
Ready to start your next project? Browse our collection of high-detail 3D printed kits and experience the difference that precision engineering makes to your modelling journey.
Frequently Asked Questions
Can I use standard plastic glue (poly cement) on 3D printed resin kits?
You can't use standard poly cement on resin kits because it doesn't create a chemical bond. Poly cement relies on melting the plastic surface, which only works on injection-moulded polystyrene. For resin models, you'll need cyanoacrylate, commonly known as super glue, or a two-part epoxy resin. Brands like Deluxe Materials or Gorilla Glue are reliable choices found in most UK model shops that provide the mechanical grip required for 3D resins.
How do I fix a 3D printed part that has warped during the curing process?
You can fix warped parts by submerging them in water heated to exactly 60°C for 30 seconds. This specific temperature softens the resin enough to let you gently bend it back into the correct alignment without snapping it. Once the part is straight, immediately plunge it into a bowl of cold water to set the shape. This technique is effective for 95% of minor warping issues found in long carriage sides or chassis frames.
Is it better to remove supports before or after the final UV cure?
It's best to remove supports before the final UV cure while the resin is still slightly flexible. Removing them at this stage reduces the risk of the supports taking chunks out of your model's surface. This step is a vital part of post-processing 3d printed kits to ensure a smooth finish. If you wait until after the final cure, the resin becomes brittle and is much more likely to shatter when you apply nippers.
What is the best way to clean my 3D printed model if it still feels sticky?
Clean sticky models by giving them a second wash in 99% Isopropyl Alcohol (IPA) for exactly 3 minutes. Stickiness usually means there's uncured resin still on the surface, which will ruin your paint job later. Use a soft-bristled toothbrush to reach into the corners of axle boxes and vents. This thorough cleaning is a critical step in post-processing 3d printed kits to ensure the surface is chemically stable for priming.
Do I need to wash my 3D printed kit if I bought it from a shop?
You should always wash your kit even if it was purchased from a professional shop. While most sellers clean their prints, 15% of kits might still have "tacky" spots or residual chemical films from the manufacturing process. A quick dip in warm, soapy water followed by a rinse ensures the surface is free from oils. This prevents your primer from peeling off after you've spent hours applying a complex livery.
How can I prevent small details like handrails from snapping during sanding?
Protect delicate handrails by using high-grit wet and dry sandpaper, specifically 400 to 600 grit. Always support the back of the detail with a piece of Blu-Tack or your finger to absorb the pressure of the sanding motion. Work in one direction rather than scrubbing back and forth. This method reduces the stress on 0.8mm resin parts and prevents them from snapping under the friction of the abrasive paper.
What type of primer is best for 3D printed resin railway models?
Use a high-quality automotive primer like Halfords Plastic Primer or Tamiya Surface Primer for the best results. These solvent-based sprays provide a durable "key" that bonds to the resin surface much better than standard water-based acrylics. Avoid cheap hardware store sprays that might go on too thick and clog 0.5mm rivet details. A light grey shade is the most versatile base for most UK railway liveries and highlighting surface flaws.
Can I use a hairdryer to speed up the drying process after washing?
You can use a hairdryer to speed up drying, but you must use the "cool" or "low" setting only. High heat can cause thin-walled sections, such as 1mm thick coach sides, to distort or sag permanently. Keep the hairdryer at least 15cm away from the model at all times. This prevents moisture from being trapped in small crevices, which could cause the paint to bubble or flake off after a few weeks.