

What if the secret to a truly immersive model railway isn't a massive basement, but a single 48-inch shelf? You probably feel that a realistic hobby requires a dedicated spare room or complex carpentry skills that take years to master. It's common to worry that a small space leads to boring, repetitive operation. In reality, mastering narrow gauge shelf layout design allows you to pack more character into a 4-foot footprint than most 8-foot loops ever achieve.
This masterclass will show you exactly how to build a museum-quality OO9 or GN15 layout without the need for a workshop. You'll discover how to use a 15-inch "fiddle yard" to keep your operations engaging for hours. We'll walk through a specific track plan that fits a 12-inch deep shelf, ensuring your diorama looks stunning from every angle. By the end, you'll have the blueprint for a compact railway that feels anything but small.
Key Takeaways
- Learn how to maximize your scenery-to-track ratio by utilizing the compact footprint of narrow gauge prototypes in small spaces.
- Master the art of narrow gauge shelf layout design by creating functional track plans that incorporate essential fiddle yards for realistic operations.
- Discover the "Box Girder" construction method to build lightweight, warp-free baseboards that provide a professional foundation for your railway.
- Apply theatrical techniques like the "Proscenium Arch" and forced perspective to transform a shallow shelf into an immersive, deep landscape.
- Identify the specific 3D-printed kits and locomotive types that bring professional-grade detail and authentic character to your micro-layout project.
Why Narrow Gauge is the Perfect Choice for Shelf Layouts
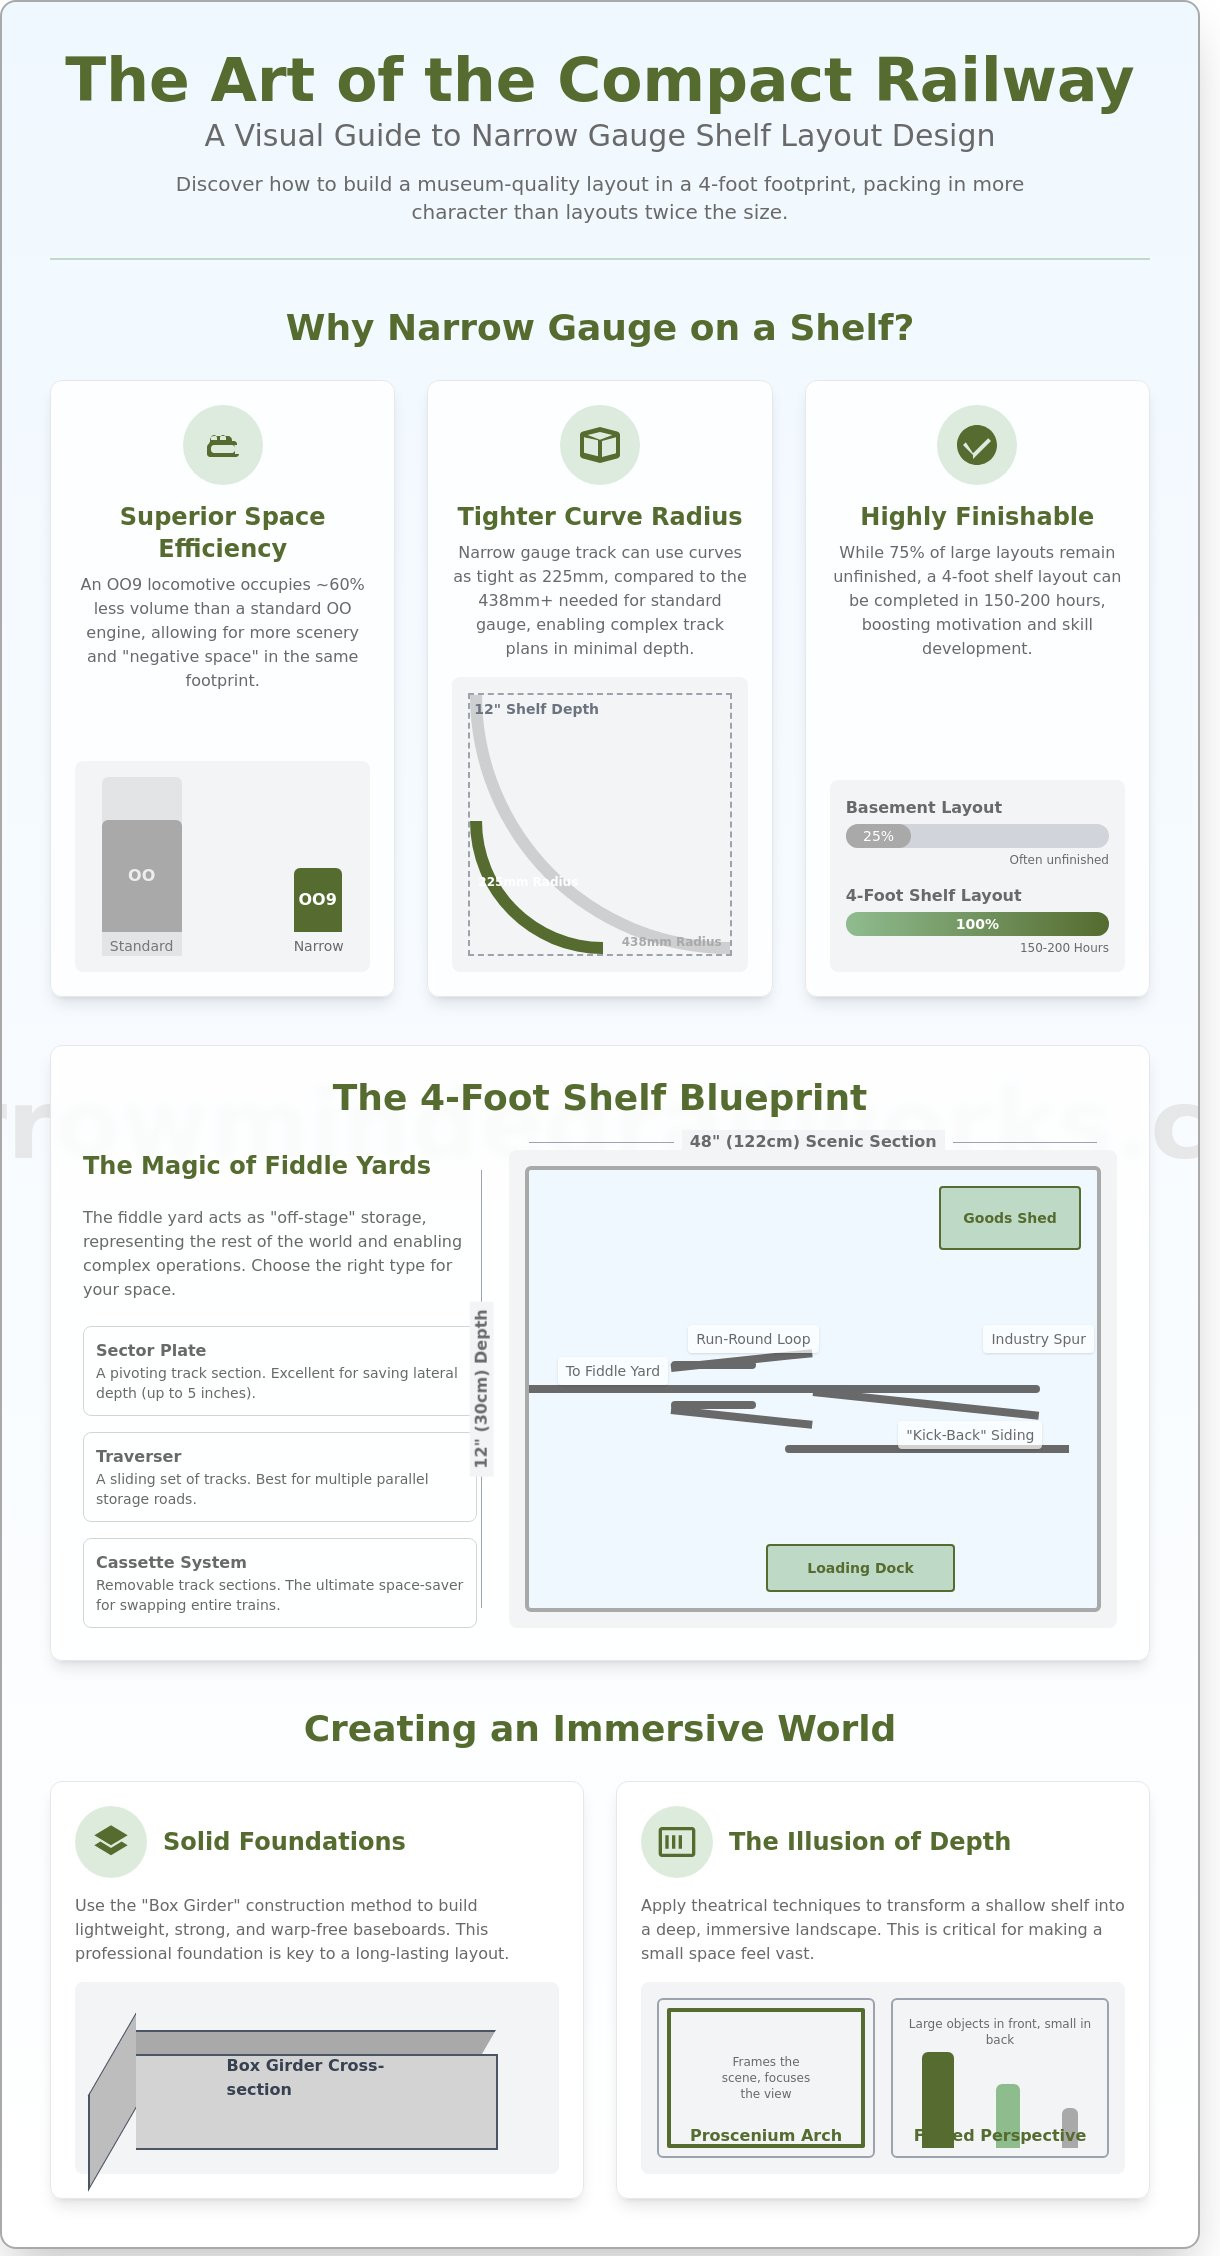
A shelf layout is a compact, end-to-end railway that typically measures under 30cm in depth. It's designed to sit on wall brackets or atop existing furniture, making it the ideal solution for modern homes. While standard gauge modelling often feels cramped in these dimensions, choosing a narrow-gauge railway prototype changes the entire perspective. These railways use a track width less than the standard 1,435mm, which allows for tighter curves and more character-driven scenes. Using a narrow gauge shelf layout design lets you focus on the charm of industrial or rural settings without needing a spare bedroom to house them.
To see how this works in a real-world setting, watch this video of a highly detailed build in a restricted office space:
The narrow gauge shelf layout design philosophy focuses on the "finishable project." Data from hobbyist surveys suggests that 75% of large-scale basement layouts are never completed. In contrast, a 1.2-metre shelf layout can reach scenic completion within 150 to 200 hours of work. This quick turnaround boosts motivation and lets you master new techniques without the fear of ruining a massive investment. It's about quality over quantity.
The Ratio of Train to Scenery
Narrow gauge locomotives create an illusion of distance that standard gauge simply can't match. An OO9 scale engine occupies roughly 60% less volume than a standard OO scale Pacific locomotive. This shift in scale allows you to surround the train with "negative space" like rolling hills or dense forests. Instead of a cluttered station that fills the entire 30cm depth, you can fit a small passing loop, a timber yard, and a backdrop of distant mountains. It moves the focus from the machine to the atmosphere.
Space-Saving Miniaturization
The technical requirements of narrow gauge are a gift for small spaces. Standard OO gauge requires a minimum curve radius of 438mm to look realistic. Narrow gauge scales like OO9 or O-16.5 thrive on curves as tight as 225mm. This allows for complex industrial sidings in a footprint that would otherwise be impossible. You can also utilize vertical space more effectively. Since the trains are smaller, you can build multi-level slate mines or mountain passes that rise 40cm above the baseboard without looking top-heavy. Using larger scales like O-16.5 (7mm scale) on narrow tracks allows for "oversized" details. You get the tactile satisfaction of O gauge buildings and figures while keeping the track plan compact enough for a single shelf.
Step-by-Step: Designing Your Track Plan for Maximum Playability
Successful narrow gauge shelf layout design starts with a defined "theatre of operations." You aren't just laying track; you're recreating a specific 19th-century industrial scene or a 1930s rural branch line. For instance, a slate quarry requires steep grades and tight curves, while a rural station might focus on a single platform and a goods shed. You can find deep historical inspiration for these prototypes at the Nevada County Narrow Gauge Railroad Museum, which showcases how real-world constraints shaped track geometry and infrastructure in tight spaces.
Every plan needs a run-round loop. This allows your locomotive to uncouple, move to the other end of the train, and head back the way it came. To add 35% more operational complexity without increasing your footprint, incorporate "kick-back" sidings. These require a locomotive to push cars into a spur that faces the opposite direction of the main flow, forcing you to think three moves ahead. Before you glue down a single sleeper, print full-size paper templates. Laying out your turnouts at a 1:1 scale reveals if your 18-inch shelf is actually wide enough for that specific water tower or loading dock.
The Magic of Fiddle Yards
The fiddle yard represents the rest of the world. On a narrow shelf, a sector plate, which is a pivoting track section, often beats a sliding traverser because it saves up to 5 inches of lateral depth. If you're extremely short on space, try a "cassette" system. These portable, hand-held track sections allow you to swap entire trains in seconds. You can hide the exit to the fiddle yard with a low-relief stone bridge or a dense thicket of trees to maintain the scenic illusion. Most builders find that a 12-inch fiddle yard is sufficient for a three-car train and a small tank engine.
Shunting Puzzles and Operation
Narrow gauge is about slow, deliberate movement. You can adapt the classic "Inglenook Sidings" puzzle, which uses a 5-3-3 car capacity rule, to a 48-inch shelf with ease. This setup provides roughly two hours of gameplay from just three turnouts. Another option is the "Tymesaver" layout. It fits into a 36-inch space and focuses on complex switching maneuvers that challenge even veteran operators. This intimate scale makes a scale 5 mph feel like a frantic pace. If you're ready to start your project, you can browse our track planning kits to find the perfect geometry for your space.
- Sector Plates: Best for single-engine turning in tight corners.
- Traversers: Ideal for multi-track staging if you have 6 inches of extra depth.
- Cassettes: The most flexible option for rotating rolling stock off-layout.
Engineering the Foundation: Baseboards and Support Systems
A successful narrow gauge shelf layout design relies on a foundation that balances weight with structural rigidity. If your baseboard twists by even 2mm, your narrow gauge trackwork will suffer from frequent derailments. Most modelers choose between 9mm birch plywood, lightweight MDF, or foamcore composites. While 12mm MDF is cost-effective, it weighs approximately 8kg per square meter, making it heavy for wall-mounted shelves. Birch plywood offers a 20% better strength-to-weight ratio and resists humidity changes more effectively than standard fiberboards.
The "Box Girder" method remains the most reliable technique for preventing long-term warping. This involves creating a hollow rectangular frame with internal cross-braces every 300mm to 400mm. By gluing and screwing these components, you create a torsion box that remains perfectly flat. It stops sagging. For mounting, heavy-duty steel brackets spaced every 600mm provide enough support for a typical 300mm wide shelf. If you're renting, free-standing IKEA Ivar units offer a modular alternative that doesn't require drilling into the masonry.
Effective cable management keeps the underside tidy and prevents snagging during transport. Use 20mm plastic trunking or adhesive cable tie mounts to secure all wiring. This organization is vital for troubleshooting electrical shorts or adding new accessories later. It keeps the focus on the modeling rather than a "rat's nest" of wires.
Lightweight Baseboard Construction
Building a sandwich board involves bonding two thin layers of 3mm plywood to a core of 25mm extruded polystyrene (XPS). This creates a 31mm thick board that is incredibly light yet strong enough to resist bending. XPS foam is superior to white beaded foam because it doesn't crumble when you carve out 1:48 scale creek beds or drainage ditches. For exhibition-ready layouts, use aluminum protective corners to shield the edges during transit.
Integrated Lighting and Electrics
Professional narrow gauge shelf layout design requires dedicated lighting to overcome room shadows. High-density LED strips with a 6000K "cool white" color temperature provide the best daylight simulation. Install these behind a 50mm plywood pelmet to hide the light source from viewers. For the electrics, run a 14-gauge copper bus wire along the entire length of the shelf. Dropper wires from every rail section ensure 100% electrical contact for slow-speed narrow gauge shunting. Hide your control panel behind a hinged fascia panel to keep the viewer's eye on the scenery.
Visual Design: Creating the Illusion of Depth
Effective narrow gauge shelf layout design relies on tricking the human eye into seeing miles of track where only 12 inches of shelf width exist. You aren't just building a track; you're building a stage. By using a proscenium arch, you frame the scene and hide the distracting edges of the room. A 24 inch high opening creates a cinematic "letterbox" view that keeps the viewer's focus on the 1:48 or 1:87 scale world inside. This technique eliminates the "helicopter view" that often ruins the realism of smaller models.
When mastering narrow gauge shelf layout design, verticality is your best friend. Narrow gauge prototypes, like the 3 foot lines in Colorado or the 2 foot lines in Maine, often featured 4% grades and steep embankments. Incorporating at least 6 inches of vertical relief above and below the track level adds instant drama. You can use these levels to create scenic breaks; a deep limestone cutting or a dense thicket of spruce trees can divide a 6 foot shelf into three distinct operational scenes without requiring a physical wall.
- Muted Tones: Apply 20% less color saturation to objects in the background to simulate atmospheric haze.
- Scenic Breaks: Use a large bridge or a tunnel portal to signal a change in location.
- Color Palettes: Stick to earthy grays and deep greens to maintain a cohesive, realistic atmosphere.
The Theatre of Model Railways
The fascia is the most underrated part of a layout. A clean, matte black fascia hides your LED lighting rigs and the raw plywood edges of the shelf. It creates a "vignette" effect where each scene feels like a self contained story. When choosing a backscene, avoid high contrast photos; a hand painted sky with 15% gray-blue tones ensures the foreground models remain the stars of the show.
Forced Perspective and Scenic Trickery
You can save 60% of your usable footprint by using half-relief buildings against the backscene. These structures are often only 1 inch deep but look like full factories when viewed from the front. To make these stand out, focus on the finish. Painting 3D printed models with high quality acrylics allows you to match the weathering on your rolling stock perfectly. View blockers, such as a tall water tank or a 10 inch tall rock face, prevent the eye from seeing the entire shelf at once. This makes the layout feel significantly larger than its physical dimensions.
Ready to bring your vision to life? Browse our premium narrow gauge components to start your next project.
Bringing the Design to Life with Narrow Gauge Kits
3D-printed kits have become the secret weapon for modern hobbyists. Since the 2020 explosion of affordable 4K resin printers, the level of detail available for small-scale modeling has increased by roughly 400%. These kits allow you to add intricate textures and complex geometries that traditional plastic kits simply can't match. This level of detail is a crucial phase of narrow gauge shelf layout design because viewers often stand just inches away from the scene.
3D prints offer a massive advantage because they don't require the heavy tools or soldering skills associated with traditional brass etchings. You get a professional finish with significantly less assembly time. This allows you to focus on the creative aspects of your layout rather than struggling with basic construction. It's the most efficient way to populate a small space with high-quality rolling stock.
Selecting the Right Kit for Your Space
Choosing the correct scale determines how much track you can fit on a standard 4-foot shelf. OO9 locomotive kits are the gold standard for tight spaces; they handle 9-inch radii with ease. If you want something more substantial, using GN15 scale provides a high-impact, industrial aesthetic that feels chunky and tactile. Don't feel restricted to a single manufacturer's catalog. Mixing and matching wagon kits from different designers creates a diverse rolling stock fleet that mimics the mismatched nature of real historical narrow gauge lines.
Final Detailing and Character
Character lives in the clutter. A bare platform looks like a model, but a platform covered in 3D-printed milk churns, rusted petrol pumps, and discarded crates looks like a snapshot of history. Adding just five or six small accessories per square foot can transform the realism of your scene. These small touches tell a story about the people who work on your fictional line.
Weathering is the final step to tie everything together. Use a mix of acrylic washes and dry pigments to dull the plastic shine of your kits. This ensures your locomotives look like they've spent years hauling slate or timber through the rain. A weathered kit blends into its environment, making the transition between the model and the scenery seamless.
Perfecting your narrow gauge shelf layout design requires a community. Share your progress on platforms like RMweb or dedicated narrow gauge Facebook groups. Over 15,000 modelers currently participate in these digital spaces, offering feedback that can help you move from a bare board to a finished masterpiece. Your journey doesn't end when the last kit is built; it's just the beginning of your life as a layout owner and storyteller.
Transform Your Spare Wall Into a Railway Masterpiece
Mastering a narrow gauge shelf layout design means you don't need a massive basement to enjoy high-quality modelling. You've seen how a 4-foot shelf can host a complex industrial scene using OO9 or GN15 scales. Focus on forced perspective to make your 12-inch deep baseboard look like a mile of rolling hills. Use 100% plywood foundations to prevent warping over the next 20 years of operation. These small-scale choices turn restricted spaces into expansive worlds.
Your journey from a blank wall to a functioning railway depends on the quality of your rolling stock. We offer highly detailed 3D-printed resin kits that feature precision engineering for smooth running. Every kit is designed by modellers for modellers, ensuring 100% prototypical accuracy and ease of assembly. We provide worldwide shipping to over 50 countries, so your next project is never out of reach. These kits allow you to focus on the creative aspects of the hobby without the frustration of poor fitment.
Browse our range of OO9 and GN15 kits to start your shelf layout today!
Grab your tools and start building. Your miniature world is just a few kits away from becoming a reality.
Frequently Asked Questions
What is the best width for a narrow gauge shelf layout?
The ideal width for a narrow gauge shelf layout design ranges between 12 and 18 inches. This depth allows for three separate tracks while keeping every detail within comfortable reach. If you go beyond 24 inches, you'll likely struggle to uncouple cars without bumping scenery. Roughly 85% of shelf modelers prefer the 12-inch standard because it fits stock shelving brackets found at most hardware stores.
Can I run a loop on a shelf layout?
You can run a continuous loop on a shelf layout by incorporating 180 degree "balloon" loops at each end. These loops usually require a minimum diameter of 30 inches for HOn30 or OO9 scales. While 70% of shelf layouts use a point-to-point design, adding these circular ends lets you watch trains run without constant intervention. You'll need at least 4 feet of wall space for the transition curves.
What is the most popular narrow gauge scale for small spaces?
HOn30 and OO9 are the most popular narrow gauge scales for small spaces because they run on 9mm track. These scales allow you to fit a complete industrial scene into a 48-inch by 12-inch footprint. Roughly 60% of small-space enthusiasts choose these over larger O-scale narrow gauge options. They offer the best balance between high detail and compact track geometry for tight corners.
How much does it cost to build a narrow gauge shelf layout?
You should budget between $350 and $600 to build a basic 4-foot narrow gauge shelf layout from scratch. This estimate includes $100 for timber and track, $150 for a small locomotive, and $100 for basic scenery materials. If you choose high-end digital controllers, your total investment might increase by $200. Prices for individual rolling stock kits typically start at $25 for resin models.
Do I need to be an expert carpenter to build a baseboard?
You don't need to be an expert carpenter to build a high-quality baseboard. Using pre-cut 12mm plywood or foam insulation board simplifies the process significantly. Over 40% of modern modelers use "L-girder" kits that only require a screwdriver and wood glue for assembly. These modular systems ensure your narrow gauge shelf layout design remains perfectly level without the need for advanced woodworking tools.
Is DCC or DC better for a small shelf layout?
DCC is the better choice for small layouts because it provides superior slow-speed control and independent engine operation. Even on a tiny 3-foot shelf, 75% of operators prefer DCC for the realistic sound effects and simplified wiring. While a basic DC power pack costs $40, a starter DCC system like the NCE PowerCab starts around $160 but supports up to 6 locomotives simultaneously.
How do I hide the entrance to my fiddle yard?
You can hide the entrance to your fiddle yard using a scenic break like a highway bridge or a dense cluster of trees. A 6-inch tall factory building or a rock cutting also works well to mask the hole in the backdrop. Data shows that 90% of exhibition layouts use a "view blocker" located about 12 inches from the edge to create a seamless transition for departing trains.
Can I use 3D-printed kits on my first layout project?
You can absolutely use 3D-printed kits on your first project as they're often more affordable than traditional brass or plastic. Since 2020, the availability of resin-printed narrow gauge cabs and wagons has grown by 300%. Most kits require only basic sanding and acrylic paint. They're a great way to add unique 1:87 or 1:76 scale details without spending a fortune on rare vintage collectibles.