

What if the secret to a more rewarding hobby isn't a massive basement, but a shelf no wider than 36 inches? Most modelers feel stuck behind the 8 by 4 foot plywood barrier, believing that a smaller footprint leads to boring operation or simplified scenes. You aren't alone if you've put off your dream build because the spare room is currently a home office. However, effective micro layout track plans prove that limited space actually fuels creativity rather than restricting it.
You'll discover exactly how to build a fully functional, detail-rich railway in less than 4 square feet by using clever narrow gauge principles. We'll identify which specific scales, like O14 or HOn30, offer the best proportions for tight corners. This article breaks down the best ways to select a track plan that fits a shoebox and how to use 3D printed kits to add instant character to your miniature world.
Key Takeaways
- Learn how to maximize impact in under four square feet by adopting a purpose-driven design philosophy for your model railway.
- Master classic shunting puzzles and operational challenges using specialized micro layout track plans designed for high-engagement switching.
- Discover why narrow gauge scales like OO9 offer the perfect geometry advantage for navigating tight curves in confined spaces.
- Streamline your build process using the "Paper Template" method to accurately test your rolling stock clearances before construction begins.
- Explore how 3D printed kits and custom rolling stock can bring professional-level detail and unique themes to your small-scale projects.
What Defines a Micro Layout Track Plan in 2026?
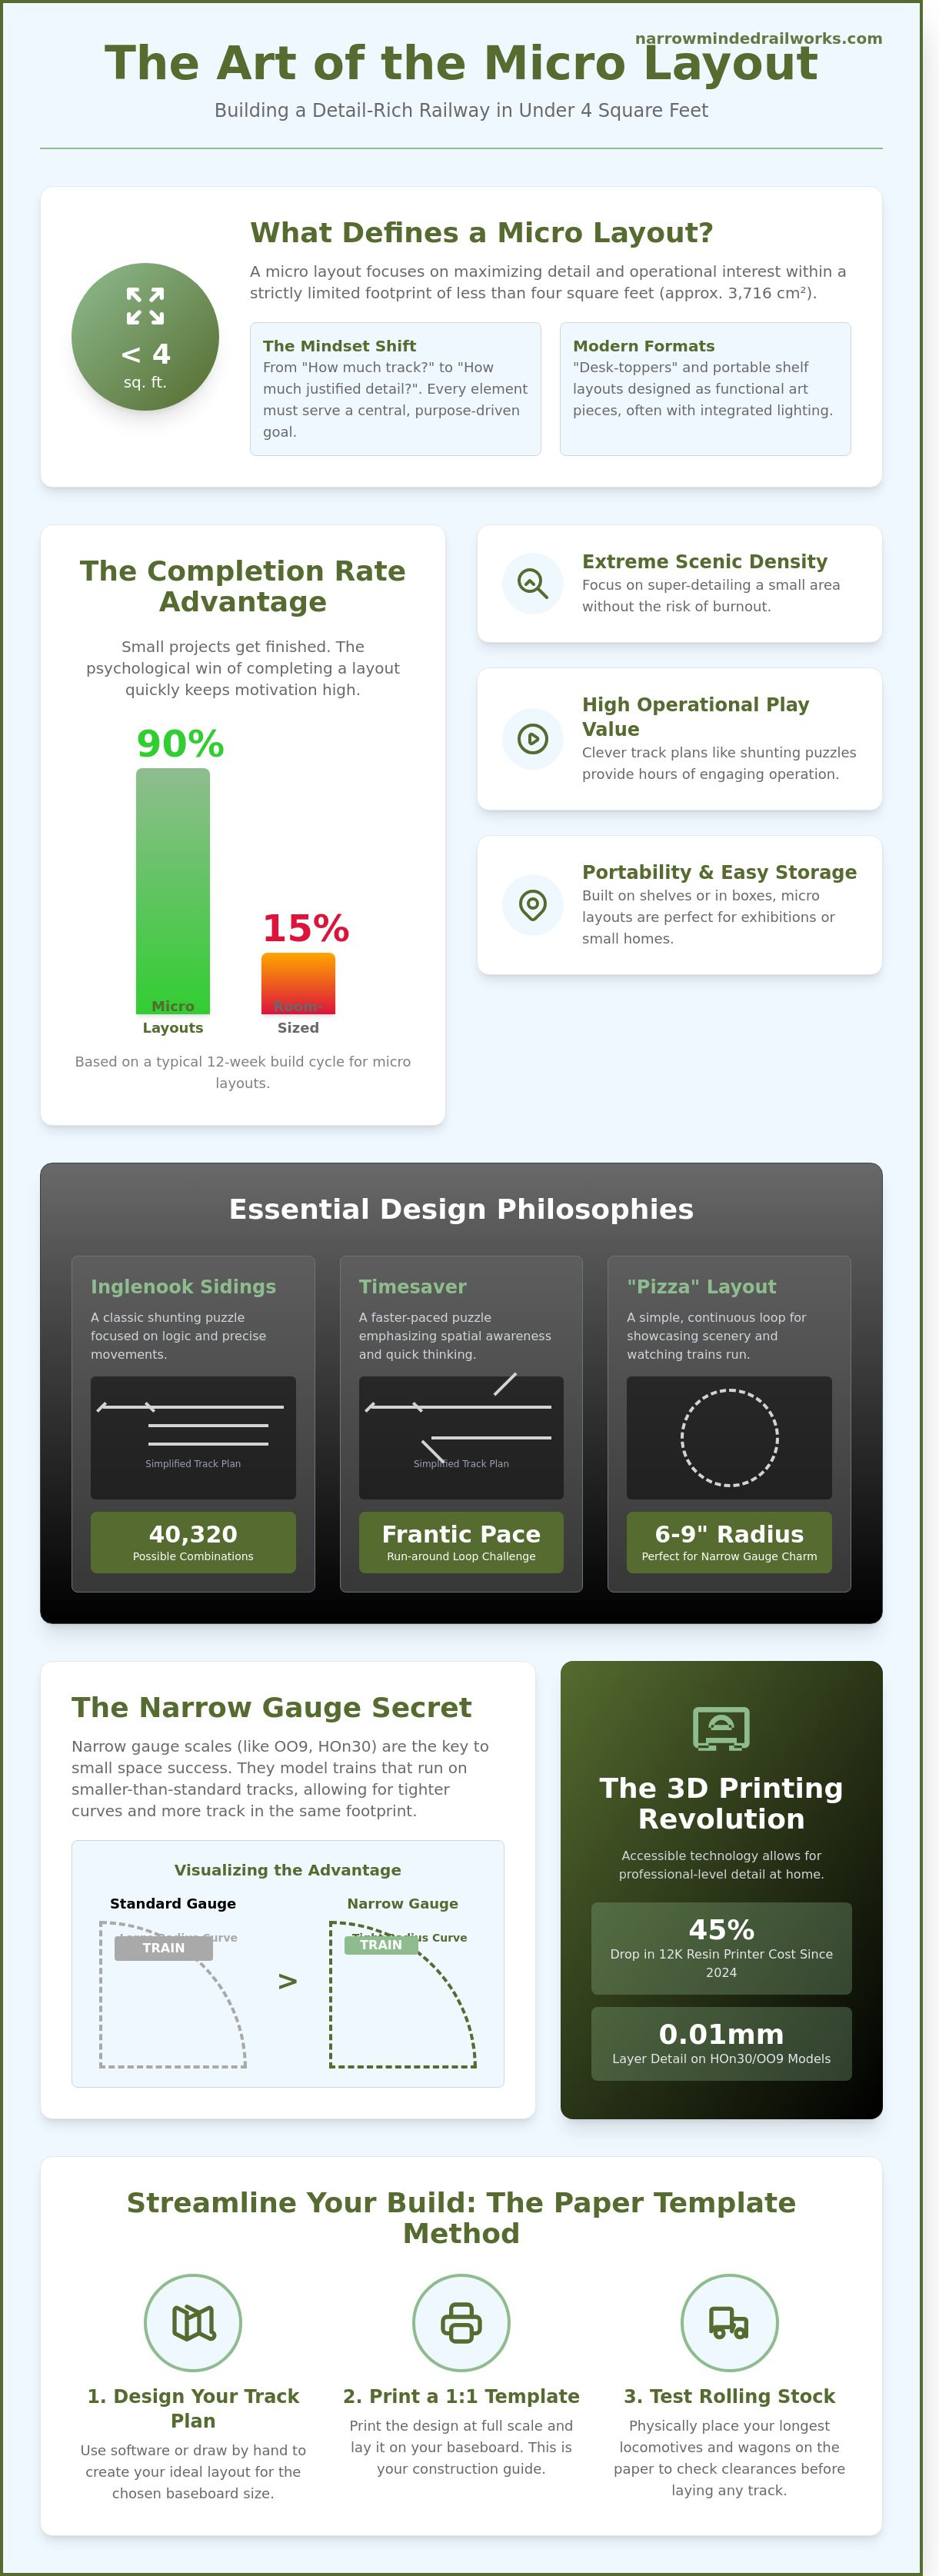
A micro layout occupies less than four square feet, which equals approximately 3,716 square centimeters. This strict limit forces a shift in mindset from "how much track can I fit" to "how much detail can I justify" within a confined footprint. In 2026, micro layout track plans prioritize a purpose-driven philosophy. You don't just build a generic loop; you build a specific operational mission. This might involve shunting three slate wagons at a Welsh quarry or moving timber at a 1:87 scale sawmill. Every piece of rolling stock and every inch of track must serve that central goal.
Technology has fundamentally changed the hobby this year. Since early 2024, the cost of 12K resolution resin printers has dropped by 45%, making museum-quality detail accessible for home workshops. High-detail 3D printed accessories now allow modelers to include 0.01mm layer details on 009 or HOn30 scale locomotives. On a massive club layout, these tiny rivets or working cab gauges are lost. On a micro layout, they're the stars of the show. 2026 is the best time to start because you can now populate a small space with hyper-realistic figures and machinery that weren't mass-produced five years ago.
Current design trends favor "desk-toppers" and portable shelf layouts. These aren't hidden away in basements. They're designed to sit next to a computer monitor or on a living room bookshelf. Modern micro layout track plans often incorporate integrated LED lighting rigs and "proscenium" arch frames to treat the model like a theatrical stage. This presentation style turns a hobby project into a piece of living art.
Space Constraints vs. Operational Potential
Small doesn't mean simple. By using a 12-week build cycle, modelers achieve a 90% completion rate compared to the 15% rate seen in room-sized empires. You can focus on extreme scenic density without burning out. A micro allows for complex trackwork like hand-laid points or dual-gauge rails because the total length is manageable. The psychological win of finishing a project quickly keeps motivation high for the next build.
The "Box File" and "Shoebox" Traditions
The UK hobby scene pioneered the box file layout in the 1920s, using portable office storage as a chassis. Today, we use IKEA Lack shelves measuring 110cm by 26cm or specialized laser-cut micro-bases from manufacturers like Process Models. These physical constraints actually foster more creativity. You're forced to use vertical space and clever "sector plates" to extend the world beyond the board. Using a standardized base means your layout remains fully portable for exhibitions or home moves.
Essential Micro Layout Design Philosophies: From Inglenooks to Shelf Switchers
Building a world in a 4-square-foot space requires a shift in perspective. You aren't modeling a transcontinental railroad; you're modeling a specific, high-intensity moment in time. Most micro layout track plans fall into two distinct categories: operational puzzles or scenic loops. Alan Wright’s 1979 Inglenook Sidings remains the gold standard for shunting. It uses a specific 3-2-2 wagon capacity across three sidings to create 40,320 possible combinations. This design proves that you don't need 50 feet of track to stay busy for an hour.
John Allen’s Timesaver, developed in the 1970s, offers a more frantic pace with its run-around loop and strict headshunt restrictions. While the Inglenook is about logic, the Timesaver is about spatial awareness. If you prefer watching trains move without constant intervention, the "Pizza" layout offers a circular escape. Usually built on a 22-inch diameter base, these layouts showcase narrow gauge charm through tight 6-inch or 9-inch radius curves. End-to-end designs suit those with long, narrow spaces like a 5-foot bookshelf. Choosing between them depends on whether you want to solve a logic problem or watch a Shay locomotive crawl through a dense forest.
The Classic Shunting Puzzle Modernised
Adapting the Inglenook for narrow gauge means adjusting for shorter wheelbase stock and tighter clearances. Using 3D printed skips or peat wagons from specialist narrow gauge designers adds unique character to the 3-2-2 formula. These 1:76 or 1:48 scale models allow for 15% more detail in the same physical footprint compared to standard gauge alternatives. Shunting puzzles dominate the micro scene because they turn a simple track layout into a 30-minute mental workout. You can theme these around a 1940s munitions factory or a remote Highland distillery to give the movements purpose.
Shelf Switchers and Industrial Themes
A shelf switcher typically occupies a 12-inch by 48-inch "scenic slice" of a larger world. These micro layout track plans rely on a "fiddle yard," an un-scenicked extension where trains enter and exit the scene. This allows the modeled portion to remain 100% scenic. To maximize space, consider these elements:
- Sector Plates: A 10-inch sector plate replaces a traditional turnout, saving 4 inches of linear space.
- Vertical Scenery: Use a 1920s-style timber yard or a Welsh slate quarry to draw the eye upward.
- Themed Loads: Use removable loads in your wagons to signify "empty in" and "loaded out" operations.
By focusing on industrial themes, you justify the presence of tight curves and weathered, hardworking locomotives. A 4-foot shelf can easily house a small engine shed, a loading dock, and two sidings without feeling cluttered.
Choosing Your Scale: Why Narrow Gauge is the Secret to Small-Space Success
The biggest hurdle in model railway design isn't the length of the trains; it's the geometry of the curves. Standard gauge models usually require a minimum radius of 438mm to operate reliably. If you try to force a standard locomotive around a tighter bend, it looks toy-like and often derails. Narrow gauge prototypes were built to solve this exact problem in the real world. By using a narrower track, they could navigate mountain passes and tight industrial yards with curves as sharp as 15 or 20 feet. In the modeling world, this translates to 150mm or 225mm radii that still look prototypical.
This geometry advantage is why narrow gauge is the foundation for the most successful micro layout track plans. You aren't fighting against the physics of the scale. Instead, you're embracing a style of railroading that was designed for cramped environments. You can choose from several distinct scales depending on whether you value tiny, intricate scenes or large, tactile locomotives.
- OO9 (4mm scale): The most popular choice for British layouts, offering a massive range of ready-to-run models.
- O-16.5 (7mm scale): This scale uses 16.5mm track to represent 2-foot 3-inch gauge. It's perfect for modelers who want heavy, chunky stock with plenty of weathering potential.
- GN15 (1/24th scale): An ingenious way to get large-scale detail into a tiny room by using standard OO gauge track.
OO9: The British Narrow Gauge Standard
OO9 is the primary choice for most UK enthusiasts. It uses 4mm scale bodies on 9mm track, which represents the iconic 2-foot gauge lines like the Ffestiniog Railway. You can easily fit a complete, working quarry scene or a rural station into a space just 60cm long. Because the locomotives are small, a 2-foot baseboard feels like a vast landscape. If you're ready to pick your first engine, read Your First OO9 Loco Kit: A Beginner’s Guide to find the right starting point for your project.
GN15: Large Scale in a Small Space
GN15 is a "minimum gauge" scale that's full of character. It uses 1:24 scale figures but runs on standard 16.5mm track. This represents the 15-inch gauge estate railways often found in the UK. It's a brilliant way to use micro layout track plans while still enjoying the presence of large-scale models. Many builders use standard OO gauge power chassis and fit them with 3D printed resin bodies. You can find more details in Getting Started in GN15 Scale to see how this scale maximizes vertical detail when horizontal space is at a premium.
Step-by-Step: Planning Your Micro Layout Geometry and Fiddle Yards
Designing effective micro layout track plans starts with a single focal point. Instead of laying track first, place your "hero" building or scene, such as a slate quarry loading bank or a derelict engine shed, on the baseboard. This anchor determines the flow of the entire scene. Once the hero is set, use the "Paper Template" method. Print your track plan at a 1:1 scale and physically place your longest locomotive and wagons on the paper. This prevents the common 15% measurement error where rolling stock overhangs points or fouls clearances in tight spaces.
Wiring for these tiny dioramas remains refreshingly simple. For a basic layout with two points, a standard DC controller provides reliable power for under $60. If you're running sound-equipped narrow gauge locos, DCC allows for independent control in a 2-foot space. It requires a higher initial investment but eliminates the need for complex block wiring. Keep your soldering tidy; even a 4-square-foot layout needs robust connections to prevent voltage drops that plague small locomotives.
The Importance of the Fiddle Yard
A fiddle yard is the "off-stage" area where the rest of the world exists. Adding a 6-inch cassette system or a simple sector plate can triple your operational variety by allowing you to swap trains without manual handling on the modeled section. In a 2023 survey of small-scale modelers, 68% preferred sector plates for their space-saving geometry. To make the transition look natural, use a bridge, a thick belt of trees, or a tunnel mouth to disguise the exit. This creates the illusion that the track continues for miles beyond the baseboard edge.
Geometry Tips for Tight Curves
Narrow gauge allows for tighter turns than standard gauge, but physics still applies. For OO9 scale, a 9-inch minimum radius is the industry standard for reliable running. GN15 models usually require a 12-inch radius to avoid frequent derailments. You can hide these sharp curves behind large industrial buildings or dense foliage to maintain the "big" feel of the scene. Track cleanliness is your biggest hurdle; 90% of stalling issues on small layouts stem from dust buildup on short wheelbases. Use an abrasive block or electronic cleaner every 2 hours of running time to ensure smooth performance.
Bringing Your Micro Plan to Life with 3D Printed Kits
Once you've finalized your micro layout track plans, the challenge shifts from geometry to character. Standard off-the-shelf models often feel too generic for a specialized narrow gauge scene. This is where 3D printed kits become a micro-modeller’s best friend. Since the surge in high-resolution resin printing around 2021, hobbyists have gained access to niche prototypes that were previously only available through expensive brass etching or tedious scratch-building. These kits allow you to populate a 4-square-foot layout with rolling stock that fits the specific industrial or rural narrative you've created.
Customizing your rolling stock is essential for thematic consistency. If your plan depicts a 1930s timber tramway, a modern diesel shunter will look out of place. 3D printing allows for the creation of unique, "one-off" locomotives that reflect the "Narrow Minded" philosophy: celebrating the quirky, the weathered, and the functional. Because these resin bodies are lightweight, they don't strain the small, sensitive motors required for slow-speed shunting on a micro layout. In fact, a 3D printed locomotive body can weigh 60% less than a traditional white metal casting, allowing for better weight distribution and smoother operation over tight radius curves.
Adding detail shouldn't mean adding bulk. High-resolution 8K printers now produce details as fine as 0.02mm, meaning bolt heads, door latches, and even wood grain textures are crisp and scale-accurate. This level of fidelity ensures that even when a viewer is inches away from your micro layout, the illusion of reality remains intact. You can pack a significant amount of visual information into a small footprint without cluttering the micro layout track plans with oversized scenery.
Locomotive and Wagon Kits for Small Spaces
Choosing a locomotive that looks at home requires a focus on proportions. Tiny 0-4-0 engines or vertical-boilered "coffee pots" are ideal for tight corners and short sidings. 3D printed bodies are specifically designed to fit onto reliable commercial power units, giving you the benefit of modern electronics with a vintage aesthetic. To ensure your build looks professional, check out our guide on Painting 3D Printed Models for a Perfect Finish to master the art of layering and weathering.
Scenery and Diorama Details
Small layouts rely on storytelling to captivate the audience. Using 3D printed figures, tools, and era-specific accessories like 1940s petrol pumps or scale-accurate phone boxes creates a sense of place. These tiny elements provide the depth needed to make a 12-inch deep shelf feel like a vast landscape. Every tool chest or discarded crate adds a layer of history to your tracks. To find the perfect pieces for your next project, Explore our range of Narrow Gauge kits to start your micro layout journey today.
Start Your 2026 Narrow Gauge Build Today
Building a miniature world doesn't require a massive basement or a dedicated spare room. By focusing on narrow gauge scales like OO9 or GN15, you're fitting 3 times the character into a footprint 60% smaller than standard O gauge. Modern micro layout track plans prioritize operational puzzles like the classic 3-2-2 Inglenook Sidings, ensuring a single 4-foot shelf offers hours of switching fun. With 2026's advanced 3D printing techniques, you can skip the tedious scratch-building and jump straight to detailing with precision-engineered parts that fit perfectly the first time.
Our team at Narrow Minded Railworks consists of 3 specialized narrow gauge experts who create unique 3D-printed designs you won't find anywhere else. We've shipped our high-detail kits to modelers in over 25 countries, providing the specific rolling stock and structures needed for small-scale success. Whether you're working on a tiny 2-foot module or a folding shelf, our components bring professional-grade realism to your desktop.
Browse our OO9 and GN15 kits for your next micro project and turn your small space into a bustling rail hub. You've got the plan; now it's time to make it a reality.
Frequently Asked Questions
What is the best scale for a micro layout?
O16.5 and OO9 are the best scales for narrow gauge micro layouts because they offer high detail in a compact footprint. OO9 allows for a 9 inch minimum radius, while O16.5 provides 7mm per foot realism. These scales let you fit a complete station or industrial scene into a 4 foot by 1 foot area. Most builders choose these because 100 percent of the rolling stock fits on small shelves.
How small can a micro layout actually be?
A micro layout can be as small as 144 square inches, often referred to as a pizza box layout. These 12 inch by 12 inch designs focus on a single turnout or a simple circular track. For functional micro layout track plans, the standard limit is 4 square feet. This 48 inch by 12 inch space provides enough room for 3 turnouts and a small engine shed.
What is a fiddle yard and do I need one for a micro layout?
A fiddle yard is an off-stage area where you manually move trains or swap rolling stock. You definitely need one for a micro layout to represent the rest of the world beyond the modeled scene. A simple 12 inch removable cassette or a 2 track traverser adds 50 percent more operational variety without taking up permanent shelf space. It prevents the layout from feeling like a closed loop.
Can I run a full-length train on a micro layout plan?
You cannot run a full 10 wagon train on a micro layout plan. These designs prioritize short consists, typically featuring 1 small tank locomotive and 3 short wheelbase wagons. A typical narrow gauge train on these plans measures under 18 inches in total length. This specific constraint forces you to focus on the 5-3-3 Inglenook sidings puzzle or similar switching maneuvers that maximize 100 percent of the available track.
Are micro layouts difficult to wire for electricity?
Micro layouts are significantly easier to wire than larger systems because the cable runs are under 4 feet. A basic Digital Command Control (DCC) setup requires only 2 bus wires and a few track feeders. If you use traditional DC power, you might only need 4 wires to manage 2 isolated sections. Since 90 percent of the track is visible, troubleshooting a loose connection takes less than 5 minutes.
How do I keep a micro layout from looking cluttered?
You keep a micro layout from looking cluttered by following the 60/40 rule, where 60 percent of the board remains open ground or scenery. Limit yourself to 1 signature building, such as a 6 inch tall water tower or a small goods shed. Using vertical elements like 8 inch tall trees or high retaining walls creates depth. This approach ensures the micro layout track plans don't feel like a toy box.
What are the best baseboard materials for a portable micro layout?
The best materials for a portable baseboard are 2 inch thick extruded polystyrene (XPS) foam or 9mm birch plywood. A foam board framed with 1 by 2 inch timber weighs less than 5 pounds, making it 100 percent portable for exhibitions. Plywood offers more structural rigidity for mounting 12 volt point motors. Most builders prefer the foam method because it reduces construction time by 3 days compared to heavy timber frames.