

What if your industrial scene could tell a story of movement rather than just sitting as a static backdrop? Many hobbyists find that capturing the grit and logic of model railway coal mine scenery is a difficult task, especially when working within the tight constraints of narrow gauge scales. It's common to feel frustrated by the lack of commercial structures that fit smaller scales or the challenge of making synthetic coal look like anything other than shiny plastic.
We understand that fitting a functional industry into a compact layout requires careful planning. While narrow gauge scales like OO9 or O-16.5 demand precision, they also offer a unique opportunity to create a dense, characterful heart for your railway. This article helps you design, build, and detail a realistic narrow gauge coal mine scene that serves as the industrial center of your layout. You'll learn about the logical workflow of mining operations, the best kits for your specific scale, and the weathering techniques needed to achieve a convincing industrial grime.
Key Takeaways
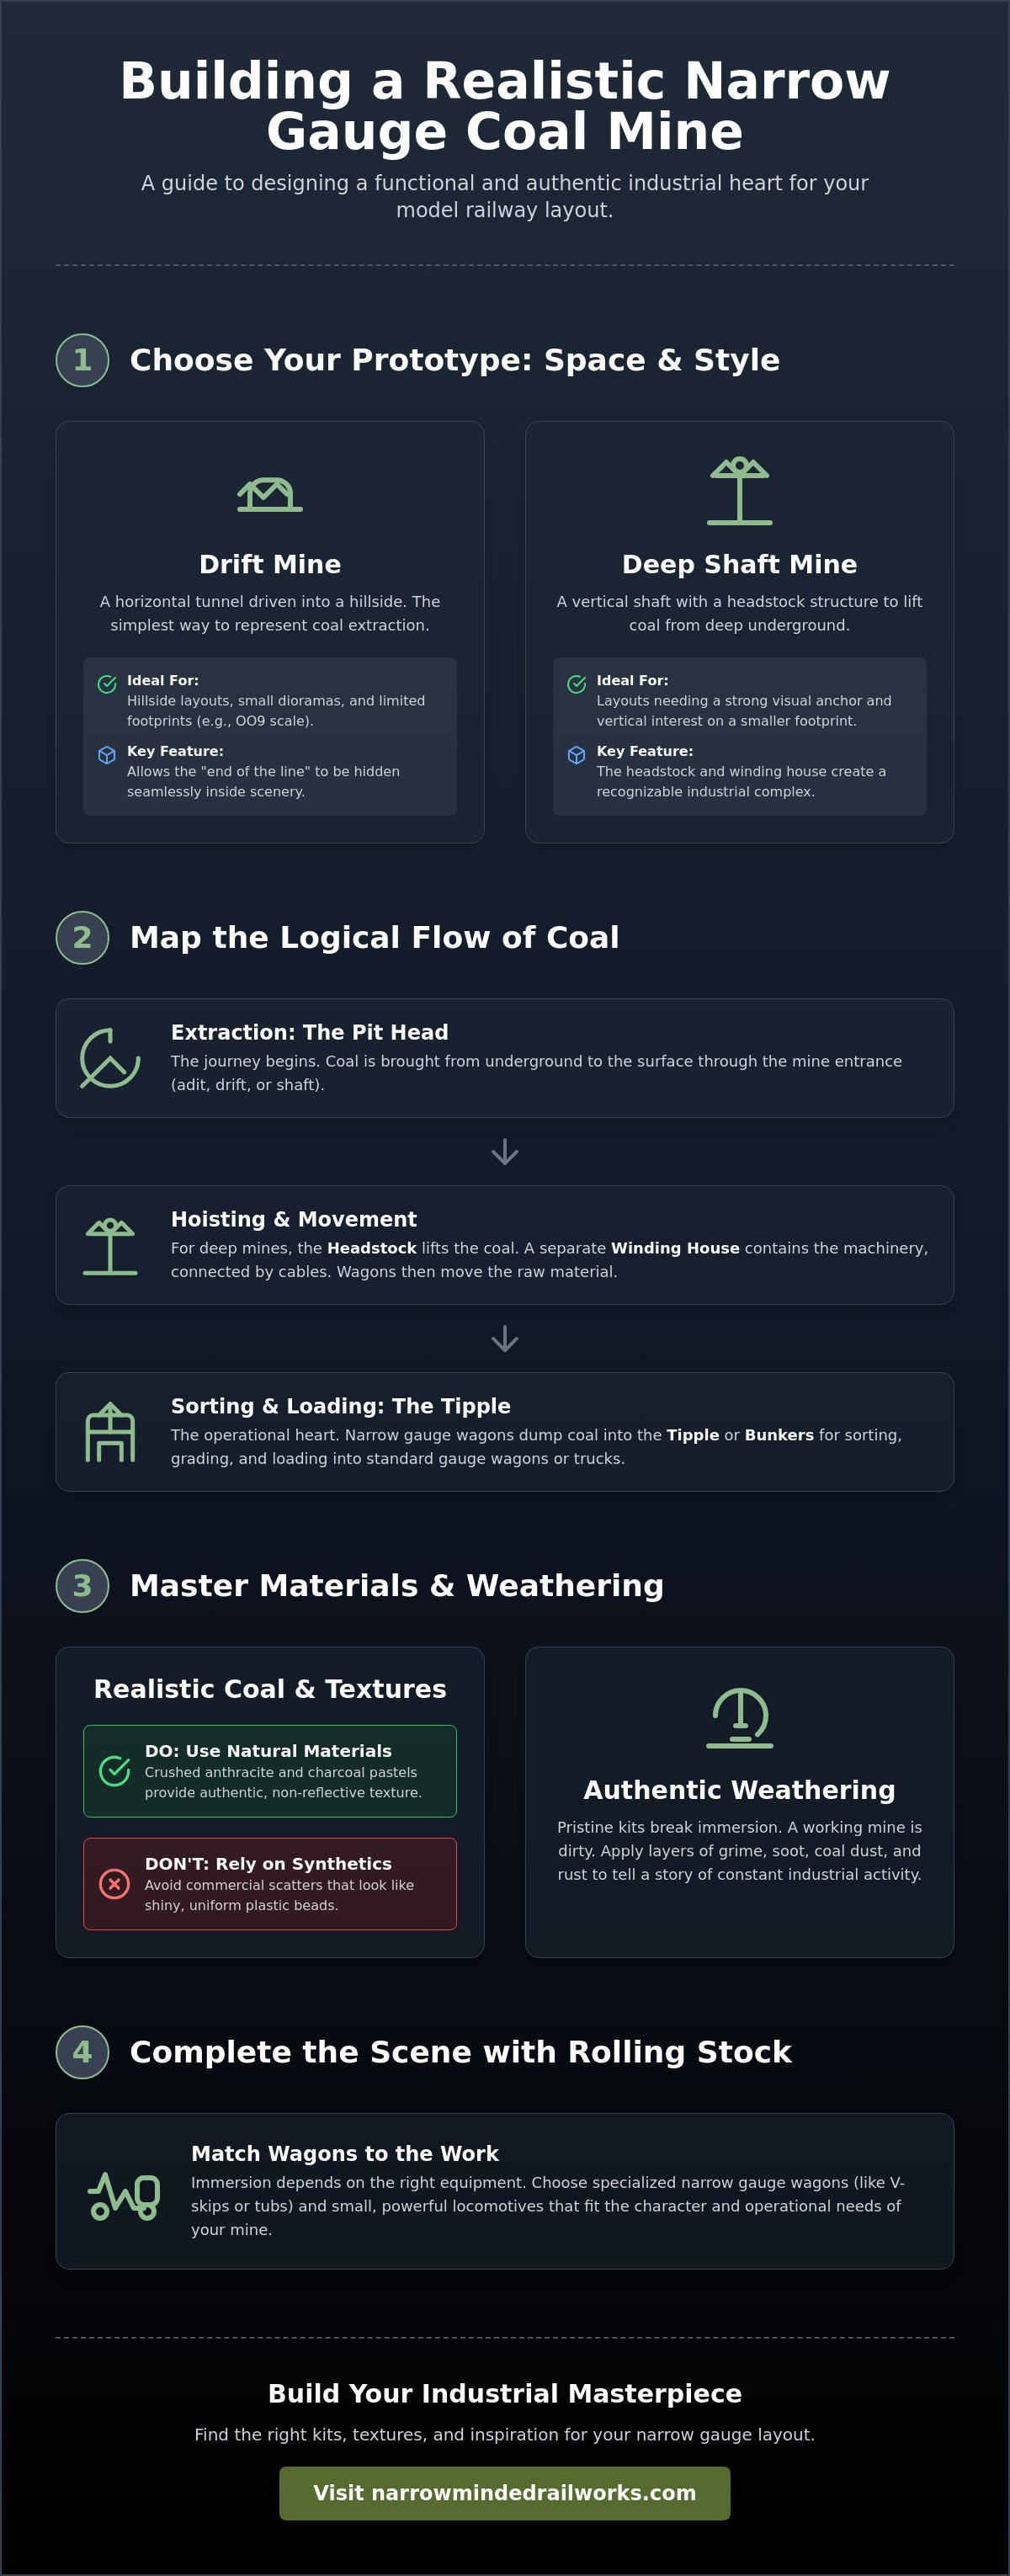
- While narrow gauge layouts have limited footprints, you can maximize impact by selecting a mining prototype that fits your spatial constraints.
- Designing model railway coal mine scenery requires logical placement, so we identify the key structures needed to create a functional industrial narrative.
- Synthetic scatters often look artificial, but utilizing crushed anthracite and charcoal pastels provides the realistic textures essential for a working mine.
- New kits can look too pristine for an industrial setting, which is why we provide step-by-step weathering techniques to add authentic grime and soot.
- Choosing the wrong rolling stock breaks immersion, so we explain how to match specialized wagons and locomotives to your mine's operational needs.
Planning Your Model Railway Coal Mine Scenery
Successful model railway coal mine scenery begins with a clear narrative rather than a random collection of buildings. You might feel limited by the physical footprint of your baseboard, but a well-planned narrow gauge scene turns these constraints into an asset. By focusing on the logical movement of material, you can create a dense, believable environment that feels larger than it is. Mapping the flow of coal from the tunnel entrance to the loading screens ensures every structure has a purpose and every siding serves a function.
To better understand how industrial details bring a scene to life, watch this helpful video:
The Role of Narrow Gauge in Mining History
Historically, the narrow gauge railway was the backbone of mining because its tight turning radii and smaller loading gauges allowed tracks to reach deep into cramped tunnels. This created a distinct tramway atmosphere where small locomotives moved short rakes of wagons between the pit head and the processing screens. Researching the history of U.S. coal mining reveals how these systems evolved from simple animal-drawn carts to sophisticated narrow gauge networks. This history provides the perfect inspiration for a layout that prioritizes character over raw size. It's a story of utility where function dictates the form of your tracks and sidings.
Selecting a Prototype: Drift Mines vs. Deep Shafts
You must decide which type of extraction best suits your available space. While large complexes look impressive, they can easily overwhelm a small room. Drift mines are ideal for hillside layouts or small OO9 dioramas because the entrance is a horizontal tunnel driven into a slope. This allows you to hide the "end of the line" inside a mountain, creating a seamless transition. If you want a visual anchor, a deep shaft mine uses a vertical headstock to create height without requiring a large horizontal footprint. For the most compact layouts, an adit entrance provides a simple way to introduce a mining theme. These small openings represent the start of the coal's journey and allow you to focus on the intricate details of the model railway coal mine scenery nearby.
Essential Structures for a Realistic Mine Layout
Building convincing model railway coal mine scenery requires more than just track and a few sheds. You need structures that reflect the physical reality of industrial extraction. In a deep mine complex, the headstock serves as the primary visual anchor and the most recognizable feature of the layout. It's the central hub where everything happens. You'll also need a winding house to contain the heavy machinery that powers the cages. Understanding coal mining technology helps you place these buildings correctly. For example, the winding house must sit at a specific distance and angle to the shaft to ensure the cables run smoothly over the sheave wheels without excessive wear.
The Headstock and Winding House
The sheave wheel is the primary moving part of the headstock. While many ready-made resin kits are available, they often lack the fine lattice detail found in real-world steel or timber frames. Using 3D printed components or fine-scale kits allows you to capture this intricate geometry. This is especially useful for narrow gauge scales where standard buildings might look too bulky. You should position the winding house so the cable run is unobstructed. This creates a logical engineering flow that even a casual observer will recognize as "correct."
Coal Tipples and Loading Bunkers
The tipple is the heart of the transit operation. It's where your narrow gauge wagons dump their raw load to be sorted or moved into larger bins. You must ensure there is enough clearance for your specific rolling stock. A tipple designed for OO9 might not accommodate the wider profile of GN15 equipment. If you're looking for versatile options, our GN15 scenery kits provide the right proportions for these larger narrow gauge scales. Integrating these structures into a hillside is a clever way to hide the "magic" of coal disappearing into a storage bin or a hidden lower level.
Don't overlook the smaller support buildings that add character to the scene. A blacksmith’s shop or a tool shed adds the essential clutter that makes an industrial environment feel lived-in and functional. You might struggle to find these smaller buildings in specific scales, but scratch-building them from timber or using modular kits solves this problem. These structures are where you can add details like discarded wheels, rusted chains, and old tools.
Placing a powder magazine in an isolated corner of the layout adds significant historical accuracy. These small, sturdy buildings were kept away from the main complex for safety reasons to prevent accidental explosions from destroying the entire mine. They provide a logical reason for a lonely siding or a short spur line to exist at the very edge of your layout. By including these specialized structures, you transform a generic scene into a detailed narrative of industrial life.
Materials and Textures: Bringing the Black Gold to Life
Creating convincing model railway coal mine scenery requires you to look beyond simple black paint. Real coal isn't just dark; it has a specific sheen and sharp, angular facets that reflect light in a unique way. You might find that using 100% real coal in your wagons causes issues with weight, especially in lightweight OO9 or GN15 plastic kits. A proactive solution is to use a lightweight "former" made of balsa wood or foam and then apply a single layer of real crushed anthracite on top. This maintains the visual authenticity without straining your locomotive's haulage capacity or causing derailments on tight curves.
Using Real Coal vs. Synthetic Scatters
While synthetic scatters are convenient, they often lack the jagged edges and light-catching properties of the real thing. If you choose real Welsh coal or anthracite, you must ensure it's scaled correctly for your layout. Use fine "dust" for OO9 and "nut" sized pieces for 7mm or GN15 scales. You can secure these loads using the traditional method of dripping a mixture of 50% PVA glue and 50% water with a drop of dish soap over the pile. This creates a solid, durable load that won't shift during transit. You should also consider the environment. Real coal can sometimes attract moisture, so ensuring your layout is kept in a dry room is a necessary precaution for long-term maintenance.
Creating Industrial Terrain and Spoil Heaps
Spoil heaps shouldn't just be piles of black powder. They're massive features that require significant volume to look realistic. You can build up this mass using scrap polystyrene or plaster bandage before applying any surface texture. This saves on expensive materials and keeps the layout lightweight. Once the base is set, mix ash, cinders, and dark earth to create a varied ground cover. Avoid a "flat" appearance by blending different shades of grey and black. In older parts of the mine, you can add sparse weeds and scrub to show where nature is slowly reclaiming the industrial waste. Using diorama tools and scenery materials like static grass and fine foam can help blend these transitions.
To simulate the "wet look" of a damp valley or a rainy industrial day, apply a light coat of gloss varnish to specific areas of the coal pile. This creates a high-contrast sheen that makes the scene feel alive. For the surrounding buildings and tracks, use crushed charcoal or dark grey pastels to simulate the fine layer of coal dust that inevitably coats everything in a mining district. These subtle transitions in texture are what separate a toy-like layout from a professional-grade industrial diorama.
Weathering and Detailing Your Industrial Scene
Building the model railway coal mine scenery structures is only half the battle. If left in their raw state, plastic and resin kits lack the heavy industrial character required for a convincing coal mine. You may find that standard paint colors appear too vibrant for a soot-heavy environment. A proactive solution is to follow a systematic weathering process that builds up layers of grime and wear. This approach ensures your buildings look like they've endured decades of hard labor rather than appearing like fresh models out of a box.
Follow these steps to transform your structures:
- Step 1: Apply a dark 'grime' wash to all buildings to settle in the recesses. This defines shadows and mimics years of accumulated soot.
- Step 2: Use dry-brushing with light greys to highlight wood grain on structures. This simulates the bleached, weathered look of untreated timber.
- Step 3: Add rust streaks to corrugated iron roofs and metal machinery. If you struggle to make metal look aged, a proactive solution is to use orange and burnt sienna oils for natural-looking oxidation.
- Step 4: Layer coal dust around loading areas using pigments or powders. Focus on the paths where wagons travel and workers stand.
- Step 5: Seal the scene with a matte varnish. It's common for pigments to smudge, so a proactive solution is to use a flat clear coat to remove unnatural plastic sheen and protect your work.
Advanced Weathering for Mining Buildings
Mines are dirty places. Industrial sites are notoriously messy where soot and grease accumulate in specific patterns. You should concentrate soot buildup around chimney stacks and boiler houses where smoke would naturally settle. If you're working with resin, using specific painting 3d printed models techniques ensures that your base coats and washes adhere properly without peeling. For moving parts like the winding gear, a mix of gloss varnish and black paint creates a convincing greasy appearance. This attention to detail prevents the mine from looking like a sterile museum piece.
Adding Life with Figures and Accessories
A mine is a place of constant activity, so your figures should reflect this energy. Don't just place standing figures; look for those in work poses like shoveling coal, leaning on tools, or operating levers. These small details tell a story of labor within your model railway coal mine scenery. You can further enhance the realism with scattered accessories such as discarded sleepers, oil drums, and spare wagon wheels. Lighting also plays a crucial role in industrial scenes. Using flickering orange LEDs inside the winding house or smithy simulates the glow of active fires and machinery. If you need the right supplies to start detailing, our range of diorama tools and scenery provides the professional finish your layout deserves.
Completing the Scene with Locomotives and Rolling Stock
Your model railway coal mine scenery remains a static display until you introduce the motive power and rolling stock that define its daily operations. In narrow gauge mining, the choice of equipment is dictated by the cramped, utilitarian nature of the environment. You might find that standard industrial locomotives look out of place next to a narrow drift mine entrance. A proactive solution is to select small-scale steam "tram" engines or early internal combustion models that reflect the tight clearances of a working colliery. These compact machines were designed for utility over aesthetics, providing the heavy-duty power needed to navigate steep gradients and uneven trackage.
Motive Power for Mining Operations
Short wheelbase locomotives are essential for tight mining curves. If your layout features the sharp radii common in OO9 or O-16.5 scales, a long-frame engine will likely derail or bind in the bends. Utilizing 3D printed loco bodies allows you to create unique, industrial-grade engines that aren't available in mass-market ranges. For those modeling urban or enclosed colliery lines, researching a tram loco provides historical context for engines with skirts and cowcatchers designed for safety in busy areas. These models offer a distinct visual profile that separates a dedicated mining line from a general-purpose narrow gauge railway.
Choosing the Right Narrow Gauge Wagon Kits
V-tippers are the workhorse of the narrow gauge mining world because their simple tipping mechanism allows for rapid unloading at the screens. You should prioritize selecting kits that fit commercial chassis to ensure reliable operation during shunting sessions. It's common to struggle with the visual repetition of a long train of identical wagons. A proactive solution is to customize your wagon loads to show "empty" versus "full" states. Using removable foam inserts topped with real coal allows you to change the status of a train as it moves from the mine face to the processing tipple. This adds a layer of operational realism that makes your sessions more engaging.
To ensure your rolling stock doesn't look like a collection of toys, you must apply the same "industrial grime" look discussed in the weathering section. Mining wagons rarely stayed clean, often covered in a permanent layer of coal dust, rust, and oil. You can use dark washes and dry pigments to blend your locomotives into the surrounding model railway coal mine scenery. Operating your layout with a logical flow, such as sending empty wagons into the mine and bringing full rakes to the screens, completes the narrative of extraction and distribution that sits at the heart of every successful industrial diorama.
Bringing Your Industrial Heart to Life
Building a convincing industrial scene requires balancing historical logic with creative detailing. You might worry that a complex mine won't fit into a compact layout, but a proactive solution is to focus on vertical headstocks and narrow gauge prototypes that maximize your available footprint. By layering realistic textures like crushed anthracite and applying systematic weathering, you can transform static buildings into a convincing model railway coal mine scenery display that feels lived-in and functional.
Finding high-quality, scale-appropriate mining details can be a challenge for narrow gauge enthusiasts. We provide a proactive solution through our specialist OO9 and GN15 kits, which are designed by modellers for modellers to ensure historical accuracy and ease of assembly. Our high-detail 3D printed scenery and figures offer the precision needed to achieve professional-grade results without the frustration of scratch-building every component. Explore our range of 3D printed narrow gauge kits and scenery to find the perfect centerpieces for your industrial layout. Your colliery serves as the industrial heartbeat of your railway, so take the time to build a scene that tells a compelling story of grit and industry.
Frequently Asked Questions
What is the best scale for a model railway coal mine?
Narrow gauge scales like OO9 or O-16.5 are excellent because they allow for extensive industrial scenes in smaller spaces. While OO9 fits standard N gauge track, O-16.5 offers more detail for larger 7mm scenes. Choosing a scale depends on your available footprint. A proactive solution for those with very limited space is focusing on OO9, which permits tight curves and compact drift mine dioramas on shelf layouts.
How do I make my model coal look real?
Achieving realistic model railway coal mine scenery requires layering different textures rather than using a single material. You can mix crushed anthracite with charcoal dust to capture both the sharp edges and the fine residue found in industrial sites. Applying a light coat of gloss varnish to the coal's surface creates a damp, high-contrast sheen. This approach mimics the way light reflects off real coal facets in various lighting conditions.
Can I use real coal on my model railway layout?
You can use real coal, but you must consider its weight and potential for corrosion. Real anthracite looks authentic because it's the actual material, but a proactive solution is to use it only as a top layer over a lightweight foam or balsa wood base. This prevents your wagons from becoming too heavy for small narrow gauge locomotives to haul reliably through steep gradients or sharp industrial curves.
What buildings are essential for a coal mine scene?
A convincing mine layout requires a headstock for vertical interest and a winding house to contain the machinery. You also need coal screens for sorting and a tipple for loading wagons. Small support structures like a blacksmith's shop or tool sheds add necessary clutter. Including a powder magazine for explosives provides historical accuracy. These buildings create a logical narrative of extraction and processing within your industrial scene.
How do I weather my mining buildings to look old and grimy?
Start by applying a dark wash to all surfaces to define shadows in the recesses. You can then use dry-brushing with light greys to highlight weathered wood grain or concrete edges. Adding rust streaks with orange and brown pigments to corrugated metal roofs simulates oxidation. A proactive solution for removing any remaining plastic sheen is to finish the model with a matte varnish coat to lock in the industrial grime.
Do I need a large space to build a model coal mine?
You don't need a massive room to build a convincing mining layout. Narrow gauge scales allow you to create dense, detailed industrial scenes on compact boards or shelf layouts. A proactive solution for small spaces is to model a drift mine or an adit entrance, which requires much less horizontal room than a full deep-shaft complex. This focus on detail over size makes narrow gauge ideal for apartment dwellers.
What kind of locomotives were used in narrow gauge coal mines?
Narrow gauge mines typically used small steam tram engines or compact internal combustion locomotives. These machines were chosen for their short wheelbases, which allowed them to navigate the tight curves of underground tunnels and surface tramways. Some designs featured protective skirts to hide moving parts, which was common in busy industrial areas. Using 3D printed loco bodies is a proactive solution for creating these specialized, non-standard industrial engines.
How do I secure coal loads in my model wagons?
You can secure coal loads using a mixture of 50% PVA glue and 50% water with a drop of dish soap. First, pile your coal onto a removable base or directly into the wagon. Drip the glue mixture over the pile until it's fully saturated. This creates a solid block that won't spill during operation. It's a reliable method that keeps your coal loads stable even during complex shunting maneuvers.