

You spend weeks sourcing a rare OO9 locomotive kit, only to find a delicate handrail snapped off because it was buried under a stack of heavy scenery boxes. It's a disheartening experience that many modellers face when their stash outgrows their workspace. Finding the right way to manage a growing collection is difficult; however, learning how to store model railway kits properly is the only way to safeguard your investment and your time.
We understand that narrow gauge components are exceptionally fragile, especially with the intricate detail found in modern 3D-printed resin. While hobbyists often lack a dedicated climate-controlled warehouse, you can still implement professional-grade protection in a standard home workshop. This guide provides actionable strategies to organise your inventory and shield your kits from environmental threats like UV light and humidity. We will cover everything from avoiding moisture-trapping materials to setting up a system that ensures no small part is ever lost again. You'll learn how to maintain a damage-free collection that's easy to navigate, so you can spend less time searching and more time building.
Key Takeaways
- Learn why narrow gauge scales like OO9 and GN15 require specialized handling to protect their exceptionally fine details from accidental damage.
- Identify the specific environmental threats, such as UV light and humidity, that can cause 3D-printed resin kits to warp or degrade before they are even built.
- Master professional methods for how to store model railway kits using a scale-based inventory system that keeps your OO9 and GN15 projects clearly separated.
- Evaluate the benefits of commercial storage systems versus cost-effective DIY solutions like repurposed drawers and airtight containers.
- Establish a strategic maintenance schedule, including the "Six-Month Rule," to monitor the condition of your stored kits and prevent long-term grime build-up.
The Unique Challenges of Storing Narrow Gauge Kits
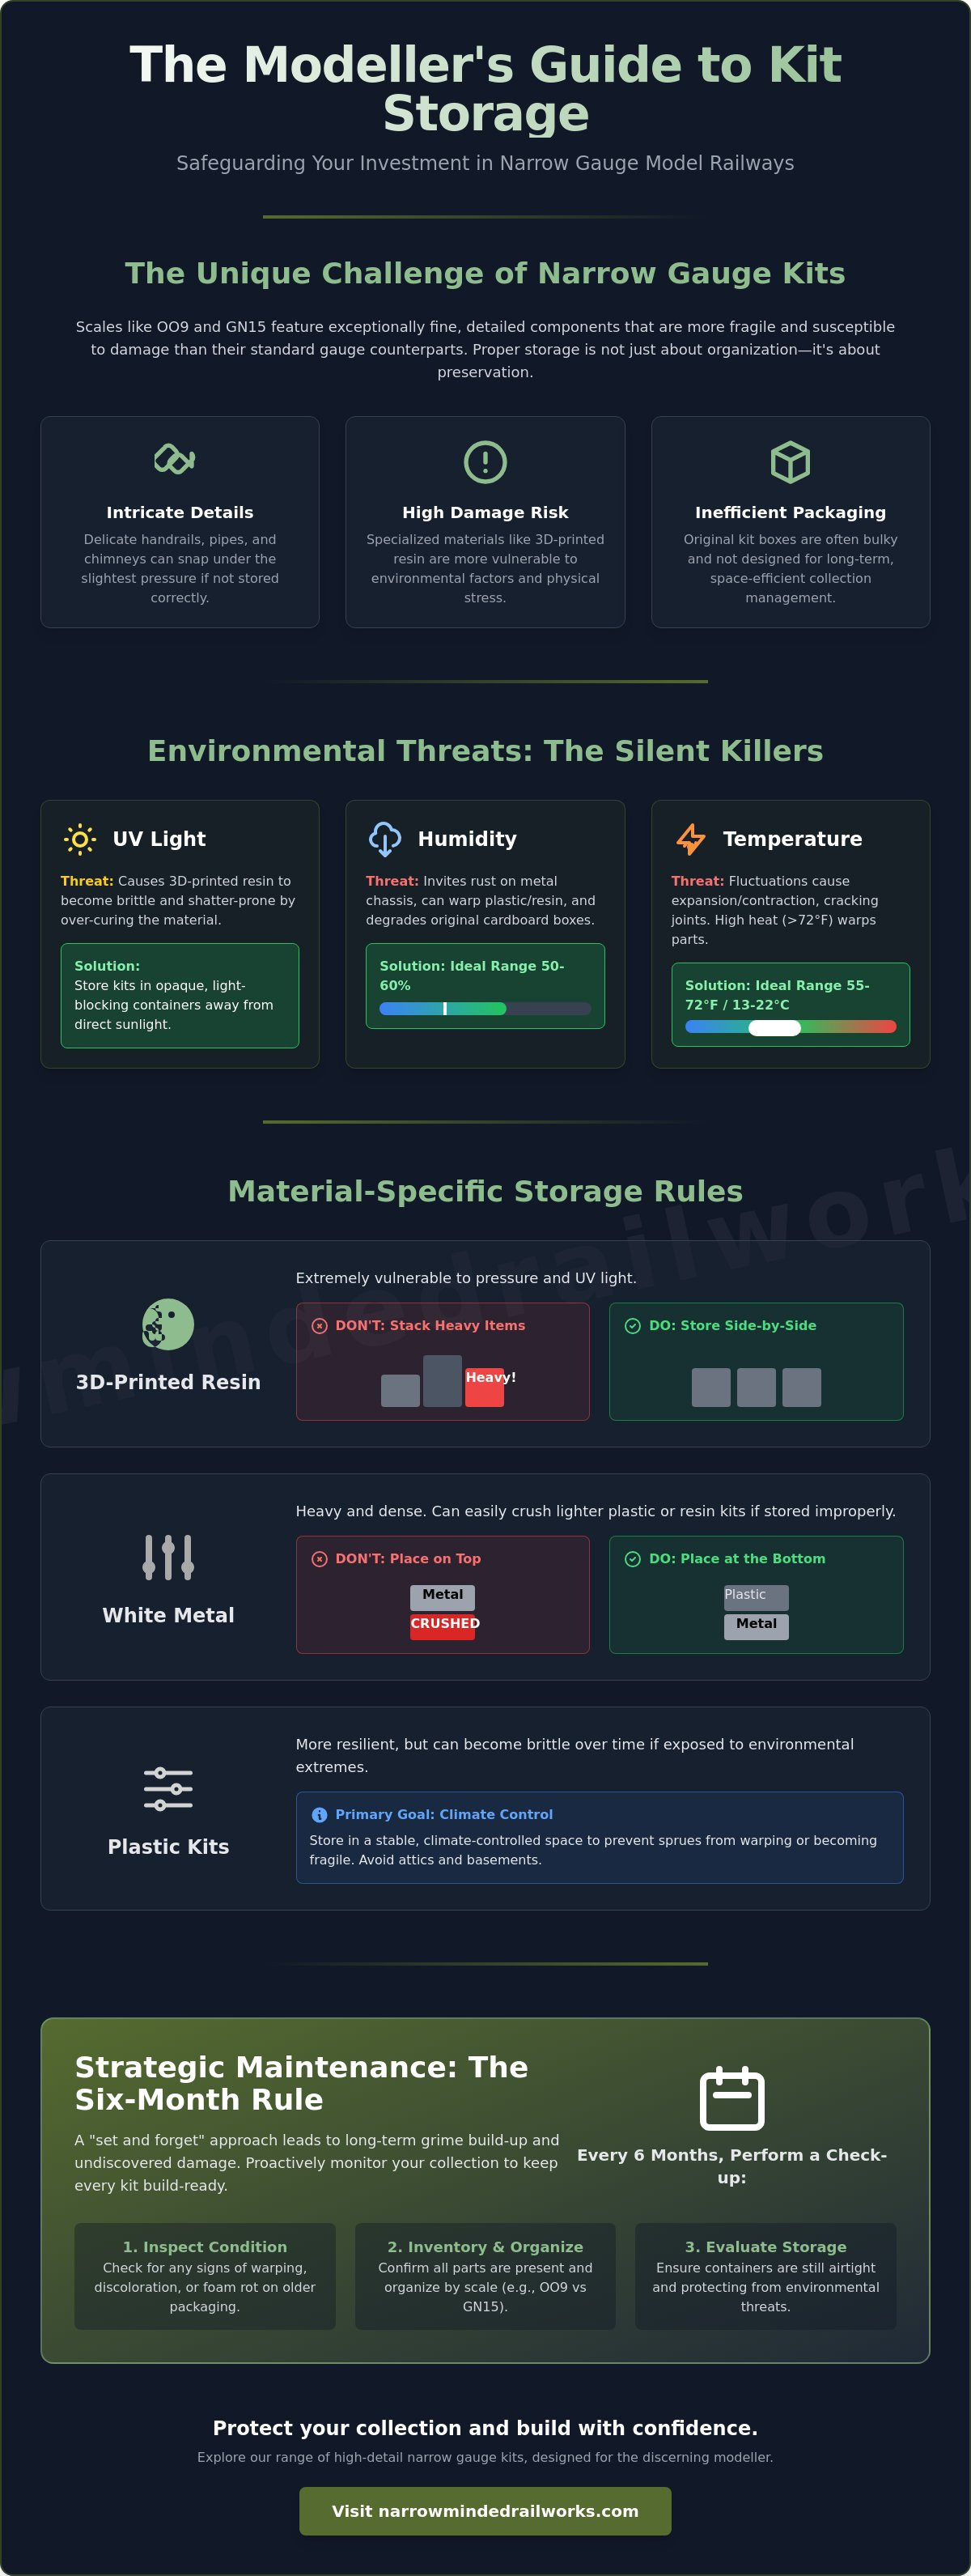
Narrow gauge modelling focuses on character and intricate detail in small spaces. Because scales like OO9 and GN15 are significantly smaller than standard gauge, the components are often finer and more susceptible to damage. You might find that your unbuilt stash grows quickly, creating a storage headache. Understanding how to store model railway kits requires looking beyond general hobby advice and focusing on the specific properties of the materials in your workshop. The kit-builder’s dilemma is real; you want your next project within arm's reach, but you cannot risk losing small components in a cluttered drawer.
A Narrow-gauge railway often features unique, scratch-built, or kit-built rolling stock that doesn't fit the "one-size-fits-all" approach of standard storage boxes. Whether you are building an industrial tramway or a rural branch line, your kits need a system that balances long-term safety with easy accessibility for your next build session.
To better understand this concept, watch this helpful video:
Material Matters: Resin vs. White Metal vs. Plastic
Different kit materials require distinct storage strategies. 3D-printed resin has revolutionized the hobby, yet it remains vulnerable to pressure. Stacking heavy items on top of a resin locomotive shell can cause microscopic cracks or snap fine handrails. When considering how to store model railway kits made from resin, we recommend a "no-pressure" environment where items are stored side-by-side rather than layered. Conversely, white metal kits are heavy. If you must stack components, always place white metal at the bottom of the pile to prevent them from crushing lighter plastic parts. Plastic kits are more resilient, but they still require a climate-controlled space to prevent the sprues from becoming brittle over time.
The Problem with Standard Storage Solutions
Most generic plastic containers aren't designed for a narrow gauge railway collection. These models often have awkward heights or delicate chimneys that exceed the depth of standard commercial slots. Original boxes provide a high level of protection, but they are often bulky and inefficient for those with limited shelf space; therefore, a structured drawer system is a more effective solution for a growing stash. Additionally, some older foam inserts are prone to "foam rot," a chemical breakdown that can fuse to your model's surface. To avoid this, use chemically inert materials like acid-free tissue or polyethylene foam to line your drawers. This proactive step ensures your models remain in pristine condition until you are ready to apply the final coat of paint.
Environmental Protection: Preserving Your Models Until 2026
Environmental factors are the silent killers of a well-curated collection. While a kit might look stable in its box, UV light, humidity, and temperature fluctuations are constantly at work. These forces can degrade materials over years of storage. If you're wondering how to store model railway kits to ensure they last until 2026 and beyond, you must treat your hobby room like a mini-archive. Even unbuilt kits are vulnerable. High temperatures, specifically those exceeding 72 degrees Fahrenheit, can cause thin-walled plastic parts to warp, while cold, damp conditions invite rust onto precision metal chassis components.
Establishing a climate-controlled stash zone is a proactive solution for any modeller. You don't need a professional laboratory; however, maintaining a stable environment is vital. Aim for a temperature range of 55 to 72 degrees Fahrenheit and a humidity level between 50% and 60%. This consistency prevents the expansion and contraction that leads to cracked joints and failing adhesives in older kits.
UV Light and 3D Printed Resin
Unpainted 3D-printed resin kits are particularly sensitive to light. Standard resin continues to cure when exposed to UV rays; consequently, over-exposure makes the material brittle and prone to shattering. You should select opaque storage containers that block all light transmission rather than clear plastic tubs. This is a critical step for protecting your unbuilt stash. If you've already started a project, applying a high-quality primer is essential. It acts as a sacrificial layer that shields the resin from light. For more tips on this process, check our guide on painting 3D printed models to ensure a durable finish.
Humidity and Dust Management
Moisture is a significant threat to metal parts and paper instructions. High humidity can lead to surface corrosion on brass or white metal. Using silica gel packets in your storage boxes helps regulate the internal environment. You should also follow professional standards for storage space planning for your museum quality collections by ensuring your containers have airtight seals. This prevents fine workshop dust from entering delicate gearboxes. In narrow gauge modelling, even a tiny speck of dust can ruin the electrical contact of a small chassis, leading to jerky performance on the track. While it's tempting to use bubble wrap for padding, you should avoid it; bubble wrap can trap moisture against the model. Use acid-free tissue paper instead to keep your OO9 locomotive and wagon kits in pristine condition.
Professional Storage vs. DIY Solutions: A Comparison
Modellers often face a choice between specialized commercial systems and cost-effective homemade alternatives. While professional boxes provide superior shock absorption for taking models to exhibitions, they often require a significant investment for a large home collection. A proactive solution is to reserve professional cases for transit and develop a custom DIY system for your permanent workshop stash. Evaluating how to store model railway kits requires looking at the cost-to-protection ratio; sometimes, a simple food container with a custom insert offers more safety for a uniquely shaped model than a generic commercial slot.
Commercial boxes are often designed for standard rolling stock dimensions. If your collection includes scratch-built items or heavily modified kits, these pre-made slots may not provide adequate support. In these instances, a homemade solution is actually safer because it's tailored to the specific dimensions of your model. Learning how to store model railway kits effectively often involves repurposing everyday items into specialized hobby storage that fits your specific needs and workspace constraints.
The DIY Foam Insert Guide
When creating your own inserts, the choice of material is vital. Polyethylene (PE) foam is a closed-cell material that provides firm support and doesn't hold moisture. It's ideal for heavier white metal components. Polyurethane (PU) foam is softer and more flexible, making it suitable for delicate resin shells, though it can degrade over decades. To achieve professional results, use an electric carving knife or a hot wire cutter for clean edges. This level of precision is especially helpful for creating cradles that support the wide footprints found in GN15 scale models without putting stress on the axles or delicate underframe detail.
Stationery Organisers as Kit Trays
A4 multi-drawer stationery units are a narrow gauge modeller’s best friend. These units offer a shallow, wide profile that's perfect for storing dozens of small wagons or unbuilt OO9 locomotive kits in a single footprint. To prevent models from sliding or sustaining scratches, line each drawer with felt or thin 2mm foam. This setup allows you to categorize your projects by scale or build stage. A clear labelling system on the front of each drawer is a simple way to identify your inventory without opening every unit. This approach solves the problem of cluttered workspaces while keeping your delicate kits safe from dust and physical damage. By combining these DIY methods with professional transit boxes, you create a robust system that protects your hobby investment for years to come.
Organising the Stash: Managing Unbuilt Kits
An unorganised stash is often the biggest barrier to starting a new project. When your kits are buried in a chaotic pile, the mental effort required to find a specific locomotive body can outweigh the excitement of the build. Finding an effective system for how to store model railway kits provides a clear roadmap for your layout's development, turning a source of guilt into a manageable hobby.
Learning how to store model railway kits systematically ensures your unbuilt collection remains an asset. We recognize that space is often limited; however, implementing a structured four-step process provides a proactive solution for any modeller.
- Sorting by Scale: Keep your OO9 items strictly separate from your larger GN15 projects. This prevents tiny 1:76 scale components from being lost in larger boxes and helps you focus on the specific tools required for each scale.
- Component Verification: Upon receiving a new kit, verify all 3D-printed parts and instructions immediately. It's better to discover a missing detail part now than years later when the kit might be out of production.
- Digital Inventory: Use a simple spreadsheet to track your holdings. This prevents duplicate purchases and allows you to plan your building schedule from your phone without digging through cupboards.
- FIFO Method: Adopt a "First-In, First-Out" approach. This ensures that older kits, which you might have bought for a specific layout phase, actually get built before newer releases take priority.
Protecting Small Parts and Decals
Small 3D-printed details like couplers and handrails are easily lost or crushed. While original packaging is useful, it often lacks internal organisation. A proactive solution is to use small grip-seal bags for these tiny components within the main box. This keeps everything together even if the kit is moved frequently. Water-slide transfers require even more care. They're sensitive to moisture and light; therefore, you should store them flat inside acid-free envelopes to prevent yellowing or cracking over time.
Inventory Tagging Systems
Digging through a stack of identical boxes is frustrating. You might feel that labelling every box is time-consuming; however, a digital tagging system saves hours in the long run. Using QR codes on the outside of storage bins allows you to scan and see the contents without disrupting the stack. You can also colour-code your boxes based on project readiness. For example, use a green label for kits that are "Ready to Build" and a yellow label for those that "Need a Donor Chassis." This clarity helps you choose your next project based on the time and parts you actually have available. If you're ready to expand your collection with organised, high-quality projects, explore our full range of OO9 locomotive and wagon kits.
Strategic Maintenance: Keeping Your Kits Ready to Run
Effective storage is not a final destination; it is a continuous cycle of care. You might assume that once a kit is boxed, it is safe indefinitely. However, environmental conditions change and materials can react over time. Learning how to store model railway kits involves regular inspections to ensure your collection remains in peak condition. We recommend implementing a "Six-Month Rule" for your stash. Every half-year, you should open your storage containers to check for signs of warping or brittleness, particularly in unpainted 3D-printed resin parts. This proactive step allows you to identify issues before they become irreversible.
Chemical safety is another critical aspect of long-term preservation. You should never store models with batteries installed, as they can leak and cause catastrophic acid damage to delicate chassis components. Similarly, be cautious with lubricants. While a kit might need oil to run smoothly on the track, certain oils can attract dust or even degrade plastic if left to sit for years. A proactive solution is to thoroughly clean and degrease your models before they enter long-term storage. This ensures they are a blank slate when you next take them out for a layout appearance or an exhibition.
Pre-Storage Cleaning Routine
Dust is an abrasive that can ruin paintwork and clog fine gearboxes. Before boxing your models, use a soft makeup brush or a gentle blast of compressed air to remove workshop debris. You should also check for loose detail parts that might have been weakened during handling. It is much easier to re-attach a handrail now than to find it missing later in a foam slot. Finally, ensure that surfaces are free from natural skin oils. These oils can react with certain resins or interfere with future paint adhesion. A quick wipe with a lint-free cloth is a simple way to maintain the integrity of your 3D-printed surfaces.
The Ready-to-Build Audit
An organised stash is only useful if the kits are complete and ready for assembly. Periodically auditing your unbuilt projects ensures that instructions remain legible and that all small parts are still accounted for. You should also check the perishables in your hobby room. Adhesives and specialized paints often have a limited shelf life; therefore, verifying that your supplies haven't dried up is essential for a smooth build process. We design our kits to be robust and detailed, but proactive care is what ensures they provide lifelong enjoyment. By following these professional strategies for how to store model railway kits, you protect both your financial investment and the hours of craftsmanship you've dedicated to the hobby.
Securing the Future of Your Narrow Gauge Stash
Managing a growing collection can feel overwhelming; however, following a systematic storage plan ensures your models stay ready for the track. You've seen that environmental control and material-specific handling are vital for preserving unbuilt projects. By implementing a digital inventory and the "Six-Month Rule" for maintenance, you turn a cluttered workspace into an efficient hobby environment. Knowing how to store model railway kits correctly provides the peace of mind you need to focus on your next build without worrying about brittle resin or lost components.
A proactive approach to storage protects your investment and keeps your creative motivation high. If you're ready to expand your layout, browse our range of robust OO9 and GN15 kits designed for the dedicated modeller. We provide specialist narrow gauge designs featuring high-detail 3D printed resin, supported by worldwide shipping for global modellers. Your next masterpiece deserves a safe home; therefore, start building your collection with confidence today.
Frequently Asked Questions
Is it better to store kits in their original boxes?
Original boxes provide the best protection because they are designed specifically for the model's dimensions. However, these boxes are often bulky and inefficient for those with limited shelf space. A proactive solution is to keep high-value locomotive kits in their original packaging while transitioning smaller wagon stashes into a more space-efficient drawer system lined with acid-free foam.
How do I prevent my 3D printed resin models from becoming brittle?
You must block all UV light to stop the resin from over-curing and becoming fragile. While clear tubs are convenient for visibility, they allow light to degrade the material over time. A proactive solution is to use opaque storage bins or apply a high-quality primer to the models as soon as they are cleaned, which provides a sacrificial layer against light exposure.
What is the best foam for model railway storage?
Polyethylene (PE) foam is the superior choice for long-term safety because it is chemically inert and moisture-resistant. Standard polyurethane foam can degrade and stick to paintwork over several years. If you are learning how to store model railway kits for professional results, you should choose closed-cell PE foam. This material offers firm support for heavy white metal parts without the risk of chemical breakdown.
Can I store my model railway kits in an unheated loft or garage?
You should avoid lofts and garages because extreme temperature fluctuations and high humidity cause plastic to warp and metal to rust. These environments lack the stability required for delicate 3D-printed resin. A proactive solution is to store your collection in a climate-controlled room where the temperature remains between 55 and 72 degrees Fahrenheit, ensuring the longevity of your unbuilt kits.
How should I store delicate water-slide decals?
Decals must be kept flat in a cool, dark, and dry environment to prevent the carrier film from cracking. Moisture is a significant threat that can cause the transfers to stick to their backing paper prematurely. A proactive solution is to place your decals inside acid-free envelopes. Store these envelopes in a sturdy, opaque folder to protect them from both physical pressure and UV light.
What is the safest way to transport narrow gauge models to an exhibition?
Should I store my locomotives with the chassis attached or separate?
You should keep the chassis attached to the body to prevent the loss of tiny mounting screws and to protect the internal gearboxes from dust. Separating them increases the risk of damaging delicate electrical pick-ups during handling. A proactive solution is to store the complete unit together, only removing the chassis when you are ready to perform mechanical maintenance or apply final paint finishes.
How can I stop my models from sweating inside plastic containers?
Moisture can become trapped inside airtight containers if they are packed in a humid environment. This leads to "sweating," which can damage paintwork and cause corrosion on metal parts. When considering how to store model railway kits in plastic tubs, a proactive solution is to include several silica gel desiccant packets. These packets absorb residual moisture and maintain a stable internal environment for your models.