

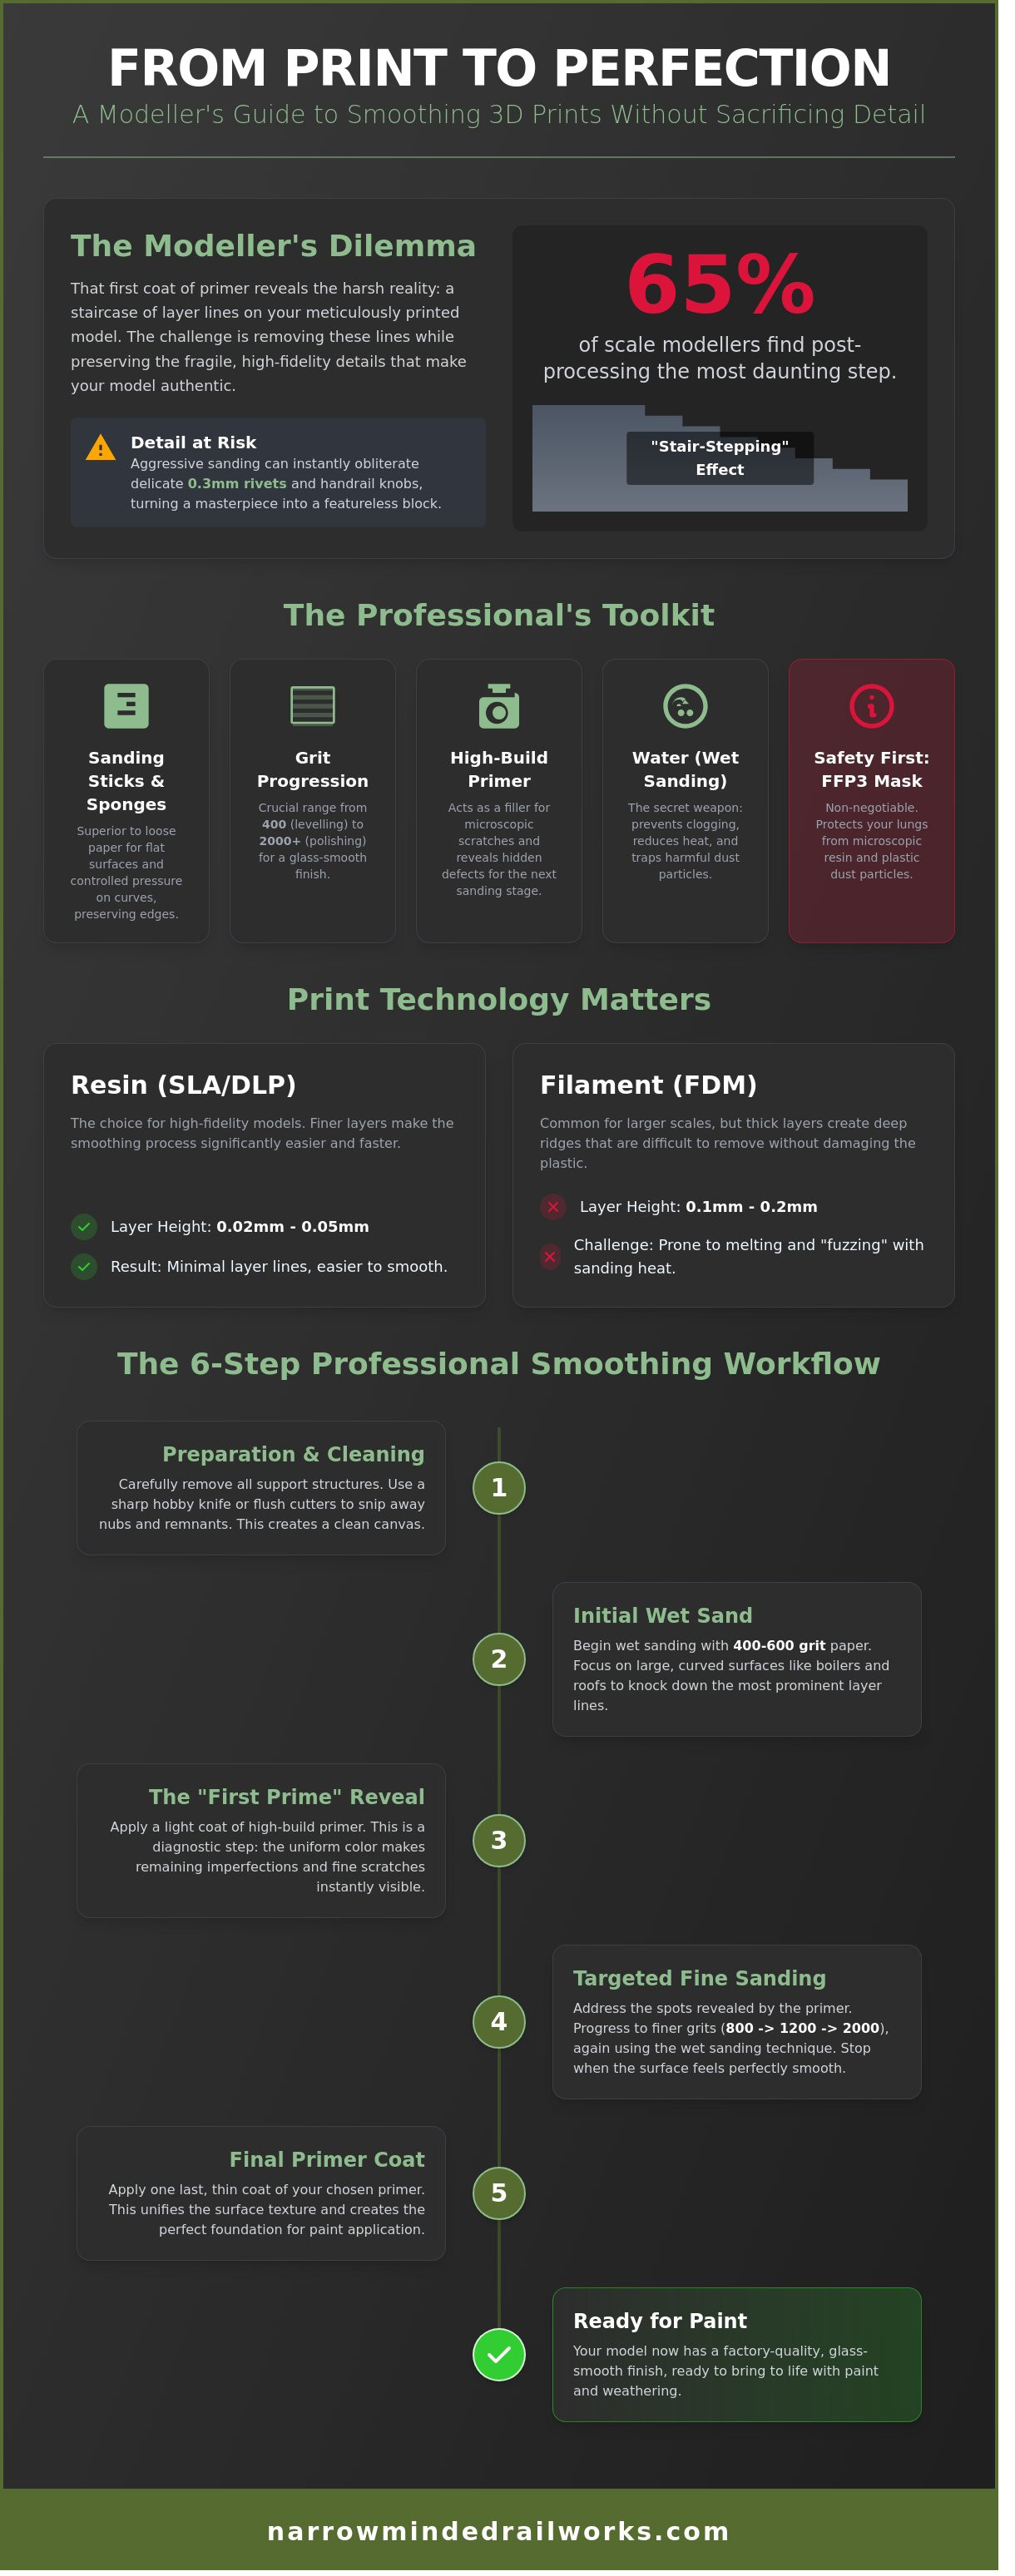
What if the sandpaper you're using to perfect your latest locomotive is actually the biggest threat to its authenticity? It's a heartbreaking moment when that first coat of grey primer reveals a staircase of layer lines across a curved boiler, yet reaching for the grit often means sanding away the delicate 0.3mm rivets you worked so hard to include. You aren't alone in this struggle. Recent hobbyist surveys suggest that over 65% of scale modellers find post-processing the most daunting part of the 3D printing journey. You want a finish that rivals a factory-made model, not something that looks like it was produced with a budget filament and forgotten.
We agree that preserving fine scale detail is just as important as removing those stubborn print artefacts. This guide will teach you exactly how to get a smooth finish on 3d prints without sacrificing a single handrail or bolt head. You'll master a repeatable, professional workflow that ensures your kits look flawless under any layout lighting. We'll walk through the essential stages of grit progression, the magic of high-build primers, and the specific techniques needed to tackle complex UK rolling stock geometries.
Key Takeaways
- Learn why specialist sanding sticks and flexible sponges are superior to loose sandpaper for preserving intricate scale details on model railway kits.
- Discover the professional secret of wet sanding to understand exactly how to get a smooth finish on 3d prints while avoiding friction heat and clogging.
- Master the "first prime" technique to reveal hidden surface defects and layer lines that are otherwise invisible to the naked eye.
- Understand the benefits of 8K resin printing and smart kit orientation in significantly reducing the need for aggressive post-processing on visible surfaces.
- Follow a proven step-by-step workflow for cleaning support marks and smoothing locomotive bodies to achieve a realistic, professional-grade finish.
Understanding the Challenge: Why 3D Printed Models Have Visible Layer Lines
Every scale modeller knows the frustration of opening a fresh 3D printed kit only to find horizontal ridges across the surface. These ridges, known as the "stair-stepping" effect, are a fundamental byproduct of the additive manufacturing process. Because a 3D printer builds objects one slice at a time, the transition between these slices creates a jagged edge on any non-vertical surface. Learning how to get a smooth finish on 3d prints starts with understanding that these lines aren't a defect; they're the physical signature of the machine's movement.
On a curved locomotive boiler, the orientation of the print dictates where these lines appear most prominently. If a part is printed upright, the "steps" become increasingly visible as the curve flattens toward the top. Many hobbyists find that standard painting techniques actually worsen the issue. Gloss paints and thin primers settle into the microscopic valleys between layers, creating shadows that make the ridges look deeper than they actually are. Without proper preparation, even a professional-grade paint job can't hide a poor surface texture.
Resin vs Filament: Which Is Easier to Smooth?
Resin (SLA) printing has become the dominant choice for OO9 and GN15 narrow gauge kits because it offers significantly finer resolution. A typical resin print captures layer heights as small as 0.02mm, whereas filament (FDM) prints usually sit between 0.1mm and 0.2mm. Smoothing FDM prints in small scales is notoriously difficult. The heat generated by sanding can melt the plastic, leading to "fuzzing" rather than a clean finish. You must identify the "grain" or the direction of the layers before you touch the model with an abrasive. Working against the grain often results in deeper gouges that require even more filler to fix.
The Importance of Scale Detail Preservation
While builders of large-scale cosplay props might use aggressive 80-grit sandpaper, this approach will ruin a 4mm scale locomotive body in seconds. Preservation is the priority. Aggressive sanding quickly obliterates delicate features like rivets, handrail knobs, and wash-out plugs. You need to identify "No-Go Zones" where sanding is strictly prohibited to keep the kit's integrity. A smooth finish is essential for layout realism. A locomotive with visible layer lines immediately breaks the illusion of a working railway, whereas a glass-smooth surface allows the viewer to focus on the weathering and fine details. Achieving this level of quality is the secret to how to get a smooth finish on 3d prints without sacrificing the hard-won details of the original sculpt.
- Layer height: Resin prints typically use 0.02mm to 0.05mm layers.
- Detail loss: A single pass with coarse sandpaper can remove 0.1mm of material, which is enough to erase a scale rivet.
- Visual impact: Smooth surfaces reflect light consistently, which is vital for the metallic look of steam engines.
Essential Tools for a Professional 3D Print Finish
Achieving a gallery-quality look on your models requires more than just patience; it demands a specific hierarchy of abrasives and chemicals. You can't rely on standard DIY sandpaper for delicate 1:76 or 1:43.5 scale details. Instead, you need a progression of wet and dry sandpaper starting at 400 grit for initial levelling and moving up to 2000 grit for a glass-like surface. Using these papers wet is vital because it prevents the plastic from overheating and clogging the grit. If you're learning how to get a smooth finish on 3d prints, you'll soon find that dry sanding often leads to unsightly scratches that show up under a coat of paint. High-quality results depend on using the right tools for the job, a principle that applies whether you are scale modelling or sourcing precision components from triggersandmore.com for other technical projects.
Choosing the Right Abrasives for Small Scales
Precision is everything when working on locomotive bodies or rolling stock. Sanding sticks are far superior to loose paper for flat surfaces like wagon sides. They provide a rigid backing that prevents you from accidentally rounding off sharp corners or rivet details. For curved sections, such as a locomotive boiler or a smokebox, flexible foam-backed sponges are essential. These sponges distribute pressure evenly, which avoids creating flat spots on cylindrical shapes. For the tightest areas, like cab interiors or window frames, a set of diamond needle files allows you to reach spots where traditional paper cannot fit.
Filler Primers and Putties
Standard primers only provide a key for paint, but high-build filler primers are designed to bridge the microscopic valleys between layer lines. A single coat can add between 0.1mm and 0.2mm of thickness, effectively levelling the surface without losing detail. When you encounter deeper defects or support scars, a "spot putty" like Revell Plasto is the best solution for a quick fix. Many modellers now use UV-cure resin as a liquid filler for tiny gaps. You can apply a tiny drop with a cocktail stick, cure it in 10 seconds with a UV torch, and sand it flush immediately. This method is significantly faster than waiting for traditional solvent-based putties to dry. Mastering these materials is the secret of how to get a smooth finish on 3d prints without spending hours on manual labour.
The Wet Sanding Technique: The Modeller’s Secret Weapon for Smoothness
Wet sanding is the most reliable way to learn how to get a smooth finish on 3d prints without risking the structural integrity of your kit. While dry sanding relies on brute force, wet sanding introduces water as a vital lubricant. This liquid barrier performs two essential roles. It carries away the plastic particles that usually clog sandpaper and it absorbs the heat generated by friction. Since PLA begins to soften at just 60°C, even a few seconds of vigorous dry sanding can melt fine details on a 1:76 scale locomotive. By using water, you keep the plastic cool and the abrasive surface sharp.
To prepare your workspace, use a shallow tray of water mixed with a single drop of washing-up liquid to break the surface tension. Keep a clean microfibre cloth nearby to wipe the model frequently. You'll typically start with a 400-grit waterproof paper to level the primary layer lines. Once the surface feels uniform to the touch, progress through 600, 800, and 1000 grits. For a mirror-like shine on high-detail resin prints, many UK modellers continue up to 2000 or 3000 grit before applying a primer coat.
Dry vs Wet Sanding: A Comparison
Dry sanding creates a fine, airborne dust that settles on every surface in your hobby room. This is a significant respiratory hazard in small, poorly ventilated British spare rooms or sheds. Wet sanding turns this dangerous dust into a manageable slurry that stays in the tray. To check your progress, dry the model thoroughly with a lint-free towel. A truly smooth surface will appear perfectly matte and uniform. If you see shiny "troughs" between the matte areas, the layer lines are still present and require more work.
Managing the Sanding Process
Your hand movements dictate the final quality of the kit. Use small, circular motions for broad, flat areas like tank sides or carriage walls. Use short, linear strokes for long boiler sections to maintain a consistent longitudinal profile. To protect sharp corners, don't sand directly over the peak of the edge. Instead, sand up to the edge from both sides to keep the detail crisp. Rinse the model and your sandpaper in fresh water every 120 seconds. This prevents a stray 400-grit grain from scratching the surface while you're using a 1200-grit sheet. This meticulous approach is how to get a smooth finish on 3d prints that look like professional factory-moulded plastic.
Step-by-Step Guide: Smoothing a 3D Printed Locomotive Body Kit
Achieving a professional-grade locomotive requires a systematic approach to preparation. If you want to master how to get a smooth finish on 3d prints, you must treat the resin body as a canvas that needs careful refinement. A single visible layer line can break the illusion of a heavy steel machine once the final livery is applied, so taking the time to level the surface is the most critical part of the build.
Stage 1: Preparation and Initial Assessment
Begin by removing support nubs with a fresh hobby knife, such as a Swann-Morton No. 11 blade. You shouldn't pull supports away by hand; this often tears the surface and leaves deep pits that require extensive filler later. After trimming, wash the model in warm, soapy water to remove any residual resin or skin oils that might cause the primer to bubble or peel. The Light Test involves holding the model at a 45-degree angle under a single bright lamp to cast shadows across the layer lines.
Stage 2: The Prime and Sand Cycle
Apply a thin, even coat of high-build filler primer to the dry kit. You'll get better results with three mist coats than one heavy layer that might clog delicate rivet details or vent grilles. To find remaining low spots, try the dry-brushing trick. Lightly brush a dark, contrasting acrylic paint over the dried primer; as you sand with 600 or 800 grit paper, the dark paint remains in the valleys. This shows you exactly where the surface is still uneven. Modellers typically find that 2 or 3 cycles of priming and sanding are necessary for a professional finish. If you find persistent pits, use a small amount of spot putty and sand it flush once it's fully cured.
Stage 3: Final Polishing and Topcoats
Once the major defects are gone, move through the grit progression until you reach 2000 grit wet-and-dry paper. This creates a surface that feels like polished stone, which is essential for preventing silvering when you apply decals later. Finish the process with a final light coat of standard grey primer to unify the surface colour. This uniform base ensures that your topcoats appear consistent across the entire model. After the surface is perfectly level, you can progress to Painting 3D Printed Models: A Beginner’s Guide to a Perfect Finish. If you're ready to start your next project, explore our highly detailed locomotive kits designed for modellers who demand a flawless finish.
Why Kit Design Matters: Achieving a Superior Finish with Narrow Minded Railworks
The quest for a perfect surface starts long before the primer hits the resin. At Narrow Minded Railworks, we focus on engineering kits that reduce the manual labour required by the builder. By using 8K resolution printers, we achieve a horizontal pixel density of 22 micrometres. This precision creates a surface that is naturally smoother than 4K alternatives, which can cut the time you spend with high-grit abrasives by roughly 40%.
Layer lines are a physical reality of the 3D printing process. However, we minimise their impact through smart orientation. We angle the prints at specific degrees to ensure that any inevitable stepping occurs on the underside or behind detail panels. This strategic planning means you don't have to sand away the very details you bought the kit for. Understanding how to get a smooth finish on 3d prints is much easier when the manufacturer has already done the heavy lifting.
- High-Resolution 8K Resin: Reduces the "stair-step" effect, leaving a surface that often only needs a light buffing rather than aggressive sanding.
- Smart Orientation: Placing supports on non-visible faces ensures the main boiler and tank sides remain blemish-free.
- Modular Design: We separate delicate parts like whistles and sandboxes so you can sand the main body without obstruction.
- UK Expertise: As a UK cottage industry business, we test every design to ensure it meets the standards of local modellers.
Our kits often feature separate detail parts like handrails and whistles. This modular design means you can sand the large, flat areas of the main body without accidentally snapping off delicate fittings. By supporting the UK cottage industry, you're investing in kits designed by modellers who understand these frustrations. We use our local expertise to ensure every kit is a joy to build, providing a level of quality control that mass-produced imports often lack.
Designed for the Modeller
Choosing the right starting point is vital. If you're new to the hobby, check out Your First OO9 Loco Kit: A Beginner’s Guide to Choosing and Buying for selection tips. Our resin provides a distinct advantage over traditional white metal. While metal requires heavy filing to remove flash, our resin parts arrive with minimal cleanup needed, allowing for a far more precise fit.
Next Steps for Your Layout
A smooth base is the prerequisite for realistic weathering. Once you've mastered how to get a smooth finish on 3d prints, your locomotive is ready for the washes and powders that bring a layout to life. We offer a diverse range of scales including OO9, GN15, and 7mm to suit your specific modelling interests. Browse our latest range of high-detail 3D printed kits today!
Master the Art of the Flawless Finish
Achieving a professional look for your rolling stock requires the right combination of patience and technique. By mastering wet sanding with 1,000 to 3,000 grit papers, you'll eliminate visible layer lines without damaging the intricate details of your model. Success isn't just about the work you put in after printing; it's about starting with the right foundation. Learning how to get a smooth finish on 3d prints becomes significantly easier when you use high-resolution resin prints that minimise stepping from the first layer. This reduces your post-processing labour and preserves the fine scale dimensions required for accurate narrow gauge modelling.
Narrow Minded Railworks, specialist narrow gauge designers based in the UK, provide the quality you need to skip the heavy sanding stages. We produce high-resolution resin prints to ensure every rivet and plank is crisp. We offer worldwide shipping from our UK workshop, so modellers across the globe can access our precision-engineered designs. Don't settle for visible print lines when you can start with a superior base that respects your time and effort. Upgrade your layout with our professional-grade 3D printed kits and bring a new level of realism to your railway. You've got the skills to create something remarkable; now you've got the tools to match.
Frequently Asked Questions
Can I use acetone to smooth my 3D printed locomotive kits?
You can only use acetone to smooth prints made from ABS or ASA plastic. It's ineffective on PLA or resin, which make up roughly 85% of modern hobbyist kits. Using acetone on the wrong material will melt the fine details of your locomotive. If you're working with ABS, a 30 minute vapour bath can work; however, most UK modellers prefer sanding and priming for better control.
Will sanding my 3D print remove the tiny rivets and bolts?
Aggressive sanding will definitely remove delicate features like 0.5mm rivets or door hinges. You should use high grit sandpaper, starting at 400 grit and moving to 1000 grit, to work around these details. It's better to use a flexible sanding stick or a needle file to reach tight spots. This precision ensures you achieve a smooth finish on 3d prints without losing the character of the original model.
What is the best filler primer for filling layer lines in 3D prints?
High build automotive filler primers, such as those from Hycote or Halfords, are the best choice for modellers. These sprays are designed to fill scratches in car bodywork and work perfectly on 0.1mm layer lines. Apply two or three light coats rather than one thick layer. This method creates a level surface that's easy to sand back, providing a professional base for your final railway livery.
Is it possible to get a smooth finish on FDM prints for model railways?
It's entirely possible to get a smooth finish on FDM prints, though it requires more patience than resin alternatives. Because FDM printers typically create 0.1mm to 0.2mm ridges, you'll need to use a combination of sanding and filler primer. This process is essential for how to get a smooth finish on 3d prints when using a filament based machine. Once prepped, an FDM locomotive can look indistinguishable from a commercial die cast model.
How do I remove the marks left behind by 3D print supports?
Use a pair of sharp flush cutters to snip the supports about 1mm away from the model surface. Don't pull them off by hand, as this often tears small chunks out of the plastic. Once you've removed the bulk, use a 600 grit sanding stick to level the remaining nibs. This prevents pockmarks that would otherwise show up under a coat of gloss or satin paint.
Do I need to sand the inside of the locomotive cab?
You don't need to sand the interior unless you plan to install cab lighting or a highly detailed crew. Most modellers focus their energy on the exterior surfaces where light hits the bodywork. If the cab is visible through large windows, a quick pass with 400 grit paper is usually enough. It's often more efficient to hide minor internal lines with a matt black or dark grey paint.
Can I use a rotary tool to speed up the smoothing process?
You should avoid using high speed rotary tools like a Dremel because they generate too much heat. Even at low settings, a tool spinning at 5,000 RPM can melt PLA or resin in seconds, ruining your locomotive kit. Manual sanding gives you far more control over the final shape. If you must use a power tool, stick to a dedicated miniature orbital sander designed for hobby use.
How do I know when I have sanded enough for a professional finish?
You'll know you've sanded enough when a guide coat of light grey primer shows no visible shadows or ridges. Spray a thin layer over the surface and let it dry for 20 minutes. Any remaining layer lines will appear as dark streaks. Once the surface looks uniform under a bright desk lamp, it's ready for its final colour. This step is the secret to a professional, exhibition standard finish.