

The most beautiful 3D-printed locomotive body is nothing more than a static ornament if it lacks a reliable heart. While the 3D printing revolution has made unique narrow gauge prototypes accessible, choosing a chassis for oo9 kits remains the most critical technical hurdle for any modeller. You've likely felt the frustration of finding a donor mechanism that looks right on paper but refuses to sit flush inside the shell. It's a common pain point that can turn a rewarding build into a series of expensive compromises.
We understand that nothing ruins the immersion of a narrow gauge layout like a loco that stalls on every set of points or vibrates with an ill-fitting motor. This guide provides the technical clarity you need to master the art of matching N gauge mechanisms to your OO9 projects for flawless, slow-speed performance. We'll walk you through a curated list of compatible chassis like the Kato 11-109, provide precise measuring instructions to avoid body-shell collisions, and offer professional tips for smooth running on even the smallest dioramas.
Key Takeaways
- Understand why the 9mm gauge connection makes N gauge mechanisms the ideal choice for powering reliable 4mm scale narrow gauge locomotives.
- Master the technical process of choosing a chassis for oo9 kits by measuring internal body clearances and wheelbases to ensure a perfect fit.
- Access the latest 2026 availability data for Kato and Tomytec donor mechanisms to avoid the frustration of designing around out-of-stock parts.
- Learn how to optimize your model's performance through strategic weighting and DCC installation techniques tailored for micro-sized locomotive shells.
- Discover how precision-engineered 3D printed kits can simplify your build by reducing the need for complex or destructive chassis modifications.
The Foundation of OO9: Why N Gauge Chassis are the Secret Ingredient
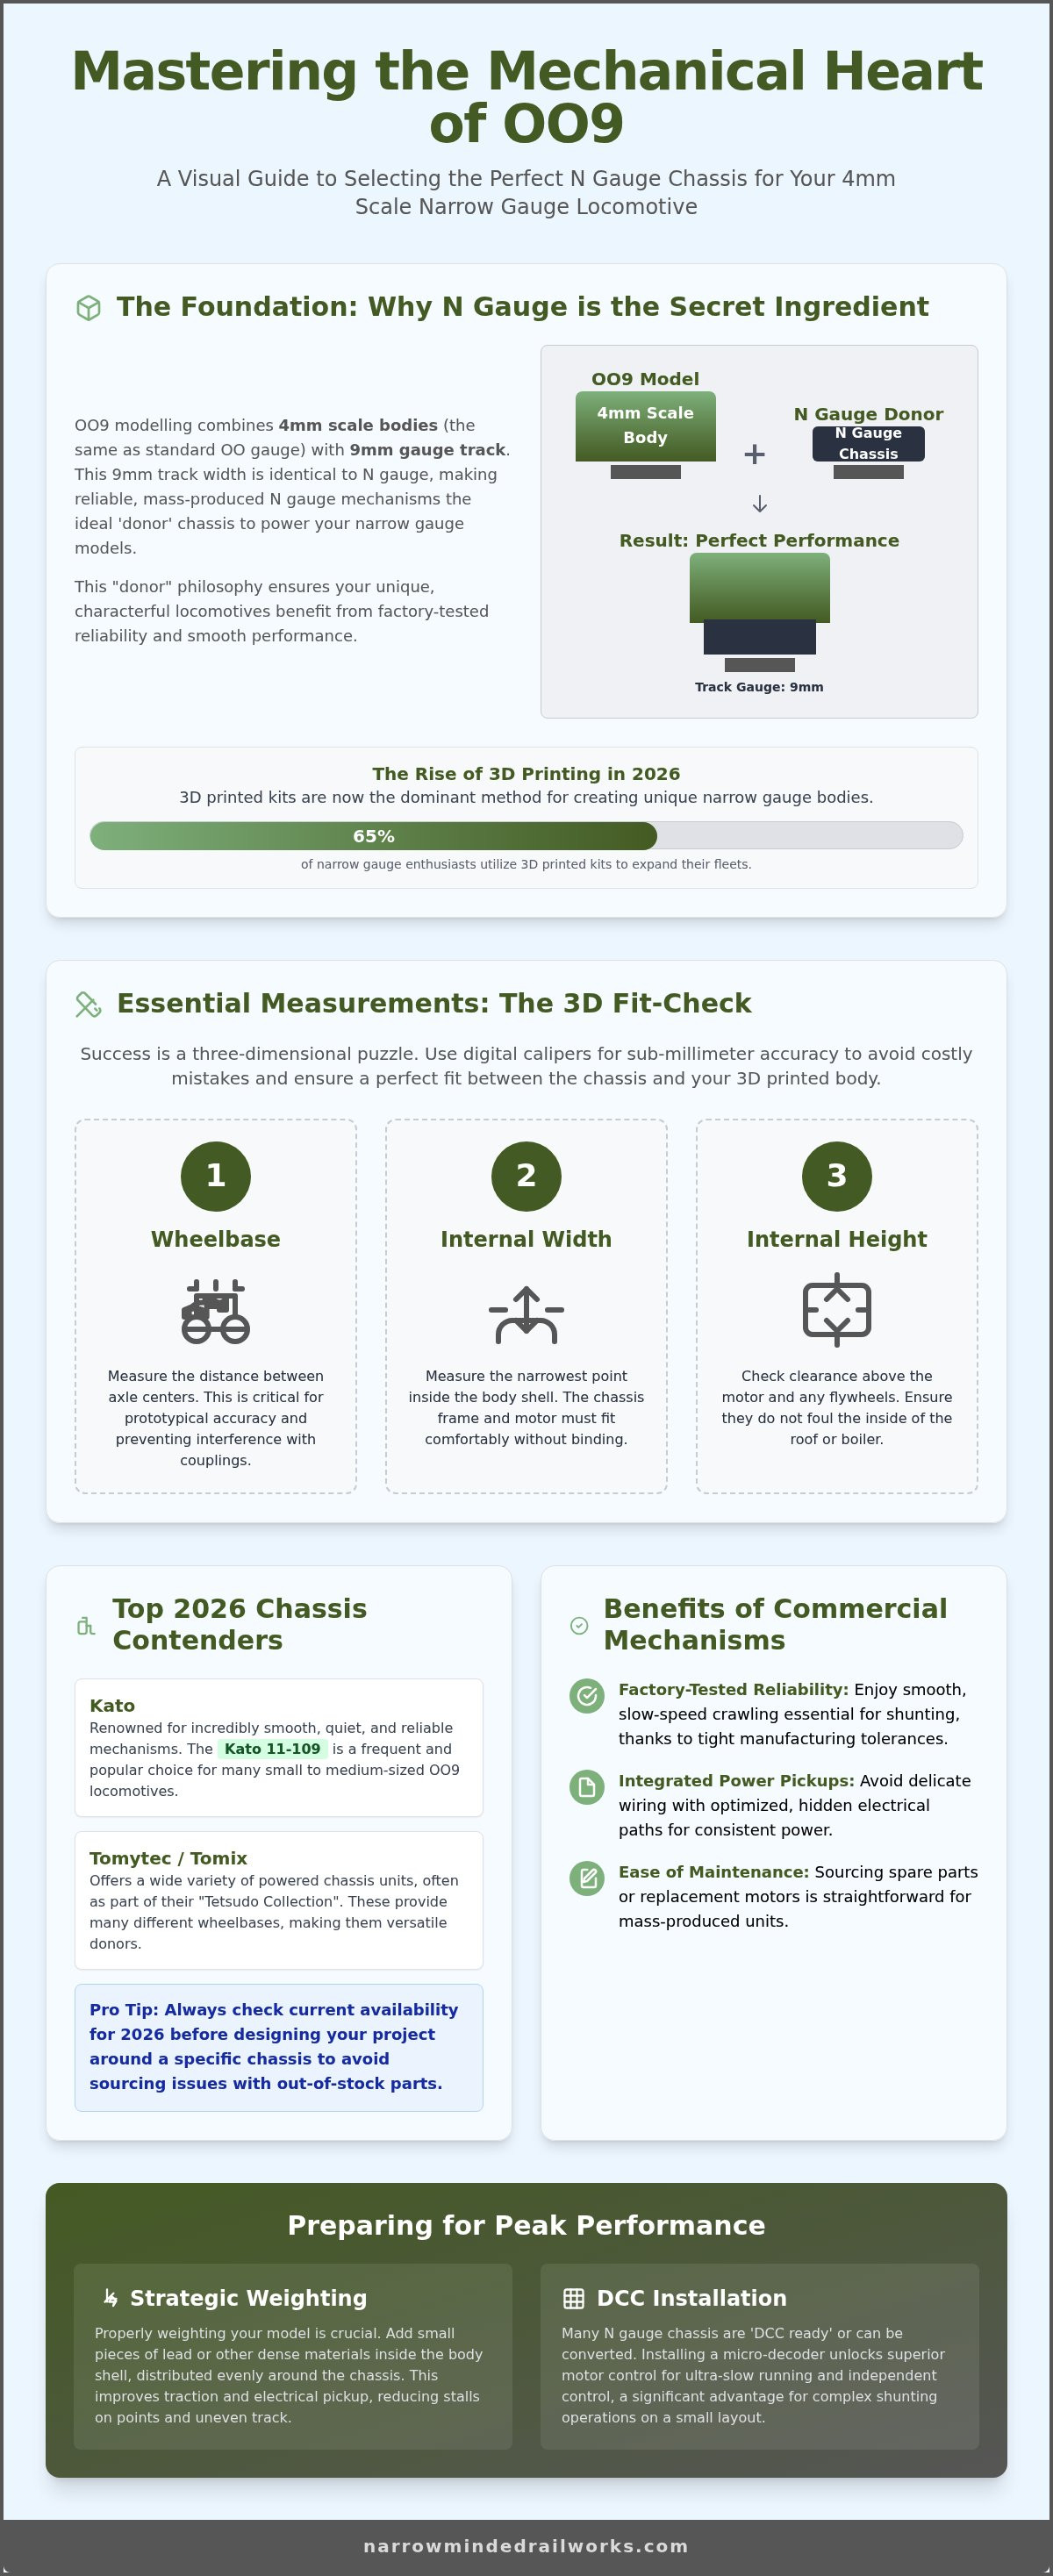
Narrow gauge modelling often feels like a balancing act between artistic character and mechanical reliability. While standard gauge modellers enjoy ready-to-run convenience, the OO9 community has long embraced a "donor" philosophy. This approach involves taking a mass-produced, highly reliable N gauge chassis and marrying it to a characterful narrow gauge body. It's the most effective way to ensure your locomotive doesn't just look the part, but actually performs on the track without constant stalling.
Scale vs. Gauge: A 2026 Refresher
Understanding the terminology is the first step in choosing a chassis for oo9 kits. An OO9 scale model railway uses 4mm-to-the-foot scale, which is the same as standard OO gauge, but runs on 9mm gauge track. This track width represents prototypes that were originally between 2 feet and 2 feet 6 inches wide. By 2026, 3D printing has become the dominant force in this niche. Statistics show that roughly 65% of narrow gauge enthusiasts now utilize 3D printed kits to expand their fleets. These kits provide the precise visual shell while leveraging the precision engineering of established N gauge manufacturers.
The Benefits of Using Commercial Mechanisms
Building a chassis from scratch is a noble pursuit, but it often leads to inconsistent power pickup and jerky movements. Commercial mechanisms offer several proactive solutions to these common headaches:
- Factory-Tested Reliability: Manufacturers like Kato and Tomytec produce units with incredibly tight tolerances, ensuring smooth slow-speed crawling that is essential for narrow gauge shunting.
- Integrated Power Pickups: You don't have to struggle with delicate phosphor bronze wipers; the electrical path is already optimized and hidden within the frame.
- Ease of Maintenance: Because these are mass-produced items, sourcing spare parts or replacement motors is straightforward compared to bespoke scratch-built units.
Choosing a chassis for oo9 kits isn't about taking a shortcut; it's about prioritizing the functional "soul" of the model. While a donor chassis might require slight modifications to fit a specific prototype's wheelbase, the trade-off is a model that runs flawlessly for years. In the 2026 market, the variety of available N gauge wheelbases means you can find a suitable match for almost any narrow gauge prototype, from diminutive industrial diesels to larger articulated steam engines. Our kits are engineered specifically to bridge this gap, ensuring that the marriage between body and motor is as seamless as possible.
Essential Measurements: Matching Body Kits to a Chassis
A common mistake modellers make when choosing a chassis for oo9 kits is assuming that matching the wheelbase is the end of the technical journey. While the distance between axle centers is vital for prototypical accuracy, it's only one dimension in a complex three-dimensional puzzle. Success requires a proactive approach to measuring the physical "void" inside your locomotive shell. To achieve professional results, a set of digital calipers is your most important tool. These allow for sub-millimeter accuracy that a standard ruler cannot provide. As often highlighted in Railway Modeller magazine, precise measurement is the difference between a model that glides and one that grinds against the bodywork.
Step 1: Determining Your Prototypical Wheelbase
Start by identifying the exact distance between the centers of the wheels on your chosen prototype. Most kit instructions specify the intended donor mechanism, but if you're adapting a custom shell, you'll need to verify the chassis length yourself. You must also account for the "overhang," which is the distance from the axle to the buffer beam. If a chassis is too long, it may interfere with coupling mounting points or the internal structural bracing of the 3D print. While a slight discrepancy in wheelbase might be acceptable for a freelance industrial locomotive, mismatched wheel positions on a recognizable prototype will immediately look incorrect to the trained eye.
Step 2: Calculating Internal Clearances
The most significant constraint modellers face is the internal width and height of the 3D printed shell. While our OO9 locomotive kits are engineered for specific mechanisms to minimize these issues, third-party shells often have thick walls that restrict space. You must measure the highest point of the motor and any flywheels to ensure they don't foul the inside of the boiler or cab. It's best to leave a 0.5mm buffer for expansion and painting. If you plan to add lead weighting for better traction or a DCC decoder, you'll need to calculate that volume now. A chassis might fit the shell perfectly, but if there's no room left for the "brain" or the ballast, the locomotive's performance will suffer on steep gradients or over complex pointwork.
The Top 2026 Chassis Contenders: Kato, Tomytec, and Beyond
Sourcing the right donor mechanism can feel like a hunt for a moving target as production runs begin and end. However, choosing a chassis for oo9 kits in 2026 is supported by several established manufacturers that prioritize smooth performance over sheer speed. While some older models like the Tomytec TM-10 are increasingly rare, newer releases and renewed versions of classics ensure modellers have reliable options. While certain Japanese models can be difficult to source locally, importers and specialized retailers provide a reliable bridge for UK modellers.
Kato: The Reliable Workhorse
Kato remains the dominant force in the market, with the 11-109 and 11-110 series serving as the foundation for approximately 85% of small industrial locomotive builds. The current 11-109 is a renewed version of the venerable 11-103, offering improved motor efficiency and a retail price typically between $26.99 and $31.03 as of August 2026. The Kato 11-109's core advantage is its combination of a compact footprint and exceptional electrical pickup, making it a plug-and-play solution for most small locomotive shells. While these units are occasionally out of stock, their status as an industry standard means retailers generally restock them within a few months.
Tomytec and Specialized Japanese Mechanisms
For modellers building larger prototypes or specialized rolling stock, the Tomytec TM-series offers a broader range of wheelbases and bogie configurations. The TM-14 is expected to see a 2026 release with a pre-order price of £48.45, while the TM-12R is slated for a September 30, 2026 release. These mechanisms often require more internal shell clearance than Kato units but provide superior stability for longer locomotive bodies. If you're working on ultra-tiny shunters, Tsugawa Yokou remains the proactive solution for short wheelbases, though their limited weight requires careful ballasting to maintain traction.
Specialist and Mainline Donors
Beyond mass-produced Japanese imports, UK modellers often turn to N-Drive Productions for high-end, bespoke chassis that offer ultimate prototypical accuracy. For those who prefer a "heavy-metal" approach, repurposing standard N gauge locomotives like the Graham Farish Class 08 or 04 shunter provides a robust, pre-weighted foundation. Resources like The 009 Society are invaluable for checking current compatibility lists and finding second-hand donors. While these mainline conversions can be complex, they often result in a locomotive with superior pulling power and integrated DCC readiness that smaller Japanese units sometimes lack.
Preparing for Performance: DCC, Weight, and Smooth Running
Once you've finished choosing a chassis for oo9 kits, the next technical hurdle is ensuring the finished model has enough physical presence to pull a load. Lightweight 3D printed resin lacks the natural heft of traditional white metal or die-cast shells. Without adding ballast, even the most expensive Kato mechanism will slip its wheels on a moderate gradient or stutter over dead-frog points. Achieving smooth performance requires a proactive approach to weighting and electrical management within the confines of a tiny locomotive body.
Ballasting for Traction in 3D Printed Shells
Adding mass is the most effective solution to the traction deficit inherent in 3D printed kits. Modellers typically choose between "liquid gravity" (tiny non-toxic metal beads) and thin lead sheets. Liquid gravity is particularly useful for filling irregular voids inside a boiler or side tank, while lead sheet can be cut to fit flat areas like the cab floor. You must ensure the center of gravity remains low and central between the axles. If the weight is too far forward or back, it can cause the chassis to "see-saw," which leads to poor electrical pickup. Always leave a small air gap around the motor to prevent overheating, as restricted airflow can lead to premature motor failure in compact OO9 shells.
Digital Command Control (DCC) in Small Spaces
Integrating DCC into the micro world of narrow gauge requires a steady hand and a minimalist mindset. While the currently available Kato 11-109 is considered DCC-friendly, it does not include a standard plug-and-play socket. This constraint means you must hard-wire a micro decoder, such as a Zimo or Lenz mini unit, directly to the motor and pickups. If you're struggling with intermittent stalling, installing a stay-alive capacitor is a proactive way to maintain power over dirty track or complex pointwork. These components act as a temporary battery, providing the split-second of energy needed to bridge gaps in current. If you're ready to start your next build with a chassis-ready shell, explore our range of OO9 locomotive kits designed for seamless mechanical integration.
Maintaining these small-wheelbase locomotives is equally vital for long-term performance. Because OO9 models are light, even a small amount of dust on the rails can interrupt the circuit. Regular cleaning with an isopropyl alcohol-based track cleaner and a light application of conductive oil to the axle bearings will ensure your donor chassis remains as reliable as the day it left the factory. By combining strategic weighting with modern DCC components, you can transform a simple kit into a professional-grade model that performs with the smoothness of its larger standard gauge counterparts.
While modelers focus on micro-wiring for their chassis, those working on larger-scale technical projects can find professional-grade reliability with Nijsha Enterprise, a specialist in custom cable assemblies, harnesses, and electronic components.
Completing Your Build with Narrow Minded Railworks Kits
Narrow Minded Railworks acknowledges that the most intimidating part of the hobby is often the physical modification of expensive mechanisms. We've developed a proactive solution by engineering our shells around the most reliable donors on the market. When choosing a chassis for oo9 kits from our range, you aren't just buying a resin shell; you're investing in a part that has been digitally and physically test-fitted to the Kato 11-109 and 11-110 series. This "designed-in" fit significantly reduces the need for aggressive chassis trimming or destructive filing of the motor block.
Designed for Modellers, by Modellers
Our philosophy centers on removing the technical guesswork that often stalls narrow gauge projects. Our OO9 locomotive kits are created using high-precision 3D printing, allowing us to include internal mounting points and clearance channels specifically for commercial mechanisms. We understand that while modellers enjoy the creative process, they don't want to spend hours troubleshooting a motor that won't sit level. Our range caters to diverse narrow gauge interests, including:
- Industrial shunters for tight factory dioramas
- Quarry hunslets for rugged hillside layouts
- Freelance designs for creative freedom
By choosing a chassis for oo9 kits that matches our engineered specifications, you ensure that your locomotive will be a smooth-running centerpiece of your layout. We test-fit these commercial mechanisms during the design phase to ensure that the marriage of the body and motor is as seamless as possible, providing the creative spark for your next layout project without the usual mechanical headaches.
From Kit to Layout: The Final Steps
A professional finish requires a structured approach to the build sequence. We strongly recommend painting 3D printed models before you perform the final assembly with the chassis. This prevents paint overspray from entering the motor or clogging the delicate gears of your donor mechanism. If this is your first project, our Beginner's Guide to OO9 provides broader context on selecting your first prototype and donor.
When you're ready for final assembly, use a small amount of non-fogging adhesive or specialized mounting putty to secure the shell safely. This allows for future maintenance or DCC adjustments without damaging the 3D print. Our community and support resources are always available to help you through the build process, ensuring that every kit you complete results in a professional-looking, smooth-running model you can be proud of.
Building Your Next Narrow Gauge Masterpiece
Success in narrow gauge modelling relies on the technical marriage between a high-quality body and a reliable motor. While the process of choosing a chassis for oo9 kits requires meticulous measuring and careful ballasting, the results are worth the effort. You now have the tools to evaluate wheelbase constraints and internal clearances to ensure your locomotive performs flawlessly on even the most complex trackwork.
Finding the perfect donor mechanism doesn't have to be a source of frustration. We offer a proactive solution through our expertly designed 3D printed bodies. Our UK-based studio engineers every kit specifically for compatibility with Kato and Tomytec mechanisms, ensuring a precise fit with minimal modification. We ship worldwide to help modellers everywhere bring their narrow gauge visions to life. Browse our range of OO9 locomotive kits designed for easy chassis fitting and start your next build with confidence. Your layout deserves a locomotive that runs as beautifully as it looks.
Frequently Asked Questions
What is the best N gauge chassis for a beginner's OO9 kit?
The Kato 11-109 is widely considered the best N gauge chassis for beginners due to its exceptional reliability and compact design. While other mechanisms exist, the 11-109 offers the most consistent power pickup for small industrial prototypes. It provides a stable foundation that fits most entry-level 3D printed shells with minimal adjustment, making it the industry standard for those new to the hobby.
Can I use an N gauge locomotive as a donor for an OO9 kit?
You can certainly use a standard N gauge locomotive as a donor, though internal space is often a significant constraint. Modellers frequently repurpose Graham Farish Class 08 or 04 shunters because of their robust metal frames and excellent slow-speed gearing. A proactive solution is to measure the donor's height and width carefully to ensure the motor block doesn't foul the inside of your narrow gauge body shell.
How do I measure the wheelbase of a chassis accurately?
Accurate measurement requires a set of digital calipers rather than a standard ruler. You should measure the distance from the center of one axle to the center of the next to determine the wheelbase. When choosing a chassis for oo9 kits, it is also vital to measure the total length of the chassis block to ensure it fits within the locomotive's buffer beams without interference.
Do I need to modify the chassis to fit a 3D printed body?
Many commercial chassis require slight modifications, such as trimming plastic tabs or filing down small protrusions, to sit flush inside a body. While this is a common constraint, our kits are engineered specifically for Kato mechanisms to provide a "designed-in" fit. This proactive design approach significantly reduces the need for aggressive or destructive modifications to your motor unit during the assembly process.
Is it possible to fit DCC to a Kato 11-109 chassis?
It is entirely possible to fit DCC to a Kato 11-109 chassis, although it lacks a standard plug-and-play socket. You will need to hard-wire a micro decoder by soldering leads directly to the motor terminals and power pickups. Because internal space is limited, using a "micro" or "nano" sized decoder from Zimo or Lenz is the most effective solution for maintaining a clean layout.
Why does my narrow gauge locomotive stall on points?
Stalling on points usually occurs because the short wheelbase of a narrow gauge locomotive cannot bridge the "dead" spot on a frog. While this is frustrating, adding weight through liquid gravity or lead sheet provides a proactive solution by improving electrical contact. You should also verify that your track is clean and that the wheel pickups are making firm contact with the back of the wheels.
Where can I buy N gauge chassis for OO9 kits in 2026?
In 2026, you can source N gauge chassis from specialist retailers like Nitro Hobbies, Factory Direct Hobbies, or Plaza Japan. While UK stock levels for the Kato 11-109 can fluctuate, many modellers find that importing directly from Japan is a reliable way to secure specific Tomytec or Tsugawa mechanisms. Always check for the latest renewed versions to ensure you receive the most modern motor technology available.
What is the difference between a 4-wheel and 6-wheel chassis for OO9?
The primary difference lies in the balance between prototypical accuracy and track performance. A 4-wheel chassis is easier for beginners to fit and handles tight radius curves with ease, which is a common requirement for industrial layouts. In contrast, a 6-wheel chassis offers better power pickup and traction for larger locomotives but requires more internal space and wider curves. When choosing a chassis for oo9 kits, your choice should reflect both the prototype's look and your layout's geometry.