

The most convincing OO9 layout may need fewer scenery pieces, not more. In a compact scene, an oversized building or a scatter of unrelated details can distract from the railway. Well-chosen oo9 scenery gives the setting a clear purpose and helps viewers understand what happens there.
It’s easy to focus on individual models first: a station building, water tower or figure can each catch the eye. But the right choice depends on how each piece fits the layout’s scale and footprint, supports its setting and contributes to a coherent scene. Finishing needs matter too, particularly when a model is supplied unpainted and you’re planning how it will sit alongside the rest of the layout.
This guide will help you compare scenery by size, function, setting and finishing work, so you can choose details that feel at home rather than overwhelm the space. We’ll look at how structures establish a location or railway purpose, how to build a scene around a few purposeful details, and what to consider before choosing your next addition.
Key Takeaways
- Start with the scene’s purpose, then choose details that support its railway setting rather than adding accessories without a clear role.
- Compare oo9 scenery by stated scale, footprint and finishing needs to help each piece suit your layout.
- Use structures such as a water tower or water crane to suggest how the railway operates and give the scene a sense of place.
- Sketch the scene and mark key sightlines before placing buildings, figures and railway details, leaving practical room around the track.
- Build a more convincing layout with a few well-placed details that work together, instead of letting large structures crowd the scene.
OO9 scenery: start with the scene you want to create
OO9 scenery includes the buildings, railway structures and surrounding details that establish the setting and activity of a narrow-gauge railway layout. It differs from track, which provides the route, and rolling stock, which moves along it. Scenery gives viewers clues about where the railway is and how the place is used.
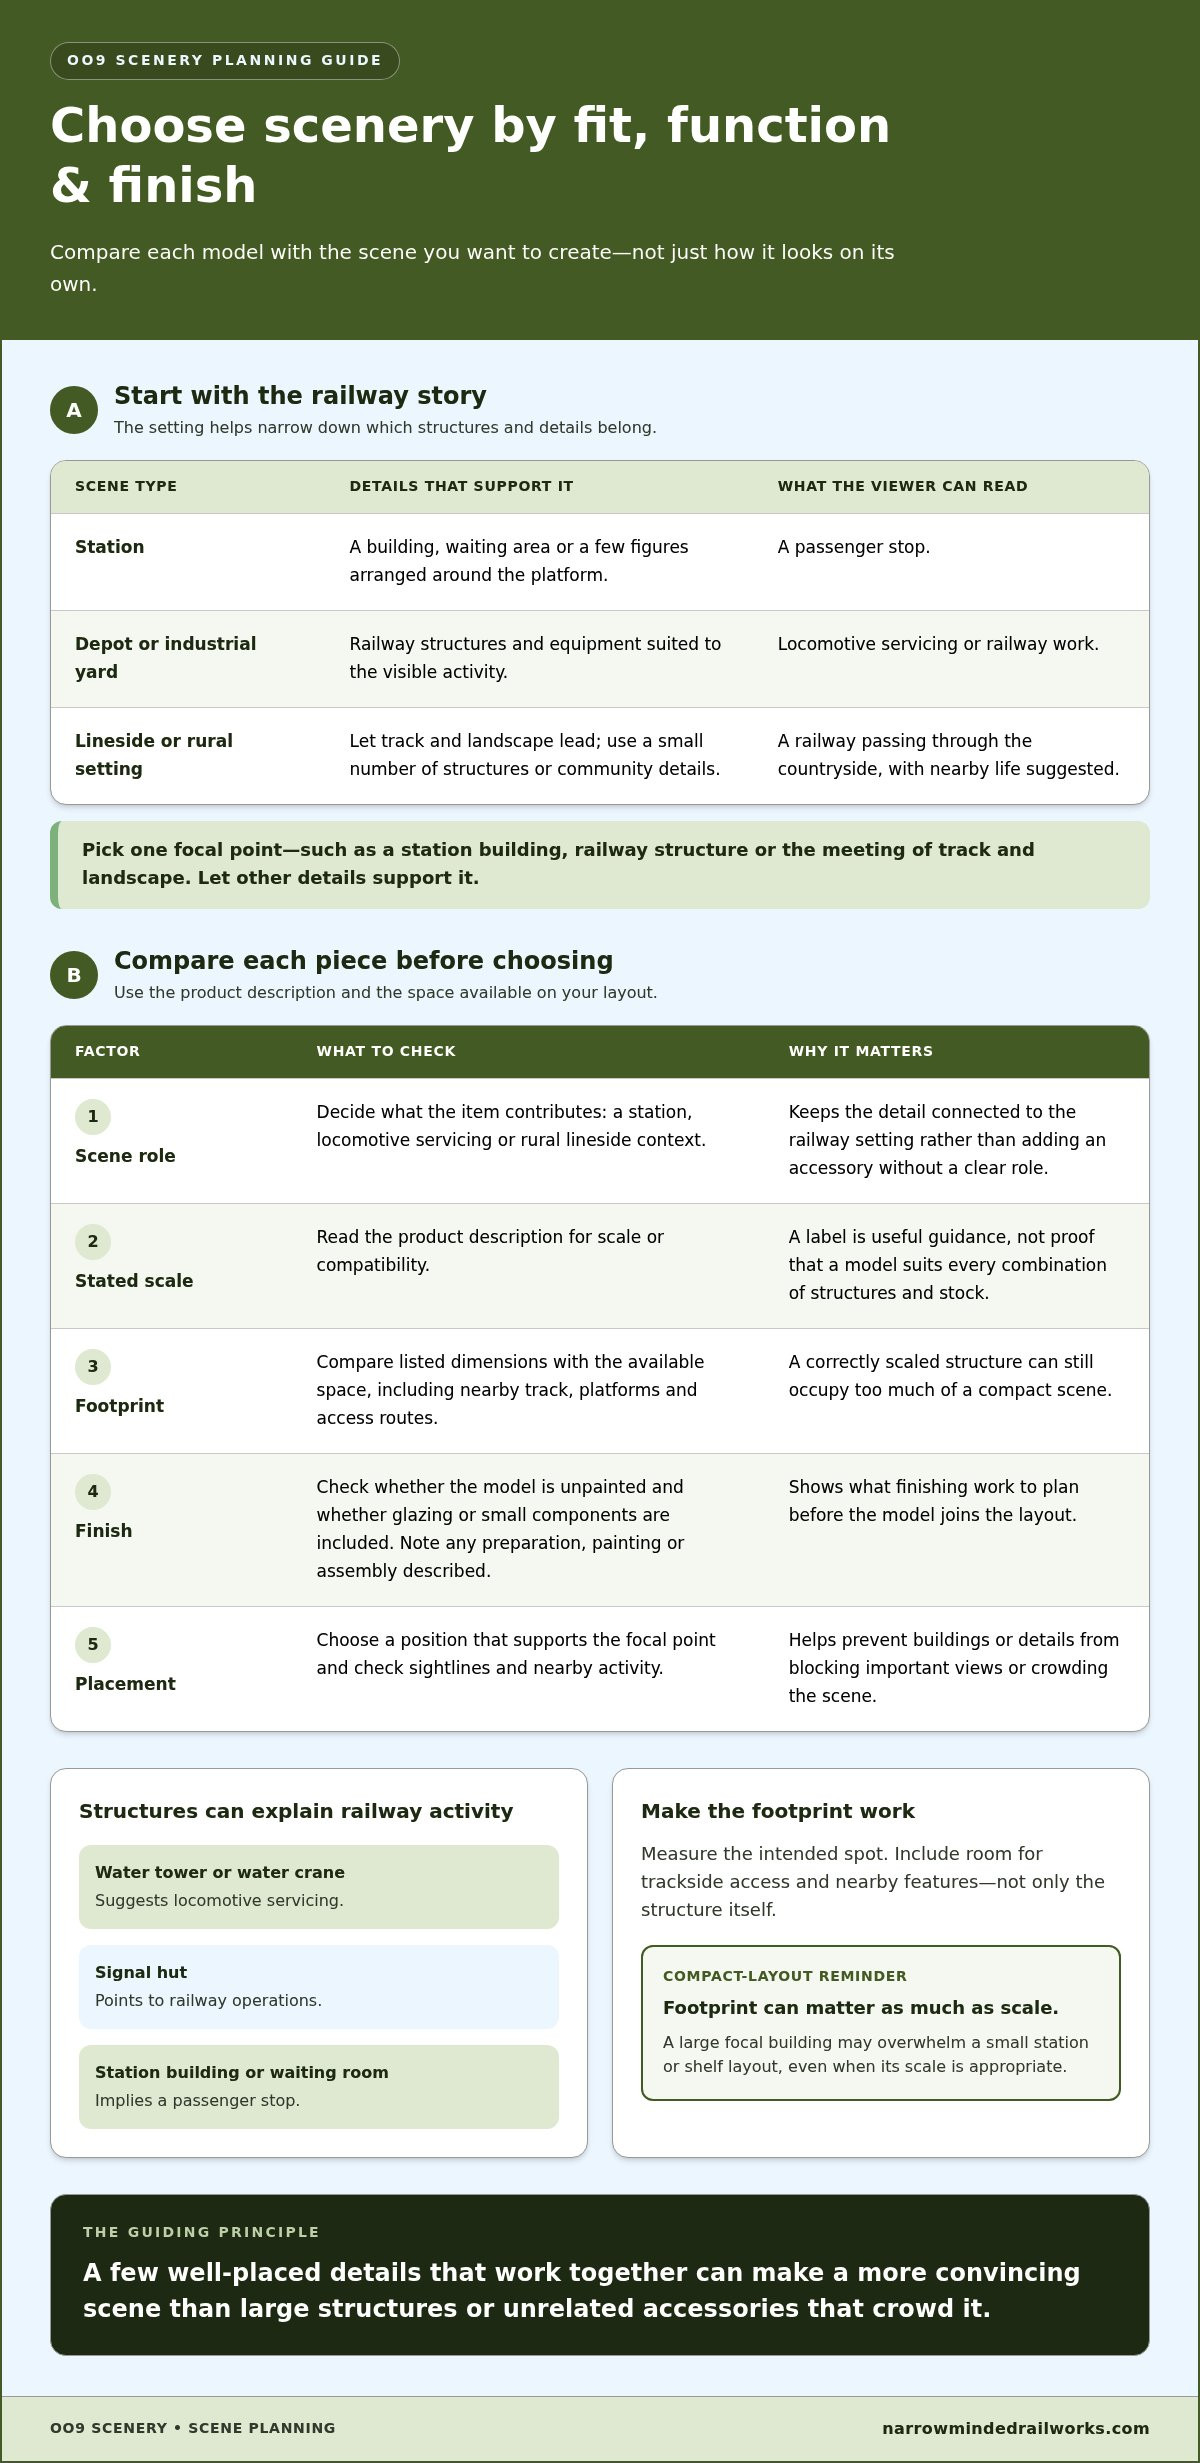
A convincing scene doesn’t need every accessory you can find. It needs details that work together. Before choosing a model, picture the location: a station stop, a locomotive depot, a lineside stretch, an industrial yard or a rural setting. That decision narrows your choices and helps prevent a compact layout from becoming a collection of unrelated objects.
What story should your OO9 layout tell?
Ask what a viewer should understand at a glance. Is this a working railway where locomotives are serviced, a station where passengers wait, or a quiet landscape where the track passes through the countryside? Each story calls for different structures and activity. A depot scene needs evidence of railway work; a small station may be better served by a platform-side building and a few figures.
Choose one focal point to lead the eye. It might be the station building, a prominent railway structure or the meeting of track and landscape. Place other details to support it rather than compete for attention. In a small scene, a clear focal point makes the layout easier to read and gives each addition a reason to be there.
- Station: Suggest a passenger stop with a building, waiting area or figures arranged around the platform.
- Depot or industrial yard: Focus on servicing or work, using railway structures and equipment that suit the visible activity.
- Lineside or rural setting: Let the track and landscape take the lead, with a small number of structures or community details to suggest nearby life.
Which scenery pieces establish a railway setting?
Railway structures communicate purpose quickly. A water tower or water crane suggests locomotive servicing, while a signal hut points to railway operations. Station buildings and waiting rooms imply a passenger stop. Choose pieces that match what your railway appears to be doing, rather than adding a structure simply because it looks attractive.
Specific references can also give a scene character. A Beddgelert-inspired water tower can anchor a railway location, while a Goathland water crane gives a scene a clear servicing role. A single structure can do more than fill space: it can hint at the railway’s work and connect the layout to a recognisable setting.
Not every detail needs to be railway equipment. Gardens, shelters and other community features can suggest that people live or gather near the line, softening the scene around operational structures. Keep these details secondary if railway activity is the main story. A few considered elements create a more coherent OO9 scenery plan than an assortment of accessories with no shared purpose.
How to choose OO9 scenery: scale, footprint and finish
Once you’ve settled on a scene, assess each piece against the space and work involved, not just its appearance. OO9 commonly follows OO-scale modelling conventions, but that doesn’t mean every OO or OO9-labelled item will suit every layout. Use the stated scale and dimensions on the product page, then judge whether the model fits your particular scene.
Use this five-step checklist before you choose:
- Scene role: Decide what the item contributes, such as defining a station, suggesting locomotive servicing or adding context to a rural lineside.
- Stated scale: Read the product description for its scale or compatibility. Treat a label as useful guidance, not proof that the piece will suit every combination of structures and stock.
- Footprint: Compare the listed dimensions with the space available, including nearby track, platforms and access routes.
- Finish: Check whether the model is supplied unpainted and whether glazing or other small components are included. Plan for any preparation, painting or assembly described in the listing.
- Placement: Decide where the model will sit and whether it supports the focal point without blocking important views or activity.
How do scale and footprint affect an OO9 scene?
Scale helps you compare a structure with the railway, but footprint determines how much of the layout it occupies. A large focal building can overwhelm a small station or shelf layout, even if its scale is appropriate. In a compact layout, footprint can matter as much as scale because a correctly scaled structure may still occupy too much of the scene.
Measure the intended spot before buying, and include the space needed for trackside access and nearby features. Check each product page for stated dimensions and scale compatibility rather than relying on appearance alone. An OO or OO9 label is a starting point for comparison, not a promise of universal fit.
What finishing work should you plan for?
Finishing affects how much time and preparation a scenery piece needs. Product listings can tell you whether a model is supplied unpainted or includes glazing, so use those details to plan rather than assuming every item arrives ready for the layout. Allow room in your project plan for priming, painting and fitting small details where required.
For 3D-printed pieces, the guide to painting 3D printed models can help you plan a suitable finishing approach. Once you know the scale, dimensions and work involved, browse the OO9 scenery collection for buildings, railway details and figures to compare with your layout.
OO9 scenery examples: compare buildings, railway details and figures
Comparing scenery by its role makes it easier to picture what a model could contribute before setting aside space for it. The examples below cover passenger stops, locomotive servicing, railway operations and the smaller details that give a yard or lineside scene context. Check each product listing for its stated scale and dimensions; don’t assume every item will suit every OO9 layout.
| Product | Scene role | Scale to check | Notable feature |
|---|---|---|---|
| Minffordd station halt | Station stop | Check product listing | Station-building option inspired by a real railway location |
| Beddgelert-inspired water tower | Locomotive servicing | Check product listing | Reference to a recognisable railway setting |
| Goathland water crane | Locomotive servicing | Check product listing | A focused operational detail |
| Signal hut | Railway operations | Check product listing | Can sit beside a station or line |
| Corrugated workshop | Maintenance or industrial scene | Check product listing | Suggests work taking place off the main line |
| Storage tanks | Depot or yard | Check product listing | Small details with a practical purpose |
| Six-figure loco crew pack | Human activity | Check product listing | Several figures to place around railway activity |
Which OO9 scenery suits a station or locomotive scene?
For a passenger stop, consider the Minffordd station halt as a building around which to organise the scene. Its role differs from a water tower or crane: those suggest locomotive servicing, so place one where the railway’s work can be understood rather than using it as decoration beside an unrelated structure. A signal hut adds another operational cue. Set it near a station or railway line where it supports the impression of an active railway, while leaving the main building or locomotive as the focal point.
These structures can be combined selectively. A station and signal hut may tell a clear story about railway operations; adding a servicing feature makes sense if the space and layout narrative support it. Check scale compatibility and footprint on the individual listing before planning the arrangement.
How can smaller details make a layout feel inhabited?
Smaller items can make a scene feel purposeful without taking attention from its main structure. Storage tanks can suggest a working depot or yard, while a corrugated workshop points towards maintenance or industrial activity. Place each where the implied work fits the scene, and leave enough open space for the railway to remain visible.
Figures add human scale and a sense of activity. A six-figure loco crew pack offers several people to arrange around railway work, but use them to support the scene rather than compete with its focal point. Buildings, railway structures and figures let you build up an OO9 setting in deliberate layers, starting with the item that best explains what happens there.
Plan OO9 scenery placement and avoid common layout mistakes
A structure can suit the setting and still feel wrong if it blocks the railway or crowds the view. Plan the arrangement before fixing anything in place. A quick sketch and a few measurements can show whether the buildings, track and open ground will work together, and make it easier to adjust the composition while changes are still simple.
A clear visual hierarchy makes a small layout easier to read: give the main feature space, then let supporting details guide the eye towards it.
How do you fit scenery into a compact OO9 layout?
Begin with the track plan and mark the areas that must remain clear, including the route, platform edges and any space needed to reach or maintain the layout. Then sketch the scene and mark its focal point. This gives each scenery item a planned position instead of leaving you to squeeze it into whatever space remains.
Use this placement sequence:
- Sketch the scene: Draw the track, platforms and landscape boundaries before adding buildings.
- Mark the focal point: Decide which structure or scene feature should attract the viewer’s attention first.
- Measure footprints: Compare each model’s listed dimensions with its intended position, allowing room around trackside features.
- Place details: Test smaller items around the largest structure, checking sightlines from the usual viewing position.
Try a paper template or temporary placement before committing to a position. Look at the layout from the front and from the angles where it will usually be viewed. A building that seems neatly tucked away from above may hide a platform or block the view of a locomotive at eye level. Open ground is useful too: it gives the eye somewhere to rest and keeps the scene from feeling packed.
Which common OO9 scenery choices can weaken a scene?
More detail doesn’t always make a scene more convincing. If every appealing item gets added, buildings can cluster together and distract from the railway’s purpose. Keep each piece connected to the scene’s story, and leave gaps where the track, figures and landscape need to remain visible.
Check stated scale and dimensions on product listings rather than judging size from photographs alone. Camera angle and framing can make an item look smaller or larger than it is. Also consider the overall setting: railway structures, industrial details and landscape features should appear to belong in the same place. A workshop and storage tanks may suit a maintenance yard, while unrelated buildings need a clear reason to share the scene.
Review the plan as a whole before final placement. Can you follow the track with your eye? Is the focal point still clear? Can viewers see the features that explain the railway’s activity? If the arrangement feels crowded, remove or reposition a detail rather than filling every spare patch. Once your layout plan is ready, browse OO9 scenery and compare pieces against the spaces you’ve set aside.
Choose OO9 scenery for your project and browse the collection
A useful shortlist starts with the scene, not the number of items you hope to add. Decide whether the layout represents a station, a working yard or a quieter stretch of railway, then choose one structure that establishes that setting. Check its stated scale and footprint against your plan, and consider what finishing work it needs before deciding which details belong alongside it.
The OO9 scenery collection brings together buildings, railway details and figures, giving you different ways to establish a location or add activity. Use the product descriptions to compare each candidate with your layout rather than treating the collection as a checklist to complete. If you’re still working out what kind of railway to model, the guide to narrow-gauge railway modelling basics can help you shape the setting first.
With a scene in mind, browse OO9 scenery and compare possible additions against the space and purpose you’ve planned.
Build a focused shortlist before you buy
Start with one focal structure, then select a small number of supporting details that have a clear role. For each candidate, note its intended location on your plan and compare the listing’s stated scale and dimensions with the available space. Check details such as glazing and finishing requirements there too, so you can account for preparation and painting in your project plan.
A shortlist keeps the choice practical: if you can’t point to a specific place for an item, it may not be needed yet. Leave room to adjust as the scene takes shape.
Turn the shortlist into a coherent OO9 scene
Give priority to pieces that establish where the railway is or what happens there. Balance the main building with smaller details and open areas, so the scene feels active without becoming crowded. A figure or railway structure can add context, but it should support the setting rather than obscure its focal point.
Before placing your final choices, review the whole arrangement together. Check that the setting feels consistent and that trackside features remain visible. Then explore the OO9 scenery collection to find pieces that fit your project plan.
Give your OO9 layout its next clear detail
Your next scenery choice can be a small step towards a layout that feels distinctly yours. Start with the space you want to develop, then decide what you’d like viewers to notice or imagine there. A single well-chosen structure can suggest a railway’s purpose, while a few supporting details can make the surrounding scene feel active without crowding it.
The collection brings together buildings, railway details and figures to consider for your project. Treat browsing as a chance to refine your plan: shortlist pieces that suit the setting, then compare their listed scale, footprint and finishing needs before deciding where they belong. The best oo9 scenery choice is one that works for your layout, not simply the next available space to fill.
Ready to choose a detail for your scene? Browse the OO9 scenery collection and find a purposeful addition for your layout. Your next modelling session can start with one clear idea and grow from there.
Frequently Asked Questions
What does OO9 mean in model railway scenery?
OO9 combines OO scale, typically 4mm to 1ft or 1:76, with track that’s 9mm gauge. The convention lets modellers represent narrow-gauge railways using relatively large, detailed models on narrow track. For scenery, that means buildings and figures should look in proportion to 4mm-scale railway models, while the narrow track helps convey the character of a smaller-gauge line.
Can OO scale scenery be used on an OO9 layout?
Often, yes, because OO9 commonly uses OO-scale modelling proportions. Still, compare the item’s stated scale and dimensions with the models already on your layout. A building might be labelled for OO but have a footprint or architectural proportions that feel out of place in a particular scene. Consider how it will look beside your locomotives, wagons and other structures before settling on its position.
How do I choose the right size scenery for a small OO9 layout?
Measure the area where the model will sit, then compare those measurements with the product listing. A paper outline cut to the listed footprint can help you test how much room a building leaves for nearby features. Check the layout from its usual viewing angle too: a structure might fit physically yet hide the train or make a small station feel cramped. Leave space to reach the track during layout work.
What buildings are useful for an OO9 station scene?
A station building or waiting room gives passengers a clear destination, while a signal hut can suggest railway operations nearby. Choose according to the kind of stop you’re depicting: a modest halt may need only a small building, whereas a busier scene could support more activity around the platform. Figures can help show how the space is used. Check the dimensions and stated scale of each building against your platform and track arrangement.
Do 3D-printed OO9 scenery models need painting?
Some do. Many scenery models are supplied unpainted, so read the relevant listing to understand the finishing work planned for that particular item. If painting is required, allow time to prepare the surface, apply a suitable primer and add colour and details. The material and instructions can affect the approach, so don’t assume every 3D-printed model needs identical preparation or will arrive in the same state.
How can I make OO9 scenery look realistic without overcrowding the layout?
Use a consistent setting as your guide, and avoid adding details simply to fill every open patch. For example, a rural halt can feel convincing with a restrained mix of railway and local features, while industrial equipment may suit a yard. Vary the height and spacing of structures to give the scene visual depth, and keep the most important railway activity visible from the viewing side.
Can figures and railway details be used alongside OO9 buildings?
Yes. Figures and small railway details can give buildings a sense of scale and show how the space is used. Place people where an activity makes sense, such as near a station building or around railway work, and keep them clear of moving stock and access points. Check that figures suit the scale of nearby structures, then use a few well-positioned details to add life without drawing attention away from the scene’s main feature.