

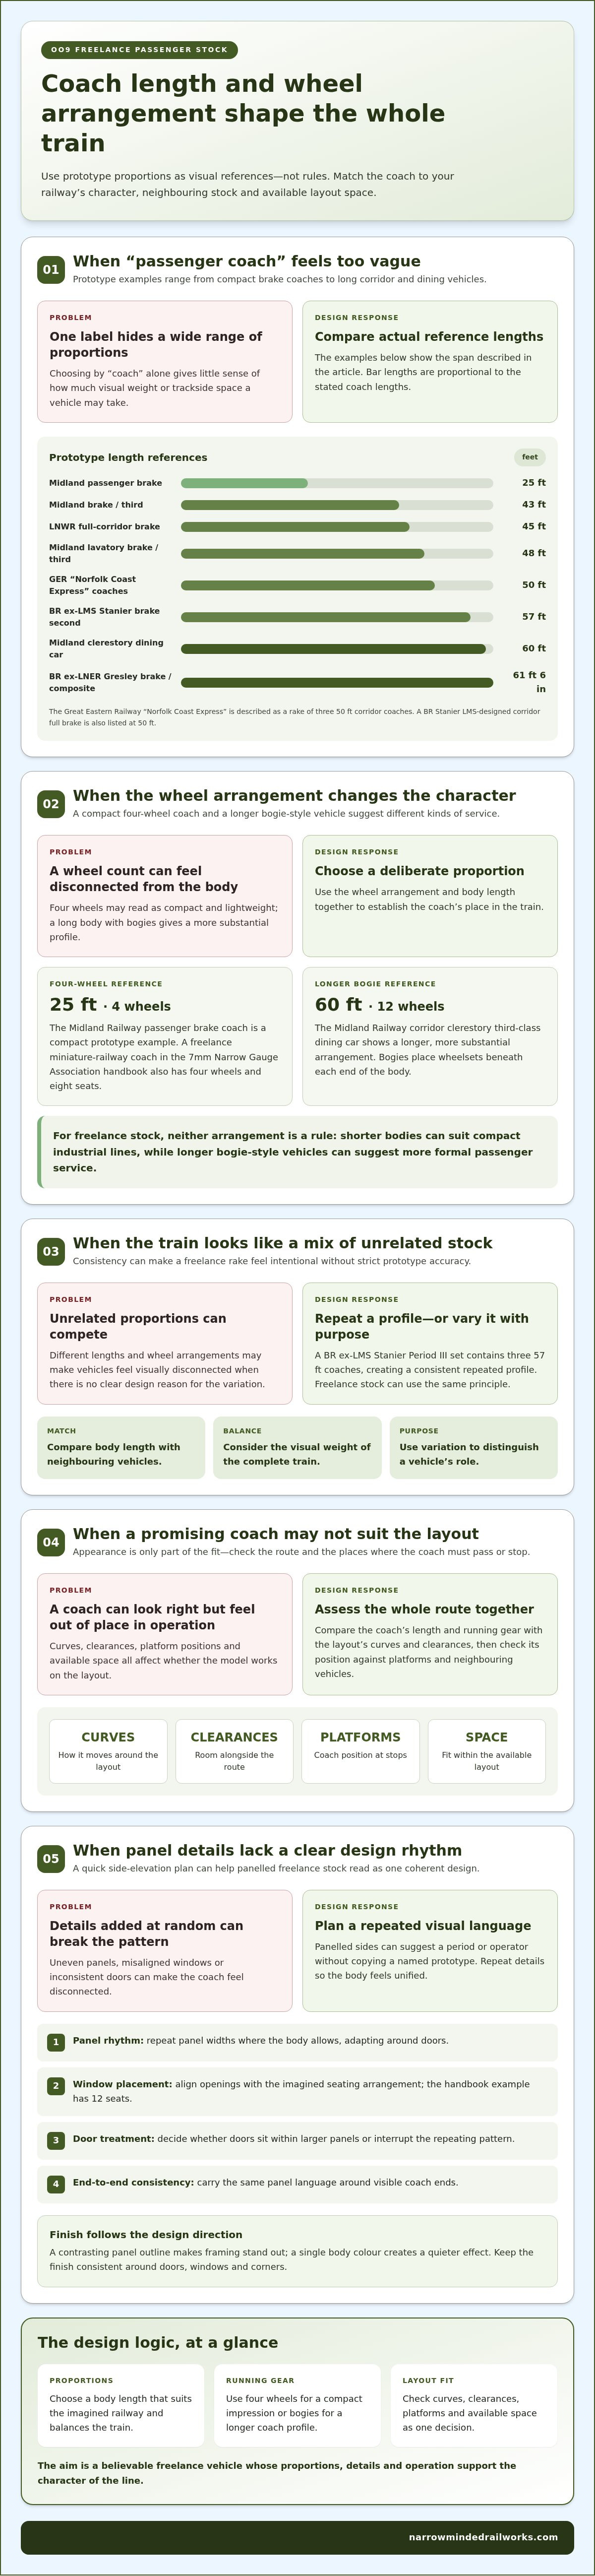
A freelance coach’s length and wheel arrangement should match the character and space available on your narrow-gauge layout. Reference designs range from a 25 ft, four-wheel Midland Railway passenger brake coach to a 60 ft, 12-wheel Midland Railway dining car; miniature-railway freelance stock also includes four-wheel coaches. An OO9 freelance passenger coach kit can therefore suggest anything from compact local stock to a longer, more formal train.
Choosing a style is only part of the decision. A panelled body may suit the railway you’re imagining, while the coach’s length, wheel configuration and running gear affect how it sits within a train and moves around your layout.
This guide explains how coach proportions and wheel arrangements differ, what panelled styling can bring to a freelance design, and how to assess a model’s fit with your curves, platforms and available space. You’ll also find practical kit-building considerations to help you choose a coach that suits both your railway’s appearance and its operating needs.
Key Takeaways
- Compare coach proportions and wheel arrangements to choose stock that looks appropriate alongside your locomotives and other vehicles.
- Use panel detailing to establish the character of freelance passenger stock while keeping the design consistent with your imagined railway.
- Assess curves, clearances and platform positions together to judge whether a coach will work on your layout.
- Understand how OO9 scale relates to track gauge before selecting a kit for your narrow-gauge scene.
- Weigh the hands-on building involved in a kit against the convenience of a ready-to-run model when deciding which approach suits you.
Coach lengths and wheel configurations
British railway prototypes show how widely passenger coach proportions can vary. A London & North Western Railway full-corridor brake coach measures 45 ft. Midland Railway examples range from a 25 ft passenger brake coach to a 60 ft corridor clerestory third-class dining car. These prototypes offer useful visual references, but they don’t dictate the dimensions of freelance stock.
Shorter bodies can suggest compact miniature-railway vehicles. The Midland Railway passenger brake coach is 25 ft long and has four wheels. A freelance miniature railway coach described in the 7mm Narrow Gauge Association handbook has four wheels and eight seats. By contrast, longer prototype coaches often use bogies, which place wheelsets beneath each end of the body.
Compare the examples by role as well as length. A Midland Railway non-corridor brake/third coach is 43 ft long, while its clerestory non-corridor lavatory brake/third coach is 48 ft. A corridor clerestory third-class dining car extends to 60 ft and has 12 wheels. These differences affect the visual weight of a train and how much space each vehicle occupies.
- The Great Eastern Railway “Norfolk Coast Express” is a rake of three 50 ft corridor coaches.
- A BR ex-LNER Gresley corridor brake/composite coach measures 61 ft 6 in.
- A BR ex-LMS Stanier corridor brake second coach measures 57 ft.
- A BR Stanier LMS-designed corridor full brake coach measures 50 ft.
Those named examples show why “passenger coach” doesn’t describe one standard length. A BR ex-LMS Stanier Period III set contains three 57 ft coaches, creating a consistent, repeated profile. For freelance stock, choose proportions that suit the imagined railway instead of copying a full-size train automatically. A shorter body can look at home on a compact industrial line; a longer, bogie-style vehicle can suggest more formal passenger service.
Before choosing an oo9 freelance passenger coach kit, decide whether its wheel arrangement supports the appearance you want. Four wheels suit a compact, lightweight impression, while bogies create a longer coach profile. Then compare the body length with neighbouring vehicles, platform space and the visual balance of the train. A consistent set of proportions usually looks more convincing than mixing unrelated prototypes without a clear design reason.
The listing describes the coach as having two compartments and four wheels. To assess whether it suits your freelance design, consider how the compartment divisions might appear through the windows and whether they fit the service you have in mind. The four-wheel arrangement can suggest a compact, simple character alongside a short body, or create a deliberate contrast with a more substantial body. These are visual choices, not rules, so consider the coach in relation to the rest of the train.
Consider how the coach will look beside other vehicles and against your railway’s platforms and buildings. Repeating similar body proportions and wheel arrangements can create a coherent train, while deliberate variation can distinguish a vehicle’s role. The compartments may suggest a divided interior, but the exterior should still suit the railway’s overall style. If the coach looks too heavy or plain beside neighbouring stock, reconsider its proportions, finish or place in the train. The goal is a believable vehicle whose details support the imagined line, not strict prototype accuracy.
Freelance panelled passenger stock
Panelled sides give a coach a distinctive passenger-stock character without requiring a direct prototype copy. On a freelance narrow-gauge railway, framed doors and windows can suggest a particular period or operator. Keep the design consistent: repeated panel shapes, aligned window tops and matching door details help the coach read as a coherent whole.
A useful reference appears in the 7mm Narrow Gauge Association handbook, Going Minimum Gauge. Its article includes a photograph of a freelance bogie coach with 12 seats. That example shows how a modeller can create passenger stock around a chosen railway rather than reproduce a named full-size vehicle. Use it as a prompt for deciding how many windows, doors and seating bays your own coach needs.
Before assembly, sketch the side elevation and mark the main features. This makes uneven spacing easier to spot before details are fixed in place. Consider these elements together:
- Panel rhythm: repeat the same panel width where the body design allows, then adapt around doors.
- Window placement: align window openings with the imagined seating arrangement, as in the 12-seat handbook example.
- Door treatment: decide whether the doors sit within larger panels or interrupt the side’s repeating pattern.
- End-to-end consistency: carry the same panel language around the coach ends where the body design makes it visible.
These choices shape the coach’s character more effectively than adding detail at random. For example, repeated, restrained panels can suggest a practical local coach, while more elaborate framing can make the same basic form feel formal. Choose a clear design direction and repeat its details across the body.
Colour and finish should reinforce the body’s structure. A contrasting panel outline makes the framing stand out, while a single body colour creates a quieter effect. Test your choice on a small drawing or sample before applying it to the whole coach. Keep the finish consistent around doors, windows and corners to avoid a visually disconnected appearance.
Panelled freelance stock also leaves room for an individual identity. A fictional railway might use a recurring emblem or lettering style, but these should complement, not compete with, the body’s framing. Apply the imagined operator’s style consistently across its passenger vehicles. That gives the design a deliberate feel without copying a specific railway.
To develop your own narrow-gauge scene, browse narrow-gauge modelling ideas alongside your panel sketch. A clear side elevation, a defined seating plan and one consistent style make a practical starting point for a freelance passenger coach.
Kit building and layout suitability
Yes, an OO9 freelance passenger coach kit can suit beginners who are comfortable with careful assembly. Start by checking the parts, following the build sequence and testing the finished vehicle on your layout.
Kit Building and Layout Fit
Kit building involves assembling separate components into a complete coach. For a useful fit assessment, consider the body length, wheel arrangement, curve radius and available platform space together. A test coach negotiated curves with a radius of 9½ inches, approximately 24 cm. Treat that as a practical example of one coach on one test layout, rather than a universal curve requirement.
Some kit details affect assembly and running directly. The coach floor is plasticard measuring 88 x 26 mm and 1.5 mm thick. Its surface is scored at 4 mm intervals to represent planking. Bogies mount on bolts with a 2 mm diameter, while plasticard bolt mounts have holes measuring 4 mm across. Spacers use 0.5 mm-thick plasticard.
Use a deliberate sequence to reduce avoidable rework:
- Lay out the floor and body parts, then identify the front, rear and seating orientation.
- Check that the floor sits squarely against the body before fixing parts in place.
- Fit the bogie mounts and spacers, keeping the wheelsets aligned beneath the coach.
- Test movement on the layout’s tightest curve before completing delicate details.
On a curved route, the coach ends and bogies move differently from the centre of the body. Check clearance from platforms, nearby scenery and adjacent vehicles. If the body overhangs on a curve, increase trackside clearance or reconsider the coach’s position in the train.
Comparing Kits and Ready-to-Run Coaches
A kit gives you a direct role in assembling the coach, while a ready-to-run model arrives assembled and needs less construction before it can go on the layout. The choice depends on whether you enjoy building or prefer a completed vehicle.
For beginners, the kit route can be manageable when the parts and instructions support a clear sequence. The 88 x 26 mm floor and 2 mm bogie-mount bolts provide specific assembly points to work from. Take time with alignment, because uneven mounts can affect how the coach sits and runs.
Choose a kit if you enjoy assembly and are comfortable working carefully with small components. Choose an assembled model if you would rather focus on operating the layout. In either case, assess the coach against your track geometry, platform edges and neighbouring stock before deciding where it will run.
OO9 scale
OO9 combines a scale convention with a narrow-gauge track designation. A kit listing identifies its gauge as OO9, so use that label when matching the coach to your railway. Gauge and scale describe different things: gauge concerns the distance between rails, while scale describes how the model relates to its imagined full-size railway.
That distinction matters when planning a train. A coach may look right beside a locomotive but still be unsuitable for your track or running gear. Start with your layout’s track gauge and compare it with the kit’s stated gauge. Check the wheel arrangement and couplings too, as these affect how the coach connects to and moves with other stock.
Use this practical check before choosing a model:
- Read the gauge label: make sure the kit is identified as OO9 if that is your layout standard.
- Compare scale appearance: judge the coach beside existing locomotives, buildings and figures.
- Review the running arrangement: check whether the wheels and bogies suit your track and curves.
- Check train compatibility: compare coupling height and position with the vehicles already in use.
Scale consistency is visual as well as mechanical. A coach much taller or wider than nearby stock can look out of place, even if it runs smoothly. Compare it with a familiar locomotive or structure before committing to a full train. This makes mismatched proportions easier to spot than when viewing the coach alone.
OO9 modelling also allows a railway to have its own identity. A freelance coach does not need to reproduce a named full-size prototype, but its proportions should feel credible beside the rest of the layout. For example, a compact station scene may call for a modest-looking coach, while a longer train can create a different impression. Let the layout’s setting guide the design.
Keep the track standard central when comparing OO9 with other narrow-gauge modelling. O-16.5 / 7mm Scale Kits represent a separate scale category, so the scale label alone does not establish compatibility with an OO9 layout. Compare gauge, wheel arrangement and overall proportions rather than assuming two narrow-gauge models can share track.
Finally, assess the complete route, not just a straight section. Check the coach through points, curves and platform areas, then observe whether its body clears adjacent scenery. The earlier test example negotiated a 9½-inch radius, approximately 24 cm, but that result applies to that coach and test arrangement. Your own track geometry and vehicle proportions determine the useful fit.
How do OO9 freelance coach kits compare with ready-to-run coaches?
An OO9 kit arrives as parts for the modeller to assemble, while a ready-to-run coach arrives built. That difference affects the work before the vehicle joins a train. A kit suits someone who wants to take part in construction; a ready-to-run model suits someone who prioritises placing stock on the layout.
Assembly gives you a direct role in shaping the coach. Follow the kit’s construction sequence, align the body and running gear, and choose a finish that suits your fictional railway. Ready-to-run stock involves less building, but gives you fewer opportunities to shape the construction process.
Compare the two approaches with the role you want the vehicle to fill:
- Choose a kit if assembling parts is part of the enjoyment and you’re prepared to work carefully.
- Choose ready-to-run if you want to concentrate on operating the railway rather than building stock.
- Consider a kit if a freelance design lets you shape the coach’s character around your imagined line.
- Consider assembled stock if you need a vehicle ready for placement without construction first.
Neither option removes the need to check layout fit. A completed model still needs to negotiate the track and sit appropriately beside platforms, scenery and other vehicles. A kit needs to be assembled soundly before running tests can provide useful results. In both cases, check body clearance and movement through points and curves.
For a beginner, a kit can suit the job if you approach the build patiently and methodically. Sort the components, understand how the body meets the running gear, and follow the assembly instructions in order. Careful alignment matters: a body fixed unevenly can affect its appearance and how the coach sits. Test the assembled vehicle on the layout before adding fragile details.
Consider the finish as well as the assembly. A kit lets you coordinate the coach’s appearance with your railway’s chosen style. A ready-to-run model comes with its construction complete, without requiring you to carry out those stages. If you’re building a consistent train, compare the vehicles’ appearance and couplings, not just their convenience.
Use a simple decision sequence: decide whether you want to build, identify the coach’s role, then assess how it will run and look on your layout. If building is central to the hobby, a kit offers a hands-on route. If construction is not the goal, ready-to-run stock may better match your priorities. Plan your next narrow-gauge build around the amount of modelling work you want to take on.
Narrow Minded Railworks: OO9 Locomotive & Wagon Kits
Narrow Minded Railworks offers OO9 Locomotive & Wagon Kits for modellers developing a narrow-gauge railway. After assessing passenger coach proportions and layout fit, these kits can help you build the locomotive and wagon stock around your chosen railway concept. The range also includes GN15 Locomotive & Scenery Kits, O-16.5 / 7mm Scale Kits, and Diorama Tools & Scenery, supporting projects across different narrow-gauge settings.
Choose an offering that matches your scale and the part of the scene you’re developing. If you’re planning an OO9 train, explore the locomotive and wagon kits as related stock for your layout. For more information, visit Narrow Minded Railworks.
Shape Your Next Narrow-Gauge Project
A fictional railway becomes more convincing when its passenger stock reflects a clear identity. Before your next build, decide what the railway carries, how its vehicles should look together, and which details deserve emphasis. That brief can guide your choice of an OO9 freelance passenger coach kit and help you plan the surrounding scene with purpose.
Narrow Minded Railworks offers OO9 Locomotive & Wagon Kits, GN15 Locomotive & Scenery Kits, and O-16.5 / 7mm Scale Kits. These offerings give modellers options for developing different narrow-gauge settings, whether the next step is adding related stock or building a scene around it. A defined project direction makes it easier to choose what supports your layout and leave out details that don’t.
Contact Narrow Minded Railworks to discuss your layout and explore an approach that fits your next modelling project. A thoughtful plan gives your railway room to develop, one well-chosen model at a time.
Frequently Asked Questions
What does OO9 freelance passenger coach kit mean?
An OO9 freelance passenger coach kit is a set of parts for building a passenger vehicle in the OO9 narrow-gauge modelling convention. “Freelance” means the coach follows an individual or imagined railway design, rather than reproducing one specific full-size prototype. For example, you can choose a body style and finish that suit your fictional railway, then assemble the components as a distinct piece of passenger stock.
What scale and track gauge are OO9 passenger coach kits designed for?
They’re designed for OO9 layouts: the kit listing identifies its gauge as OO9. The label tells you which modelling convention to match, but it doesn’t give a separate scale ratio or track measurement here. Before combining stock, check that your track, wheel arrangement and couplings suit the model. This helps avoid treating every narrow-gauge vehicle as compatible simply because it represents a small railway.
What materials and tools are needed to build an OO9 freelance coach kit?
The kit uses a plasticard floor measuring 88 x 26 mm and 1.5 mm thick, with 0.5 mm plasticard spacers. Its bogies mount on 2 mm bolts, and the plasticard bolt mounts have 4 mm holes.