


A quick gaming paint job needn’t mean careless masking. Useful masking techniques for model painting include low-tack tape, loose masks for softer edges, and quick coverage with tissue, foil or a bag. Match the method to the surface and desired finish, then remove the mask carefully to protect the paint beneath.
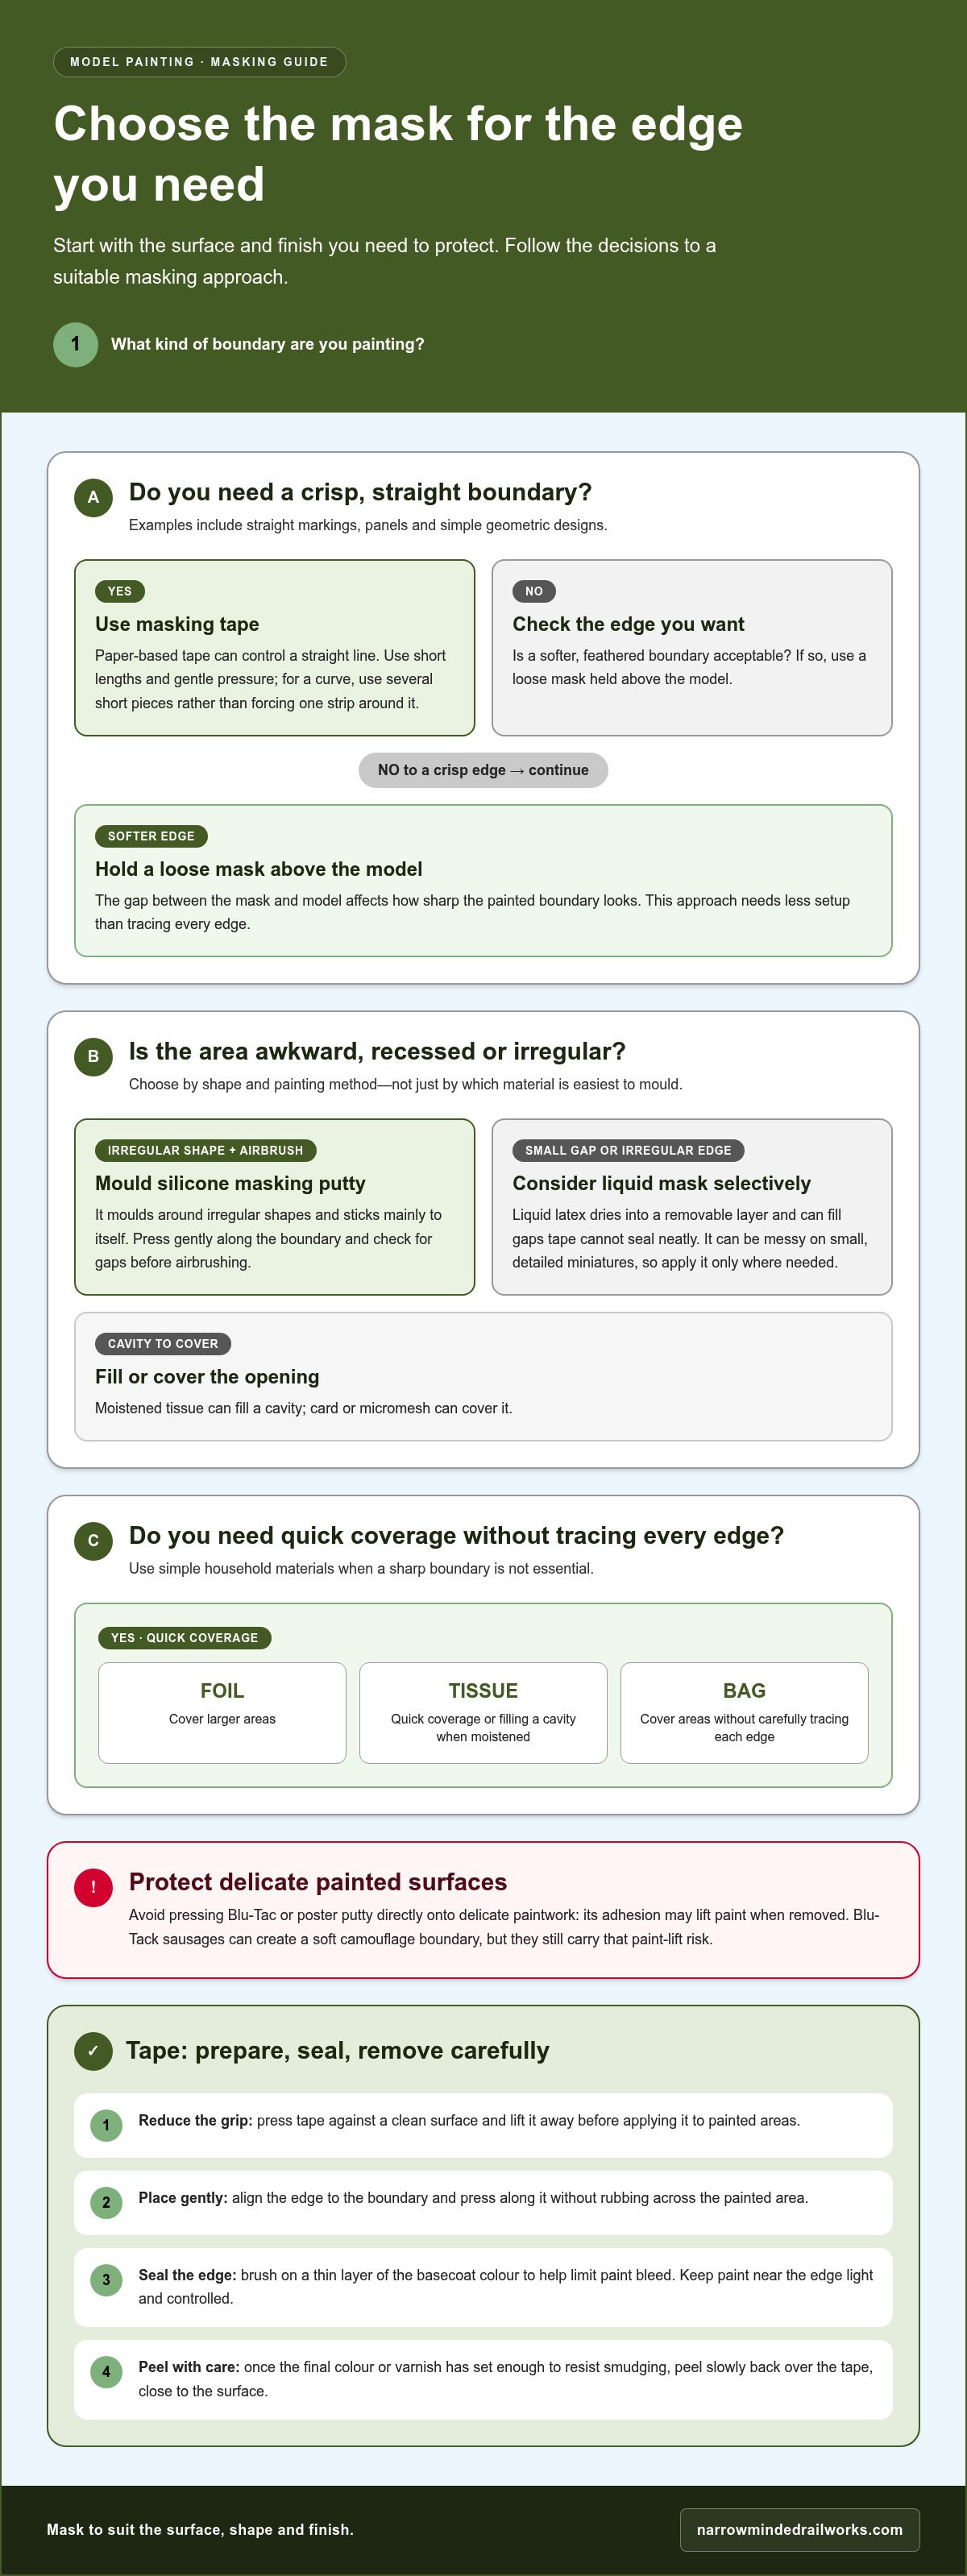
Masking can feel fiddly, especially when tape lifts fresh paint or liquid mask spreads beyond the intended area. A little preparation makes the process more controlled: seal tape edges to limit paint bleed, keep masking materials away from delicate finishes, and use quick coverage when a sharp boundary isn’t essential.
This guide explains how to reduce paint lift, when liquid mask is useful, and how to mask miniatures with less effort. It also covers quick approaches for gaming figures, from narrow tape for straight designs to simple household materials for protecting larger areas.
Key Takeaways
- Reduce tape’s adhesive strength before applying it to painted areas, and seal the edge with a thin layer of the basecoat to help limit paint lift and bleed.
- Use liquid mask selectively: it dries into a removable layer, but can be messy on small, detailed miniatures.
- For a softer edge with less setup, hold a loose mask above the model; the gap affects how sharp the painted boundary looks.
- Speed up gaming paintjobs with narrow tape for straight designs, or use foil, tissue and bags to cover areas without carefully tracing every edge.
- Choose the mask to suit the surface: delicate paint, awkward shapes and recessed areas each call for a different approach.
1. Avoiding Blu-Tac and poster putty on painted models
Blu-Tac and poster putty may seem convenient for covering small areas, but their adhesion can lift paint when removed. On a painted miniature, this can expose the layer beneath and spoil a carefully finished edge. Avoid pressing them directly onto delicate paintwork. For camouflage, Blu-Tack sausages can still create a soft boundary: their diameter affects how much the edge feathers.
Airbrushing and hand painting place different demands on a mask. For airbrushing, the mask should hold its shape against airflow; for hand painting, it needs a secure boundary to stop the brush straying onto nearby details. Silicone masking putty moulds around irregular shapes and sticks mainly to itself, making it useful for airbrushing miniatures.
Silly Putty can also be shaped around details without leaving residue, while Plasticene may leave oily marks. These materials behave differently, so choose according to the surface and finish you need to protect. Don’t assume every mouldable putty works like silicone masking putty.
For a curved surface or fine detail, mould silicone putty around the area to protect instead of stretching adhesive putty across it. Press gently along the boundary, then check for gaps before airbrushing. On a miniature with a cavity, moistened tissue can fill the opening; card or micromesh can cover it.
Apply primer before the main base coats, and mask only when the painted surface is dry enough to handle. Add the next colour in controlled passes, remove the mask carefully, then apply clear coats once the paintwork is complete. For a model canopy, paint the internal framing colour before priming so it shows through the transparent area.
Remove masks with care. Lift silicone putty from an edge and roll it back on itself instead of pulling sharply across the paint. If a mask crosses a fragile boundary, ease it away gradually and watch the painted edge as you work. Avoid sudden force, especially where paint meets raised detail.
Before choosing a putty, consider the finish, shape and painting method. Blu-Tack sausages can create graduated camouflage edges, but may lift paint from painted surfaces. Silicone putty is mouldable around awkward shapes for airbrushing, while careful hand painting may need only a small, precisely placed mask.
Make the masking choice before bringing a material to the model, rather than relying on Blu-Tac or poster putty because they are easy to shape. The author advises against Blu-Tac or poster putty for masking because its adhesion may lift paint when removed. On finished paintwork, preserving the surface should take priority over a quick, mouldable mask. Match the method to the task: use silicone masking putty when shaping around irregular contours for airbrushing, and keep hand-painted boundaries controlled with precise placement. Where a soft camouflage edge is wanted, Blu-Tack sausages can shape it, but that does not remove the risk to painted areas. If a mask would cross a delicate painted edge, choose another approach and work gently rather than accepting the risk of lifting paint.
2. Reducing masking tape’s adhesive strength
Masking tape can create a crisp boundary, but strong adhesion may pull paint from a miniature. Before applying it, press the tape against a clean surface and lift it away to reduce its grip. This lowers the risk of disturbing the painted layer beneath. Place tape with gentle pressure, especially over a gradient or recently painted area.
For model painting in the UK, choose tape that lies flat and lifts cleanly from the surface. Paper-based masking tape works well for straight lines, while liquid mask can cover small gaps or irregular edges. The right choice depends on the shape and finish: tape controls a line, while liquid mask fills spaces that tape cannot seal neatly.
Apply tape in short lengths, aligning its edge with the boundary you want to paint. Press along the edge with a fingertip or soft tool rather than rubbing across the painted area. Before spraying or brushing, apply a thin layer of the basecoat colour along the tape edge. This seals the boundary and helps prevent the new colour from bleeding underneath.
Thin paint can creep beneath masking tape and damage the basecoat, so avoid loading the brush or airbrush near the edge. Use light, controlled passes instead. If a gap remains, apply masking fluid sparingly to seal it. Matt varnish can also seal tape without changing the colour of a gradient basecoat. Keep either layer thin to avoid a raised ridge when the mask is removed.
Masking tape is especially useful for straight markings, panels and simple geometric designs. Lay it along a guide line, then smooth the edge without stretching the tape. To cross a curved surface, use several short pieces rather than forcing one strip around the curve. Overlapping pieces can leave gaps, so check each join before painting.
There’s no single fixed time to leave tape on model paint. Remove it once the final colour or varnish has set enough to resist smudging, but don’t leave it on longer than the painting step requires. Peel slowly back over the tape itself, keeping it close to the surface instead of pulling upwards.
Common mistakes include pressing tape down too hard, applying paint too wet, and skipping edge sealing. If paint bleeds, let the area dry before correcting the boundary with a fine brush. If tape lifts the basecoat, stop pulling and ease it back slowly. Don’t put fresh tape over the damaged patch until it’s repaired.
3. Using liquid mask on miniatures
Liquid mask is liquid latex that dries into a removable covering. It can follow an irregular outline more easily than a straight strip of tape, but miniature details make neat application difficult. Use a fine brush to apply it only where paint must not reach. Keep the layer controlled around rivets, raised trim and narrow recesses.
Work in small sections. First, identify the boundary and make sure the surrounding paint is dry. Apply liquid mask to the area you want to protect, then let it dry before painting over or beside it. A continuous film is easier to lift than scattered patches, which can leave tiny pieces behind on a figure.
Liquid mask can be messy on miniatures and is better suited to flat surfaces, such as watercolour paper. On a small model, a brush may drag latex onto details you meant to paint, while recesses can trap residue. On a broad, flat panel, however, the film can cover an area without several overlapping pieces of tape.
To remove dried masking fluid from a painted model, use a soft rubber to roll or lift the latex gently from an edge. Work gradually across the covered area instead of scraping the paint with a hard tool. Check narrow details as you go, since dried fragments can cling to raised edges and recesses.
Take care on varnished surfaces. Humbrol Maskol contains ammonia, which can dissolve Johnson’s Klear, so don’t apply it over that finish. A mask’s chemistry matters as much as its coverage: a product that protects paint in one situation may damage a particular clear coat.
For a miniature with fine surface detail, compare liquid mask with tape before covering a large area. Tape gives a defined boundary along a straight panel, while liquid latex can conform around a small shape but may spread. If using liquid mask, keep it off features that need colour and inspect the dried film before painting.
After removing the mask, inspect the boundary in good light. If latex remains beside a raised detail, use the soft rubber to roll it away gently. Avoid pulling quickly across the miniature, as this can catch edges or disturb nearby paint. Reserve liquid mask for shapes it covers cleanly rather than using it by default on every miniature.
4. Lazy masking
A loose mask saves time when a painted pattern needs broken rather than precise edges. For example, paper with pierced holes can create mottled camouflage on an airbrushed model. Instead of fitting tape around every section, hold the perforated paper above the surface and spray through its openings. The paper blocks some paint while the gaps let colour reach selected areas.
The distance between the paper and model controls the edge. Hold the mask close for a more defined pattern; raise it to let more paint spread beneath the openings and soften the shapes. Test the gap on a spare piece first, or on an inconspicuous part of the model. Adjust the mask’s height before changing the camouflage pattern.
Keep the paper steady while spraying. A moving mask can shift the mottled pattern across a wing or vehicle panel, creating uneven clusters. Hold it by an uncovered edge, or secure it lightly where it won’t touch fresh paint. Check that the holes sit over the areas you want exposed, then spray in controlled passes instead of flooding an opening.
Vary the effect by changing the paper’s position. A close mask can make tighter marks near a panel line, while a higher position creates softer marks across a broad area. Reposition it between passes to avoid an obvious repeated pattern. On a model wing, for example, turn or shift the paper so the spots don’t form identical rows.
Loose masking suits airbrushing better than hand painting because sprayed colour passes through the openings without a brush catching the mask. With a brush, paper may drag across the surface or disturb wet paint. For hand-painted camouflage, apply the colour directly with a controlled brush instead of using a suspended paper mask.
Protect nearby areas before spraying through perforated paper. A broad sheet can shield most of the model, but gaps around the edges may let overspray reach adjoining panels. Use a larger piece of paper or another cover, exposing only the section being painted. Keep the mask clear of wet paint as you move it.
After each pass, inspect the pattern before adding more colour. If the marks look too sharp, raise the paper slightly on the next pass; if they look too soft, bring it closer. This method suits irregular effects such as mottled camouflage, not exact insignia or crisp geometric lines. Use a fitted mask when a precise boundary matters.
5. Masking for a quick gaming paintjob
For a gaming miniature, mask only the areas that need a clear boundary. On a 28 mm Games Workshop Dwarf Slayer, 2 mm Washi tape can create a quick stripe or simple graphic without covering the entire figure. Paper-based masking tape works well for straight lines. Press it lightly into place, paint the exposed area, then remove it carefully.
Keep paint or varnish thin along the tape edge. A heavy coat can leave a raised ridge after removal, which stands out on armour plates and shields. Build the colour with controlled layers instead. For a design, place the 2 mm tape first, check the line from several angles, then apply paint in light passes.
Use non-staining Blu-Tack for quick coverage of small model details. For a cavity, such as a cockpit or wheel well, press in moistened tissue and secure it with diluted white PVA glue. Once dry, wet the tissue again to make it easier to remove. Card or micromesh can support the tissue over an opening.
Aluminium cooking foil provides quick, adhesive-free coverage for larger parts. A polythene bag can protect most of a model while leaving one area exposed; a plastic bag also works around protruding parts. Clingfilm can wrap awkward figure shapes without leaving adhesive residue. Keep the material clear of wet paint and secure it so it cannot shift during spraying.
Curved canopies take longer to mask precisely, but several small tape pieces can follow the curve without stretching one strip. Press each piece along the frame, then run a new Swann Morton 15C scalpel blade around the mask edge before removal. That cut helps reduce paint peeling from the frame. Pre-cut canopy masks are another option; Eduard, Montex and Black-Box make them.
For speed, match the coverage to the task: use narrow tape for a stripe, foil for a broad section, and tissue for a cavity. If a polythene bag can protect the rest of the model, there’s no need to wrap every surface. After painting, remove masks carefully and check the design before adding detail. This keeps the paint job focused on visible gaming details rather than unnecessary masking.
Explore model kits for your next paintjob and plan a quick finish around the shapes and details you want to paint.
Choose a mask to suit the shape and finish: aluminium cooking foil gives quick, adhesive-free coverage, while non-staining Blu-Tack suits small details. Keep paint or varnish thin at tape boundaries to avoid a raised edge when the tape comes away. For a cavity, use moistened tissue; once it has dried, wet it again before lifting it out. This makes removal easier without pulling at the surrounding work.
On a curved canopy, take care at the frame rather than forcing a single strip to fit. Before lifting the mask, guide a sharp scalpel around its edge. Cutting the boundary first can reduce the chance of paint peeling from the frame and help preserve a clean finish where the mask ends.
Narrow Minded Railworks: OO9 Locomotive & Wagon Kits
Narrow Minded Railworks offers OO9 Locomotive & Wagon Kits for model railway projects that you can assemble and paint yourself. If you’re applying masking methods to a narrow-gauge locomotive or wagon, these kits give you a model to bring into your own paint scheme. The range also includes GN15 Locomotive & Scenery Kits, O-16.5 / 7mm Scale Kits, and Diorama Tools & Scenery.
Choose a kit or scenery item that suits the scale and subject of your build, then plan the paintwork around its shapes and details. Masking can define panels, markings and scenery features, while careful coverage protects adjacent areas as you paint.
Contact Narrow Minded Railworks to discuss the kits and scenery suited to your next modelling project.
Make your next model a masking testbed
Your next build can help you develop a repeatable painting routine. Before applying a finished scheme, decide which boundaries need crisp lines and which can stay soft. Note the materials and sequence that suit the model so your next paint job starts with a plan, not trial and error. The best masking techniques for model painting are those suited to the surface, finish and time available.
If you’re ready for a new project, Narrow Minded Railworks offers OO9 Locomotive & Wagon Kits, GN15 Locomotive & Scenery Kits, and O-16.5 / 7mm Scale Kits. Choose a subject that gives you room to practise a marking, panel edge or camouflage scheme, then build the paint plan around its details.
Contact Narrow Minded Railworks today to discuss a suitable kit for your next modelling project. Take the next step at your own pace, and enjoy turning a careful paint plan into a finished model.
Frequently Asked Questions
What masking techniques are used for model painting?
Choose a mask to suit the shape and finish: tape works for straight boundaries, mouldable putty follows irregular contours, and liquid mask covers selected small areas. For mottled airbrushed patterns, use pierced paper as a loose mask; foil or a bag quickly shields larger sections. These masking techniques for model painting work best when you test the material on a hidden area first and plan the sequence of colours.