


Filler isn’t always the right fix: gaps often point to a problem with the print itself. Knowing how to fill gaps in 3D printed models starts with finding whether under-extrusion or a setting such as nozzle height, wall width or layer thickness caused the defect. Correcting the cause can improve the model’s structure as well as its appearance.
If you’ve printed a model with visible gaps, it’s tempting to fill them and move on. This guide shows how to identify common causes, adjust print settings and address under-extrusion before deciding whether surface filler is needed. You’ll also learn what to check when gaps appear in the first layer, between walls or across the top of a print.
Key Takeaways
- Match wall width to nozzle width and review layer height, speed and infill settings to reduce voids in the print.
- Use gaps and incomplete sections as clues to possible under-extrusion, then inspect the filament path and extrusion settings.
- Look at where and when gaps form to distinguish a first-layer issue from weak walls, top layers or other print defects.
- For small PLA holes that remain after the cause is addressed, choose a suitable filler and apply it carefully before finishing the surface.
1. Layer height, print speed, walls and infill
Check the slicer settings before reaching for filler. If the first layer has gaps, adjust the nozzle height relative to the build plate. A nozzle set too high can leave lines that do not meet. For thin walls, set the wall width to a multiple of the nozzle width to minimise spaces between extrusion paths.
Layer height affects how each layer bonds with the next. If the layers seem poorly joined, review the height and extrusion consistency rather than assuming surface filler will fix the problem. Print speed matters too: excessive speed can prevent consistent material deposition. Reduce it if the printer struggles to maintain a steady flow, then assess the next print.
For sparse top surfaces, review infill and the number of solid top layers. Infill supports the top skin, while additional solid layers can help close small openings. Make top layers at least 1 mm thick at model corners to improve stability. Change one setting at a time, so you can identify which adjustment affects the defect.
Which filler works best for PLA, PETG, ABS and resin prints? There is no universal choice. Use modelling filler or epoxy putty that suits both the print material and the finish you want. Test compatibility on a hidden area before applying it to a visible surface.
How do you apply epoxy putty or modelling filler to a 3D print? Clean and dry the area, press a small amount into the gap, then smooth it before it hardens. For separate parts, apply a thin layer in the joint, bring the edges together, and remove excess before assembly sets.
Once cured, sand the filler gradually until it sits flush, then remove dust before finishing. A 3D pen can add material to a local gap, but it won’t correct the original print settings; extra layers require a properly prepared, compatible print. Wear eye protection, control sanding dust, ventilate when using solvent-based products, and follow the product label.
2. Under-extrusion and incomplete parts
Under-extrusion means the printer deposits less filament than the model requires. It can leave thin walls, pinholes, weak infill or missing sections. A small gap may be cosmetic, but repeated gaps across several layers suggest inconsistent material flow. Knowing how to fill gaps in 3D printed models starts with checking whether the print itself is sound.
Check the filament path first. Look for a tangled spool, a snagged strand or resistance where filament enters the extruder. Then inspect the drive gear: dust or a loose grip can interrupt feeding. Clean the gear carefully and make sure the filament moves freely towards the hot end.
A partly blocked nozzle can also restrict extrusion. If the printer clicks, skips or produces a thin, intermittent strand, pause the job and inspect the nozzle. Clear the obstruction using the method recommended by the printer manufacturer. Do not force tools into a hot nozzle unless that method specifically calls for it.
Next, check the slicer’s material and flow settings. Confirm that the selected filament diameter matches the spool and that the printer temperature suits the material. A setting that is too low can make extrusion uneven. Adjust one setting at a time and print a small test, rather than changing several variables at once.
Moisture can make filament behave inconsistently and cause surface imperfections. Store filament in an airtight container or use a filament dryer. If gaps appear only in certain sections, consider whether fast movements or frequent retractions are interrupting material delivery. Compare the defect’s position with the print path in the slicer.
Filler can disguise a shallow surface flaw, but it cannot restore strength to a wall that never printed properly. The best way to fill gaps in 3D printed models is to correct the feed problem first, then reprint parts that need structural integrity. For a non-structural model, fill only after the print is clean and stable; otherwise, the same defect may show through the finished surface.
To reduce stringing between parts, adjust retraction distance and rate. For overhangs, enable supports generated by the slicer to help those sections print as intended and reduce unsupported material.
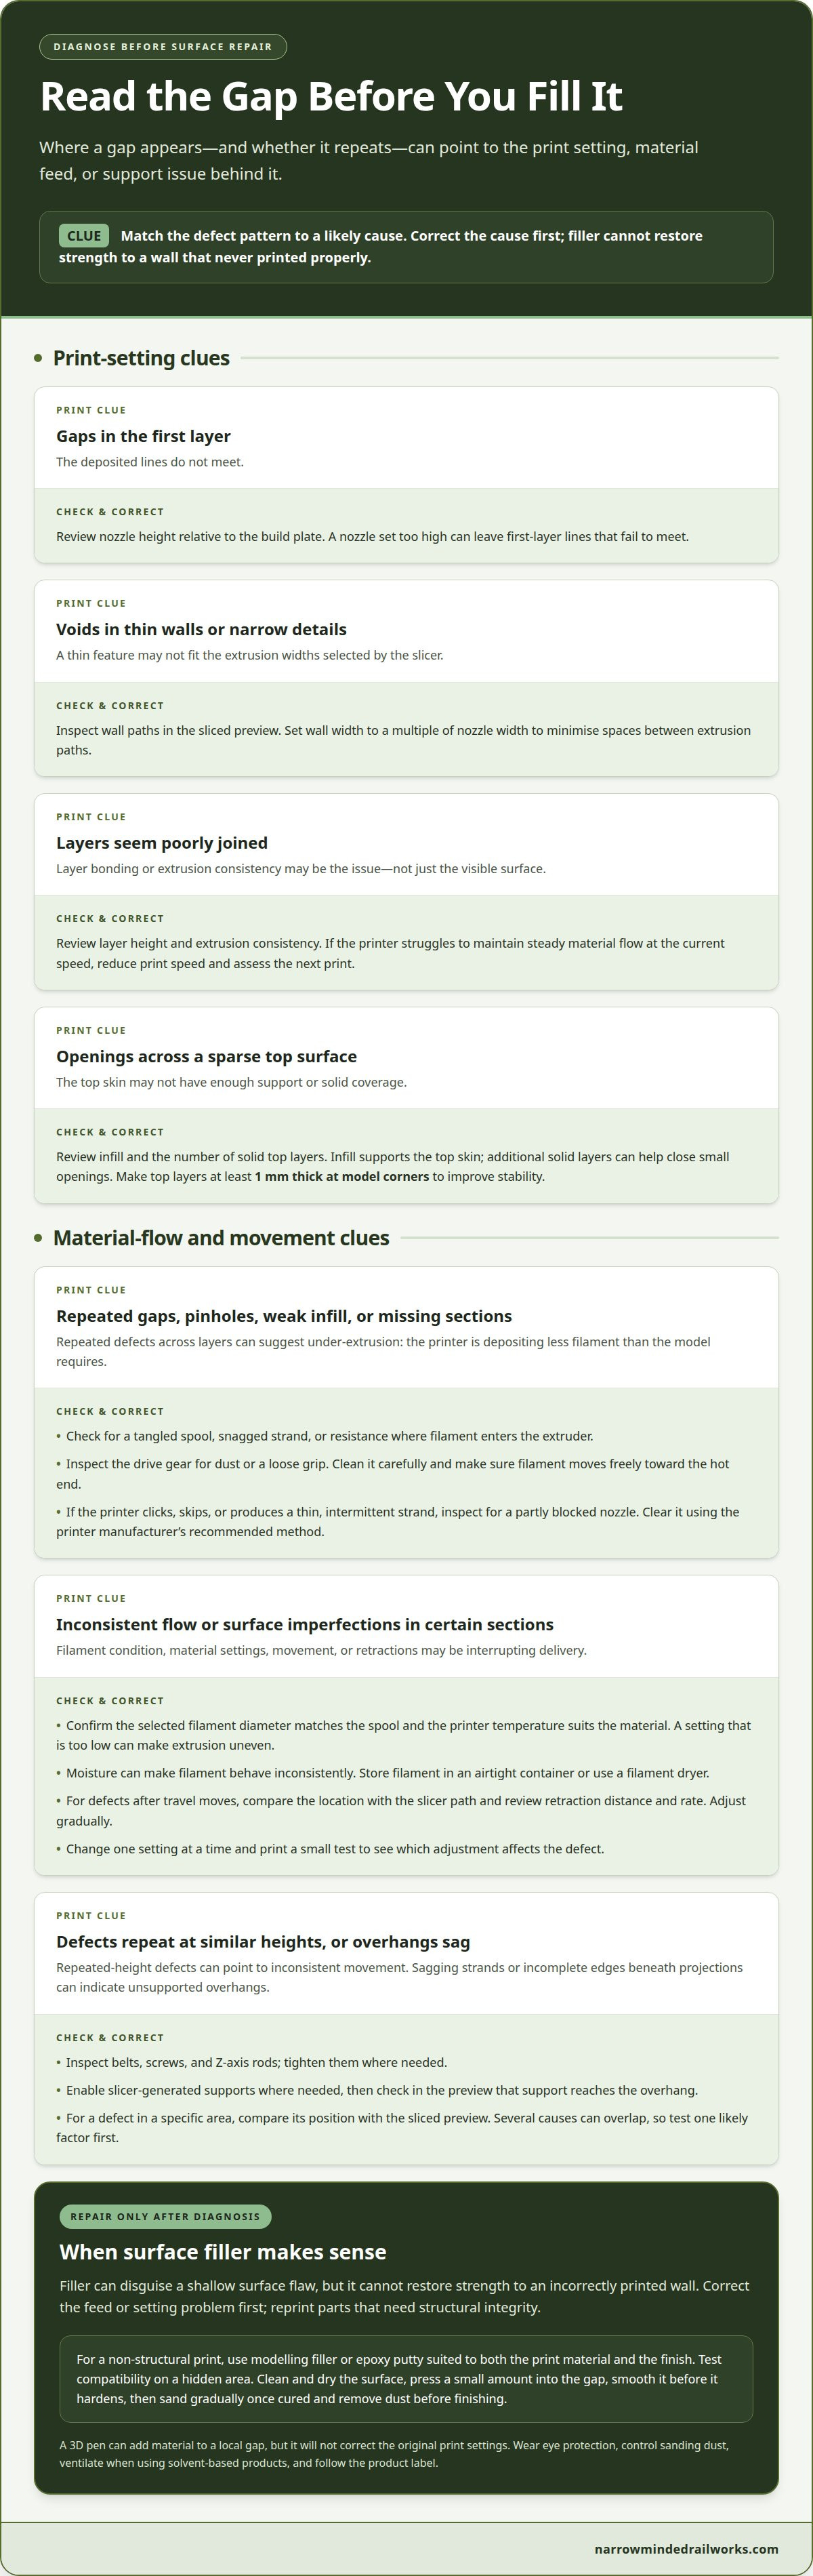
3. What causes gaps in 3D printed models?
Gaps can originate in the model, slicer, filament or printer movement, and their location offers a useful clue. A continuous seam may point to a wall or extrusion setting, while scattered pinholes can indicate inconsistent material flow. Compare the affected area with the sliced preview before changing settings.
Wall geometry is one possible cause. If a thin feature does not fit the extrusion widths selected by the slicer, the toolpath may leave a narrow void. Check the wall paths in the preview and adjust the wall width to a multiple of the nozzle width. This is particularly useful around thin panels and narrow model details.
Uneven movement can also disrupt layer placement. Loose belts, screws or Z-axis rods can affect how consistently the print head or build plate moves between layers. Inspect these components and tighten them where needed. A defect that repeats at similar heights may indicate a movement issue rather than a flaw in the model.
Retraction settings matter when the nozzle travels between separate features. Retraction distance or rate that is excessive or poorly matched can disrupt material flow when printing resumes, leaving a gap after a travel move. Check the travel path in the slicer and adjust retraction gradually if the defect appears at those restart points.
Unsupported overhangs create another recognisable pattern: sagging strands or incomplete edges beneath projecting sections. Enable slicer-generated supports where the model needs them, then check that the support reaches the overhang in the preview. At corners, top layers need at least 1 mm thickness for improved stability. If the top surface still shows openings, inspect its solid layers and the infill beneath them.
Several causes can overlap. A gap may result from both a poorly supported feature and inconsistent extrusion, so change one likely factor first. Print a small test with the same geometry and compare it with the original defect. This controlled check helps identify the cause before you start surface repairs.
4. How do you fill small gaps and holes in PLA 3D prints?
First, work out whether the defect is a surface pinhole or a hole through the print. A shallow pinhole may need only a small amount of modelling filler. A deeper opening needs support behind the filler, or the material may sink into the cavity instead of forming a level surface.
Let the PLA print cool, then remove loose strands with a craft knife or fine file. Brush away the dust and check that the edges around the gap are firm. If the opening exposes a thin or unstable wall, repair or reprint that section rather than relying on filler to restore its strength.
For a shallow mark, use a small spatula to press modelling filler into the defect. Work across the opening so the filler reaches its edges, then scrape away the excess. For a larger hole, shape epoxy putty to bridge the opening. Follow the product instructions for mixing and curing, as handling varies by formulation.
Let the filler cure fully before finishing. Use fine abrasive paper to level it with the surrounding PLA, working gently to avoid flattening nearby details. Remove the sanding dust and inspect the surface under angled light. If a depression remains, apply another thin layer instead of sanding deeply into the print.
To fill a seam between printed parts, dry-fit the pieces and note where the edges meet. Apply a narrow strip of filler along the joint, press the parts into alignment and remove any excess before it hardens. Keep filler away from moving or close-fitting surfaces, where it could prevent the parts from joining correctly.
Test the filler on an inconspicuous area before treating a visible face. Once the surface is smooth, use a compatible primer if you plan to paint the model. Primer can reveal remaining pinholes and sanding marks, letting you make local corrections before applying the final colour.
Narrow Minded Railworks
Narrow Minded Railworks designs and sells 3D-printed model railway kits and accessories, giving you options when a repair leads you to plan a new project. Its range includes OO9 Locomotive & Wagon Kits, GN15 Locomotive & Scenery Kits, O-16.5 / 7mm Scale Kits, and Diorama Tools & Scenery.
If a print has structural gaps, correct the cause before relying on filler. For a new model or scenery project, Narrow Minded Railworks’ narrow-gauge kits and scenery tools can help bring your miniature world to life. Choose a scale and project type that suit your plans, and use the print-setting checks in this guide to work towards a cleaner result.
For questions about Narrow Minded Railworks’ model railway kits and accessories, contact Narrow Minded Railworks.
Make your next print a more deliberate one
Treat each repair as useful feedback for your next model. Keep a brief record of the filament, slicer profile and change you made, then compare the results after printing. This helps show whether the cleaner finish came from correcting the cause or simply covering the mark. Over time, your notes can help you choose settings with greater confidence for different model shapes.
If you’re planning another narrow-gauge model or scenery project, connect the finishing techniques here with a design that suits your layout. For questions about kits and accessories, contact Narrow Minded Railworks. You can discuss your modelling plans and decide what to work on next.
Each print is another chance to refine your process. Make one clear adjustment, assess the result and work towards the finish you want.
Frequently Asked Questions
How can slicer settings prevent gaps in future 3D prints?
Match the slicer profile to the filament and inspect the model layer by layer before printing. If a wall or section is missing from the preview, check the model mesh or repair it in the slicer. Printer setting changes cannot restore geometry that is not there. If the preview shows complete paths, review the relevant extrusion and wall settings, then test the revised profile on a small model.