

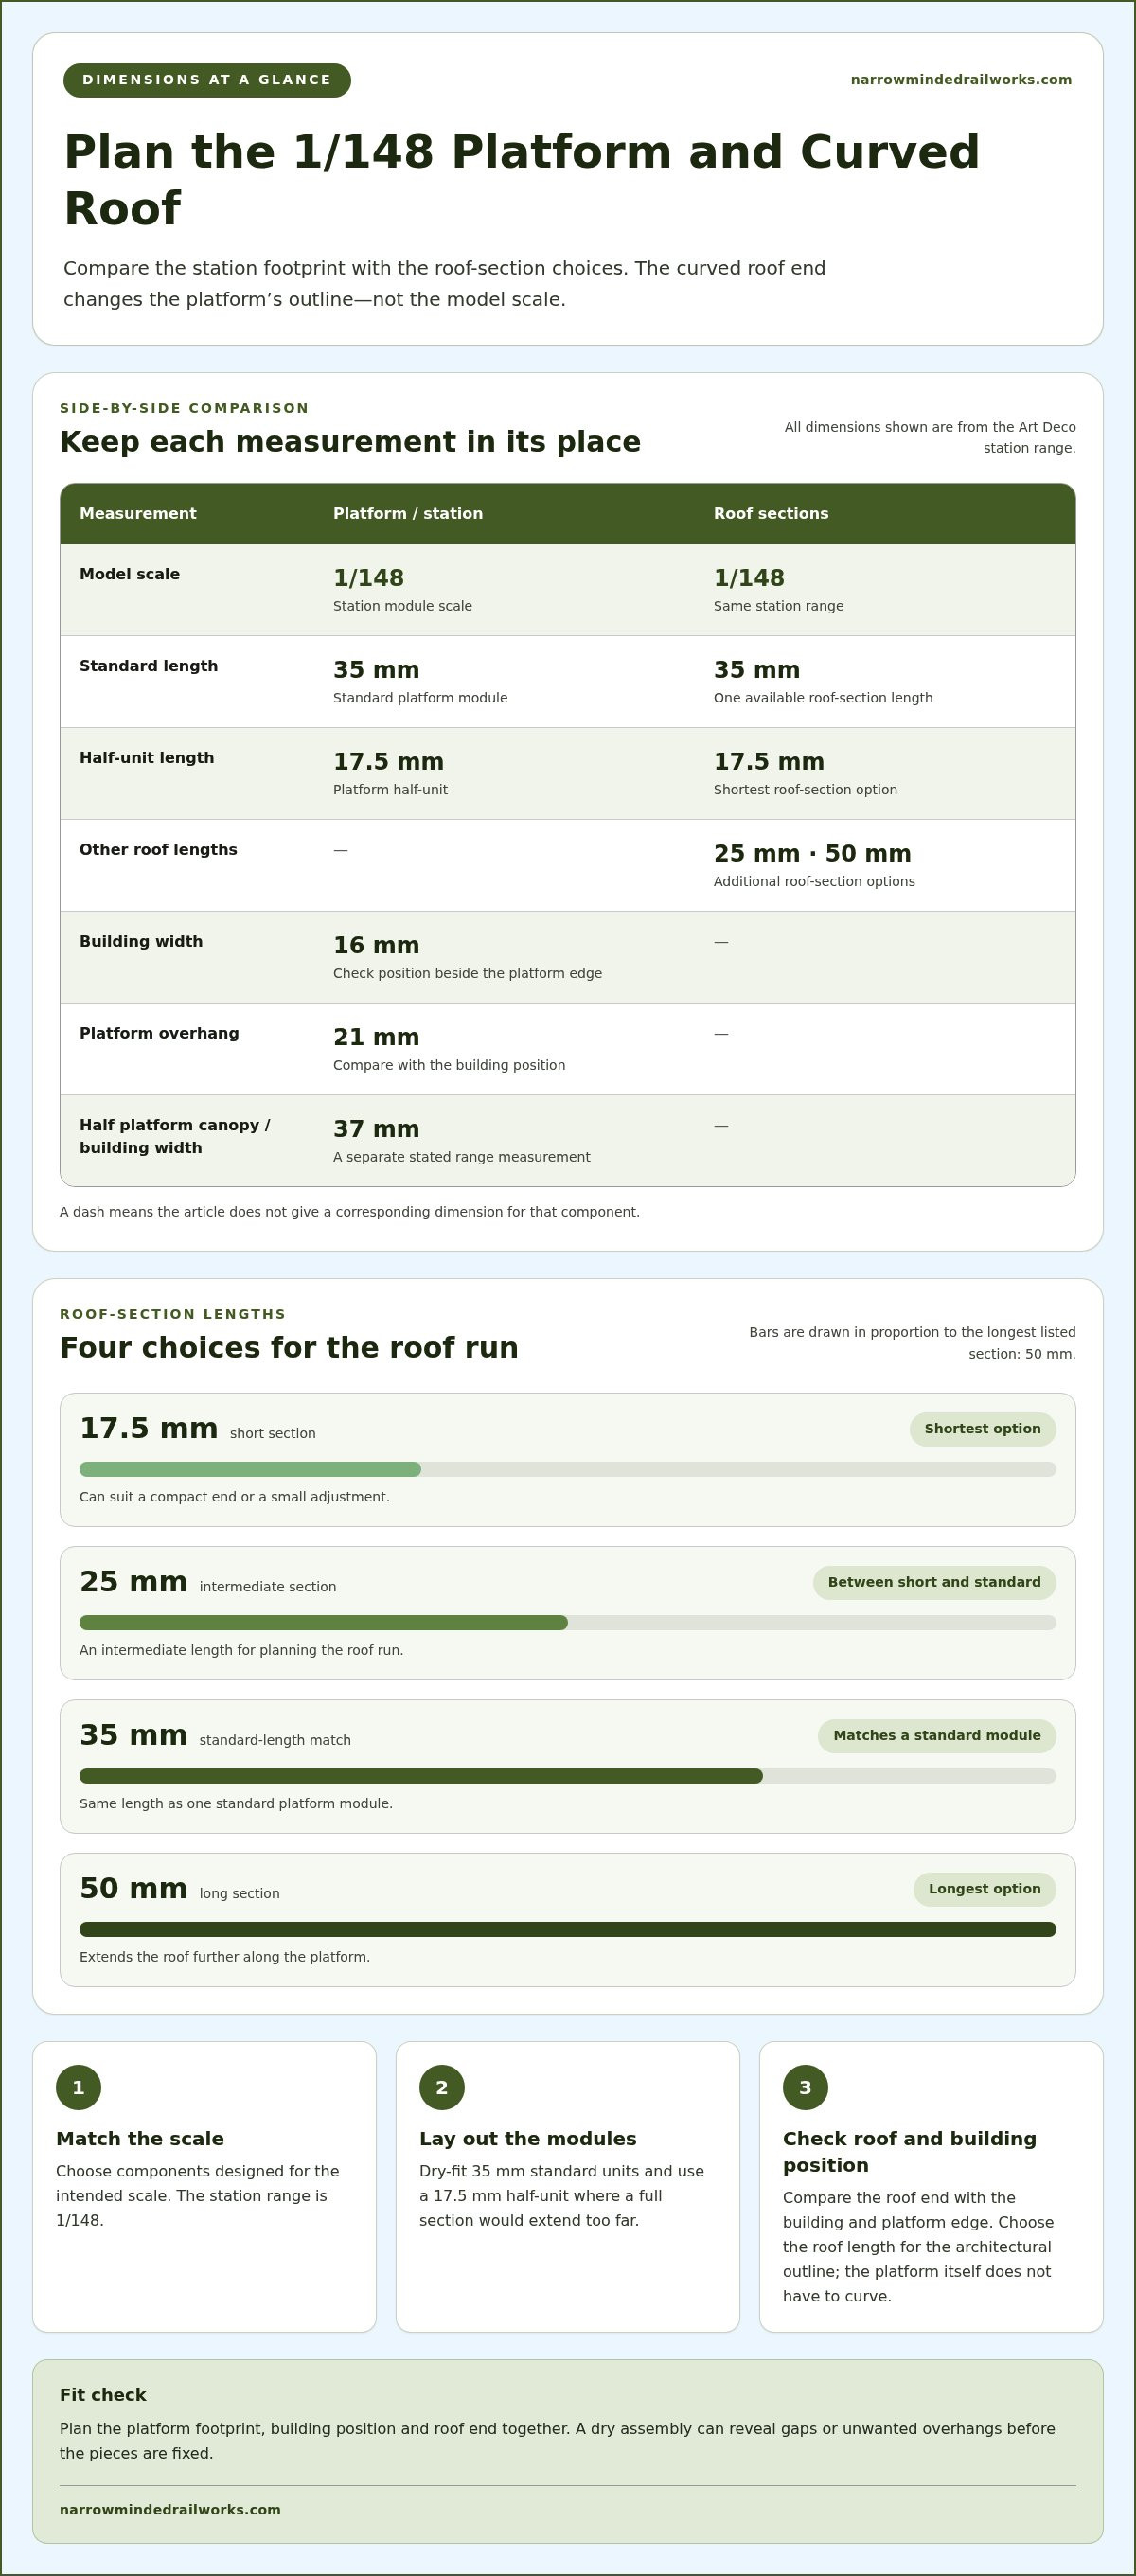
A curved roof end affects the platform’s outline, but it doesn’t change the model scale. The 3D printed station platform sections for this Art Deco station range are designed at 1/148 scale, with standard modules 35 mm long and half-units 17.5 mm long. Roof sections come in 17.5 mm, 25 mm, 35 mm and 50 mm lengths, giving you options for planning the end shape and overall fit.
It’s easy to focus on the roof curve and overlook how the platform modules meet beneath it. Matching the scale, section length and building position helps keep the platform aligned and the roof neatly finished at the end.
This article explains how scale affects a model platform’s dimensions, what section lengths mean for a curved roof end, and which measurements to compare when planning a fit. You’ll also see how the building width and roof overhang relate to the layout, helping you choose sections before assembly.
Key Takeaways
- Plan the roof end and platform footprint together so the curved finish sits neatly without disrupting the platform layout.
- Compare manufacturers by the scale and section shapes they produce, then match those details to your railway scene.
- Material and printing method affect surface detail, strength and the preparation needed before painting or assembly.
- Cost depends on the sections and finishing work involved, while production and installation time depend on the project’s complexity.
- Use the article’s measurement and selection guidance to decide whether modular platform sections suit your curved-roof design.
Model scale and module dimensions
The Art Deco station modules use 1/148 scale. Standard units measure 35 mm long. Half-units measure 17.5 mm. Those lengths give you a practical starting point. They help establish where straight platform sections end. They also help plan a roof’s curved finish.
The station range combines LT and SR design influences. Its intended look is a 1930s Art Deco station. The platform building width is 16 mm. The platform overhang is 21 mm. Compare these measurements before positioning the building beside the platform edge.
For a visual guide to platform building and detailing, watch this model railway video:
Match the model scale before choosing sections. At 1/148, real-world features appear smaller in the model. A consistent scale keeps the station architecture, platform and surrounding railway visually coherent. Mixing scales can make the building appear oversized or undersized beside adjacent trackside details.
Next, plan the straight run. Each 35 mm module adds one standard unit. A 17.5 mm half-unit can help adjust the overall run when a full section would extend too far. Lay out the pieces against the intended platform footprint before fixing them together. This simple dry fit can reveal gaps or unwanted overhangs early.
Roof sections are available in four lengths:
- 17.5 mm for a short end or small adjustment.
- 25 mm for an intermediate roof section.
- 35 mm to match a standard module length.
- 50 mm for a longer roof span.
Section lengths help shape the roof run, but they don’t define the platform’s entire footprint. For a curved roof end, consider where the roof stops relative to the building and platform edge. A short section can create a compact finish, while a longer one extends the roof further along the platform. Match the section length to the architectural outline rather than assuming the platform itself must curve.
Check the building position separately. The stated building width is 16 mm, while the platform overhang is 21 mm. The range also gives a half platform canopy/building width of 37 mm. Treat each measurement as a distinct feature when comparing the model pieces. A drawn plan or dry assembly can show how those dimensions sit together.
For another scale, don't resize these dimensions by eye. The O-16.5 / 7mm Scale Kits category represents a different modelling scale. Choose components designed for the intended scale, then fit the roof end to the platform layout.
Treat the listing details separately from your measurements: make sure the pieces suit your layout, then compare their scale and dimensions before assembly. A careful dry fit is useful, especially where a roof end meets a straight run or the building sits beside the platform. Plan with the chosen components together so the finished station looks coherent and its proportions remain consistent.
Which UK companies manufacture 3D-printed railway platform sections?
Distinguish platform makers from general model sellers. A shop may stock printed scenery without producing platforms, while a printer may take custom work without offering railway components. That distinction matters when you need a curved roof end, matching platform edge or repeatable modules.
Look for evidence tied to the exact component. A product description should identify the scale, section shape, joining method, and intended use. For example, a listing for a station building doesn’t prove that the same maker produces platform sections. Likewise, a general 3D-printing service doesn’t establish railway-specific design experience.
Use this short screening sequence for UK listings:
- Check the product category. Find platform sections, not only station buildings or scenery.
- Read the scale information. Match it to your layout and adjoining structures.
- Study the section options. Look for straight pieces, end pieces, or modular joins.
- Inspect the stated dimensions. Compare the footprint with your track and roof plan.
- Review the maker’s scope. Distinguish stocked designs from commissioned printing.
Then test whether the design suits your layout. A straight section may work for a long platform, while a purpose-shaped end can finish a curved roof more neatly. If a listing shows only a complete station, inspect the component details: a platform pictured beside a building may be scenery, not a separately supplied section.
Product photographs help, but they may not answer every fit question. Look for close views of joins, underside supports and end profiles. A scale drawing or dimensioned image makes comparison easier. Match the platform edge to the track position, then compare the roof end with the building footprint. This narrows your search without relying on broad claims about a manufacturer.
Also distinguish the maker’s location from the product’s origin. A UK retailer may sell items printed elsewhere, while a UK-based designer may outsource production. Product wording should make clear whether a business designs, prints or simply stocks the component. These roles affect how closely its range fits your planned modification.
For a curved-end project, record the exact profile and adjoining-section requirements before choosing. Keep the platform, canopy and building plan consistent. That makes a specific product easier to assess than a general claim about custom printing.
If your wider layout includes narrow-gauge scenes, browse narrow-gauge modelling ideas alongside your station planning.
What materials and printing methods are used for 3D-printed station platforms?
Material and print method affect a platform’s detail, finish and assembly. Resin and filament printing are common approaches, each with different surface results. Resin can capture small architectural details such as canopy brackets or narrow trim. Filament printing can produce broader platform bases and structural forms. The design and printer also influence the final result.
Resin printers form parts from liquid photopolymer resin, using light to harden selected areas layer by layer. This process can capture fine edges and shallow features, making it suitable for details such as a station façade or curved roof end. Printed parts usually need washing and curing. Follow the resin maker’s handling and finishing instructions.
Filament printers feed thermoplastic through a heated nozzle. PLA is a commonly used modelling filament. The nozzle lays down each layer along a planned path, and visible lines may appear on broad surfaces. Sanding and primer can help prepare those areas for paint. A platform base with simple geometry may suit this process.
Compare the methods against the part’s job:
- Fine trim: Resin can reproduce small details clearly.
- Broad bases: Filament printing can form larger, practical shapes.
- Curved profiles: Check the printed surface and join placement.
- Paint preparation: Consider cleaning, curing, sanding, and priming.
These are useful tendencies, not a substitute for inspecting the actual design. A delicate canopy edge needs different support from a flat platform slab. Resin parts may need careful handling during cleanup, while filament parts may need surface preparation where layer lines remain visible. The part’s shape matters as much as its material.
For a curved roof end, consider how printer orientation affects visible faces. The underside may show support marks, and a join on the curve can interrupt its outline. Choose an assembly plan that keeps joins away from prominent edges. Dry-fit adjoining pieces before painting, while the surfaces are still accessible.
Use a practical preparation sequence:
- Identify the material and printing process.
- Separate delicate details from larger platform pieces.
- Remove supports using the appropriate method.
- Clean or sand the surface as required.
- Test-fit the pieces before priming and painting.
Primer can reveal surface defects on both resin and filament prints. Apply it only after the required cleaning and preparation. Check corners, edges and joins under good light. A small test area can show whether sanding has removed detail. On a station platform, this helps preserve crisp paving lines while improving the finished appearance.
Finally, match the finish to the layout. A smooth platform edge may need less work than textured paving. Resin can preserve fine surface relief, while filament can leave more visible layer patterns. Choose the process for the features you need, then plan cleanup and painting around the material.
What are the costs of 3D-printed station platform sections in the UK?
A platform’s total cost depends on its specification. One straight piece differs from a joined layout, and a curved roof end may need a distinct profile. Design work, printing, finishing and delivery also affect the total. Compare the complete project requirements, not just one visible component.
Start with a parts list. Record each platform section, end piece and joining element, and include any building or canopy components in the same plan. For example, a short platform with one shaped end needs different parts from a long platform with repeated modules. A clear list makes it easier to compare like with like.
Design complexity can affect production effort. A plain slab has simpler geometry than paving with steps, edging or surface relief. A curved end also needs a defined profile. If the roof and platform end separately, their outlines must still work together. A drawing or layout template can communicate those details clearly.
Consider these cost drivers when assessing a project:
- Section count: More pieces require more production and assembly.
- Shape: Curves and detailed edges need specific geometry.
- Fit: Tight joins may require careful design and adjustment.
- Finish: Cleaning, sanding, priming, and painting add work.
- Delivery: Packaging and shipping affect the final amount.
Finishing is easy to overlook. A bare printed section may need preparation before painting. If you do the work yourself, assess the cost differently than you would for finished scenery. Include paint, tools and assembly materials in your project budget, separate from the printed components.
Custom work can involve design time as well as printing. A standard module follows an existing shape, while a profile designed for a particular roof end needs more definition. Provide a plan showing the track position, platform edge and adjoining building. Clear measurements reduce avoidable redesign and help define the required parts.
For a UK comparison, review an itemised breakdown. Separate design, printed parts, finishing and delivery, then check whether the scope covers the curved end, straight sections and joins. A low component total may exclude finishing or other project requirements. Compare the same scope across options.
Before deciding, sketch the platform footprint and mark every join. Note which surfaces will remain visible after assembly. This helps you prioritise detail where viewers will see it and avoid paying for features hidden beneath a canopy or behind station furniture. Build your budget around the finished layout, not a single part in isolation.
How quickly can 3D-printed platform sections be manufactured and installed
Production time varies by platform. A repeatable straight section follows an existing design, while a custom curved end needs its profile prepared first. Printing then depends on part size, detail, machine workload and material. Finishing adds work after printing.
Plan the project as a sequence. First, settle the platform outline and roof-end profile. Next, prepare the model for printing, then print, remove supports and clean the pieces. Finally, test-fit and finish them. If the curve changes, the design may need adjustment.
Prepare a clear layout before production begins. Mark the track edge, platform footprint, building position and roof termination. A sketch with labelled joins shows how sections meet. If the end profile is still changing, the design is not yet stable enough for production. Resolve those choices early.
Production pace also depends on the printed geometry. A broad slab and a detailed edge place different demands on printing. Delicate trim may need careful support removal, and a multi-piece platform needs more assembly checks than a simple section. Consider every production stage rather than estimating completion from printing alone.
After printing, allow time for practical preparation. Clean the surface as the material requires and remove supports without damaging narrow edges. Sand visible marks where needed, then check each join against its neighbour. Dry-fit a curved roof end before painting, because paint can conceal small alignment problems.
Installation on a model layout is a separate stage. Clear dust and loose scenery from the base, then position the sections without adhesive. Check the platform edge against the track and confirm the roof and building alignment. Once the fit works, attach the parts with an adhesive suited to their materials.
Use this order to keep the work controlled:
- Freeze the outline: mark straight runs, joins, and curved ends.
- Approve the part layout: separate platform pieces from roof details.
- Inspect printed parts: check edges, surfaces, and alignment.
- Dry-fit the assembly: test the trackside position before fixing.
- Finish the model: apply primer, paint, and scenery details.
On a home-built layout, schedule installation around other scenery work. Fit the platform before adding nearby fences or dense planting to keep the joins accessible. If the scene already has ballast or structures, protect those details while adjusting the platform. Careful sequencing helps prevent rework.
To organise the project, bring together the final profile, section plan and intended finish. Schedule manufacturing, finishing, delivery and installation separately. The design’s complexity and preparation needs determine the sequence. Treat each stage as its own task, and plan the curved end before surrounding scenery limits access.
Narrow Minded Railworks: OO9 Locomotive & Wagon Kits
Narrow Minded Railworks offers model railway kits and scenery for narrow-gauge layouts. If your station project sits within an OO9 scene, its OO9 Locomotive & Wagon Kits can help develop the railway around the platform. The GN15 Locomotive & Scenery Kits and O-16.5 / 7mm Scale Kits provide options for other modelling scales. Diorama Tools & Scenery can support the surrounding scene.
Choose an offering based on your layout’s scale and the wider scene you want to build. These kits complement station planning, while platform fit still depends on the section dimensions and roof profile covered above.
Explore Narrow Minded Railworks’ kits and scenery to plan the details of your layout.
Build the Station into a Complete Scene
Before settling the layout, consider how the station connects with its track, buildings, and surrounding scenery. A platform feels more convincing when it belongs to a coherent scene. Planning 3D-printed station platform sections alongside the wider railway helps you make thoughtful choices about the overall composition.
For narrow-gauge layouts, Narrow Minded Railworks offers OO9 Locomotive & Wagon Kits, GN15 Locomotive & Scenery Kits, and O-16.5 / 7mm Scale Kits. These can help develop the railway around your station, while the platform design remains guided by its own dimensions and roof profile.
Choose the modelling scale that suits your layout, then build outward from the station with compatible details. To explore options for your next modelling project, contact Narrow Minded Railworks. A considered plan can give your station a natural place in the finished scene.
Frequently Asked Questions
What are 3D-printed station platform sections?
3D-printed station platform sections are model railway components made layer by layer to form part of a miniature station platform. Modellers can arrange separate pieces to create a platform run, an end, or a layout-specific shape. For example, a straight section can join a shaped end to complete a platform beside a station building. Their dimensions and profile need to suit the model railway’s scale and available space.
What are the risks and maintenance requirements of 3D-printed railway platforms?
Handle resin parts carefully during cleanup, washing and curing, following the maker’s instructions. Filament prints may show layer lines and need sanding and primer. Remove supports carefully and dry-fit parts before painting to check alignment.