

What if the building that gives your narrow gauge layout its character isn’t available as a standard kit? Generic plastic structures can feel out of place beside a distinctive OO9 or GN15 railway. 3D printed model railway buildings can offer different shapes and architectural details to help make a setting feel convincing.
It’s reasonable to have reservations. Layer lines can show through a finish, resin parts may need careful handling, and painting an unfamiliar material can seem daunting. A few considered preparation and finishing steps can help bring out fine details and create a realistic result. These are kits, too, so you can customise them to suit your layout rather than settle for a one-size-fits-all look.
This guide explains how 3D printed structures compare with conventional plastic kits, what to consider about print detail and durability, and how to prepare, paint and weather a model. You’ll also see how specialist narrow gauge buildings can work alongside locomotive kits and scenery to create a more cohesive layout.
Key Takeaways
- Understand how digital files become 3D printed structures, and why the method offers more options for niche narrow gauge settings.
- Compare resin and filament printing to decide which material best suits fine architectural features or larger structural pieces.
- Learn how 3D printed model railway buildings differ from traditional kits in prototype character and assembly, and what to check before choosing one.
- Follow practical preparation steps, including cleaning resin parts and smoothing support marks, to help achieve a tidy painted finish.
- Check scale and track compatibility when choosing structures, then consider how industrial buildings can complement your layout.
What are 3D Printed Model Railway Buildings?
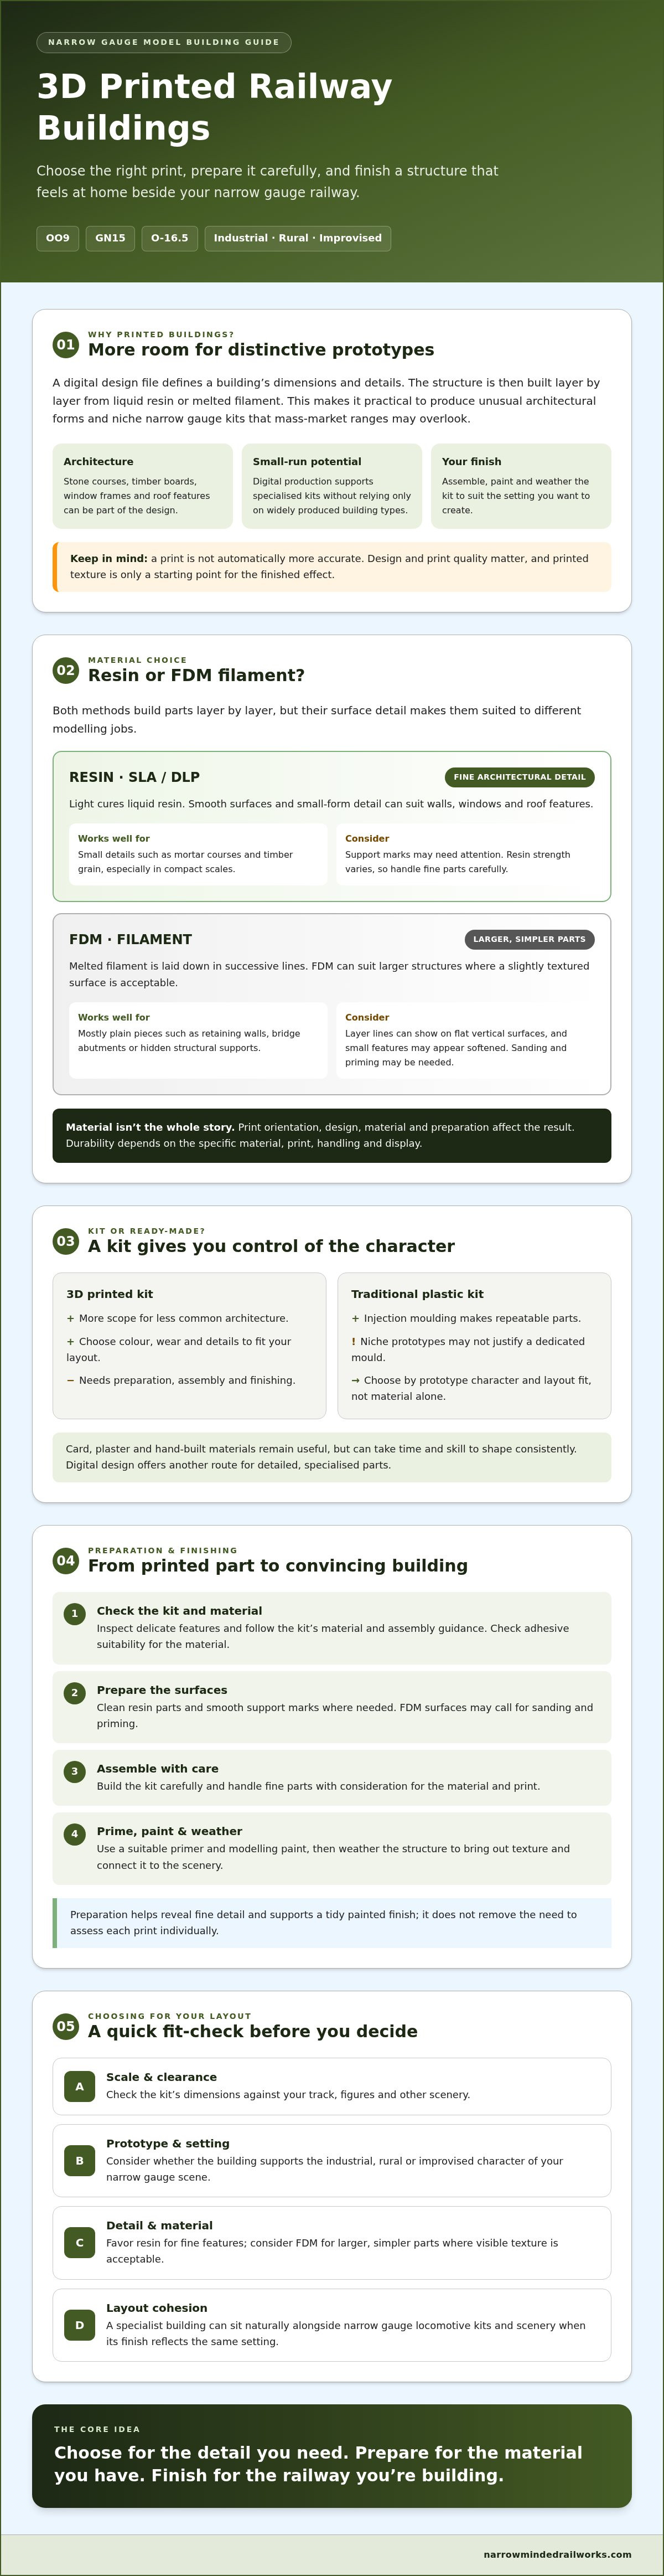
3D printed model railway buildings are structures made from a digital design file, built up layer by layer using either liquid resin or melted filament. The design sets the building’s dimensions and can include details such as stone courses, timber boards, window frames and roof features. The finished print still needs preparation and painting, but digital design makes it practical to produce distinctive architectural forms in scales that mass-market ranges may overlook.
This is especially useful in narrow gauge modelling. OO9, GN15 and O-16.5 layouts often call for buildings that suggest a particular industrial, rural or improvised setting. A suitable structure can help establish that character, while a building that feels generic or out of scale may distract from it. A kit can be designed for a defined scale, but check its dimensions against your track, figures and other scenery before you buy.
Unlike traditional injection moulding, which is most economical for products made in large quantities, 3D printing can support smaller, more specialised kits. This gives modellers more scope to find unusual prototypes and architectural features without relying only on widely produced building types. The result isn’t automatically more accurate: design and print quality matter. A well-designed kit, however, can offer crisp details and a less familiar silhouette.
The Evolution of Scenery Production
Card, plaster and hand-built materials remain useful for scenery, but they take time and skill to shape consistently. Injection-moulded plastic makes repeatable parts, yet niche narrow gauge prototypes may not justify a dedicated mould. Digital design offers another route: a designer can model textured stonework or timber boards directly into a kit, then produce the parts as needed. Printed texture is a starting point, not a finished effect. Priming, painting and weathering bring the surface to life.
Kits vs. Ready-to-Run Structures
A kit asks you to assemble and finish the structure, so you can adjust its colour, wear and details to suit the layout. That takes effort, but it also gives you control over how the building sits beside your track, locomotives and scenery. Treat the print as a modelling project: prepare the parts, build them carefully, then use paint and weathering to create a coherent setting. Specialist kits can also pair naturally with narrow gauge locomotive and scenery kits.
For enthusiasts who value individual character over a mass-produced look, 3D printed model railway buildings offer a way to bring less common architecture into a layout. The kit format leaves the final appearance in your hands, so the structure can reflect your interpretation of its setting.
Resin vs. FDM: Choosing the Right 3D Printing Material
Resin and filament printing both build objects layer by layer, but they suit different modelling tasks. Resin printers, using SLA or DLP processes, cure liquid resin with light. FDM printers melt filament and lay it down in successive lines. MIT Sloan’s Additive manufacturing process overview explains the broader principle behind these methods. For modellers, the practical difference is the surface detail each can reproduce.
For fine architectural features, resin is often the stronger choice. Its smooth surfaces and ability to capture small forms make it well suited to walls, windows and roof details. FDM can work for larger, less detailed parts, but its stacked lines can remain visible, particularly on flat vertical surfaces. Neither method guarantees a perfect finish: print orientation, design, material and preparation all affect the result.
Why Resin Works Well for Narrow Gauge
In OO9, small features such as mortar courses and timber grain can be lost if a print lacks resolution. Resin can reproduce these details cleanly and reduce distracting layer lines on walls. That may mean less surface correction before painting, though support marks and other imperfections may still need attention. Use a suitable primer and modelling paint, and check the kit’s material and assembly guidance before choosing an adhesive. Resin products vary in strength, so handle fine parts with care.
When to Use Filament (FDM)
FDM can make sense for large, mostly plain structures where a slightly textured surface won’t undermine the appearance, such as a retaining wall or bridge abutment. It can also suit hidden structural supports beneath the layout, where fine detail isn’t a priority. At 7mm and smaller scales, visible layer lines and softened small features may be more apparent on architectural models. Consider whether sanding and priming will be needed.
Durability depends on the specific material, print and how the finished part is handled and displayed. Avoid assuming that every resin print is fragile or that every filament print is robust. Inspect delicate features, support the structure properly and protect the finished model from knocks. For 3D printed model railway buildings, choose the process according to the detail you want and the building’s role on the layout. Narrow gauge kits and scenery can help you see how structures work alongside locomotives and other layout details.
Whatever the print method, a kit remains a starting point for your own finish. Explore narrow gauge kits and scenery as you consider how structures, locomotives and setting can work together.
3D Printed Kits vs. Traditional Plastic Buildings
Traditional plastic kits offer familiar materials and repeatable parts, but their range tends to favour subjects that can be produced and sold in volume. Narrow gauge layouts often call for something more specific: a weathered structure beside a Welsh slate quarry, a modest engine shed for an industrial line, or a building with an unusual footprint. A 3D printed kit can suit these less common settings, including prototypes that have never appeared as plastic kits.
That difference is about more than novelty. A structure designed for a particular narrow gauge scene can have a more convincing profile, texture and sense of use than a generic building adapted to fit. Plastic kits aren’t inherently inaccurate, and a modeller can weather or modify them, but their familiar shapes may need extra work to feel at home in a rugged or improvised setting. Well-designed 3D printed model railway buildings offer another starting point, with architectural details and proportions shaped around a specific concept.
Prototype Accuracy and Niche Subjects
Digital design makes it practical to create small runs of specialist buildings without committing to a large injection mould. That opens the door to distinctive industrial and rural architecture suited to OO9, GN15 or O-16.5 scenes. Check dimensions and reference details before building: “narrow gauge” covers varied settings, and a structure still needs to look right alongside your track, locomotives and figures. Printed texture can support realism, while paint and weathering give it context.
The Modeller’s Experience
Assembly varies by kit, but some printed structures use fewer separate parts than a complex plastic kit. This can simplify construction, though resin may need different preparation and handling from polystyrene. Polystyrene cement generally works by softening compatible plastic; it won’t reliably bond resin. Many resin kits call for cyanoacrylate adhesive, often called CA or superglue, so follow the kit’s instructions and test the fit before joining parts.
Kits also leave the finish in your hands. You can adapt colours, add signs, or make careful cuts and adjustments to better integrate a building with the layout. Printed parts aren’t automatically easier to modify, especially where details are fine, so work slowly and use appropriate tools. The benefit is creative control, not a promise that every change will be simple.
Price is one part of the decision, but compare like with like: consider whether the subject suits your layout, how much assembly and finishing you’re prepared to do, and whether the detail reduces the need for extensive modification. A specialist kit may be worthwhile when it provides the character or prototype you can’t find in a standard range. For related modelling considerations, read Your First OO9 Loco Kit.
How to Prepare and Finish 3D Printed Building Kits
A convincing finish starts before the first coat of paint. Careful cleaning, light sanding and a suitable primer help reveal the detail in 3D printed model railway buildings while preventing support marks or surface residue from spoiling the result. Work gently, especially around fine window frames, roof edges and other delicate features.
Preparation and Cleaning
Inspect each part under good light and identify any remaining support pips or rough contact points. Remove them carefully with a fine-grit sanding stick, using short, controlled strokes rather than pressing hard. If a mark sits close to fine detail, trim it first with a sharp modelling tool, then smooth the area. Avoid sanding away the texture you want to keep.
Wash resin parts in warm, soapy water to remove residue that could interfere with primer or paint, then rinse and let them dry fully. Check the kit’s instructions first, and avoid hot water or harsh cleaners that could affect the material. Use CA glue for resin-to-resin joints because it bonds resin parts without relying on the plastic-softening action of polystyrene cement.
Once clean and dry, apply a thin, even coat of primer suitable for the kit material. Primer helps paint adhere and makes remaining blemishes easier to spot, so inspect the surface before moving on. If needed, lightly smooth a flaw and reprime that area rather than applying a thick coat that could soften fine details.
Painting for Realism
Build colour in thin layers, allowing each coat to dry before adding the next. For stone or brick, start with a base colour, then use a wash to settle into mortar lines and recesses. A restrained dry-brush of a lighter tone across raised edges can suggest worn masonry. For corrugated iron, vary the panels with subdued shades, then use a dark wash in the grooves to emphasise the ridges.
Weathering gives a building a place in the scene. Add subtle dirt near ground level, streaks below windows or roof edges, and muted wear where people might handle doors or steps. Match the degree of weathering to nearby narrow gauge locomotives and scenery so the structure feels part of the same environment. Build effects gradually; it’s easier to add more than to remove an overly heavy wash.
For more detailed guidance on primers, paint layers and finishing methods, read Painting 3D Printed Models. When you’re ready to choose a structure to finish and customise, explore narrow gauge kits and scenery for your layout.
Unique Narrow Gauge Buildings for Your Layout
A building that suits the railway’s scale and setting can make a layout feel like a particular place, rather than a collection of track and scenery. Narrow gauge scenes often benefit from architecture with an improvised, industrial or rural character: an engine shed beside a small locomotive, a water tower near a stopping place, or a weighbridge serving a quarry. Choosing a structure is about more than its name; its footprint, proportions and finish should make sense beside your rolling stock.
Scale is the first check. OO9 uses 4mm scale models on 9mm track, while O-16.5 uses 7mm scale models on 16.5mm track. GN15 uses G-scale models on 16.5mm track, so its buildings and figures are larger than those in OO9. Before settling on a kit, compare its dimensions with your track plan and available space. The GN15 scale guide can help you think through layout footprint and planning.
Architecture for OO9 and GN15
Narrow gauge buildings often look most convincing when their materials and condition suit the railway’s purpose. A compact shed, a weathered lineside hut or a modest station building can help create a distinct scene without overwhelming the track. Match details such as roofing, signs and paintwork to the era and character suggested by your locomotives and wagons. Kits give you room to customise these finishes, so the architecture and rolling stock feel connected rather than independently selected.
Detailing with Scenery Accessories
Small accessories help imply activity and tell a story. A vintage petrol pump beside a shed, a phone box near a station, or milk churns awaiting collection can suggest how people use the space. Place figures where their actions make sense, such as waiting on a platform or working near a building. Figures and diorama tools can add human detail and help blend structures into the surrounding ground.
Keep the scene selective. A few well-placed objects can establish a railway’s purpose more clearly than a crowded platform. For example, pair a small station structure with figures and only the accessories that suit the setting, then use weathering to bring the building into harmony with nearby locomotives and wagons.
For a layout built around distinctive narrow gauge subjects, consider how buildings, locomotive kits and scenery can work together as one scene. Browse 3D printed kits and scenery to explore options for your layout.
Bring More Character to Your Narrow Gauge Layout
The right structure can make a narrow gauge scene feel specific and lived-in. 3D printed model railway buildings offer a route to distinctive architectural detail, especially when standard kits don’t capture the character you want. The material matters: resin is well suited to fine features, while FDM can serve larger, less detailed structures. Careful cleaning, priming, painting and weathering help turn a printed kit into a convincing part of the scene.
Narrow Minded Railworks sells model railway kits and accessories for narrow gauge scales, including locomotive bodies, wagons, buildings and scenery items. Its kits are available for OO9, GN15 and O-16.5 modelling. Because they’re kits, you can customise the finish to complement your locomotives, rolling stock and scenery. The business offers worldwide shipping.
Ready to find a structure that suits your layout? Browse Narrow Minded Railworks’ 3D printed kits and scenery and choose a project to finish your way. With a thoughtful scale match and a personal touch, you can create a scene that feels like it belongs to your railway.
Frequently Asked Questions
Do 3D printed buildings have visible layer lines?
They can, but visibility depends on the printing method, design, orientation and finish. Resin printing generally produces smoother surfaces and finer architectural details, while FDM can leave lines that show on flat walls, especially at smaller scales. Inspect the model under good light before painting. Light sanding where appropriate, followed by a suitable primer, can help reduce visible marks without wearing away stonework, timber texture or other fine details.
What is the best glue for 3D printed resin buildings?
Cyanoacrylate adhesive, commonly called CA or superglue, is generally suitable for resin-to-resin joints. Polystyrene cement works by softening compatible plastic, so it won’t reliably bond resin parts. Before gluing, make sure the surfaces are clean and dry, and test-fit the pieces to check alignment. Apply a small amount of adhesive and follow the kit’s instructions, taking care around delicate details and avoiding excess glue on visible surfaces.
Can I use standard acrylic paints on 3D printed kits?
Yes, acrylic modelling paints can be used on many 3D printed kits, but prepare the surface first. Clean the parts, let them dry completely, and apply a primer suitable for the material. This helps paint adhere and reveals marks you may want to smooth before continuing. Build colour with thin coats so fine details remain visible. Check the kit’s guidance and the paint label, since materials and paint formulations can vary.
Are 3D printed buildings durable enough for outdoor layouts?
Durability outdoors depends on the specific print material, construction and exposure to weather, sunlight and temperature changes. Don’t assume a model intended for indoor use will withstand outdoor conditions. Check the maker’s material guidance before placing a kit outside, and consider whether it can be sheltered or brought indoors when not in use. Handle delicate details carefully, since fine features may be more vulnerable to knocks than larger structural parts.
How do I remove support marks from my 3D printed model?
First, inspect the model under good light to locate support pips and rough contact points. Trim raised marks carefully with a sharp modelling tool, then smooth them using a fine-grit sanding stick and short, gentle strokes. Take extra care near windows, roof edges and textured surfaces, since heavy sanding can flatten details. If a mark is close to a fragile feature, work slowly and check your progress often rather than trying to remove it in one pass.
Why should I choose a 3D printed kit over a ready-to-run building?
A kit gives you control over assembly, colour and weathering, which can help the structure fit your narrow gauge layout more naturally. It may also offer an unusual architectural subject or detail that’s difficult to find in a mass-produced range. That flexibility involves hands-on work, including preparation and painting, so consider how much modelling you want to do. Kits designed for narrow gauge scenes can also complement your locomotives and scenery.
What scales are available for Narrow Minded Railworks buildings?
Narrow Minded Railworks specialises in narrow gauge kits and scenery for OO9, GN15 and O-16.5 modelling. The current selection of buildings may vary, so check the product listing for the specific scale and dimensions before choosing a kit. Scale names alone don’t confirm that a structure will fit your available space or match every layout feature. Compare the building’s measurements with your track plan, rolling stock and figures.
Do I need to wash my 3D printed kit before painting?
For resin kits, washing before painting is a useful preparation step because residue on the surface can interfere with primer and paint. Use warm, soapy water unless the kit’s instructions specify another method, then rinse and allow the parts to dry fully. Avoid hot water or harsh cleaners that could affect the material. Once dry, inspect the surfaces, remove any remaining support marks carefully and apply a suitable primer before painting.