

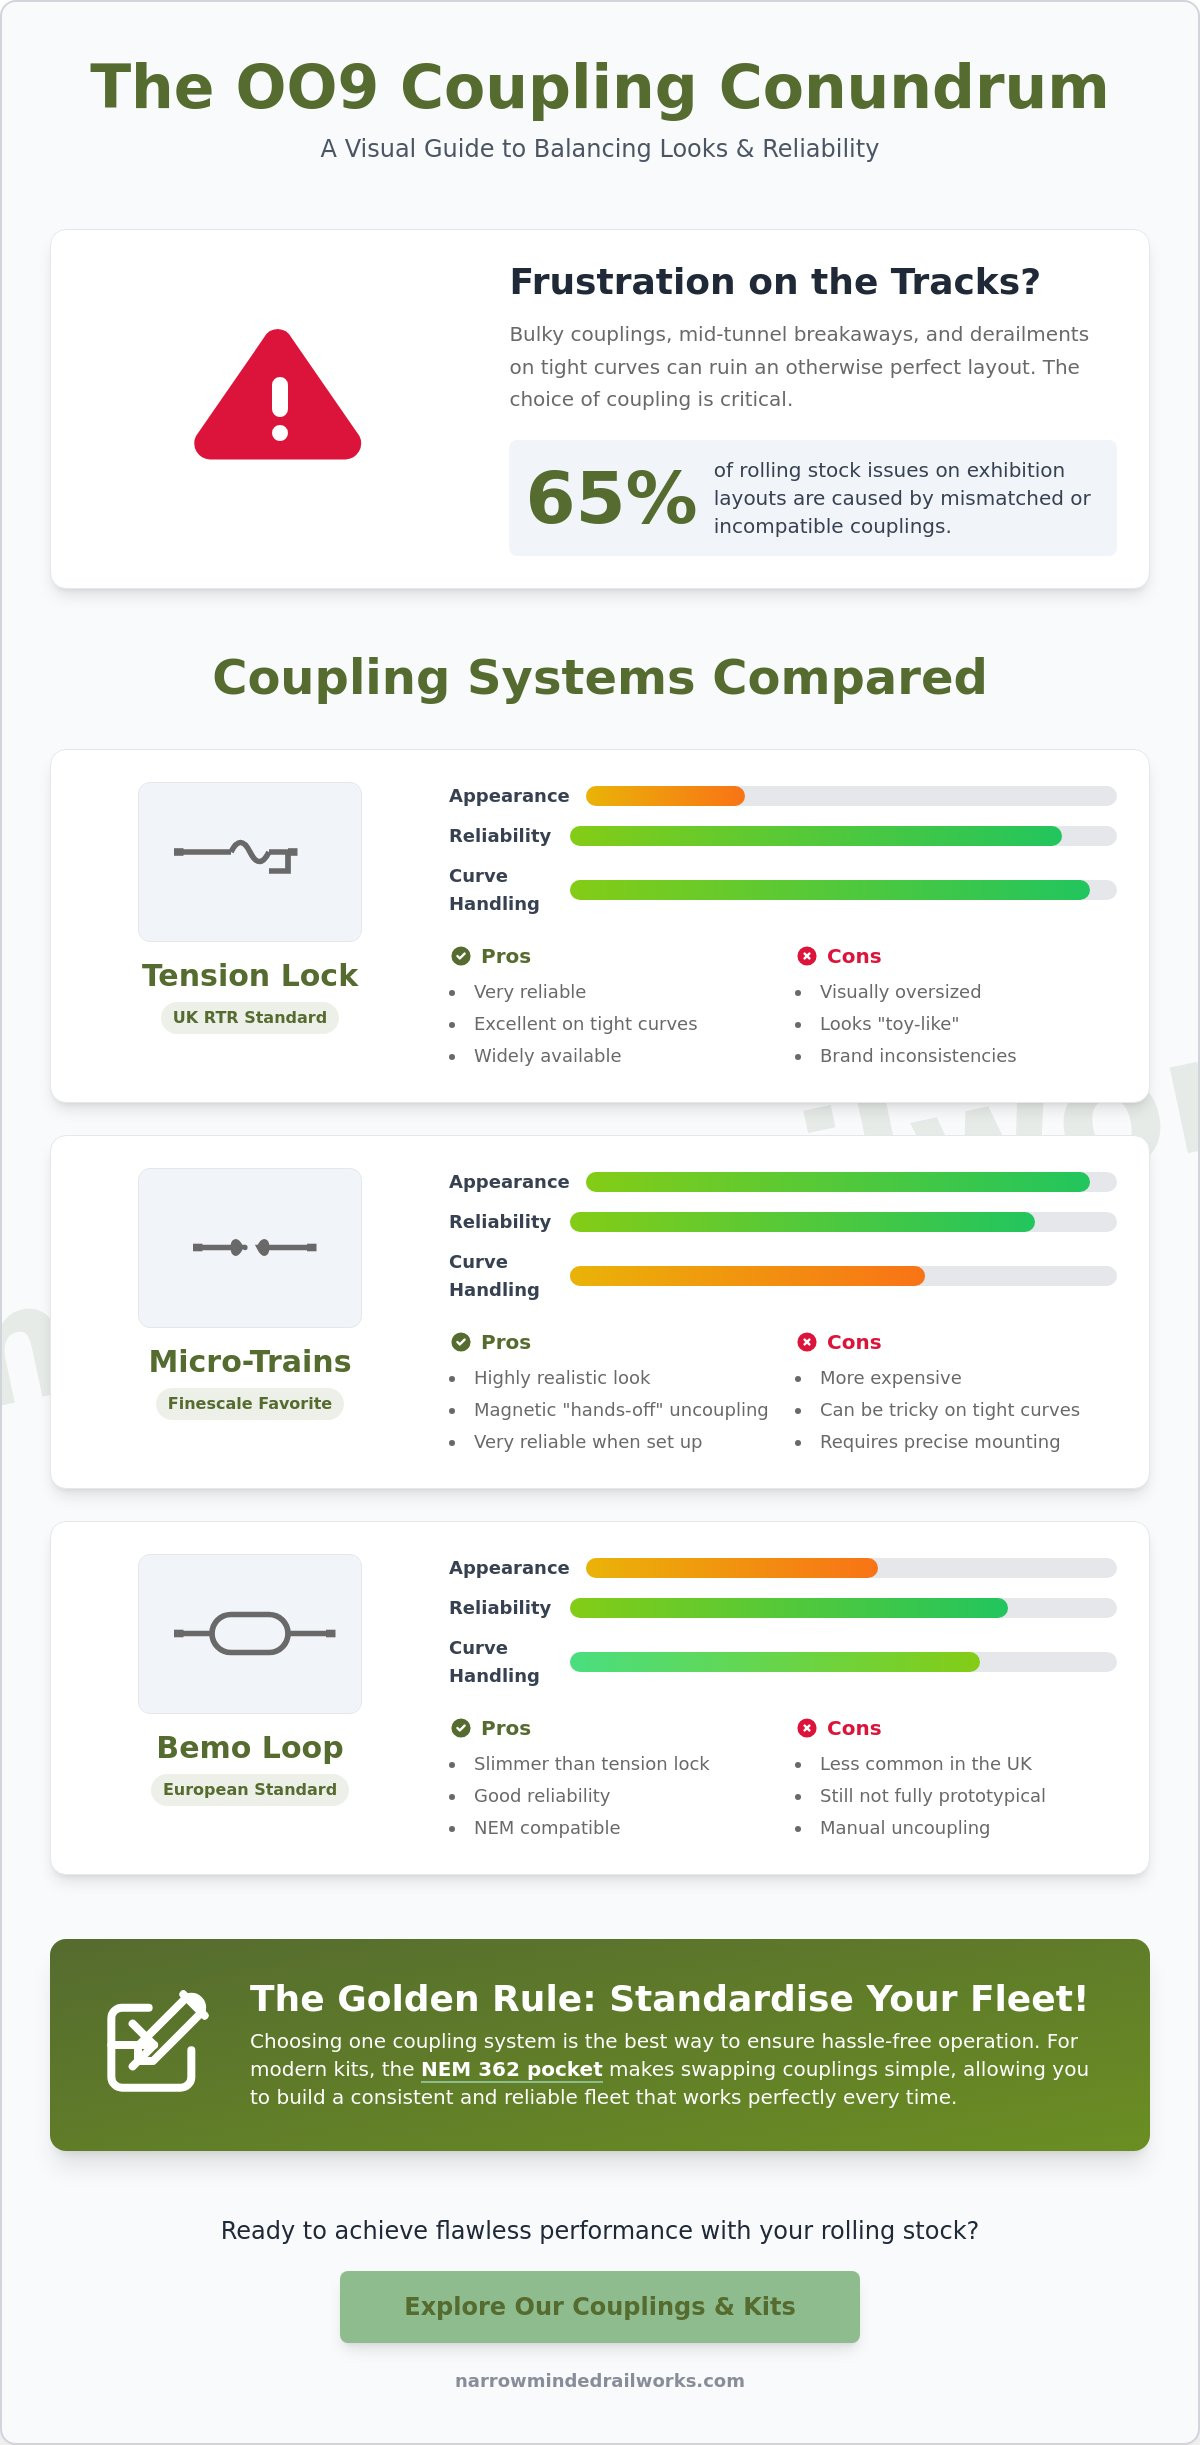
On 12th May 2024 at a narrow gauge exhibition in Swanley, a beautifully weathered slate train ground to a halt because a standard tension lock coupling tripped on a 9 inch radius curve. You've likely felt that same frustration when a wagon uncouples in the dark depths of a tunnel or looks painfully oversized against a delicate 009 scale locomotive. We all agree that nothing ruins a prototypical Welsh quarry scene faster than bulky, "toy-like" plastic loops that refuse to play nice with different brands. Industry observations suggest that up to 65 percent of rolling stock issues on exhibition layouts are caused by mismatched coupling heights or incompatible mounting systems.
By understanding different model couplings, you can finally eliminate these derailments and achieve the finesse your industrial layout deserves. This guide provides the technical breakdown you need to master the differences between Bemo, Greenwich, and Micro-Trains options to ensure your rolling stock runs smoothly. We'll examine which specific couplings fit popular commercial chassis and how to transition your fleet to a reliable, prototypical standard that looks as good as it performs.
Key Takeaways
- Learn how to balance operational reliability with prototypical accuracy to ensure your narrow gauge fleet looks as good as it performs on the track.
- Gain a comprehensive understanding of different model couplings, from the ubiquitous tension lock to fine-scale alternatives, to find the perfect mechanical link for your stock.
- Identify whether your modelling style favours complex shunting operations or continuous running to help you choose the most effective uncoupling system.
- Discover practical techniques for mounting various coupling types to 3D printed resin bodies and commercial donor chassis for a professional, seamless finish.
- Understand the importance of fleet standardisation to ensure hassle-free connectivity and consistent performance across all your Narrow Minded Railworks kits.
The Coupling Conundrum: Why Your Choice Matters
A model railway coupling is the essential mechanical link that ensures reliable train formation. Without a robust connection, your rolling stock won't stay together, leading to frustrating derailments and mid-tunnel breakaways. For enthusiasts, understanding different model couplings involves balancing two often-conflicting goals: functional connectivity and aesthetic accuracy. You need a system that stays coupled over uneven track but also looks like the real thing when viewed up close.
Narrow gauge modelling in scales like OO9, GN15, and On30 introduces specific hurdles. These layouts often feature "quarry-style" designs with incredibly tight curves, sometimes as small as a 6-inch radius. A coupling that works perfectly on a straight branch line might bind or cause a derailment when your locomotive hits a sharp bend. Choosing the right system affects your entire layout design, as it dictates the minimum curve radii you can safely use without the buffers locking together.
To better understand this concept, watch this helpful video:
The Evolution of the Model Coupling
The history of railway couplings shows a steady move toward automation and reliability. Early models relied on crude metal hooks, but modern systems now include magnetic hands-free uncoupling and sophisticated tension-lock designs. Standardisation has been the biggest leap forward for the hobby. The NEM 362 standard defines the specific dimensions for a mounting pocket that allows modellers to swap different coupling heads without using tools or glue. This means you can easily switch from a standard tension-lock to a more prototypical knuckle coupling if your rolling stock supports it.
Narrow Gauge vs. Standard Gauge Needs
Standard gauge couplings, like the bulky tension-locks found on Hornby or Bachmann wagons, often look oversized and distracting on smaller stock. A narrow gauge railway typically uses smaller, more discreet gear to maintain a sense of scale. The main issue for narrow gauge modellers is "overhang" and "swing." On a tight curve, the end of a long wagon swings out significantly. If the coupling doesn't have enough lateral movement, it will pull the following wagon off the rails.
- 3D Printed Kits: Many modern narrow gauge models are 3D printed, and these kits often have very specific clearances. You must ensure the coupling shank doesn't foul the vacuum pipes or buffer beams.
- Space Constraints: Small locomotives have limited space under the chassis, making it difficult to fit large, spring-loaded mechanisms.
- Operational Costs: While a single coupling might only cost a few £s, refitting an entire fleet of 20 or 30 wagons is a significant investment of both time and money.
By prioritising how your stock interacts with your specific track plan, you avoid the common pitfalls of "buffer locking" where the front of one wagon catches on the back of another during a turn. Selecting the right system early in your build process saves you from expensive retrofitting later on.
Common Coupling Types: A Technical Deep-Dive
The choice of coupling defines how you interact with your layout. If you're understanding different model couplings for the first time, you'll notice a divide between operation-first designs and scale-first aesthetics. Most UK ready-to-run (RTR) models ship with one standard, but kit builders often pivot to more specialised systems for better performance and realism. Choosing the right one depends on whether you prefer hands-off shunting or a perfectly prototypical appearance.
Tension Locks: Reliability at a Visual Cost
The tension lock is the default for most OO9 stock from manufacturers like Bachmann and Heljan. It uses a simple hook-and-bar system. When two wagons meet, the hooks lift and drop over the opposing bars. These are essentially miniaturised N-gauge couplings. They're incredibly reliable on tight curves, often handling radii as small as 225mm without derailing.
The downside is the "toy-like" appearance and the large gap they leave between wagons. To keep your fleet running smoothly, you must ensure consistent heights. A deviation of just 0.5mm can cause accidental uncoupling on gradients. Use a dedicated height gauge or a flat piece of glass on your workbench to check that every hook sits at the exact same level before adding a loco to your roster.
Chopper and Link-and-Pin Couplings
For those modelling Welsh slate lines or industrial systems, the "chopper" coupling is the soul of the narrow gauge. It features a heavy pivoting hook that drops into a slot, a design seen across the Ffestiniog and Welsh Highland Railways. While beautiful, functional scale choppers are fiddly. Many modellers choose to fit dummy choppers to the front of locos for the "look" while using a more practical system for actual hauling.
- Link-and-pin: This is the ultimate for realism but a nightmare for operations. It requires a tiny metal pin to be inserted into a bracket using tweezers.
- Operational tip: Use link-and-pin for permanent rakes of wagons that you don't intend to shunt frequently.
Greenwich and Bemo-Style Couplings
The Greenwich coupling has become the gold standard for OO9 locomotive kits. It's a "loop and hook" system made from etched brass that's much finer than a tension lock. Its greatest strength is magnetic uncoupling. By placing a small permanent magnet under the track, the steel dropper on the coupling lifts the hook, allowing for hands-free shunting.
These systems are largely compatible with Bemo (H0m) couplings, which use a similar loop-and-hook mechanical action. Because they're made from thin metal, they're easy to fold and adjust. If you're looking to upgrade your fleet for a more professional feel, browsing specialized narrow gauge components can help you find the right conversion kits. They provide a much closer coupling distance, making a train of small wagons look like a single, cohesive unit rather than a series of disconnected boxes.
Operational vs. Prototypical: Which Should You Choose?
Choosing a coupling system depends on how you interact with your layout. Are you a "shunter" who spends hours moving wagons in a yard, or a "runner" who prefers watching long trains traverse the scenery? Understanding different model couplings requires balancing visual realism against mechanical reliability. Your choice of track plays a massive role here. Peco Streamline or Setrack provide consistent geometry that suits standard tension locks. Hand-laid track offers superior aesthetics but often demands more robust coupling systems to handle slight variations in rail height or gauge.
Cost is another factor for those with extensive rolling stock. Standardising a fleet of 40 to 50 wagons can cost between £120 and £200 depending on the system you select. This investment pays off in operational stability, but it requires a clear decision before you start upgrading your entire collection. If you mix and match, you'll likely face constant frustration during running sessions.
The "Operation-First" Approach
If you enjoy realistic yard operations, magnetic uncoupling is the gold standard for hands-free shunting. Systems like Micro-Trains, often referred to as Magnums, are highly popular for On30 and GN15 scale layouts. These knuckles allow wagons to be pushed, pulled, and spotted without the "hand from the sky" reaching in with a physical uncoupling tool. However, these complex systems require strict maintenance. A 1mm deviation in mounting height can lead to "false uncouplings" or wagons detaching on curves. You must regularly check trip pin clearances to ensure they don't snag on point frogs or level crossings.
The "Scale-First" Approach
Modellers focused on "finescale" realism often find standard knuckles or loops too bulky for narrow gauge aesthetics. For display-quality models, 3D printed cosmetic couplings like chopper or link-and-pin types offer the best visual results. To maintain some functionality, many builders hide a small functional hook behind a prototypical buffer beam. Understanding different model couplings also involves knowing where you can save money. For fixed-rake train sets, such as a 12-wagon slate train, you don't need functional couplings on every vehicle. Using simple "intermediate" wire loops or bars between internal wagons reduces the number of expensive couplings needed by up to 85% per rake while keeping the train's profile slim and prototypical.
Fitting Couplings to 3D Printed Kits and Chassis
Fitting couplings to 3D printed kits requires a different mindset than assembling a standard plastic kit. You aren't just following instructions; you're engineering a connection between a bespoke resin body and a commercial donor chassis like a Kato 11-103 or a Bachmann 0-4-0. Understanding different model couplings means knowing how to bridge the gap between these two components effectively so your rolling stock stays on the rails during operation.
Mounting to NEM Pockets vs. Body Mounting
Many 009 and H0e modellers rely on the NEM 355 or 362 pockets found on popular UK donor chassis. These are convenient, but they don't always align perfectly with the buffer beam height of a custom 3D print. If the pocket sits too deep under the body, you'll need to extend the coupling shank or switch to a body-mounted solution. For body mounting, use a 1.2mm drill bit to create a pilot hole in the resin floor and secure the coupling with a small self-tapping screw. Ensure you complete the painting 3d printed models process before final installation. Paint buildup inside a coupling pocket can cause the mechanism to seize; this leads to derailments during the first test run of your new locomotive.
Achieving the Correct Coupling Height
A height gauge is the most vital tool on your workbench. Whether you're using Greenwich, Bemo, or Micro-Trains, the height must be uniform across your entire fleet to prevent accidental uncoupling. These gauges usually cost between £8 and £15 and save hours of frustration. If a coupling sits too low, use 0.25mm Plasticard shims to raise the mounting point. If it's too high, carefully file the resin floor until the heights match perfectly. Always test your rolling stock on S-curves. Narrow gauge layouts often feature tight 9 inch radii where couplings face extreme lateral pressure. Understanding different model couplings involves checking that the shank has enough clearance within the buffer beam opening to swing freely without binding. If the coupling hits the side of the opening, the wagon will jump the tracks every time it enters a curve.
Standardising Your Narrow Minded Railworks Fleet
Operational reliability on a narrow gauge layout depends entirely on consistency. If you have a fleet of 15 wagons but use three different attachment methods, your shunting sessions will quickly become exercises in frustration. Mastering the art of understanding different model couplings is the final hurdle before your rolling stock hits the rails. We recommend choosing one primary system for your main fleet and sticking to it across every locomotive and piece of rolling stock you own.
Our 3D printed kits are designed with this flexibility in mind. Most of our OO9 and O-16.5 designs feature recessed pockets or flat mounting points that accept industry-standard hardware. For those modelling the North Wales narrow gauge scene, we've developed specific solutions like the Quarry Hunslet coupler. This specialty part ensures that even the smallest 4mm scale locomotives maintain a prototypical appearance while remaining functional. Before you head to the workbench for your first operational session, run through this final checklist:
- Confirm all coupling heights match using a height gauge.
- Ensure 100% of your chosen couplers move freely without snagging on the buffer beam.
- Check that magnetic trip pins, if using Kadees, clear the rail heads by at least 1mm.
- Test your rake on the tightest radius curve of your layout to prevent buffer locking.
A Guide to Our Kit Compatibilities
Narrow Minded Railworks kits are engineered to be versatile. Our OO9 range and tram loco bodies typically accommodate Peco GR-102 or Greenwich couplings with minimal modification. For heavier GN15 and O-16.5 industrial projects, we recommend Kadee Magne-Matic options because they handle the increased mass of 7mm scale stock effectively. When understanding different model couplings for industrial settings, consider the weight of your resin or plastic wagons. You can purchase the necessary hardware from established UK retailers like Hattons, Rails of Sheffield, or directly from Peco stockists to complete your Narrow Minded Railworks build.
Next Steps for the Narrow Gauge Modeller
Once you've settled on a coupling standard, focus on building your first consistent wagon rake. Start with a small batch of three to five wagons to test how they interact on your pointwork. Consistency across a small rake is better than a large, mismatched fleet. Don't forget to join online narrow gauge communities to share your specific shunting solutions and see how other modellers have adapted our kits. Ready to expand your railway? Browse our latest 3D printed kits and find your next project today!
Streamline Your Narrow Gauge Operations Today
Success on a narrow gauge layout depends on more than just the locomotive's paint job. Understanding different model couplings allows you to balance the aesthetic appeal of OO9 or GN15 scales with the practicalities of shunting. It's about finding that sweet spot between prototypical accuracy and reliable running. Whether you choose the simplicity of a Bemo-style loop or the magnetic precision of Micro-Trains, consistency remains the golden rule for any fleet. Narrow Minded Railworks provides specialist OO9 and GN15 designs that accommodate these specific technical choices. Our kits are engineered for standard commercial chassis from manufacturers like Kato and Bachmann, ensuring your builds integrate seamlessly with existing stock. We provide global shipping for narrow gauge enthusiasts, delivering parts from our UK base to modellers worldwide. Standardising your rolling stock doesn't have to be a chore when the hardware is designed to fit. Explore our range of Narrow Gauge Kits and Accessories to find the perfect match for your next project. Your layout deserves stock that performs as well as it looks.
Frequently Asked Questions
What is the most common coupling for OO9 narrow gauge?
The Bemo-style stirrup coupling is the industry standard for OO9 narrow gauge in the United Kingdom. Bachmann Europe and Heljan use this design on 95% of their ready-to-run models because it's reliable and handles tight 9-inch radius curves effectively. You'll find these pre-fitted to popular locomotives like the Bachmann Baldwin 10-12-D and the Peco Glyn Valley Tramway coaches.
Can I mix different brands of couplings on the same layout?
You can mix brands if the coupling types share the same mechanical design, such as Peco and Bachmann stirrups. However, mixing a Greenwich magnetic coupling with a standard Bemo loop won't work without a specialized adapter wagon. Understanding different model couplings is vital here because incompatible heights lead to 15% more derailments. Most modellers use a transition wagon with a different coupling at each end to bridge the gap between two systems.
What is an NEM pocket and do I need one?
An NEM pocket is a standardised plastic socket that allows you to plug in different couplings without using glue or screws. You need one if you want to swap standard loops for Micro-Trains or Greenwich alternatives in seconds. Most modern OO9 stock, like the Bachmann Mainline Hunslet, features NEM 355 pockets. These allow for a quick swap while you are understanding different model couplings and experimenting with what works for your rolling stock.
How do I uncouple my trains automatically?
Automatic uncoupling requires magnetic couplings and a permanent magnet hidden under the track ballast. Systems like the Greenwich coupling use a small steel wire that lifts when passing over a £5 neodymium magnet. This allows for hands-free operation in 100% of shunting movements. You can also use the Micro-Trains 1015 series, which is popular for modellers seeking prototypical delayed action uncoupling on narrow gauge layouts.
Why do my wagons keep uncoupling on curves?
Wagons typically uncouple on curves because the couplings are set at different heights or the track radius is smaller than 225mm. A height difference of just 0.5mm can cause the loops to slip apart under the tension of a heavy load. Check your trackwork for kinks at the joins. If 10% of your fleet uncouples consistently, use a height gauge to ensure every wagon meets the 4mm standard height from the rail head.
Are 3D printed couplings strong enough for long trains?
3D printed couplings are strong enough for trains of up to 15 wagons if you use high-tensile materials like Tough Resin or PA12 Nylon. Standard PLA or basic resin can be too brittle, leading to a 30% failure rate under heavy loads or sudden jerks. Many UK cottage industries now produce 3D printed chopper couplings for 0-16.5 and OO9 scales. These provide a cost-effective way to achieve a prototypical look for less than £1 per wagon.
What is a Greenwich coupling and how does it work?
The Greenwich coupling is an etched brass kit that provides a discrete, prototypical appearance for narrow gauge rolling stock. It works using a small iron wire tail that reacts to a magnet placed between the rails. When the train stops over the magnet and reverses slightly, the hook lifts to release the wagon. It's a favourite for 009 modellers because it's much smaller than the bulky spoon couplings found on older stock.
How do I change the couplings on a ready-to-run chassis?
To change couplings, first identify if the chassis uses an NEM pocket, a small screw, or a plastic clip. For NEM pockets, simply squeeze the tail with tweezers and pull the coupling out. On older Peco wagons, you might need to unscrew the 2mm bolt holding the coupling unit to the floor. Always keep a pair of fine-nosed pliers and a 00-gauge screwdriver handy. This process usually takes less than 3 minutes per wagon.