

Building a bespoke model railway locomotive no longer requires low-melt soldering, specialised tools, or decades of precision engineering experience. Modern narrow gauge kit building replaces fiddly metal fabrication with smart, accessible assembly, putting distinctive and characterful rolling stock well within your reach from your very first build.
Taking your first steps can certainly feel daunting when unfamiliar scale designations like OO9, GN15, and O-16.5 blur together. While fine 3D-printed resin components demand thoughtful handling to prevent damaged detail parts or messy adhesive lines, modern kit engineering ensures you don't need advanced workshop tools to produce a durable, clean finish.
This beginner's guide shows you how to choose, assemble, and paint realistic narrow gauge model kits with genuine confidence, even if you are entirely new to the craft. We will clarify essential scale fundamentals, share proven preparation and painting methods, and explain step by step how to fit a lightweight, detailed kit body cleanly onto a reliable commercial chassis.
Key Takeaways
- Understanding designations like OO9, GN15, and O-16.5 can initially seem confusing, but grasping the relationship between scale and track gauge quickly clarifies your ideal project path.
- Modern narrow gauge kit building removes the barrier of complex metalwork, allowing beginners to construct highly detailed models using accessible hand tools and cyanoacrylate adhesives.
- Motor assembly and gearbox quartering often intimidate newcomers, yet pairing dedicated kit bodies with off-the-shelf commercial donor chassis guarantees smooth running without mechanical frustration.
- While resin and plastic body shells are lightweight, planning internal ballast weight ensures your finished locomotive maintains dependable electrical pickup across pointwork.
- Surface preparation demands patience to protect fine details, but systematic cleaning, dedicated priming, and gentle weathering deliver durable, museum-quality industrial finishes.
What Is Narrow Gauge Kit Building and Why Choose It?
Narrow gauge kit building involves constructing scale models of real-world railways that operate on rails spaced narrower than the standard 4ft 8.5in (1,435mm). While mainline networks were engineered for long-distance speed and uniform freight, narrow gauge lines thrived across rugged slate quarries, peat bogs, agricultural estates, and remote valleys.
Commercial manufacturers focus their ready-to-run catalogues on mainstream standard gauge subjects. Because of this commercial reality, mass-market retailers rarely stock the idiosyncratic, small-batch locomotives that define narrow gauge history. Choosing narrow gauge kit building gives you the freedom to reproduce these distinctive prototypes yourself. Traditional white metal or etched-brass kits once demanded complex soldering skills, but modern high-resolution 3D-printed resin parts allow newcomers to build museum-grade models using accessible hand assembly techniques.
The Charm of Narrow Gauge Prototypes
Industrial tramways and rural feeder lines favoured strict utility, navigating sharp curves and steep hillside gradients where standard railways could not operate economically. This functional heritage produced an array of quirky locomotives, from vertical-boilered "coffee-pots" to home-built diesel shunters. Building these subjects encourages individual creativity and storytelling on compact baseboards. To understand how these lines operated historically, read our guide explaining what is a narrow gauge railway.
Understanding Key Narrow Gauge Scales
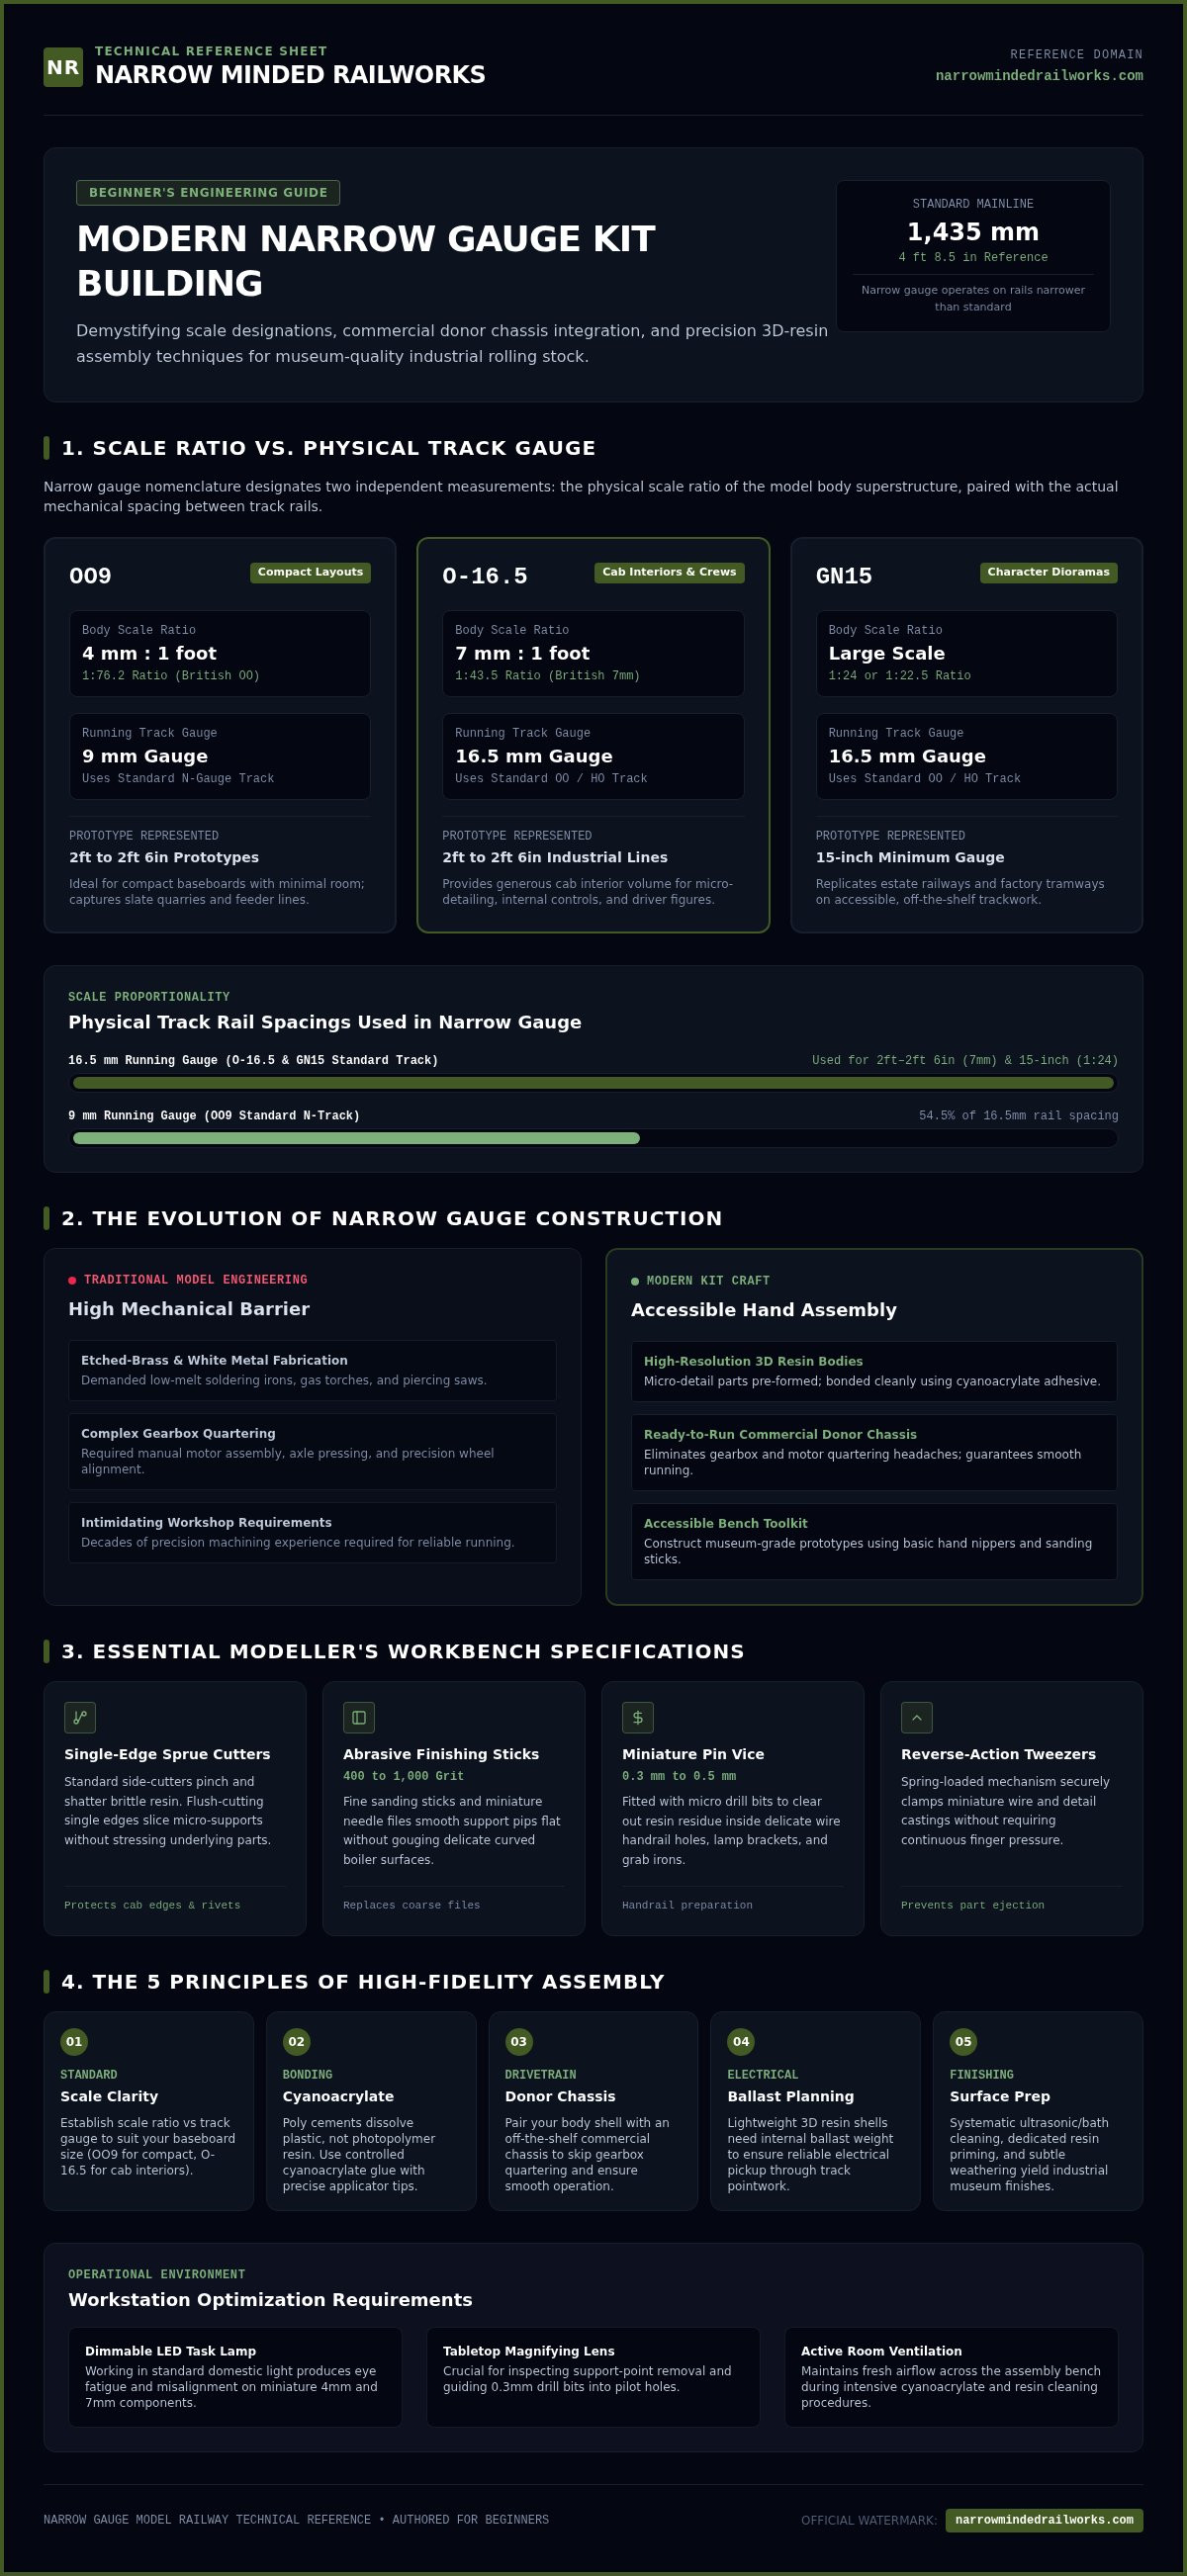
Novice builders often find narrow gauge classifications confusing because the terms describe two distinct measurements: the scale ratio of the model body, and the physical gauge between the rails. Understanding this distinction clarifies your options immediately:
- OO9 Scale: Pairs British 4mm to 1 foot (1:76.2) scale bodies with 9mm (N gauge) track. This standard accurately represents 2ft to 2ft 6in prototypes, making it ideal for compact layouts with minimal room.
- O-16.5 / 7mm Scale: Combines British 7mm to 1 foot (1:43.5) scale superstructures with standard 16.5mm (OO/HO) track. This ratio represents 2ft to 2ft 6in gauge industrial railways, offering generous space for detailed cab interiors and working crews.
- GN15 Scale: Places large-scale (1:24 or 1:22.5) locomotive bodies onto standard 16.5mm track. This scale represents 15-inch minimum-gauge estate and factory lines, lending itself perfectly to characterful industrial dioramas.
Essential Tools and Materials for Building Narrow Gauge Kits
Embarking on narrow gauge kit building requires only a modest investment in hand tools and a clean, flat work surface. Traditional metal kits demanded piercing saws, gas torches, and temperature-controlled soldering stations. In contrast, modern photopolymer resin kits rely on gentle cutting, careful dry-fitting, and controlled adhesive application.
Working with miniature 4mm or 7mm parts presents obvious visual challenges. Operating under poor domestic lighting causes eye strain and misaligned assemblies, but equipping your bench with a dimmable LED hobby lamp and a tabletop magnifying lens resolves these difficulties immediately. Ensuring adequate room ventilation keeps adhesive fumes at bay while you focus on delicate assembly work.
Hand Tools Every Modeller Needs
Precision tools prevent accidental damage to fine 3D-printed details during preparation:
- Single-Edge Sprue Cutters: Standard side-cutters pinch and crush brittle resin. A flush-cutting, single-edge nipper slices micro-supports cleanly away from cab edges and boiler fittings without stressing the underlying print.
- Abrasive Finishing Sticks: Coarse metal files gouge delicate curves. Fine-grit sanding sticks (400 to 1,000 grit) and miniature needle files smooth remaining support pips without rubbing away adjacent rivet patterns.
- Reverse-Action Tweezers and Pin Vices: Holding wire grab irons with your fingers risks losing them. Reverse-action tweezers grip small parts securely without continuous finger pressure, while a mini pin vice holding 0.3mm to 0.5mm drills cleans out handrail holes effortlessly.
Adhesives, Fillers, and Cleaners
Selecting the correct bonding agent is critical. Liquid plastic poly cements dissolve polystyrene, but they have zero effect on cured 3D photopolymer resin. Using the wrong adhesive leads to sudden joint failure, but choosing purpose-formulated chemicals guarantees permanent bonds:
- Medium Cyanoacrylate (Superglue): Thin superglue wicks into unintended joints and fogs nearby surfaces. Medium-viscosity cyanoacrylate provides a working window of several seconds, offering controlled placement for cab sides, roof panels, and brake gear.
- Two-Part 5-Minute Epoxy: High-stress areas, such as chassis mounting points and internal ballast weights, benefit from a flexible, gap-filling structural bond that cyanoacrylate cannot provide.
- Water-Based Acrylic Putty: Solvent-heavy body fillers can soften thin resin sections. Water-cleanup acrylic modellers' putty fills microscopic print joins smoothly and wipes flush with a damp cotton bud before curing.
Equipping your workspace with dependable equipment ensures a rewarding build. If you need reliable workshop supplies to complement your rolling stock projects, explore our range of diorama tools and scenery accessories to set your workbench up for success.
Step-by-Step Guide to Assembling Your First Narrow Gauge Kit
Rushing straight into assembly often causes crooked seams, but adhering to a disciplined sequence prevents irreversible mistakes. Successful narrow gauge kit building depends on a methodical workflow: inspect, clean, dry-fit, build sub-assemblies, and mount your running gear. Examining every casting under a bright task lamp reveals how each mating face aligns before you ever uncap an adhesive bottle.
Component Preparation and Dry-Fitting
While fresh resin or moulded components appear ready for glue, invisible production residues can prevent adhesives from achieving full strength. Washing your kit parts in lukewarm water with a drop of washing-up liquid removes lingering release agents and cleaning fluids. Let the pieces air-dry thoroughly on a lint-free towel before continuing.
Support nibs must be removed carefully to avoid pulling divots out of visible body panels. Slicing these nibs flush with a fresh scalpel blade, directing the cut away from adjacent surface detail, leaves the surrounding structure crisp and intact. Dry-fit the cab sides, ends, and floor together repeatedly. Dry-fitting verifies that edges sit completely flush, allowing you to lightly dress mating joints with a fine sanding stick before applying glue.
Assembling Locomotives and Rolling Stock
Achieving square, true corners on rectangular wagon boxes or locomotive cabs can be awkward with finger pressure alone. Clamping parts against a small steel machinist's square or utilizing a magnetic assembly jig keeps corners at rigid 90-degree angles while your cyanoacrylate sets.
Dividing your project into distinct sub-assemblies simplifies the entire build. Assembling the primary cab shell, footplate, and boiler first provides a solid core, leaving delicate grab irons, lubricators, and vacuum pipes aside until the heavy structural joins are firm. This method also leaves the cab interior completely accessible for painting and crew fitting before the roof is secured permanently. When you are ready to select an initial project, explore your first OO9 loco kit guide for tailored advice on picking an accessible locomotive body.
Selecting and Fitting a Commercial Chassis to Your Model
Historic whitemetal and brass kits often required builders to assemble tiny gearboxes, press wheels onto axles, and quarter crankpins by hand. This level of mechanical engineering understandably caused frustration for beginners. Modern narrow gauge kit building resolves this barrier by separating detailed body craft from drive engineering. Kit bodies are now precision-designed to drop straight onto mass-produced donor chassis, guaranteeing smooth running without mechanical headaches.
Matching Locomotives to Proprietary Chassis
Every locomotive kit states its required donor unit, such as the widely available Kato 11-109 two-axle mechanism or the Kato 11-110 bogie drive. These commercially available Japanese N gauge mechanisms retail in the UK between £18.00 and £25.00, providing modern coreless motors that deliver reliable, slow-speed crawl straight from the packaging.
Always verify clearances before permanently attaching exterior details. Check that the motion gear and driving wheel rims rotate freely inside the body skirts, and test the assembly through your layout's sharpest curves. Tramway designs with deep side valances demand particular attention to track clearances; you can read more about enclosed wheel arrangements in our dedicated guide to modelling tram locos.
Securing Bodies and Tuning for Reliable Operation
Lightweight 3D-printed resin shells capture incredible rivet detail down to 20-micron layers, but lack the physical heft of poured white metal. This lightness can cause two-axle locomotives to stall across dead-frog track turnouts. Adding self-adhesive lead strip, lead shot, or tungsten putty inside hollow boiler cavities and side tanks dramatically improves wheel-to-rail contact and hauling capacity.
Never glue a chassis permanently into a locomotive shell. Retaining the chassis with original factory clips, friction tabs, or discrete 10BA or 12BA machine screws ensures you can remove the drive unit easily for routine wheel cleaning and lubrication:
- Mounting Alignment: Ensure the body sits perfectly parallel with the track. Any fore-and-aft tilt causes couplings to ride at mismatched heights, leading to uncoupling over gradients.
- Coupler Height Gauges: Install standard narrow gauge stirrup, hook-and-loop, or magnetic micro-couplers against an established height gauge on a dead-flat test plank. Consistent heights ensure seamless shunting.
- Weight Distribution: Pack internal ballast evenly over the driven axles. Concentrating all weight on one end causes wheel slippage and uneven tyre wear.
Ready to start your next workshop project? Browse our 3D-printed locomotive kits to find accurately scaled bodies engineered for proven commercial drivetrains.
Painting, Weathering, and Detailing Your Finished Kit
A structured painting sequence turns a bare resin shell into a convincing miniature industrial workhorse. While raw materials look toy-like straight off the workbench, disciplined paint application brings fine rivet lines, boiler bands, and planking textures to life. Taking time over finishing ensures your investment in narrow gauge kit building delivers a centrepiece model you can display with pride.
Priming and Basecoat Techniques
Applying topcoat paint straight onto raw resin often causes flaking, as smooth photopolymer surfaces give acrylics poor purchase. Laying down a dedicated foundation solves this challenge. A light mist coat of grey automotive or plastic primer (such as Halfords Grey Primer or Tamiya Fine Surface Primer) bites firmly into cured resin without clogging micro-details.
Apply several thin coats from roughly 20 centimetres away rather than a single heavy blast. Once your primer cures for 24 hours, apply your livery base colours using hobby acrylics or an airbrush. Thinning your paint with dedicated acrylic medium maintains a smooth, level finish across wide panels. For a thorough walkthrough on surface prep, consult our guide to painting 3D printed models.
Adding Realism with Weathering and Transfers
Real-world narrow gauge engines worked long shifts in harsh, soot-filled environments. Factory-fresh gloss paint looks unnatural on an industrial shunter, but subtle weathering techniques instantly replicate decades of hard service:
- Pin Washes: Flowing a thinned burnt umber or dark grey enamel wash along boiler bands, cab corners, and door seams creates deep shadow lines without darkening the surrounding colour coats.
- Dry Pigments: Stippling black and slate-grey weathering powders around the smokebox, chimney base, and cab roof recreates baked-on soot and coal residue.
- Underframe Grime: Brushing earthy pigments over brake shoes, axleboxes, and footplates captures road grime thrown up from ballasted tracks.
Protecting this handiwork is essential. Water-slide transfers and weathering powders can wear off with regular handling, but misting the entire body with a durable matt or satin clear varnish seals the decals, unifies surface sheen, and shields your work from greasy fingerprints during operation. If you are keen to begin your journey, explore our full range of precision Narrow Minded Railworks kits across OO9, GN15, and 7mm scales to discover your next build.
Bringing Your Narrow Gauge Vision to the Rails
Starting your narrow gauge kit building journey can feel daunting when working with fine scale parts and unfamiliar terminology. However, following a structured sequence transforms the build into an accessible, deeply satisfying craft. Modern 3D-printed resin components eliminate the hurdles of metal soldering, while pairing crisp body shells with reliable commercial chassis ensures smooth running without mechanical frustration.
You don't need decades of workshop experience to create an authentic miniature railway. We design precision 3D-printed locomotive bodies, rolling stock, and diorama accessories in the UK, engineering every kit to mount cleanly onto popular off-the-shelf mechanisms. With worldwide shipping available for enthusiasts everywhere, finding distinctive industrial prototypes across OO9, GN15, and 7mm scales has never been simpler.
Explore our range of 3D-printed narrow gauge kits today and bring your first custom locomotive to life with confidence.
Frequently Asked Questions
Do I need soldering skills to start narrow gauge kit building?
No, you don't need soldering skills to start modern narrow gauge kit building. Traditional whitemetal and etched brass kits frequently required low-temperature irons and corrosive fluxes, which understandably intimidated newcomers. In contrast, contemporary kits utilise precision 3D-printed resin components that bond securely using standard cyanoacrylate or two-part epoxy. Combining modern adhesive methods with pre-assembled commercial donor mechanisms lets you construct robust, highly detailed models without ever handling a soldering iron.
What is the easiest scale for a beginner in narrow gauge kit building?
OO9 and O-16.5 both serve as practical starting points, depending on your available layout space and manual dexterity. OO9 provides easy access to affordable commercial N gauge mechanisms, though its 4mm scale parts require steady hands and good lighting. If handling miniature details feels daunting, O-16.5 or GN15 offers much larger components. These larger scales provide generous internal space for ballast and run reliably on standard OO/HO trackwork.
How do 3D-printed locomotive kits attach to commercial chassis?
Designers engineer 3D-printed body shells around the exact external dimensions of commercially available donor chassis. While some builders worry about complex alterations, most bodies simply push-fit into position using integrated friction clips or existing chassis tabs. For models requiring mechanical fasteners, kits incorporate pre-formed mounting bosses drilled for small machine screws. This direct approach guarantees proper axle alignment while allowing you to detach the drive unit effortlessly for periodic motor maintenance.
Can I run narrow gauge trains on standard model railway track?
Narrow gauge trains cannot run on standard track without matching the specific gauge ratio of the model. For instance, OO9 models represent narrow gauge prototypes running on 9mm rails, meaning they cannot operate on 16.5mm standard OO track. However, O-16.5 and GN15 models are specifically proportioned to run directly on standard 16.5mm track. If you already own standard OO/HO trackwork, building O-16.5 or GN15 kits allows you to reuse your existing layout immediately.
What glue works best for assembling resin narrow gauge kits?
Medium-viscosity cyanoacrylate, commonly known as superglue, works best for general resin kit assembly. Liquid plastic solvent cements fail because they cannot melt or chemically weld cured photopolymer resins. Using medium cyanoacrylate grants you several seconds to adjust part alignment before forming a solid bond. For high-stress structural joints or securing internal metal weights, two-part five-minute epoxy resin provides exceptional shear strength and fills minor internal gaps cleanly.
How do I add weight to lightweight narrow gauge locomotive bodies?
Lightweight 3D resin bodies lack the mass needed for optimal electrical pickup, but packing ballast inside hollow internal spaces easily solves this problem. Modellers fit self-adhesive lead strip, non-toxic tungsten putty, or lead shot mixed with PVA into boilers, side tanks, and cab roofs. Distributing this weight evenly over the driving wheels ensures consistent electrical contact across pointwork while dramatically increasing the locomotive's overall train-hauling capacity.
Where can I find suitable donor chassis for narrow gauge kits?
Independent kit designers rarely supply motorised chassis directly, requiring builders to source drive units from third-party model railway retailers. Popular Japanese mechanisms, such as the Kato 11-109 and 11-110, are widely stocked by specialist UK model shops, major online hobby suppliers, and international distributors. Sourcing your chassis independently allows you to secure the latest coreless-motor versions at current retail pricing before mounting your chosen body shell.