

The most characterful narrow gauge railways in Britain weren't built from a catalogue, so your layout shouldn't be either. While ready-to-run models offer convenience, they often carry a high price tag exceeding £150 and lack the unique charm of specific industrial prototypes. You might feel that achieving a prototypical look requires the complex soldering skills of a master brass-smith, but kitbashing narrow gauge locomotives using modern 3D-printed resin components has changed the rules of the hobby.
We recognize that finding specific prototypes is a challenge when mainstream brands focus on a limited range; therefore, utilizing specialized kits offers a precise and accessible alternative. This guide explains how to transform affordable, reliable commercial chassis into bespoke motive power. You will learn the essential techniques for preparing resin parts, adapting them to fit standard mechanisms, and applying professional finishes to your new fleet.
Key Takeaways
- Modern 3D resin printing provides intricate details like rivets and cab fittings without the technical difficulty of traditional brass or white metal kits.
- You can master kitbashing narrow gauge locomotives by mounting high-detail bespoke bodies onto reliable, commercially available chassis from brands like Kato or Bachmann.
- Surface preparation is vital for a professional finish; always ensure resin parts are degreased and treated with a high-quality automotive primer before painting.
- Bespoke modelling offers a cost-effective route to building a unique fleet of specific prototypes that aren't found in mainstream ready-to-run ranges.
What Defines a Custom Narrow Gauge Locomotive?
A custom narrow gauge locomotive represents a shift from passive collecting to active creation. It is a model modified or built to represent a specific industrial prototype or a unique freelance design. While many modellers start with box-standard items, What is Kitbashing? explains the process of using parts from various sources to create something entirely new. By kitbashing narrow gauge locomotives, you move beyond the limitations of mass production to build a fleet that tells a specific story. This process builds a much deeper connection to your narrow gauge railway layout. When every engine has a history you have personally crafted, the railway feels like a living entity rather than a static display.
Bespoke vs. Off-the-Shelf Models
Mass-produced models are often designed to appeal to the widest possible audience, which means they frequently lack the quirky character found on specific industrial lines. You might find that high-end ready-to-run models are prohibitively expensive; however, finishing a 3D-printed body kit yourself offers a proactive solution that balances cost and detail. There is immense satisfaction in operating a locomotive that you have personally assembled and weathered. It allows for high-end results without the premium price tag often associated with limited-edition releases. By taking control of the build, you ensure the model fits your specific era and operating requirements perfectly.
The Appeal of Narrow Gauge Prototypes
Narrow gauge railways in the UK were historically freelance by nature. From slate quarries in North Wales to industrial sites in the Midlands, these lines used whatever equipment worked best for the specific terrain. This history makes the medium perfect for customisation. Whether you are working in OO9, GN15, or O-16.5, you have the freedom to choose your own path between prototypical accuracy and freelance creativity. Kitbashing narrow gauge locomotives allows you to bridge the gap between these two worlds. You can maintain the mechanical reliability of a modern commercial chassis while enjoying the aesthetic freedom of a bespoke, 3D-printed body. Common approaches include:
- Prototypical accuracy: Recreating a specific engine from a defunct quarry or timber line using historical photographs.
- Freelance creativity: Designing a "might-have-been" locomotive that fits your layout's fictional history.
- Scale flexibility: Adapting common chassis to work across different gauges to suit your available space.
Ultimately, custom modelling is about solving the problem of generic layouts. By choosing a bespoke path, you create a railway that is uniquely yours.
The 3D Printing Revolution in Custom Modelling
3D printing technology has effectively democratised the production of bespoke models. In the past, creating a unique engine meant working with complex white metal castings or etched brass, which often deterred beginners. Modern resin printing allows for the inclusion of intricate details like individual rivets, boiler bands, and interior cab fittings directly into the print. This precision means that kitbashing narrow gauge locomotives isn't limited by your ability to solder tiny components anymore. It allows for the rapid development of obscure prototypes that mainstream manufacturers wouldn't find commercially viable.
While 3D-printed bodies are highly detailed, they lack the natural weight of traditional metal kits. This constraint can lead to poor traction on steeper gradients. To solve this, you should plan to add lead shot or tungsten putty into the hollow spaces of the boiler or side tanks. This proactive approach ensures your custom loco performs as well as it looks on the track. By combining the visual fidelity of resin with added internal mass, you create a model that rivals high-end brass imports.
Resin vs. Plastic Filament Printing
Standard filament (FDM) printers are excellent for large structures, but they often leave visible layer lines that ruin the scale effect on a small locomotive. SLA resin printing is the industry standard because it produces a perfectly smooth finish. This surface is essential for the successful painting of 3D printed models. Modern resins used in 2026 are also far more stable than early iterations, resisting warping and brittleness over time. You don't have to worry about the model degrading if you use high-quality, engineering-grade resins designed for the hobby.
Designing for Commercial Chassis
The true power of the 3D-printed body kit lies in its compatibility with reliable, mass-produced mechanisms. Many kits are specifically designed to fit "donor" chassis from manufacturers like Kato or Bachmann. This setup removes the need for complex motor assembly or gear alignment, which are often the most frustrating parts of a build. When selecting a kit, always verify which chassis it's engineered for to ensure a seamless fit. Following Essential Steps for Customising Your Loco Kit will help you understand how these mechanical components interact with your custom body.
By utilizing a commercial chassis, you benefit from smooth running and electrical pick-up right out of the box. This allows you to focus your energy on the creative aspects of the build, such as weathering and adding specific industrial details. If you're ready to start your next project, exploring a range of OO9 and GN15 body kits is the most efficient way to find a unique prototype for your layout.
Kitbashing vs. Scratch Building: Choosing Your Path
Choosing between kitbashing and scratch building often comes down to your available time and technical experience. Scratch building a locomotive from metal sheets can take months of meticulous fabrication; however, kitbashing narrow gauge locomotives using resin bodies provides a professional result in just a few days. While some may prefer the traditional route, many modellers lack the specialised workshop space for rolling bars and heavy-duty soldering. Utilizing a high-quality kit offers a proactive solution that maintains high standards of detail while respecting your schedule.
The learning curve for scratch building is steep. You must manage proportions and scale accuracy without a pre-defined guide, which often leads to frustration for those new to the hobby. Kits serve as the logical stepping stone, teaching you the fundamentals of assembly and finishing before you attempt a fully bespoke build from raw materials. This approach also ensures consistency across your fleet. If you want three identical industrial shunters for a quarry layout, kits provide a uniform look that is exceptionally difficult to replicate by hand.
When to Choose a Locomotive Kit
A locomotive kit is ideal if you want high detail without the months of fabrication required for metalwork. These kits feature pre-designed parts that fit together perfectly, removing the guesswork from the assembly process. Starting with your first OO9 loco kit is the best way to build confidence. You can focus on the aesthetic elements, such as adding fine wire handrails or custom weathering, rather than worrying about whether the boiler is perfectly circular. It's a faster route to a working model that doesn't compromise on visual quality.
The Challenges of Pure Scratch Building
Pure scratch building presents significant logistical hurdles, particularly when sourcing individual components. Finding the correct scale chimneys, domes, and safety valves can be an exhausting search through various specialist suppliers. Many experienced builders now acknowledge The 3D Printing Revolution in Custom Modelling as a vital tool for their projects. They often use 3D-printed parts for complex shapes while building the main footplate from brass. This hybrid approach allows for prototypical accuracy without the need to fabricate every tiny fitting from scratch. It bridges the gap between traditional craftsmanship and modern precision.
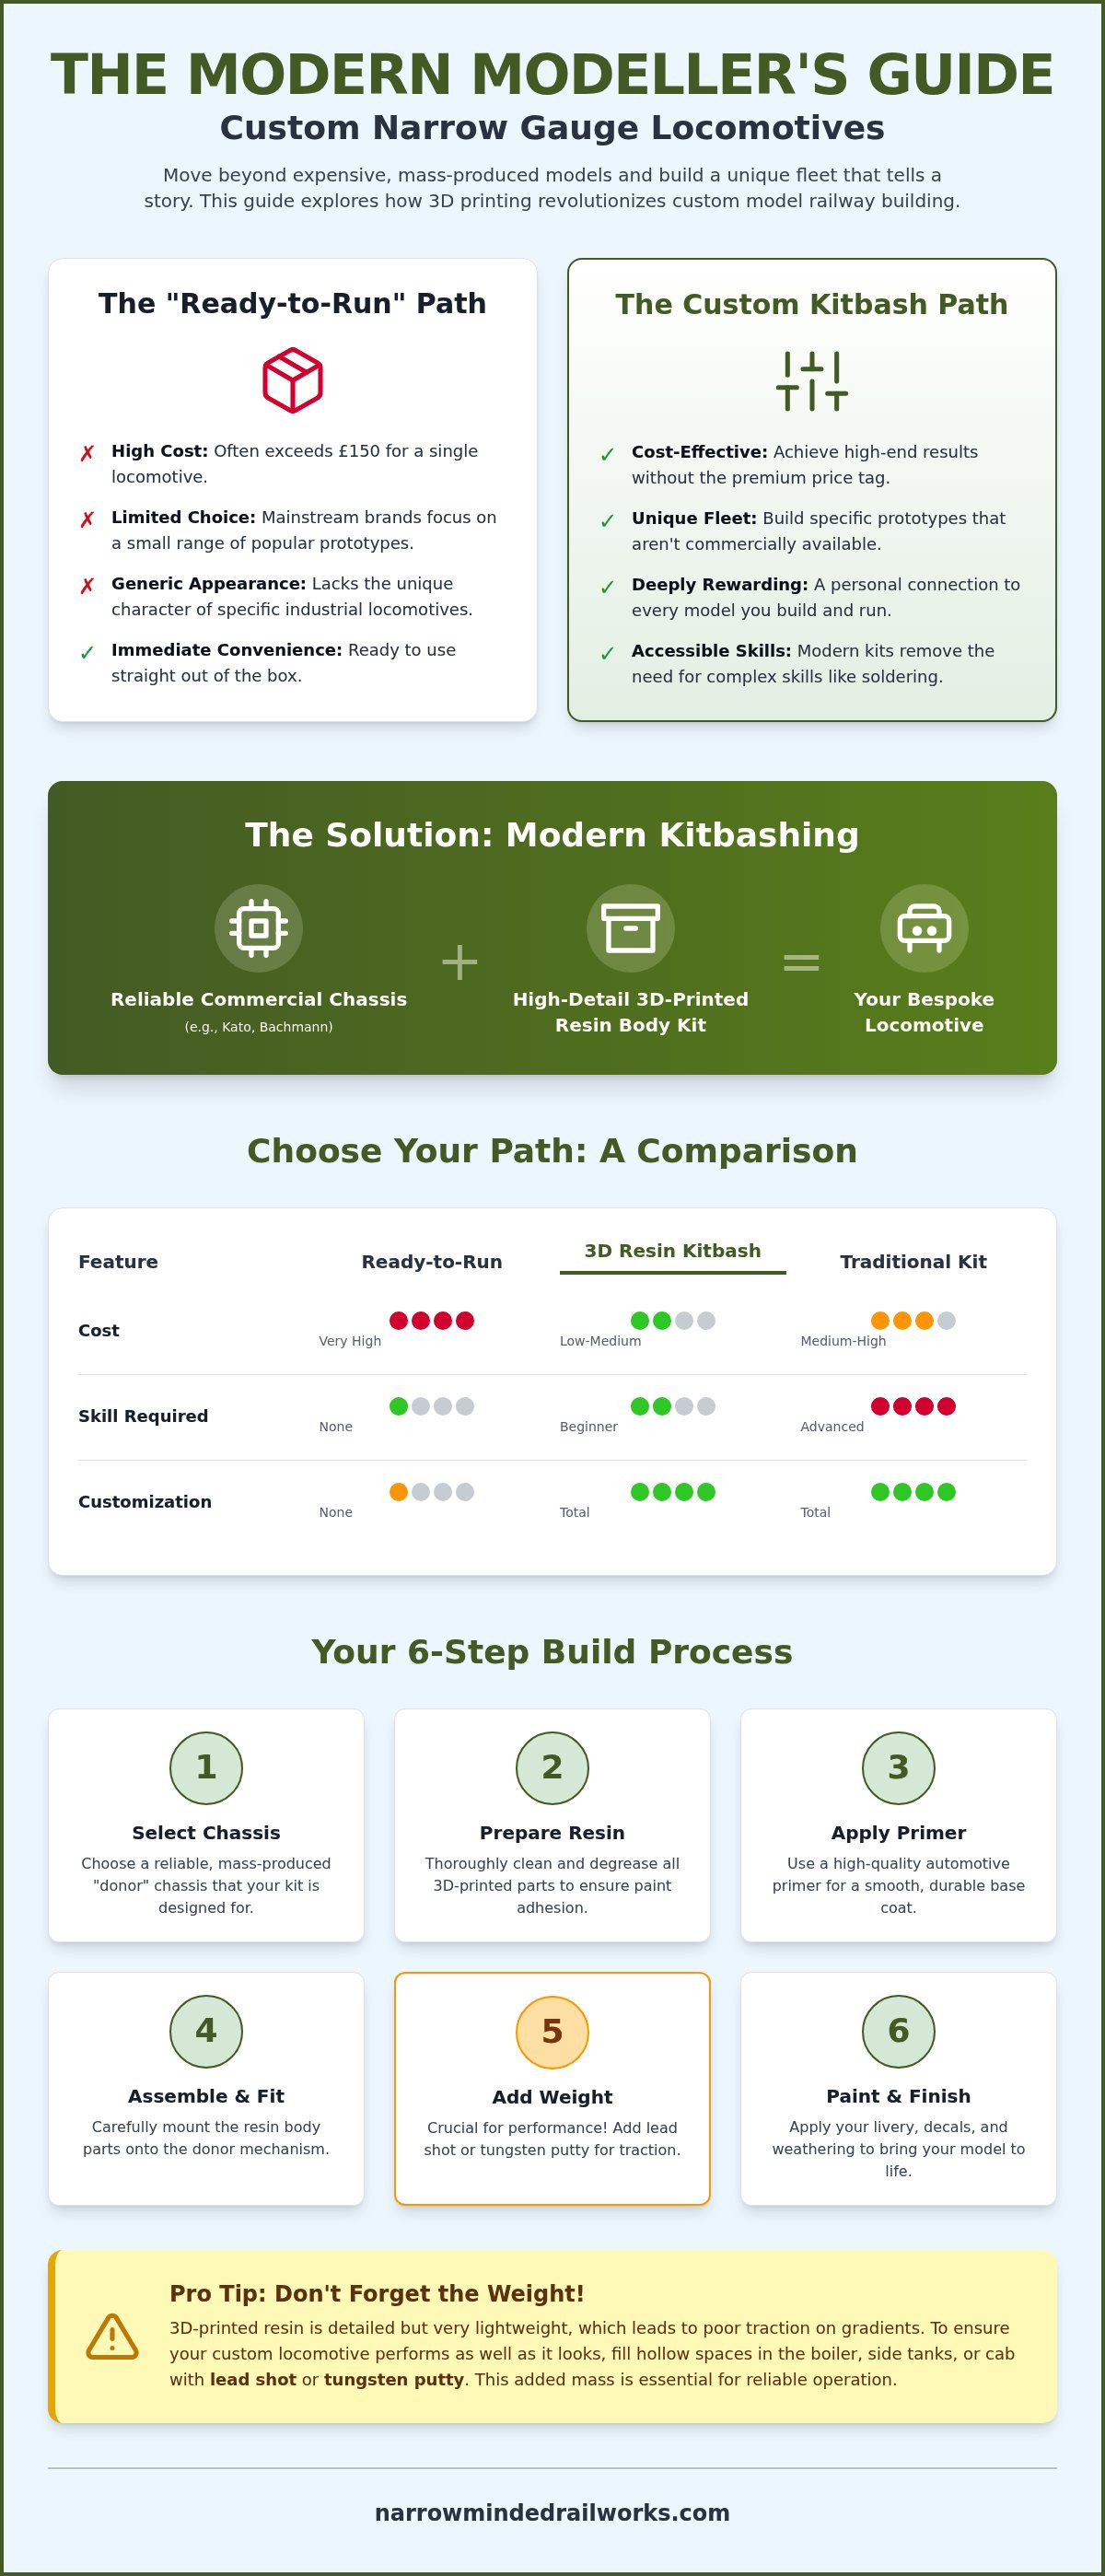
Essential Steps for Customising Your Loco Kit
Success in kitbashing narrow gauge locomotives depends on the attention paid to the initial preparation stages. While 3D-printed resin offers incredible detail, the manufacturing process leaves small support marks and a thin layer of residue that can prevent paint from adhering. You should start by washing the resin body in warm, soapy water to degrease the surface. Once dry, examine the body for any tiny pips left by supports. Removing these early ensures a professional finish that hides the model's digital origins and prepares it for a seamless assembly.
Preparing the 3D Printed Surface
Achieving a glass-smooth finish requires fine-grit wet and dry paper, typically starting around 800 grit and moving up to 1200 or 1500. Use the paper wet to prevent resin dust from becoming airborne and to achieve a finer abrasive action. If you identify minor print lines or artifacts, apply a small amount of modeller's putty and sand it back once cured. Before you commit to painting, always check that the body sits level on your chosen chassis. Adjusting the internal mounting points now is much easier than trying to fix a wonky locomotive after the livery has been applied.
Priming is a non-negotiable step in the process. Resin can be slick; therefore, a high-quality automotive primer is essential for creating a "key" for your topcoat. Standard hobby primers sometimes lack the etching properties needed for 3D prints. Once primed, you can add personal touches like brass whistles, wire handrails, or crew figures. These small additions break up the uniform surface of the resin and provide the visual depth that characterises high-end custom models.
Painting and Decals
Choosing a livery is where your freelance or prototypical vision comes to life. If you're building a fleet for a specific industrial line, look for historical British Rail colours or specific quarry company paints. Applying waterslide transfers and etched nameplates gives the locomotive a home and an identity. For multi-colour schemes, use high-quality low-tack masking tape to ensure crisp lines. This prevents paint bleed, which is the most common sign of an amateur build and can be difficult to correct once dry.
Finally, consider weathering. Industrial narrow gauge engines were rarely clean. Using powders, washes, or an airbrush to add soot, rust, and grime transforms a plastic-looking model into a hard-working machine. It bridges the gap between a toy and a miniature representation of reality. To find the perfect base for your next project, browse our collection of OO9 and O-16.5 locomotive kits today.
Build Your Custom Fleet with Narrow Minded Railworks
Narrow Minded Railworks supports your journey into bespoke modelling by providing the foundations for unique projects. We specialize in producing 3D-printed locomotive and wagon kits that capture the industrial grit of British narrow gauge history. While we do not sell ready-to-run models or motors, our kits offer a proactive solution for those who enjoy the assembly and finishing process. By choosing our resin bodies, you take the first step toward kitbashing narrow gauge locomotives that stand out on any exhibition layout or home diorama. Supporting independent UK-based designers ensures that the hobby continues to innovate with prototypes that mainstream manufacturers often overlook. We believe the modeller's input is what gives a railway its soul.
Locomotive Bodies for Every Scale
Our shop caters to a variety of gauges, offering specialized bodies for OO9, O-16.5, and the increasingly popular GN15 scale. If you are looking for something with a distinct urban or industrial feel, our range includes characterful tram locos that are perfect for tight dockside curves. We understand that mechanical reliability is paramount; therefore, we design our kits to fit common commercial chassis from brands like Kato or Bachmann. Before starting your build, you can easily check the compatibility notes in our product descriptions to ensure your existing donor chassis is a perfect match. This transparency helps you plan your budget and your build schedule with confidence.
Completing the Scene with Accessories
A bespoke locomotive requires an equally detailed environment to truly shine. We provide more than just locomotive shells; our range includes wagon kits, 3D-printed figures, and specialized scenery items designed to add realism to your layout. Using our diorama tools allows you to create the precise industrial setting your custom fleet deserves. Whether you are modelling a Welsh slate quarry or a freelance estate railway, our accessories help you build a cohesive world. We recognize that a standard wagon doesn't always fit a custom theme; consequently, we offer a variety of rolling stock kits that share the same level of detail as our engines.
We believe that kitbashing narrow gauge locomotives is only the beginning of a larger creative project. By combining our high-detail kits with your painting and weathering skills, you create a miniature railway that is entirely unique. This approach allows you to expand your fleet cost-effectively while maintaining a consistent, professional aesthetic across your entire layout.
Transform Your Narrow Gauge Layout Today
Bespoke modelling is no longer restricted to those with advanced metalworking skills. As we have explored, the combination of 3D-printed resin technology and reliable commercial mechanisms provides a professional gateway to a unique fleet. Kitbashing narrow gauge locomotives allows you to move beyond mass-produced models and create something that perfectly matches your industrial or freelance vision. By utilizing a pre-designed body kit, you save months of fabrication time while ensuring your locomotive maintains prototypical proportions and intricate details.
While we don't provide the motors or chassis, our kits are specifically engineered for a seamless fit with common donor mechanisms like those from Kato or Bachmann. We offer unique prototypes you won't find in standard ready-to-run ranges, and we provide worldwide shipping to support modellers across the globe. It's time to stop settling for generic engines and start building a railway that reflects your personal creativity. Browse our range of custom 3D-printed locomotive kits to find the perfect starting point for your next project. Your layout's most characterful engine is just one build away.
Frequently Asked Questions
Do custom narrow gauge kits include the motor and chassis?
Standard kits do not include the motor or chassis; however, they are specifically designed to fit reliable commercial units. You will need to source a donor mechanism from manufacturers like Kato or Bachmann to complete the build. This approach ensures your model has proven electrical pick-up and smooth running characteristics without the complexity of building a gearbox from scratch. Always check the product description to confirm which specific chassis is required.
What is the best glue to use for 3D-printed resin locomotive kits?
You should use cyanoacrylate (super glue) or a two-part epoxy resin for these models. Standard plastic cements designed for injection-moulded polystyrene won't work because they rely on a chemical reaction that doesn't occur with cured 3D resin. For smaller details, a gel-based super glue provides more control and a faster bond. Epoxy is better for structural joins that require a longer setting time to ensure perfect alignment during assembly.
Are 3D-printed locomotive bodies as durable as metal or plastic?
Modern 3D-printed resin bodies are highly durable and offer excellent long-term stability. While they are slightly more brittle than traditional injection-moulded plastic if dropped, they don't suffer from the warping issues sometimes found in older white metal castings. The engineering-grade resins used in 2026 provide a robust shell that can withstand regular handling and operation on any active layout without losing fine surface details like rivets or cab fittings.
Can I use a custom OO9 body on a standard N gauge chassis?
Yes, you can use a custom OO9 body on an N gauge chassis because both systems utilize 9mm track. This is a foundational technique when kitbashing narrow gauge locomotives, as it allows you to utilize the high-quality engineering of N gauge mechanisms. Many of our kits are specifically scaled to fit the Kato 11-103 or similar small power units, providing a proactive solution for modellers who want reliable performance right out of the box.
How do I add weight to a 3D-printed locomotive for better pulling power?
Adding internal mass is a proactive solution to the lightweight nature of resin bodies. You can pack lead shot, tungsten putty, or small adhesive-backed weights into the hollow spaces of the boiler, side tanks, or bunkers. Increasing the weight improves the electrical contact with the rails and significantly boosts the locomotive's pulling power. Ensure the weights are securely glued in place to prevent them from shifting and interfering with the motor or gears.
What scales are most popular for custom narrow gauge modelling?
The most popular scales for custom narrow gauge work in the UK are OO9 (4mm scale) and O-16.5 (7mm scale). OO9 is favoured for its space-saving qualities, while O-16.5 offers a larger canvas for fine detailing. GN15 is also gaining traction among those who enjoy the quirky nature of minimum-gauge estate railways. Each scale offers a different balance of detail and space requirements to suit your specific modelling goals and layout size.
Do I need a 3D printer to build these custom locomotives?
You don't need to own a 3D printer to build these custom locomotives. We handle the complex printing process using high-resolution industrial machines to ensure every rivet and boiler band is perfectly rendered. You receive a cleaned, cured, and ready-to-assemble resin body through the post. This allows you to focus entirely on the creative aspects of the hobby, such as painting, detailing, and weathering your new engine for your layout.
What are the main differences between OO9 and GN15 custom builds?
The primary difference lies in the scale and the "donor" track used. OO9 represents narrow gauge prototypes in 4mm scale and runs on 9mm (N gauge) track. GN15 is much larger, utilizing 1/24 scale figures and stock on 16.5mm (OO gauge) track to represent 15-inch gauge lines. While both are excellent for kitbashing narrow gauge locomotives, GN15 allows for larger, more visible interior cab details and characterful crew figures due to its increased size.