

Last Tuesday, a seasoned railway modeller spent 12 hours printing a bespoke GWR coach body, only to find the curved roof marred by visible stair-stepping. It's a common heart-break when those tiny 0.05mm layer lines refuse to disappear under a standard coat of grey paint. You've likely felt that same frustration when paint peels off a resin surface or when a heavy hand with the spray can buries your fine rivet work. We agree that a model should look like it came from a professional factory, not a hobbyist's workbench.
This guide teaches you the exact technique for using filler primer on 3d prints to eliminate those ridges without losing the crisp details that make your kits special. You'll master the art of building up layers and sanding them back to achieve a finish that rivals injection-moulded plastic. We'll walk through the best high-build primers available in the UK and the specific grit sequences you need to prepare your kit for its final livery colour.
Key Takeaways
- Understand how to use filler primer as "liquid sandpaper" to save hours of manual filing on complex locomotive shapes and boiler curves.
- Learn how to strike the perfect balance between high-build filling power and preserving delicate details like rivets on OO9 scale kits.
- Discover the essential cleaning and preparation steps required to remove resin residue and ensure your primer adheres perfectly without peeling.
- Master a professional two-step workflow for using filler primer on 3d prints, starting with a mist coat for maximum adhesion.
- Find out how to verify compatibility between your primer and topcoat to ensure a flawless finish for your final locomotive livery.
What is Filler Primer and Why is it Essential for 3D Prints?
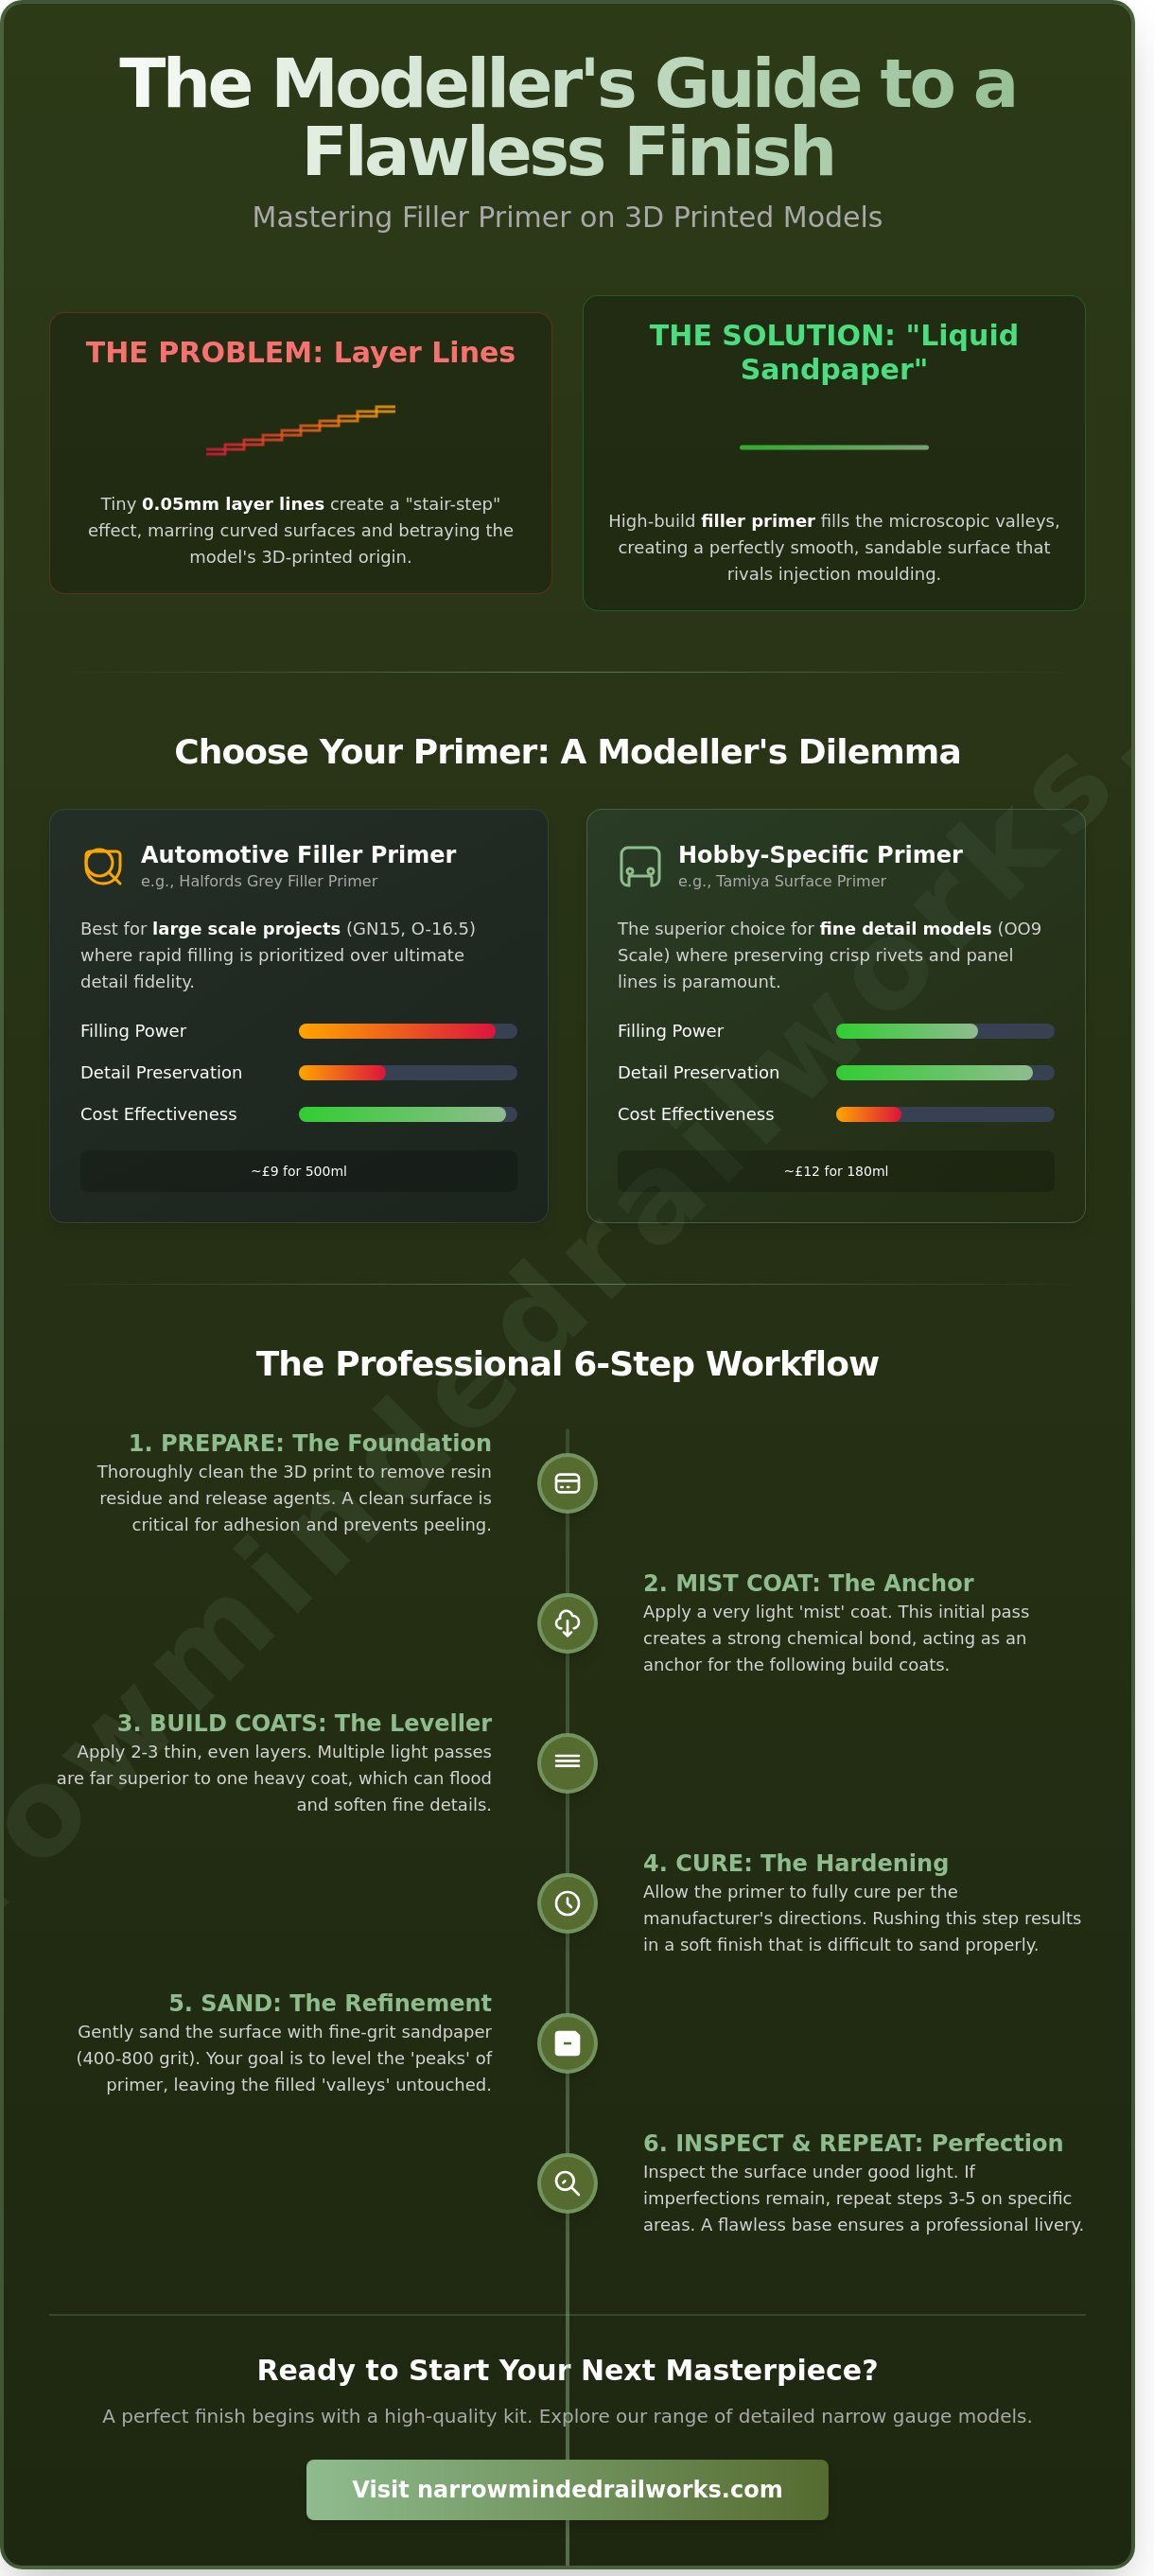
Filler primer is a high-build coating used to level surface imperfections. Unlike a standard Primer (paint), which provides a thin key for topcoats, this high-solids aerosol is engineered to settle into the low points of a print. For modellers, it's often described as "liquid sandpaper." Instead of spending 10 hours manually filing the curved surfaces of a complex locomotive boiler, this spray does the heavy lifting by filling the microscopic valleys between layers. It shifts the priming stage from a simple colour base to a vital corrective process.
When you're using filler primer on 3d prints, you're addressing the physical geometry of the object. Standard primers are too thin to hide the "stair-step" effect common in additive manufacturing. They simply coat the ridges, leaving the texture visible. A high-build filler primer bridges these gaps, allowing you to sand back the peaks until the surface is perfectly flat. This transition is crucial for anyone aiming to move away from the "printed look" towards a professional, realistic finish.
To better understand this concept, watch this helpful video:
Layer Lines vs. Surface Texture
FDM prints typically feature layer heights between 0.1mm and 0.3mm, which create distinct, visible ridges. SLA resin prints are significantly smoother but still possess subtle UV-curing lines. Filler primer interacts with these ridges by pooling in the troughs while remaining thin on the peaks. This creates a sandable volume that levels the surface without obscuring fine bolt heads or rivets. It's the only way to effectively neutralise the texture of 3D-printed filaments before applying final colours.
The Importance of a Smooth Canvas
A professional finish is the hallmark of a high-quality narrow gauge model. Once you apply a final locomotive livery, such as a traditional deep green or maroon, any underlying imperfection is magnified by 200%. Gloss and satin paints reflect light in a way that highlights every tiny ridge. Using filler primer on 3d prints ensures consistent paint adhesion across different materials. This is especially important when your model combines resin parts with brass etchings or plastic components, as it creates a unified surface for the final coat.
Choosing the Right Filler Primer for Model Railway Scales
Selecting the right product is a balancing act between hiding layer lines and preserving fine rivet detail. When using filler primer on 3d prints, modellers often face a choice between heavy-duty automotive sprays and refined hobby alternatives. A high-build primer designed for a car bumper can easily obliterate the 0.2mm rivets on a 1:76 scale OO9 locomotive; however, those interested in how these products are used on actual vehicles can explore The Ultimate Restomod Guide to see professional restoration in practice. You must match the "filling power" of the paint to the scale of your model to avoid losing the very features that make 3D printing so effective.
Automotive vs. Hobby-Specific Primers
Halfords Grey Filler Primer is a staple in UK workshops. At roughly £9 for a 500ml can, it offers excellent value for larger projects like GN15 wagons or 1:43 scale O-16.5 rolling stock. Its high solids content fills FDM print lines quickly, which saves hours of sanding. However, the spray nozzle on automotive cans is less precise than hobby equivalents. For delicate resin prints, investing £12 in a 180ml can of Tamiya Surface Primer L or Mr. Hobby Mr. Surfacer 1000 is often wiser. These specialised sprays use finer pigments that settle into recesses without bridging gaps or softening sharp edges. If you're building a fleet of 10 wagons, the cost-effectiveness of Halfords is hard to beat; for a flagship loco, the hobby-specific route is safer. You can find high-quality bases for these techniques in our range of narrow gauge model kits.
Detail Retention: The Modeller’s Priority
The secret to success when using filler primer on 3d prints lies in the "mist coat" technique. Automotive "high-build" products are designed to fill deep scratches in metal, so they can flood a 1:76 scale surface in seconds. You can identify a "detail-safe" primer by its nozzle. Hobby brands usually feature a vertical fan or a fine mist actuator rather than a circular blast. Follow these steps to protect your details:
- Apply multiple thin coats: Three light passes are better than one heavy layer.
- Check the particle size: Products like Mr. Surfacer 1200 have smaller particles than the 500 grade, making them better for tiny OO9 details.
- Distance matters: Keep the can 20cm to 25cm away to prevent the paint from pooling.
Always test your primer on a scrap support sprue or a failed print before you touch the main body. This 30-second test reveals if the primer is too aggressive for your specific resin or filament. It's better to find out on a piece of waste than on a locomotive that took 15 hours to print. Consistency is key, so stick to one brand once you find the "sweet spot" for your preferred scale.
How to Prepare Your 3D Print for Priming
Preparation is the most labour intensive part of the process, yet it dictates the final quality of your model. If you rush this stage, even the most expensive paints won't save the finish. Before using filler primer on 3d prints, you must ensure the surface is chemically clean and mechanically ready to accept the high-build coating. Any lingering resin or grease will cause the primer to "fish-eye" or peel away in large flakes later.
Start by taking the edge off the most prominent layer lines with 400-grit wet and dry sandpaper. You aren't trying to achieve a mirror finish yet; you're simply creating a "key" for the primer to bite into. Work in circular motions and avoid pressing too hard on delicate components like handrails or rivets. A light scuffing across the flat surfaces of a locomotive boiler or carriage side makes a massive difference in how the primer settles.
Your environment is just as vital as your technique. British weather is notoriously fickle, and high humidity is the enemy of aerosol cans. If the humidity level exceeds 65 percent, the primer can trap moisture, leading to a cloudy, brittle finish. Aim for a workspace temperature between 15 and 20 degrees Celsius. Ensure the area is completely dust-free, as a single speck of grit can become a permanent mountain once the filler primer builds up around it.
Degreasing and Cleaning
Even if a print looks clean, it often carries a film of isopropyl alcohol (IPA) or skin oils. Wash the model in warm, soapy water using a mild dish detergent. This removes contaminants that IPA might leave behind. You must let the model dry for at least 24 hours. Any moisture trapped in deep recesses will cause "orange peel" textures as the primer gas-off process is interrupted. Always wear nitrile gloves during this phase to stop your natural skin oils from transferring back onto the plastic.
Removing Support Marks and Burrs
Support structures are a necessity, but they leave behind "witness marks" that look like small craters or pimples. You can find detailed techniques for Removing Support Marks from 3D Prints to help clean these areas without gouging the plastic. Use a fine needle file to reach into tight corners around the cab or under the chassis. When using filler primer on 3d prints, these small burrs become much more obvious, so spend the extra 15 minutes now to file them flush. A smooth foundation ensures the filler primer can do its job of levelling the microscopic ridges rather than fighting against large physical lumps.
The Step-by-Step Filler Primer Workflow
Achieving a professional look when using filler primer on 3d prints requires a disciplined approach rather than spraying blindly. Your workflow determines whether the final model looks like a piece of plastic or a precision-engineered component. Follow these five stages to ensure a perfect surface every time.
- Step 1: The Mist Coat – Start with a light, dusting layer. This isn't meant to provide full coverage or hide any lines. It creates a "key" on the plastic surface, giving the heavier layers something to grip onto. Wait 10 minutes for this to become tacky.
- Step 2: The Fill Coat – Apply a more substantial layer. This is where the high-build solids in the primer settle into the ridges. Keep the can moving to avoid runs. In most UK workshops, you should allow 20 to 30 minutes between these heavier coats.
- Step 3: The Witness Coat – Once the fill coat is dry, lightly mist a contrasting colour over the model. If your primer is grey, use a quick puff of black matt spray. When you sand, the black paint remains in the low spots, revealing exactly where the surface is still uneven.
- Step 4: Wet Sanding – This is the transformative stage. Using water as a lubricant, sand the model until the witness coat disappears. This ensures the peaks of the 3D print are levelled perfectly with the primed valleys.
- Step 5: Final Inspection – Rinse the model and dry it thoroughly. Check the surface under a bright 5000K lamp. If you see any remaining "ghost" lines, repeat steps 2 through 4.
Mastering the Spray Technique
Precision spraying prevents wasted material and hours of extra sanding. Maintain a distance of exactly 20cm from the model. If you're too close, the primer pools and obscures detail; too far, and the paint dries mid-air, creating a sandpaper-like texture. Use the "start-stop" method by beginning your spray burst to the side of the model, passing across it in a fluid motion, and releasing the nozzle only once you've cleared the opposite side. Always work in a dedicated spray booth or outdoors to manage fumes and overspray.
Wet Sanding for Scale Models
Wet sanding is essential because dry sanding generates enough friction heat to soften PLA plastic at just 60°C, which leads to clogging and surface scarring. Start with 600-grit paper to remove the bulk of the primer. Progress through 800 and 1000 grit, finishing with 2000 grit for a glass-like feel. When working around rivets or 0.5mm bolt heads, use a flexible foam sanding pad. This distributes pressure evenly, allowing you to smooth the surrounding area without grinding away the delicate raised details. If you want to skip the tedious prep work, you can find expertly prepared 3D printed model kits that make the finishing process much faster.
Finishing Your Narrow Minded Railworks Kit
Applying the final livery to your locomotive is the moment your project truly comes to life. While it's tempting to reach for the paint pots as soon as the primer feels dry to the touch, patience at this stage separates a standard effort from a professional-quality model. Using filler primer on 3d prints acts as a vital diagnostic layer; it reveals "ghost lines" that are invisible on raw resin but become glaringly obvious under a bright workbench light. If you spot these faint ridges now, a quick 30-second buff with 1000-grit paper will save you the frustration of a stripped paint job later.
Before you apply your topcoat, perform a compatibility check. Most modellers in the UK prefer acrylic-based paints like those from Vallejo or Lifecolor, while others stick to traditional enamels. You must ensure your primer is fully cured so the solvents don't react with the new layer. A mismatched pairing can lead to "orange peel" textures or paint that never truly hardens. Spend five minutes testing your combination on a piece of scrap support material from the kit to be certain before committing to the main body shell.
From Primer to Paint
Stick to the 24-hour rule for the best results. Even if the surface feels hard after an hour, the primer is still outgassing solvents. Painting too early traps these gases, which can lead to tiny bubbles or a tacky finish that lasts for weeks. Once the full day has passed, use a high-quality tack cloth to wipe the entire model. This removes every microscopic speck of sanding dust that would otherwise ruin a smooth boiler jacket. If you're still deciding on a prototype or freelance colour scheme, check out Your First OO9 Loco Kit for inspiration on choosing the right livery for your era.
Achieving the Narrow Minded Look
Our 3D-printed kits are engineered with primer-friendly tolerances in mind. We understand that using filler primer on 3d prints adds a fraction of a millimetre to the surface. Because of this, we've designed our handrail knobs and cab fittings to accommodate these essential finishing layers without losing detail. The difference is stark. A raw print looks like a plastic object, but a primed and painted model looks like a heavy, cast-metal locomotive that has spent decades hauling slate or timber. This level of realism transforms your narrow gauge layout into a convincing miniature world. Ready to start your next project? Browse our latest OO9 and GN15 kits today and experience the quality for yourself.
Master Your Next Railway Project
Achieving a museum-quality finish on your layout starts with the right preparation. By following a structured workflow of light sanding and thin, incremental layers, you'll eliminate visible layer lines while preserving the intricate bolt heads and rivet details that define high-end models. Success when using filler primer on 3d prints depends on patience. You should allow at least 24 hours for the primer to fully cure before beginning your final wet-sand. This process transforms raw resin into a smooth canvas ready for authentic weathering.
Narrow Minded Railworks kits are specifically engineered to be primer-friendly, ensuring you spend less time sanding and more time detailing. Our designs cater specifically to OO9, GN15, and O-16.5 scales, providing the perfect foundation for modellers who demand precision. These kits are currently used by award-winning modellers across the UK and worldwide to create realistic narrow-gauge scenes. You'll find that our high-detail surfaces respond perfectly to standard UK automotive primers and hobby-specific sprays.
Explore our range of high-detail 3D printed railway kits and elevate the standard of your rolling stock. You've got the techniques; now it's time to put them into practice on your workbench.
Frequently Asked Questions
Can I use automotive filler primer on resin 3D prints?
Yes, you can use automotive filler primer on resin 3D prints, provided you apply light coats. Many UK modellers use Halfords Filler Primer because it adheres well to photopolymer resins. However, automotive sprays are thicker than hobby-specific brands like Tamiya. If you apply too much, the high solvent content might soften fine resin details or cause "crazing" on 100% cured surfaces.
How long should I wait for filler primer to dry before sanding?
You should wait at least 2 hours for the surface to be touch-dry, but waiting 24 hours is best for a full cure. Sanding too early causes the primer to "gum up" your sandpaper, wasting your materials. In a typical UK workshop at 20°C, the primer shrinks slightly as solvents evaporate. For the smoothest finish, let it sit overnight so the filler settles into the layer lines.
Will filler primer hide all 3D print layer lines in one coat?
No, filler primer won't hide all layer lines in a single application. Standard FDM prints with 0.2mm layer heights usually require 2 or 3 coats combined with progressive sanding to achieve a glass-like finish. When using filler primer on 3d prints, the goal is to build up material in the valleys of the print. Expect to sand away 70% of the first coat before applying the next layer.
Does filler primer fill in fine details like rivets and panel lines?
Yes, filler primer will quickly fill in fine details like 0.5mm rivets or shallow panel lines. Because it's designed to be "high-build," it doesn't distinguish between unwanted layer lines and intentional model features. If your model has intricate textures, use a standard primer instead. For 1:72 scale aircraft or detailed wargaming miniatures, one heavy coat can obscure 40% of the surface definition.
What is the best grit sandpaper for sanding filler primer on models?
The best starting point is 400-grit wet and dry sandpaper for the initial levelling. Once the layer lines start to disappear, switch to 600 or 800-grit for a smoother finish. If you're preparing a surface for metallic paint, finishing with 1000-grit is essential. Using 400-grit removes the bulk of the primer quickly without leaving deep scratches that the next paint layer can't hide.
Can I use filler primer on both FDM and SLA resin prints?
Yes, filler primer works effectively on both FDM and SLA prints. It's particularly useful for FDM prints to hide the 0.1mm to 0.3mm ridges left by the nozzle. When using filler primer on 3d prints made of resin, it helps smooth out support marks. Just ensure the resin is 100% cured under UV light before spraying to prevent the primer from peeling or bubbling.
Is it better to use grey or white filler primer for model trains?
Grey filler primer is generally better for model trains because it provides the best visual contrast for spotting imperfections. It's easier to see 0.1mm gaps or remaining print lines against a neutral grey than a bright white. If your final livery is a light colour like yellow or white, apply a final thin coat of white primer over the sanded grey filler to ensure the colours pop.
What happens if the filler primer goes on "fuzzy" or textured?
A "fuzzy" texture usually means the paint dried in mid-air before hitting the model, a common issue in UK humidity levels over 60%. This often happens if you spray from more than 25cm away or in direct sunlight. You'll need to sand the texture off with 600-grit sandpaper once it's dry. To fix it, ensure the can is warm and reduce your spraying distance to roughly 20cm.