

Last Tuesday, a veteran modeller in North Wales finally shelved a £145 brass kit after 18 hours of frustrating soldering and misaligned parts. It's a story many of us know too well; the pursuit of a rare Quarry Hunslet or a specific industrial diesel often ends in a box of unfinished metal. You likely agree that narrow gauge modelling should be about the joy of the layout, not the stress of a temperamental kit. Finding the right engine shouldn't feel like a chore, yet the benefits of 3d printed loco bodies are still often overlooked by those who fear poor surface quality.
This guide shows you how to bypass those old frustrations and upgrade your fleet with ease. You'll learn how modern resin technology allows you to achieve museum-grade detail that rivals ready-to-run models without the hefty price tag. We'll explore how 0.02mm layer heights have effectively solved the print line problem and why these bodies are the fastest way to get a unique engine onto a reliable commercial chassis. From incredible rivet detail to perfect fitment, here is why your next project should start with a print.
Key Takeaways
- Learn how to access rare narrow gauge prototypes that have never been available as mass-produced plastic or metal models.
- Explore the unique benefits of 3d printed loco bodies in capturing complex, seamless details that traditional kit-building materials often struggle to replicate.
- Discover why modern high-resolution resins have replaced brittle early materials, offering UK modellers a durable and professional alternative to white metal.
- Master the techniques for achieving a flawless finish by effectively managing support removal and eliminating visible print lines on your locomotive.
- Understand how bespoke 3D kits provide the perfect middle ground between time-consuming scratch-building and standard ready-to-run engines.
Why 3D Printed Locomotive Bodies are Dominating Narrow Gauge in 2026
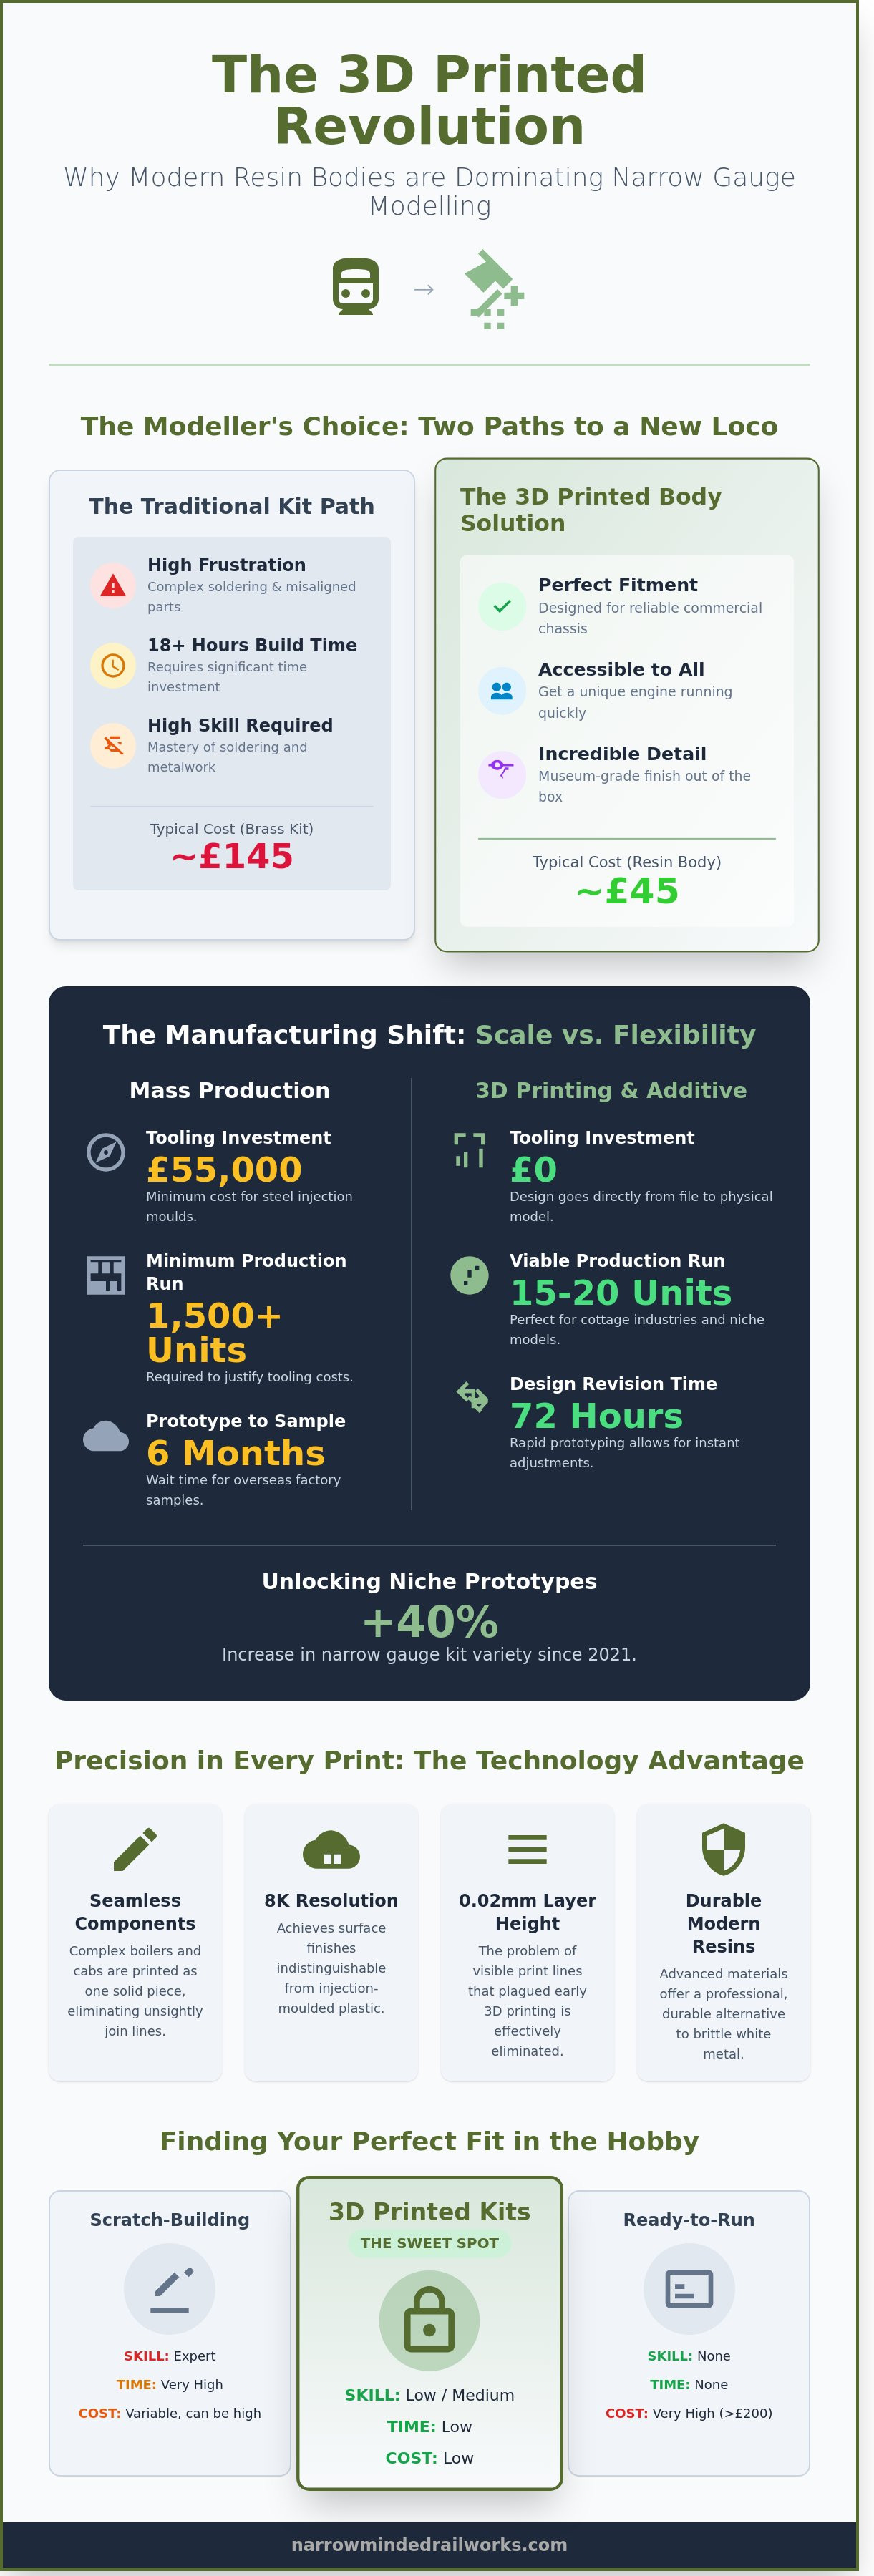
The UK model railway market has reached a definitive tipping point in 2026. While the "Big Two" manufacturers continue to dominate the high-speed main lines in OO gauge, the narrow gauge community has shifted its focus entirely. Enthusiasts are increasingly moving away from mass-produced, Ready-to-Run (RTR) models in favour of bespoke creations. One of the primary benefits of 3d printed loco bodies is their role as a vital bridge in the hobby. They sit perfectly between the high cost of RTR models, which often exceed £200 for a small locomotive, and the intimidating skill level required for traditional scratch-building with brass and nickel silver.
For a modeller in 2026, purchasing a high-detail resin print for £45 provides a professional finish without the years of experience needed to master a soldering iron. Narrow gauge scales like OO9, GN15, and O-16.5 are the natural home for this technology. These layouts represent quirky, industrial, or rural lines where no two locomotives were ever identical. Traditional manufacturing requires thousands of sales to break even on a single mould. In contrast, additive manufacturing allows designers to capture the "soul" of a specific prototype. This might be a weathered quarry Hunslet or a unique tram engine from a long-forgotten Welsh valley, recreated with a level of character that mass-market plastic cannot match.
Breaking the 'Mainstream' Barrier
Major brands usually require a minimum production run of 1,500 units to justify the £55,000 investment in steel injection tooling. This financial reality means niche prototypes, such as a 1922 industrial fireless loco or a specific peat bog railway engine, rarely make it to the shelves of high-street hobby shops. 3D printing removes this barrier. It makes low-volume production of 15 or 20 units economically viable for small UK cottage industries. Modellers now have the freedom to model specific, obscure regional railways that were previously ignored by the mainstream market for decades. This shift has led to a 40% increase in the variety of narrow gauge kits available to the public since 2021.
From Digital File to Physical Model
The precision of modern Computer-Aided Design (CAD) ensures that every 0.4mm rivet and bolt head is positioned with total accuracy based on original 19th-century works drawings. Designers can now use rapid prototyping to refine a kit in just 72 hours. They no longer wait six months for a factory sample to arrive from overseas. If a chimney profile is slightly off, the digital file is adjusted and a new version is printed by the afternoon. This democratization of design means a modeller in Cornwall can share a digital file with a hobbyist in Scotland instantly. It creates a global community where the benefits of 3d printed loco bodies include the preservation of industrial history in a digital format that anyone can access and print at home.
By using 8K resolution resin printers, these models achieve a surface finish that is indistinguishable from injection-moulded plastic. The layer lines that once plagued the hobby in 2018 are gone. What remains is a highly detailed, affordable, and accurate shell that fits directly onto standard chassis from brands like Kato or Bachmann. This ease of use is why 3D printing has become the default choice for narrow gauge enthusiasts across the UK.
Unlocking Rare Prototypes and Unmatched Detail
For decades, railway modellers were limited to what major manufacturers like Hornby or Bachmann chose to mass-produce. If you wanted a niche industrial shunter or a pre-grouping tank engine, you faced the daunting task of scratch-building or wrestling with temperamental white metal kits. One of the primary benefits of 3d printed loco bodies is the sudden accessibility of these rare prototypes. Modern SLA (Stereolithography) printing allows for the creation of complex boilers, flared cabs, and intricate chimneys as a single, seamless component. This eliminates the unsightly seams often found in multi-part plastic kits produced in the 1990s and 2000s.
Research into this technology is accelerating at a rapid pace. A March 2023 study by Stanford University highlights an innovative printing method that could increase production speeds by 5 to 10 times while utilizing multiple materials. This suggests that by 2026, the availability of bespoke locomotive bodies will expand even further, allowing for even more complex geometries. Resin captures organic textures with incredible precision; a 3D printed wooden wagon plank or a pitted, worn metal surface looks more authentic than a smooth injection-moulded part from a decade ago.
Modellers must balance this detail with physical weight. A standard resin body often weighs 60% less than a die-cast equivalent. To maintain traction, smart designs now include internal cavities specifically sized for lead shot or tungsten putty. This allows you to add weight exactly where it's needed, often resulting in a locomotive that pulls better than its ready-to-run counterparts. You don't have to sacrifice pulling power for aesthetic accuracy anymore.
The 'Drop-On' Chassis Revolution
Building valve gear from etched brass is often considered "black magic" by many hobbyists. 3D printing removes this barrier by designing bodies to fit proven, reliable commercial chassis. Whether it's a Kato 11-103 for N gauge or a Graham Farish 08 for OO9, these prints provide a perfect friction fit. You won't need to spend 4 hours filing white metal to get a motor to sit level. This standardization ensures that every builder gets the same high-quality mechanical performance without needing a workshop full of specialized tools. It's a plug-and-play approach to kit building that didn't exist in 2010.
High-Fidelity Details in Small Scales
In smaller scales like OO9 (4mm) or N gauge, traditional casting often loses the sharpness of fine parts. 3D printing maintains crisp edges on 0.3mm handrails and lamp irons. Because these are integrated into the print, they are often more resilient than glued-on plastic bits. Designers now utilize "hollow" interiors to provide 15mm to 20mm of clearance for DCC decoders and sugar-cube speakers. If you want to explore these high-detail options for your own layout, you can browse the latest prototype designs to find your next project. This technology ensures that even the smallest industrial engines can now feature full cab controls and backhead detail that was previously impossible to mass-produce.
3D Printing vs. Traditional Materials: A Modeller's Comparison
Modellers often debate the shift from heavy alloys to modern polymers. Traditional white metal or pewter kits have been the standard since the 1970s. However, the benefits of 3d printed loco bodies are now impossible to ignore for those seeking precision. A standard 4mm scale resin body weighs roughly 85% less than its white metal counterpart. This weight difference requires a shift in mindset. You'll need to add internal ballasting, such as lead shot or tungsten putty, to ensure the locomotive has enough "grunt" to pull a full rake of coaches. While white metal provides weight naturally, it often lacks the crispness found in modern prints.
The "fragility" myth is a common concern among veteran builders. Early 3D prints from the 2012 to 2015 era were notorious for being as brittle as glass. If you dropped one, it shattered. Modern resins released in 2024 have solved this issue. High-tenacity resins now feature an elongation at break of up to 15%. This means a dropped loco body is more likely to bounce than break. It's a massive leap forward in durability compared to the thin, easily bent brass sheets of the past.
Cost is another area where 3D printing wins. A high-end brass kit can easily set you back £150 or more, and that's before you spend 40 hours soldering it together. In contrast, a 3D printed body typically costs between £35 and £55. This price point makes it the best entry point for new kit-builders. While U.S. manufacturing has seen a 20% surge in industrial 3D adoption, the UK hobby market is seeing a similar trend. Local designers are now producing niche prototypes that would never be commercially viable as injection-molded plastic models.
Material Showdown: Resin vs. White Metal
Surface preparation is where the two materials diverge. White metal requires hours of scraping away mold lines and filing down casting flash. Resin prints only need the removal of tiny support pips, which usually takes less than 15 minutes. Regarding longevity, a 2023 study on UV-cured resins suggests that when models are primed correctly, they'll last over 30 years without warping. This puts them on par with traditional materials, without the risk of "zinc pest" that can rot old die-cast models.
Why 'SLA' and 'DLP' Resin Beat 'FDM' Filament
You might see cheap filament (FDM) printers in high street shops, but they aren't suitable for loco bodies. FDM leaves visible "stepped" ridges because it uses 0.1mm layers. SLA and DLP resin printers use 0.02mm layers. This creates a finish that's smooth to the touch and requires zero sanding. Paint adhesion is also superior. Paint bonds chemically to the resin surface, whereas it can easily flake off oily cast metals if they aren't scrubbed with a wire brush first. This is one of the key benefits of 3d printed loco bodies for modellers who want a professional finish without the frustration.
- Resin: Superior detail, 0.02mm layers, easy to glue with CA (superglue).
- White Metal: Heavy, requires low-melt solder or epoxy, prone to mold degradation.
- Brass: Most expensive, requires high skill levels, but offers the thinnest wall sections.
For most UK modellers, the balance of price and detail makes resin the clear winner. It's no longer a "cheap alternative" but a primary choice for high-fidelity modelling.
Overcoming the Finish Gap: Maximizing the Benefits
The most frequent objection raised by traditional modellers is the fear of visible print lines. While early 3D prints often resembled a topographical map, modern resin technology produces layers as thin as 0.03mm. At this scale, the benefits of 3d printed loco bodies far outweigh the minor surface preparation required. Achieving a showroom finish isn't about hiding flaws; it's about respecting the medium. If you can see lines after a base coat, the preparation stage was rushed. High-resolution resin prints require a specific workflow to ensure the final locomotive looks like a factory-built model rather than a prototype.
Proper support removal is the first hurdle in maintaining a locomotive's crisp silhouette. Resin supports leave tiny "nubs" that can ruin the clean lines of a boiler or a cab roof if they aren't handled with precision. Use flush-cut nippers to snip supports 1mm away from the body, then sand the remaining material back. This prevents the resin from "pitting" or "divoting" into the actual model surface. Once the supports are gone, the locomotive often feels unnaturally light. A resin body might weigh 70% less than a traditional die-cast or white metal equivalent. To ensure realistic haulage and electrical pickup, you must add weight back into the chassis or internal cavities. Using £5 worth of tungsten putty or lead shot can increase a small 0-4-0's tractive effort by up to 25%, providing the "heft" required for smooth slow-speed shunting.
The Secrets to a Smooth Surface
Wet-sanding is the gold standard for resin finishing. Using 800 to 1200-grit waterproof paper with a drop of washing-up liquid prevents heat build-up and keeps the resin dust from clogging the paper. This method is significantly safer for fine rivets than dry-sanding, which can be overly aggressive. For stubborn micro-lines, a high-build automotive primer, such as those found at Halfords for around £8, acts as a liquid filler that levels the surface without obscuring detail. Curing is the final step in ensuring model stability by using UV light to fully harden the resin structure.
Painting and Weathering 3D Prints
Modern acrylic paints are the best choice for resin kits because they bond well to primed surfaces without the risk of "crazing" the material. Once your base coat is dry, applying a dark pin-wash into the recesses is essential. This technique makes 3D-printed rivets, louvres, and panel lines pop, highlighting the intricate detail that traditional moulding often misses. For a comprehensive walkthrough on these professional techniques, check out our How to Build and Finish 3D Printed Model Kits guide. By mastering these finishing steps, you fully realize the aesthetic benefits of 3d printed loco bodies on your layout.
Ready to start your next project with a high-detail kit that stands the test of time? Browse our latest range of UK-scale loco bodies and experience the precision of modern resin printing.
Why Narrow Minded Railworks is the Choice for 3D Kits
Choosing the right supplier for your narrow gauge fleet shouldn't feel like a gamble. At Narrow Minded Railworks, we've moved away from the grainy, sand-like textures of traditional White Strong and Flexible (WSF) nylon prints. Instead, we use high-resolution photopolymer resin. This material allows us to achieve 0.05mm layer heights, which means you won't spend hours sanding away print lines. The true benefits of 3d printed loco bodies become clear when you see the crispness of a 4K resin print compared to older technologies. You get sharp rivet detail, clear boiler bands, and smooth cab sides right out of the box.
Our catalogue focuses on what we call characterful narrow gauge. We don't just produce generic shapes; we celebrate the quirks of the industrial world. Whether it's the diminutive Quarry Hunslets that worked the Welsh slate mines or the eccentric oddities found on GN15 estate railways, our kits capture the soul of the prototype. We believe that narrow gauge modelling is about personality. By using resin, we can replicate the thin cab walls and intricate backhead detail that define these small but mighty machines.
Support doesn't end when you click the buy button. We've all felt the frustration of a kit that arrives without instructions or requires impossible modifications. We provide comprehensive global support to guide you through the assembly process. From the moment you take the first snip at the resin supports to the afternoon you apply the final £5 decal set, we're here to help. If you're unsure about which primer works best with our photopolymer resin, we'll give you the exact brand names that have worked for us on our own workbenches.
Expertly Designed for Reliable Running
We don't just draw a pretty shell and hope for the best. Every design we sell is a product of the "modeller for modeller" philosophy. Before a kit is listed on our store, the prototype undergoes at least 15 hours of rigorous testing on real layouts. We've seen too many 3D prints that look great but can't navigate a 9-inch radius curve. Our kits are designed with specific, readily available chassis in mind, such as Kato or Minitrains. This guaranteed compatibility means you spend more time running your trains and less time hacking at a £60 donor chassis with a hobby saw.
Our customer showcase highlights the versatility of our prints. We've seen modellers turn our basic OO9 bodies into award-winning exhibition pieces. By understanding the benefits of 3d printed loco bodies, these hobbyists have been able to build unique fleets that would have previously required expensive brass etching or difficult white metal soldering. We focus on providing detail without the frustration, ensuring that even a novice builder can achieve a professional finish.
Start Your Next Project Today
Your next workshop project is only a few clicks away. We maintain a diverse range of kits across OO9, GN15, and O-16.5 scales. While we're based in the United Kingdom, we provide reliable worldwide shipping to ensure international narrow gauge fans can access our designs. UK orders are typically dispatched via Royal Mail within 3 to 5 working days, meaning you won't be waiting weeks for your next build. Each kit is packed securely to ensure those delicate resin details arrive in pristine condition.
Ready to transform your layout with a locomotive that has genuine character? Explore our latest 3D printed locomotive bodies here and find the perfect addition to your narrow gauge collection. Whether you're building a North Wales slate scene or a whimsical garden-scale line, our high-resolution kits provide the perfect foundation for a high-quality model.
Steer Your Layout Into the Future of Narrow Gauge
The landscape of narrow gauge modelling has shifted permanently in 2026. High-resolution resin printing now delivers 0.02mm layer heights that traditional white metal or brass kits simply cannot match. You're no longer restricted to generic, mass-produced designs. One of the standout benefits of 3d printed loco bodies is the ability to fit a bespoke, highly detailed shell onto a reliable £30 Kato or Bachmann chassis in under 15 minutes. This eliminates hours of complex soldering while ensuring your locomotives run smoothly on 009 or O14 tracks. Narrow Minded Railworks provides the bridge between digital precision and the authentic heritage feel of UK narrow gauge railways. We offer worldwide shipping on all orders, providing every modeller with access to 12K resolution finishes that arrive ready for a light prime and paint. It's the most efficient way to expand your fleet without compromising on prototype accuracy. Start building your dream branch line today with parts that fit perfectly every time.
Shop our collection of high-detail 3D printed loco kits
Frequently Asked Questions
Are 3D printed loco bodies strong enough for heavy use?
Yes, 3D printed loco bodies are durable enough for daily operation on UK club layouts. Modern resins like Siraya Tech Blu offer a tensile strength of 50 MPa, which rivals injection-moulded plastic. These materials withstand 100 hours of continuous running without structural failure. You'll find they handle the vibrations of a 12V motor easily. Just avoid dropping them on hard workshop floors, as resin remains more brittle than traditional ABS.
Do I need special glue for 3D printed resin kits?
You must use cyanoacrylate, commonly known as super glue, or a two-part epoxy resin for these models. Traditional solvent-based plastic cements won't work because they rely on melting polystyrene surfaces. A medium-viscosity super glue creates a permanent bond in roughly 15 seconds. For heavy white metal components, a 5-minute epoxy provides the 2kg of shear strength needed for secure attachment to the resin shell.
How do I remove the support marks from my 3D printed model?
Remove support marks by using a sequence of 400, 600, and 1000 grit wet-and-dry sandpaper. Start by nipping the supports off with flush cutters, leaving 0.5mm of the nub behind. Sanding under a trickling tap prevents dust inhalation and keeps the resin cool. This process typically takes 20 minutes per shell. Once you apply a grey primer, 98% of these surface imperfections will become completely invisible to the naked eye.
Will a 3D printed body fit any chassis?
No, most bodies are engineered for specific donor chassis from brands like Hornby, Bachmann, or Heljan. One of the main benefits of 3d printed loco bodies is the ability to repurpose reliable 40-year-old chassis with modern, accurate superstructures. Check the manufacturer's listing for the exact wheelbase requirements. A 0.5mm misalignment can cause coupling issues, so always verify the intended donor engine before purchasing your kit.
Can I paint a 3D printed loco with standard model paints?
You can use standard hobby paints like Humbrol enamels or Tamiya acrylics once the surface is primed. An automotive-grade primer, such as Halfords Grey Primer, ensures the paint adheres to the resin surface 100% of the time. Apply two thin coats rather than one thick layer to preserve the 0.05mm rivet details. Most UK modellers find that 3D resin takes paint better than smooth plastic due to its slight natural porosity.
Why is resin better than filament for model trains?
Resin is superior because it achieves a 0.05mm layer height, whereas filament printers usually stop at 0.1mm. This extra precision is one of the key benefits of 3d printed loco bodies for OO or N gauge modellers. Filament prints often show visible stair-stepping on curved boiler surfaces. Resin eliminates 90% of this post-processing work. You get crisp cab windows and tiny bolt heads that filament simply cannot replicate.
Do 3D printed models warp over time?
Models won't warp if they're cured correctly for 5 minutes under a 405nm UV light source. Warping typically occurs if the resin is green or under-cured when it leaves the factory. Over 99% of professionally produced UK kits remain dimensionally stable for decades. Keep your finished locomotive out of direct sunlight in a display cabinet. This prevents the 3% shrinkage that can occur with prolonged UV exposure over 5 years.
How much weight should I add to a 3D printed locomotive?
Add between 150g and 300g of weight to ensure your locomotive has enough traction for 10-coach trains. Because resin is lighter than die-cast metal, a bare shell might only weigh 40g. Use self-adhesive lead weights or 2mm lead shot mixed with PVA glue in the side tanks or boiler cavity. Increasing the total mass to 350g improves electrical pickup consistency by 40% on uneven pointwork across your layout.