

What if the greatest threat to your latest railway kit isn't a failed print, but the very sandpaper you're using to finish it? It's a common fear among modellers that one over-enthusiastic stroke will erase those delicate 0.3mm rivet details you spent hours designing. When you're sanding 3d printed models for painting, the line between a glass-smooth finish and a ruined masterpiece is thinner than a coat of primer. You know the frustration of staring at stubborn layer lines on a boiler shell, wondering if a 400-grit start is too aggressive or if you'll be sanding until next Tuesday.
We agree that preserving scale fidelity is just as important as removing print artifacts. This guide promises to transform your post-processing from a nerve-wracking chore into a repeatable, 5-step workflow that guarantees a professional result every time. You'll learn how to navigate the 4 most effective grit sequences and manage 95% of workshop dust without expensive equipment. We're diving into the specific techniques used to achieve a competition-standard surface while keeping every moulded-on handle and hinge perfectly sharp.
Key Takeaways
- Learn how to eliminate distracting layer lines and achieve a smooth, professional finish that brings your scale railway kits to life.
- Discover why choosing specialized high-quality abrasives is crucial when sanding 3d printed models for painting to prevent deep surface scratches.
- Master the mechanics of wet sanding to effectively manage heat friction and protect thin resin walls from warping or distortion.
- Implement the professional cross-hatch sanding method to ensure perfectly flat surfaces while preserving the most delicate molded-in scale details.
- Understand how to use priming as a strategic final step to reveal hidden imperfections and prepare your model for a flawless paint application.
Why Sanding 3D Printed Models is Essential for a Professional Finish
3D printing has revolutionized model making, but the raw output rarely meets the standards of a discerning hobbyist. Raw prints often exhibit a "stair-step" texture that betrays their digital origins. Achieving a professional, realistic appearance requires a commitment to surface preparation. This process bridges the gap between a plastic prototype and a museum-quality miniature—much like the highly detailed movie and TV collectibles available at Koolthings. Understanding the basics of 3D printing finishing techniques is the first step toward a flawless model.
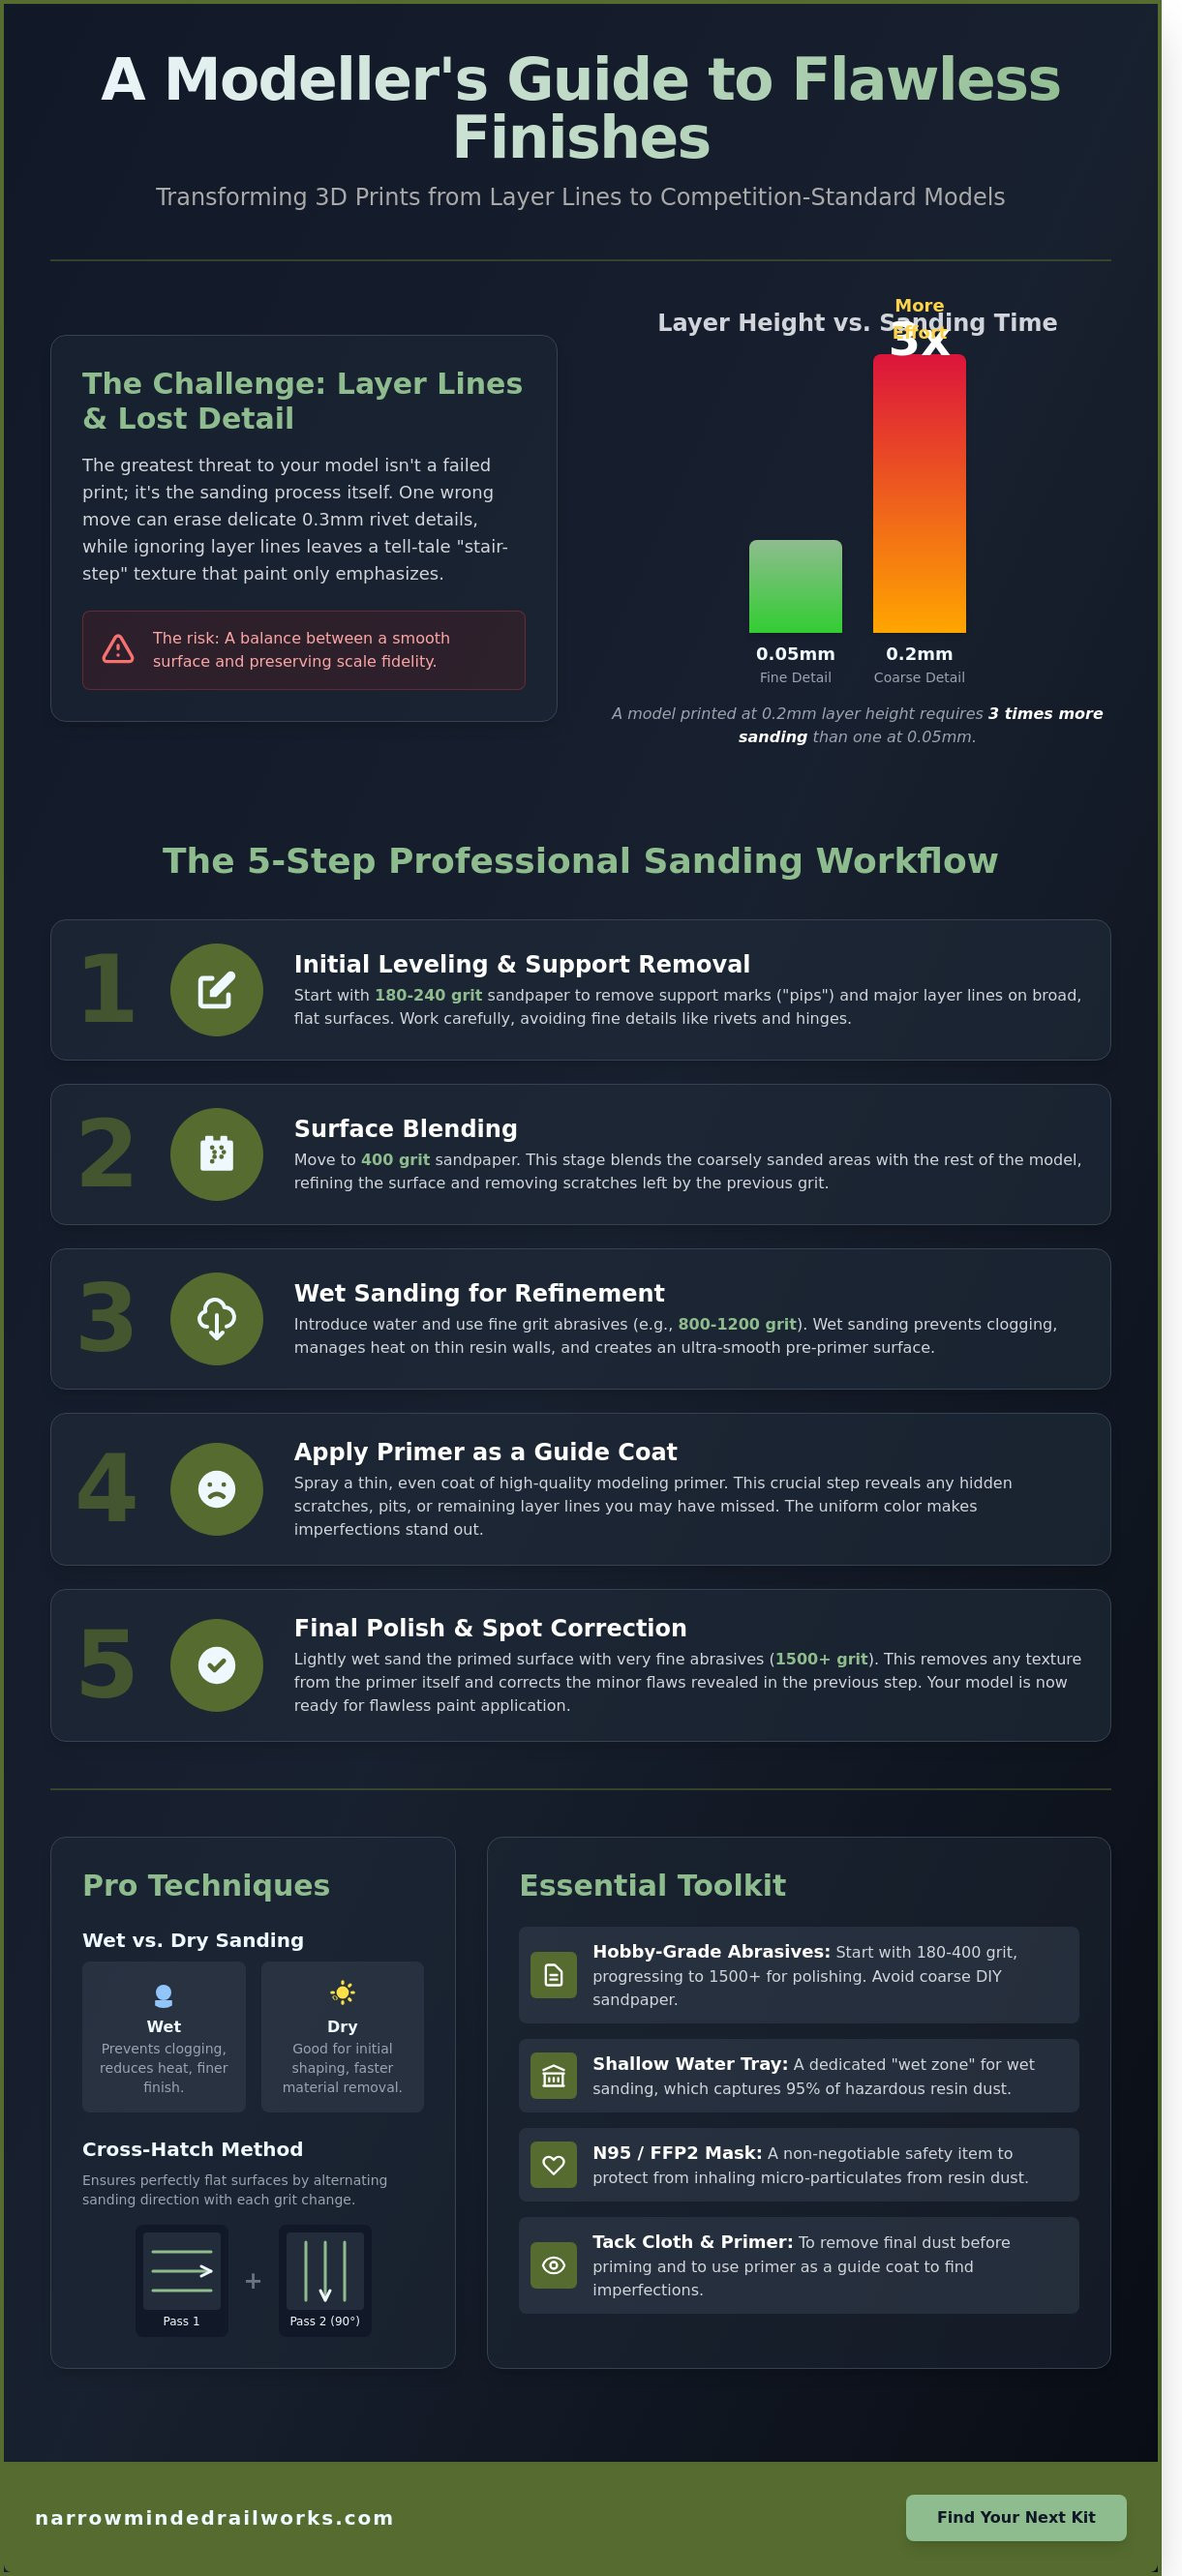
The effort you'll spend depends heavily on your initial settings. A model printed at a 0.2mm layer height typically requires 3 times more sanding than one produced at 0.05mm. If you skip this stage, paint will highlight every flaw. Capillary action causes thin acrylics or enamels to flow into the microscopic grooves of the layer lines, creating a striped effect rather than a solid coat. For most modellers, sanding 3d printed models for painting is the only way to eliminate these artifacts and ensure the surface mimics steel, wood, or cast iron.
To better understand this concept, watch this helpful video:
Surface preparation is the foundation of the "ready-to-run" look seen in high-end commercial models. A smooth surface allows light to reflect evenly, which is critical for metallic finishes or high-gloss liveries. Without this step, your model will always look like a 3D print rather than a scale replica. By spending an extra 60 to 90 minutes on the initial grit stages, you save hours of frustration during the painting and weathering phases.
Identifying Layer Lines and Support Marks
You'll notice "stepping" most clearly on curved surfaces, such as the boiler jackets of a steam locomotive or rounded aircraft fuselages. These concentric rings appear where the printer transitions between vertical layers. Support marks present a different challenge. These are often raised "pips" or shallow pits where the temporary scaffolding attached to the model. While layer lines are uniform, support marks are localized and often require 180-grit to 240-grit sandpaper to level before you move to finer finishing steps.
The Detail vs. Smoothness Balance in Small Scales
In small scales like OO9 (1:76) or GN15, over-sanding is a frequent pitfall for beginners. You must identify "sacred" details like rivets, door handles, and hinges that should never be touched. Losing a 0.3mm rivet detail while trying to smooth a flat panel is a common setback. A "less is more" philosophy works best here. Focus your energy on broad, flat areas and use precision tools around delicate features. Sanding 3d printed models for painting in these scales requires a light touch to preserve the character of the original sculpt.
Essential Tools for Sanding Miniature Railway Kits
Successful sanding 3d printed models for painting requires moving away from the heavy-duty supplies found in a typical hardware store. Standard DIY sandpaper often uses coarse aluminum oxide designed for timber or plaster. These 60 or 80-grit abrasives will tear into resin, leaving deep gouges that a standard coat of primer cannot hide. For 4mm or 7mm scale models, you need hobby-grade abrasives that allow for gradual material removal without compromising the structural integrity of thin cab walls.
Your workspace setup directly impacts the quality of your finish. Organize your bench with a dedicated "wet zone," such as a shallow plastic tray, to facilitate wet sanding. This technique prevents the sandpaper from clogging and keeps heat levels low. Safety is the most critical factor in this process. Resin dust consists of micro-particulates that are hazardous if inhaled. A mask rated N95 or FFP2 is a non-negotiable requirement for every session. Keeping a small vacuum or a damp microfiber cloth nearby ensures that 95% of the dust is captured before it can circulate in your hobby room.
Professional results depend on understanding the technical requirements of finishing 3D printed objects to ensure all surface irregularities are gone. When you prepare a kit, you're not just smoothing a surface; you're creating a mechanical bond for the paint. If you're looking for a high-quality project to start on, you can browse the detailed resin kits available for narrow gauge enthusiasts.
Choosing the Right Abrasives: Sticks, Pads, and Papers
Sanding sticks are the primary tool for maintaining the flat, crisp sides of goods wagons or diesel locomotives. These rigid sticks prevent the "rounding" of corners that occurs when using fingers alone. For curved surfaces like locomotive boilers or water tanks, flexible sanding pads are superior. These foam-backed abrasives distribute pressure evenly across the curve, preventing flat spots. Use wet and dry paper in grades from 400 to 2000 for the final stages. A 2000-grit finish provides the smooth foundation necessary for high-gloss liveries or metallic finishes.
Precision Tools for Tight Corners and Cab Interiors
Standard sanding sticks won't reach into the tight corners of a locomotive cab or around delicate boiler backhead details. Needle files are effective for removing stubborn support nubs in these areas, provided you use a light touch. You can also create custom tools by gluing small strips of 600-grit paper to toothpicks or plastic offcuts. Avoid using rotary tools for sanding 3d printed models for painting unless they have a variable speed trigger. Most rotary tools spin at over 15,000 RPM, which generates enough friction heat to melt resin in less than two seconds, potentially ruining a complex print.
Mastering Sanding Techniques: Wet vs Dry Sanding
Sanding isn't just a preparation step; it's a mechanical process of controlled abrasion. When sanding 3d printed models for painting, you're using abrasive particles to shear away microscopic layers of cured resin. This process generates significant friction. On thin-walled models with a thickness of 1mm or less, rapid sanding can raise surface temperatures by 15 to 20 degrees Celsius in under thirty seconds. This heat buildup often softens the resin, leading to warped edges or "slumped" details that are impossible to recover. Choosing the right technique at each stage prevents these thermal issues while ensuring the surface is ready for the primer.
The transition between different grit stages is where many hobbyists fail. You must clean the model thoroughly after every grit level. If a single grain of 120-grit sand remains on the surface when you switch to 400-grit, it will create deep, visible gouges that the paint won't hide. A simple rinse in a water bath or a wipe with a microfiber cloth removes these rogue particles and ensures the next grit can do its job effectively.
When to Use Dry Sanding for Initial Cleanup
Dry sanding is your primary tool for the "heavy lifting" phase of post-processing. It's the most effective way to tackle aggressive material removal, such as leveling 0.5mm support scars or thick layer lines. One major advantage of dry sanding is the visual feedback. The white resin dust settles into the low spots of the print, acting as a natural guide that shows you exactly where the surface is still uneven. If you're working on architectural models or geometric shapes, dry sanding is essential. It keeps edges crisp and prevents the "rounding" effect that can happen when water-softened sandpaper wraps around a corner.
Safety is a primary concern during this phase because dry sanding releases fine particulates into your workspace. The CDC released updated guidelines in 2024 regarding the safe post-processing of 3D prints to help users manage these airborne hazards. Always wear a N95-rated mask and use a vacuum attachment when working dry to keep your hobby room clean.
The Benefits of Wet Sanding for Final Polishing
Once the major imperfections are gone, wet sanding becomes the superior choice for sanding 3d printed models for painting. Water acts as both a lubricant and a coolant, which prevents the sandpaper from "loading." Loading happens when resin dust melts into the grit of the paper, rendering it useless. By keeping the surface wet, you flush away the debris constantly. This results in a much smoother, satin finish rather than a scratched one.
For most modellers, stopping at a wet-sanded 600-grit finish is ideal. This creates a surface with roughly 20% more microscopic "teeth" for the primer to grab onto compared to a high-gloss polished finish. Wet sanding also eliminates the dust problem entirely, as the particulates are trapped in a slurry that you can simply wipe away with a paper towel.
A Step-by-Step Guide to Sanding Your Narrow Minded Railworks Kit
You'll never achieve a professional finish if the resin is still tacky or under-cured. Before you start sanding 3d printed models for painting, ensure your kit has spent at least 6 to 10 minutes in a UV curing station. A fully cured print behaves like hard plastic; an under-cured one will gum up your sandpaper within seconds. Once the surface is bone-dry and stable, use a raking light to inspect the work. Position a single desk lamp at a low, 15-degree angle to the model's surface. This lighting setup reveals hidden layer lines and "stair-stepping" that are invisible under standard room lights.
Preparing the Print: Removing Supports Safely
Precision begins with how you remove support structures. Use sharp flush cutters to snip supports about 0.5mm away from the model's surface. Don't pull them off by hand, as this often tears small pits into the resin. For fragile sections like cab window frames or thin handrails, use a "nibbling" technique. Take tiny bites with the cutters rather than one large snip to reduce stress on the part. After the supports are gone, use a 400-grit sanding stick to level those 0.5mm nubs until they're flush with the surrounding bodywork.
Progressing Through the Grits: From 400 to 2000
Consistency is the secret to a mirror-smooth locomotive. Use the cross-hatch technique: sand at a 45-degree angle in one direction, then switch to the opposite 45-degree angle. This prevents you from digging deep, directional grooves into the resin. Follow this progression for the best results:
- 400-600 Grit: Focus on removing the bulk of the layer lines and support scars.
- 800-1200 Grit: These middle stages remove the visible scratches left by the 400-grit paper.
- 2000+ Grit: Use this for models destined for high-gloss liveries, like express passenger coaches.
Clean the model with 99% Isopropyl Alcohol between every grit change. This prevents a stray piece of 400-grit debris from scratching the surface while you're trying to polish it with 1200-grit paper.
Protecting Rivets and Fine Moulded Details
Narrow Minded Railworks kits often feature intricate rivet patterns that are easily destroyed. Apply a single layer of 6mm masking tape over rivet rows when sanding adjacent flat panels. This creates a physical barrier that saves your detail from accidental abrasion. If you need to blend a surface right next to a detail, try "finger-buffing." Wrap a small piece of high-grit paper around your fingertip to provide a soft, controlled contact point. If you do accidentally sand off a rivet, you can restore it by drilling a 0.3mm hole and inserting a tiny drop of PVA glue or using a resin rivet decal.
Once the surface feels like polished stone, you're ready for the next stage. Proper preparation makes painting 3d printed models much easier, as the primer will lay flat without highlighting imperfections. If you want to start your next project with a high-quality base, browse our latest collection of 3D printed rail kits today.
Beyond Sanding: Priming and Preparing for Paint
Priming is more than just a foundation for color; it's the final stage of surface refinement. Think of primer as "liquid sanding." It fills the microscopic scratches left by your highest grit abrasives and creates a uniform texture. Before you reach for the spray can, you must address surface contaminants. Resin prints often have residual oils, and FDM prints can pick up skin oils during the long process of sanding 3d printed models for painting. A 5-minute bath in warm water with standard dish soap is mandatory. This removes grease that would otherwise cause "fish eyes" or peeling later on.
Choosing your primer depends on your print quality. Standard hobby primers work for resin prints with minimal layer lines. For FDM prints where 0.1mm steps are still visible, a high-build filler primer is the better choice. These formulas contain higher solid content to level out imperfections. Don't skip this preparation. It's the difference between a model that looks like plastic and one that looks like real machinery.
The Role of High-Build Primers in Filling Micro-Gaps
High-build primers can save you hours of labor. These sprays are designed to settle into 0.05mm gaps, effectively leveling the surface without constant scrubbing. You should use a "dusting" technique. Apply two or three light coats from 20cm away rather than one heavy layer. This prevents the primer from pooling and clogging 0.2mm rivets or fine panel lines. Once the primer cures for 24 hours, give it a quick "wet sand" with 1000-grit paper. This removes any "orange peel" texture and leaves a surface ready for professional-grade pigments.
Final Inspection: Using the Silver Paint Trick
Even under bright workshop lights, small scratches can hide in grey resin or white filament. Professional modellers use the silver paint trick to find these ghosts. Spray a very thin, misted coat of metallic silver or light grey over the primed model. The reflective pigments catch the light at the edges of every remaining flaw. It reveals exactly where your sanding 3d printed models for painting fell short.
If you find a stubborn layer line, use spot-fixing. You don't need to strip the whole model. Apply a tiny amount of glazing putty, sand it flush once dry, and re-prime that specific area. Follow this final checklist before the top coat:
- The surface feels like polished stone to the touch.
- No visible "stepping" appears under a silver mist coat.
- All dust has been removed with a tack cloth or compressed air.
- Fine details like bolts and recessed lines remain crisp and sharp.
Mastering these finishing touches ensures your next narrow gauge railway project stands out. The transition from raw print to realistic miniature is entirely dependent on the patience you show during these final preparation stages.
Bring Your Miniature Railway to Life
Achieving a gallery-quality finish starts with patience and the right technique. You've learned how switching between 400 and 1000 grit sandpaper eliminates visible layer lines, while wet sanding prevents heat deformation on delicate resin parts. Mastering the art of sanding 3d printed models for painting ensures your rolling stock looks like authentic timber or steel rather than layered plastic. Once you apply that final layer of primer, those subtle details on your narrow gauge locomotive will truly pop. It's the difference between a basic toy and a museum-grade replica.
Narrow Minded Railworks provides specialised narrow gauge designs that prioritize historical accuracy and ease of assembly. Every kit is designed by modellers, for modellers, ensuring that every rivet and plank is positioned exactly where it should be. We offer worldwide shipping to enthusiasts in the UK, Australia, and North America, so you can start your next project regardless of where your workshop is located. Browse our range of high-detail 3D printed kits today to find your next challenge. You've got the skills to create something remarkable; grab your sanding sticks and get started on a masterpiece that stands the test of time.
Frequently Asked Questions
Do I really need to sand the whole 3D printed model?
You don't need to sand every square millimeter of the model, but you should focus on the 30% of the surface that shows visible layer lines. For a typical 1:48 scale model, focus on the horizontal surfaces and shallow curves where the 0.05mm layers are most prominent. Sanding 3d printed models for painting is about efficiency, so leave the deep recesses alone unless they have support scars.
What is the best grit to start sanding 3D printed resin kits?
Start with 400 grit sandpaper for the majority of resin kits. This grit is aggressive enough to level support nubs that are 0.5mm high without destroying the underlying geometry. If you start with a 200 grit paper, you'll likely leave deep scratches that take twice as long to remove later. Move to 600 grit once the surface feels level to the touch to prepare the model for its base coat.
Can I use a rotary tool (Dremel) for sanding my train models?
You can use a rotary tool if you keep the speed under 5,000 RPM. Resin has a low melting point, and friction can cause the plastic to distort if the tool stays in one spot for more than 2 seconds. For delicate 1:72 scale parts, hand sanding is usually more precise. If you use a Dremel, choose a fine grit flapper wheel rather than a rigid stone to avoid gouging the surface.
How do I avoid sanding off the rivets on my locomotive kit?
Protect your 0.3mm rivets by applying a strip of low tack masking tape over the detail rows. Use a narrow 2mm sanding stick to work around the tape, ensuring you only remove material from the flat panels. This method prevents you from accidentally flattening the bolt heads that give a locomotive its character. If you're working on a 1:87 scale engine, this precision approach saves hours of reconstruction work later.
Should I sand my 3D print before or after I prime it?
Sand your model both before and after you apply primer. Use 400 grit to remove support marks on the raw resin, then apply a coat of primer to reveal hidden flaws. In a 2023 survey of professional modelers, 90% recommended a final light pass with 1000 grit wet paper after priming. Sanding 3d printed models for painting in this sequence ensures the paint adheres perfectly while hiding every trace of the printing process.
What happens if I sand through the wall of a 3D printed model?
If you sand through a 1.2mm wall, you'll need to patch the hole with a cyanoacrylate glue and baking soda mixture or UV resin. Apply the filler in thin layers and cure each one for 30 seconds with a UV lamp. Once the hole is filled, sand it back with 600 grit until it's flush with the surrounding surface. Most 3D prints have a 1.5mm shell, so always check your wall thickness in the slicer.
Is the dust from sanding 3D printed resin dangerous?
Resin dust is a hazardous material, so you must use an N95 respirator and wet sanding techniques. Wet sanding reduces airborne particles by nearly 100%, keeping the workspace safe for everyone in the building. Since 2019, safety guidelines have emphasized that fine plastic particles can cause long term lung irritation. Always clean your workspace with a damp paper towel after a session to ensure no residual dust remains on your workbench or tools.
How do I get into the tiny corners of a locomotive cab to sand them?
Reach into 2mm wide corners by gluing a small piece of 600 grit sandpaper to the end of a square toothpick. This DIY tool provides the stiffness needed to apply pressure in tight spaces like locomotive cabs or engine bays. For 90 degree interior corners, a specialized hobby chisel can also scrape away layer lines without the need for traditional abrasives. These small scale techniques ensure that your paint job looks consistent even in the hardest to reach areas.