

A beautifully printed 3D wagon kit is only half the battle; the real magic of narrow gauge modelling happens in the paint booth and at the weathering bench. While the precision of modern resin prints offers incredible detail, many modellers fear that a heavy hand with the brush might obscure those fine rivets or that paint will not properly adhere to the surface. It is a common frustration to see a delicate OO9 scale model lose its character under a thick, flat coat of paint.
At Narrow Minded Railworks, we understand these technical hurdles and provide a structured approach to help you achieve a professional finish. By mastering the art of painting and weathering OO9 wagon kits, you can transform a plain resin shell into a piece of hyper-realistic rolling stock that feels truly lived-in. This guide covers everything from essential priming techniques for 3D prints to the micro-layering of washes and weathering powders. You will learn how to build up authentic textures that respect the fine scale of narrow gauge railways, ensuring your finished wagons look right at home on any layout. We will help you gain confidence with your tools so your rolling stock captures the grit and industrial charm of a working line.
Key Takeaways
- Understand how to properly prepare 3D-printed resin surfaces to ensure paint adhesion without obscuring fine rivets or plank details.
- Master the professional approach to painting and weathering OO9 wagon kits by using micro-layering techniques that respect the delicate narrow gauge scale.
- Learn a structured four-step weathering process that moves from basic depth washes to specific industrial textures like rust and grime.
- Create authentic narratives for your rolling stock by simulating specific UK narrow gauge environments, such as Welsh slate dust or industrial coal residue.
- Discover the best methods for applying decals and protective varnishes to ensure your models remain durable during frequent layout operation.
Preparing Your OO9 Wagon Kit for the Paint Shop
3D-printed resin offers a level of detail that traditional injection-moulded plastic often struggles to match, particularly in the diminutive world of narrow gauge. However, this material is non-porous and can sometimes retain a slight oily residue from the manufacturing process. Achieving a museum-quality finish when painting and weathering OO9 wagon kits starts with a flawless surface. If you skip the preparation phase, you risk the paint flaking or peeling away later, especially during the aggressive stages of weathering with spirits and washes.
Removing Support Marks and Finishing
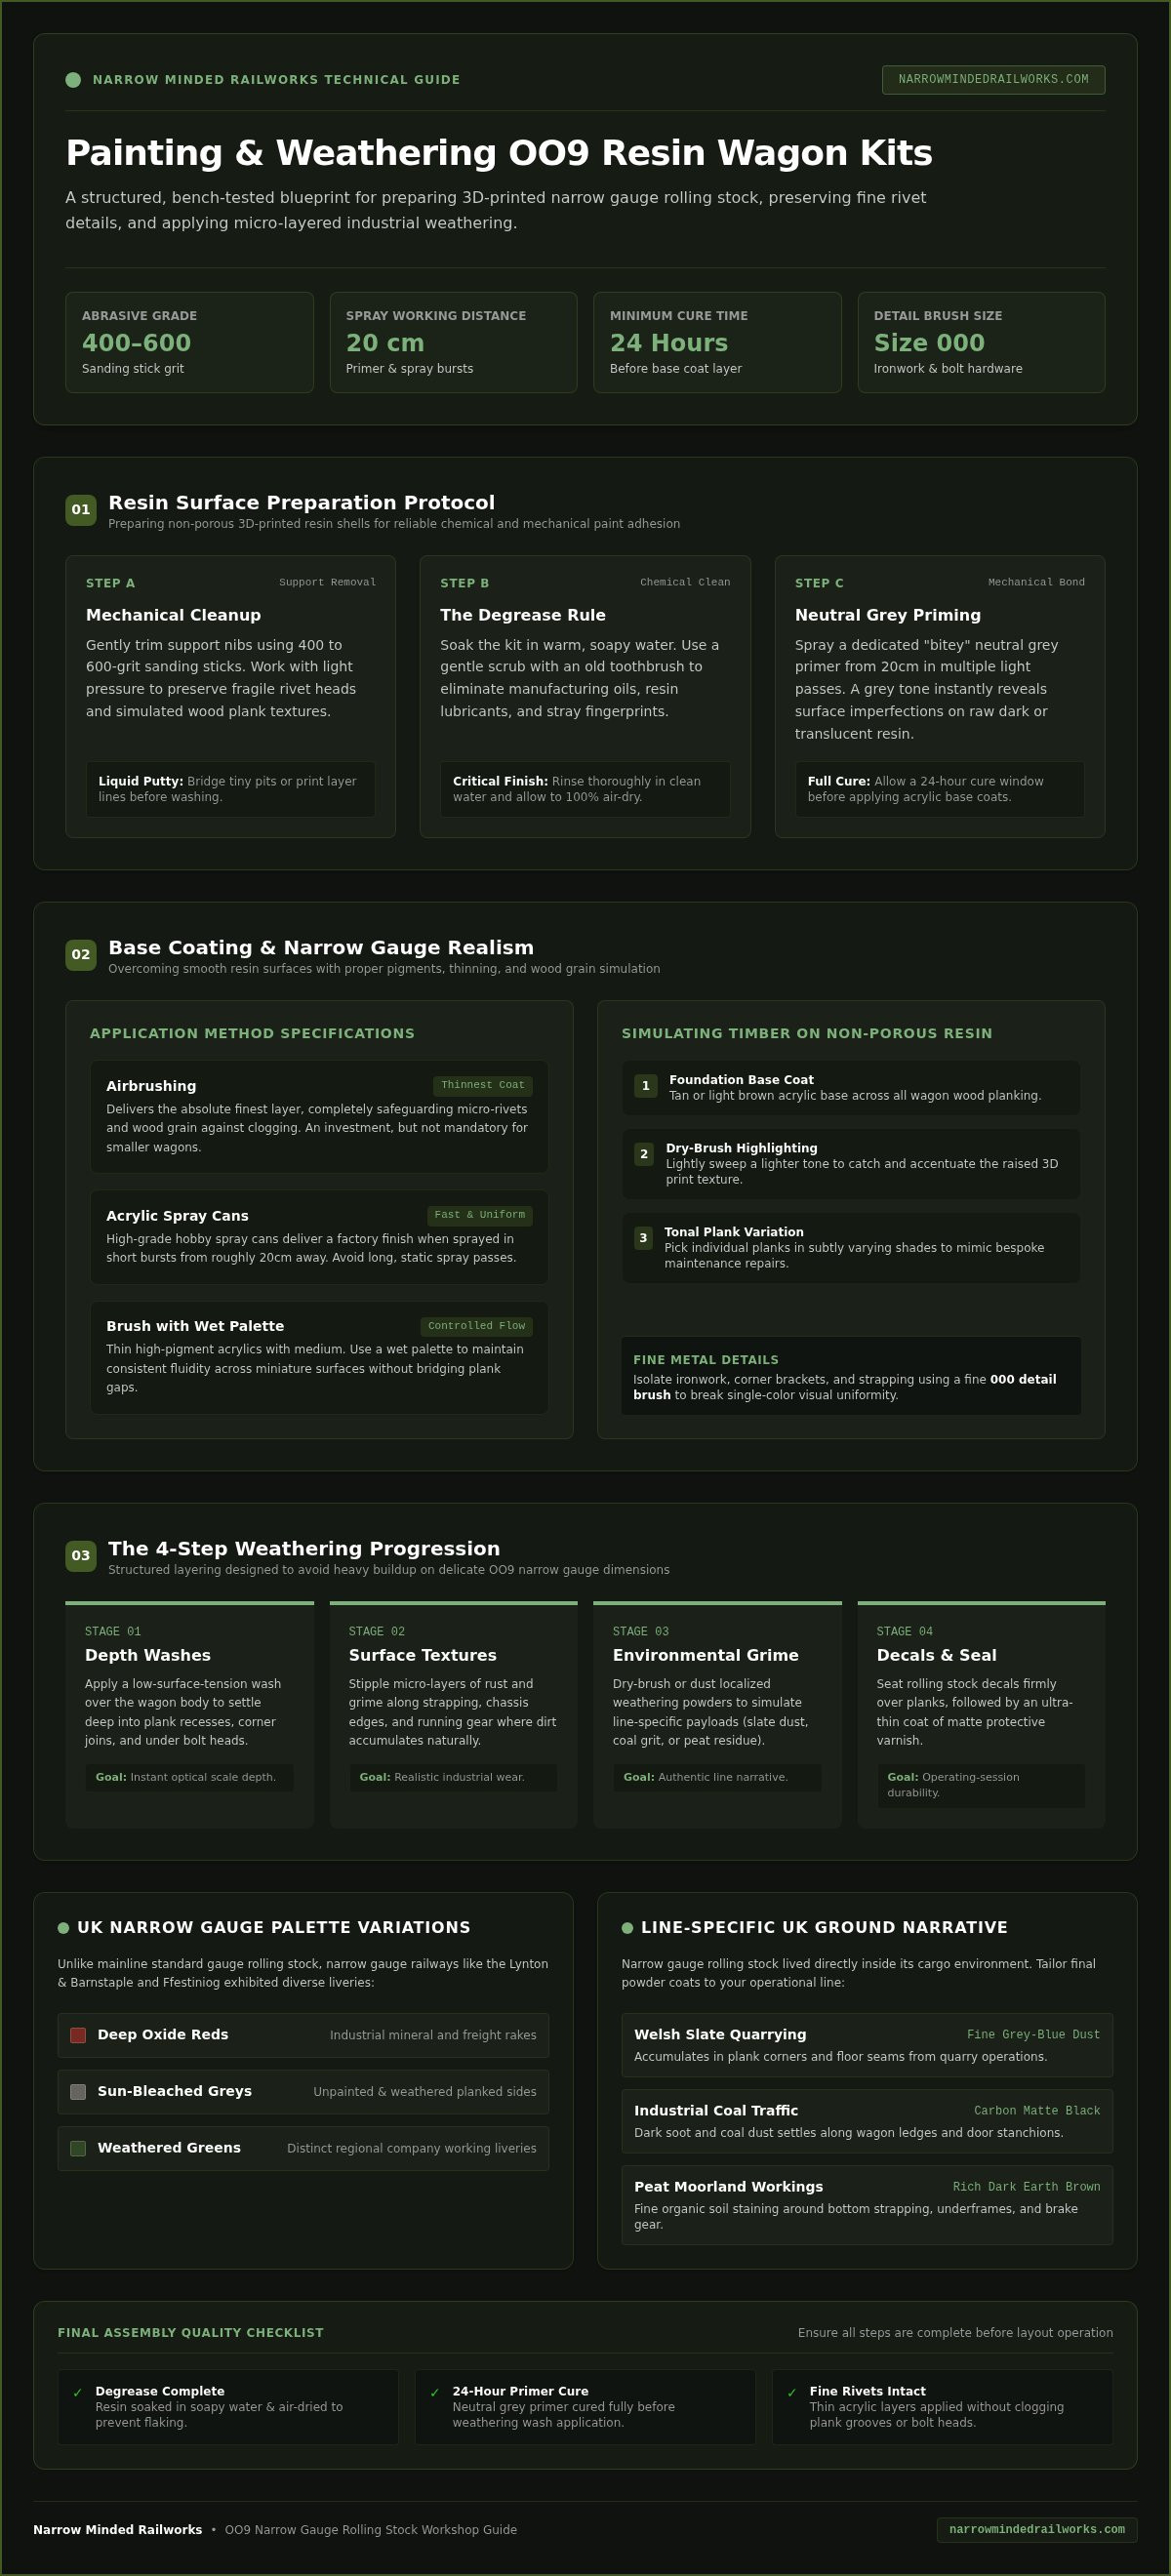
While 3D prints are exceptionally detailed, they often feature tiny artifacts or "nibs" where the support structures were attached during printing. You can easily rectify this by using a series of fine-grit sanding sticks, typically ranging from 400 to 600 grit. It's vital to sand gently to avoid flattening the delicate rivet heads or wood grain textures that make these kits special. If you encounter a small pit or print line, a tiny amount of liquid putty can bridge the gap. For a deeper dive into these techniques, our guide on Finishing 3D Printed Kits provides a comprehensive walkthrough of the cleanup process.
The Degrease Rule: Before any primer touches the model, you must ensure it's chemically clean. We recommend a quick soak in warm, soapy water followed by a gentle scrub with an old toothbrush. This removes any lingering resin oils or fingerprints. Rinse the kit in clean water and let it air dry completely. Even a microscopic layer of oil can prevent your primer from "biting" into the resin, leading to frustration during the painting phase.
Priming for Success
Selecting the right primer is the most important decision you'll make in the early stages of painting and weathering OO9 wagon kits. Resin requires a "bitey" primer that creates a mechanical bond with the surface. We find that a dedicated surface primer in a neutral grey is the most effective choice. Grey provides a perfect middle ground for checking surface flaws; it highlights any missed support marks or uneven textures that were invisible on the raw translucent or black resin.
Apply the primer in thin, multiple coats rather than one heavy layer. Because OO9 models are so small, a thick coat of paint can easily fill in the gaps between planks or obscure fine ironwork. Hold the spray can or airbrush approximately 20cm away and use short, sweeping motions. Once the primer has cured for at least 24 hours, the resin is no longer a fragile print; it's a durable canvas ready for its base colours and the character-building layers of weathering to follow.
Base Coating Techniques for Narrow Gauge Realism
Narrow gauge railways were often utilitarian and distinct from their standard gauge counterparts. While mainline wagons followed strict livery codes, lines like the Lynton & Barnstaple or the Ffestiniog developed their own unique palettes. When painting and weathering OO9 wagon kits, don't feel limited to basic black or grey. Deep oxide reds, sun-bleached greys, and even weathered greens add immense character to your rake. You might find that some resin surfaces are exceptionally smooth, which can make paint application feel slippery. To solve this, use high-pigment acrylics and apply multiple thin layers rather than one thick coat.
Achieving a smooth finish on small scales can be challenging. While airbrushing offers the thinnest coat, it's an investment that isn't always necessary for smaller wagons. High-quality acrylic spray cans provide a professional finish if applied in short bursts from about 20cm away. If you prefer brush painting, thin your acrylics with a dedicated medium. This prevents "clogging" the fine 3D-printed details like bolt heads or plank gaps. For crisp edges and fine details, acrylic paint markers from specialist retailers like PoscART can also provide controlled, opaque coverage. A wet palette is a proactive solution here; it keeps your paint at the correct consistency for longer, allowing for smoother strokes across the diminutive surfaces of an OO9 model.
Simulating Timber Textures
Resin doesn't have the natural porosity of real wood, so you must create the illusion of grain through clever layering. Start with a base coat of tan or light brown. Once dry, use a "dry-brush" technique with a slightly lighter shade to catch the raised textures of the print. To avoid a uniform, factory-fresh look, paint individual planks in slightly different tones. This mimics the hand-built nature of narrow gauge rolling stock where repairs were often made with whatever timber was available. It’s a simple way to make a 3D-printed kit look like a bespoke wooden construction.
Painting Metal Details
Picking out ironwork transforms a model from a single-colour block into a realistic miniature. Use a fine 000 brush to paint hinges, straps, and bolts. Colours like "Oily Steel" or "Gunmetal" are superior to bright silver, as they reflect the functional, industrial nature of these parts. If you find your hand is unsteady, try bracing your wrists against the edge of your workbench to provide better control over the fine brush. For more advanced tips on colour selection and theory, see our guide on Painting 3D Printed Models. Our own OO9 wagon kits are designed with these raised details in mind, making them an ideal project for developing your painting skills.
The 4-Step Weathering Process for OO9 Wagons
Weathering is the essential final act that bridges the gap between a plastic model and a convincing miniature replica. Narrow gauge railways were rarely pristine; they were industrial workhorses often operating on shoe-string budgets in rugged environments. When painting and weathering OO9 wagon kits, your goal is to replicate the cumulative effects of rain, sun, soot, and cargo. We utilize a structured four-layer approach to build this realism without overwhelming the delicate 3D-printed details you’ve worked hard to preserve.
This systematic process moves from broad applications to specific details, ensuring each layer adds depth rather than just "mess." By following these steps, you can avoid the common pitfall of a model looking accidentally dirty rather than authentically aged. Each layer should be allowed to dry fully before the next is applied to maintain the clarity of the finish.
Applying the Global Wash
A wash is a highly diluted paint used to settle in recesses. For most OO9 wagons, a "grimy black" or "burnt umber" acrylic wash is the most effective starting point. Apply the wash liberally over the entire body, allowing the fluid to naturally seek out the gaps between planks and the bases of rivets. This creates artificial shadows that make the model "pop" visually, providing an immediate sense of scale to the 3D-printed resin.
However, you must manage the fluid carefully to prevent unsightly tide marks. Use a clean, damp brush to wick away excess wash from flat surfaces where it shouldn't pool. This proactive step ensures the tint remains in the deep corners while leaving the main panels relatively clean. It's a simple way to define the complex geometry of the kit without using a heavy hand.
Dry Brushing for Detail
Once the wash is completely dry, you can bring the raised details back to life. Select a highlight colour approximately two shades lighter than your original base coat. Dip a flat, stiff brush into the paint and then perform the "paper towel test": wipe the brush across a towel until almost no pigment remains on the bristles. Only when the brush leaves a faint, dusty trace is it ready for the model.
Gently flick the brush across the edges of the wagon and over the tops of the rivets. This catches the high points, simulating the way natural light hits a full-sized vehicle. It’s a precise technique that highlights the quality of the kit's design, making the ironwork and wood grain stand out against the darker shadows created by your initial wash.
To complete the painting and weathering OO9 wagon kits process, use Layer 3 (pin-washes) to add specific rust streaks around bolts or oil spills near the axle boxes. Finally, Layer 4 involves applying weathering powders to simulate dust and debris. This environmental context links the wagon to its surroundings, whether it's a slate quarry in North Wales or a peat bog in Ireland.
Narrow Gauge Specific Weathering: Slate, Coal, and Peat
Effective weathering tells a specific story about your rolling stock's history. A wagon shouldn't just look dirty; it should look like it has spent a decade hauling slate from a Snowdonia quarry or coal to a remote village station. When painting and weathering OO9 wagon kits, the environmental context of your layout dictates your pigment choice. We recognise that narrow gauge lines often operated in harsh, damp conditions. We provide proactive techniques to replicate these textures without damaging the underlying paintwork.
Slate and Stone Effects
In Welsh-inspired layouts, slate dust is the dominant environmental factor. This fine, light grey powder settles into every crevice, particularly around the lower chassis and axle boxes. We suggest using light grey weathering powders applied with a soft, dry brush. It's easy to overdo this effect, so apply it in thin stages. If you're still at the construction phase, checking our guide on Building OO9 Wagon Kits will help you prepare the chassis for these specific weathering details.
Rust and Corrosion
Rust on OO9 models requires a delicate touch. At 1:76 scale, a "rusty bucket" look can quickly become a caricature. We distinguish between surface rust, which is a light orange dusting, and structural rot, which involves darker, textured sienna. Use orange and sienna pigments sparingly on ironwork, couplings, and corner plates. By focusing on areas where moisture naturally collects, you create a realistic industrial appearance that respects the model's small scale. It's better to under-weather than to obscure the fine 3D-printed details with thick, crusty paint.
For lines serving industrial ports or moorland bogs, the textures change significantly. Coal dust is best represented by a matte black powder with a slight sheen. Peat lines require a "wet" mud look. You can achieve this by mixing dark brown pigments with a touch of gloss varnish and applying it to the lower frames. This proactive approach ensures your rake looks like it belongs in its specific landscape rather than a generic display case. If you're ready to start your next project, explore our full range of OO9 wagon kits to find the perfect canvas for these weathering techniques.
Finishing Touches and Protecting Your Work
Once you have completed the artistic stages of painting and weathering OO9 wagon kits, you must secure your hard work against the rigours of layout operation. Handling a model during shunting or maintenance can easily lift delicate weathering powders or chip unsealed paint. This final phase is about durability and visual cohesion, ensuring your wagon doesn't just look realistic but stays that way for years of service. Protecting the finish is a proactive step that prevents the fine resin details from becoming damaged during frequent use.
Decals and Lettering
Applying decals to 3D-printed resin requires a specific approach due to the high level of surface detail. If you apply a transfer over a line of rivets, it won't sit flush against the body. We recommend applying a small amount of gloss varnish to the specific area first to create a perfectly smooth surface. Once the decal is in place, use a setting solution like Micro Sol to soften the carrier film. This allows the lettering to conform to the underlying textures, making it look like it was painted directly onto the planks. After the decal has dried, apply a very light wash over it to bed the lettering into the surrounding weathering.
The Final Varnish
Choosing the correct varnish is vital for maintaining the narrow gauge aesthetic. While satin might be appropriate for a freshly shopped locomotive, a flat matt varnish is the secret weapon for realistic wagons. It removes the "plasticky" sheen often associated with resin models and unifies the different layers of paint and pigments. However, spraying varnish in the UK requires caution. High humidity can cause "frosting," where the varnish dries with a white, cloudy finish. To avoid this, only spray on dry days or ensure your workspace is well-ventilated and climate-controlled.
Modellers often find that weathering powders seem to disappear once varnished. This happens because the liquid varnish wets the pigment particles, changing how they reflect light. A proactive solution is to apply your powders slightly more heavily than you think necessary if you intend to seal them. Alternatively, you can leave the final layer of dust unsealed if the wagon won't be handled frequently. This preserves the ultra-flat, dusty texture that is so characteristic of industrial narrow gauge lines. It is a balancing act between the tactile realism of the powders and the protection offered by the varnish.
The last step involves fitting the chassis and adding weight. Because 3D-printed resin is lightweight, adding a small amount of lead or "liquid gravity" inside the wagon floor improves tracking on uneven narrow gauge permanent way. Most of our kits are designed to fit standard Peco or Kato chassis, making the final assembly a straightforward process. If you are ready to expand your rake, you can browse our latest OO9 Wagon Kits to start your next project.
Bringing Your Narrow Gauge Layout to Life
Mastering the art of painting and weathering OO9 wagon kits is a transformative skill that elevates a collection of parts into a realistic slice of railway history. By prioritising thorough surface preparation and applying weathering in structured layers, you can respect the high detail of 3D-printed resin while capturing the industrial grit of a working line. Whether you are simulating the grey dust of a Welsh slate quarry or the dark soot of a coal-hauling industrial route, these techniques ensure your rolling stock looks authentic and cohesive.
Our kits are designed by narrow gauge enthusiasts for maximum realism, offering detailed resin prints that surpass traditional plastic kits in terms of fine textures. We provide proactive solutions for modellers who want to move beyond factory finishes and create something truly unique. If you're ready to expand your rake with models designed for the modern hobbyist, explore our range of 3D-printed OO9 Wagon Kits. We offer worldwide shipping for all model kits, ensuring you can access high-quality narrow gauge stock wherever your workshop is located. Grab your brushes and start creating your own lived-in miniature world today.
Frequently Asked Questions
Do I need to wash my 3D-printed wagon kits before painting?
Yes, you must wash 3D-printed resin kits in warm, soapy water before starting. This process removes any lingering oils or chemical residue from the printing process that might prevent paint from adhering. Use a soft toothbrush to gently scrub the surface, then rinse thoroughly with clean water. Ensure the model is completely dry before applying any primer, as trapped moisture can cause the paint to bubble or peel later.
What is the best primer for resin OO9 models?
A high-quality grey surface primer is the most effective choice for resin models. Resin is non-porous, so you need a primer with a strong "bite" to create a mechanical bond. Grey is superior to black or white because it makes it much easier to identify any remaining support marks or print lines that need further sanding. Apply the primer in thin, even coats to avoid filling in the fine rivet details.
Can I use standard acrylic paints on 3D-printed kits?
You can certainly use standard model acrylics when painting and weathering OO9 wagon kits. High-pigment acrylics from reputable hobby brands offer excellent coverage on resin once it's been properly primed. Because these models are small, we recommend thinning your paints with a dedicated medium or water. This ensures the paint flows into the wood grain and around ironwork without obscuring the delicate 3D-printed textures.
How do I prevent my weathering from looking like a mess?
The secret to realistic weathering is building up effects in thin, controlled layers. Avoid applying thick washes or heavy pigments all at once. Start with a subtle global wash to define shadows, then slowly add specific details like rust streaks or dust. If you find an effect is too strong, you can often knock it back with a damp brush before it dries, allowing for a much more natural finish.
Should I paint the wagon before or after assembly?
It's generally best to paint the main wagon body after it's been fully assembled and cleaned. This ensures that any glue marks or seams are covered by the primer and base coat. However, you should keep the chassis and wheels separate during the initial painting stages. This allows you to reach the underside and interior more easily, ensuring a professional finish across every surface of your narrow gauge rolling stock.
How do I make 3D-printed wood look like real timber?
To simulate real timber on a resin kit, use a combination of base coating and dry brushing. Start with a tan or light brown acrylic base. Once dry, apply a darker brown wash to settle into the grain. Finally, use a lighter cream or grey shade to gently dry-brush the raised textures. Painting individual planks in slightly different tones will also mimic the hand-built, repaired look common on narrow gauge railways.
What is the best way to seal weathering powders on a model?
A light coat of matt varnish is the most reliable way to seal weathering powders. While some modellers prefer to leave powders unsealed for a "dustier" look, a varnish protects the model during handling. Be aware that varnish can make powders appear slightly darker. To solve this, apply your pigments a little more heavily than needed to compensate for the darkening effect once the protective seal is applied.
Do I need an airbrush to get a professional finish on OO9 wagons?
You don't need an airbrush to achieve professional results when painting and weathering OO9 wagon kits. While an airbrush is useful for large fleets, high-quality spray cans and traditional brushes are perfectly adequate for models of this size. The key is in the technique; using thin layers and fine-tipped brushes for metalwork will produce a finish that rivals any airbrushed model. This makes our kits accessible to modellers at any skill level.