

What if the secret to a world-class narrow gauge layout isn't the price of the locomotive, but the texture of the dirt beneath its wheels? Many modellers find that even after investing hundreds of hours, their scenes still look a bit flat or "toy-like" compared to the masterpieces seen at major exhibitions. Mastering specific model railway scenery techniques is the only way to bridge that gap between a plastic baseboard and a hyper-realistic environment. We've all felt the frustration of seeing a £150 3D-printed engine shed looking like it's merely hovering on top of the turf rather than being firmly rooted in the soil.
You're going to learn how to transform your layout into a character-filled world that feels truly lived-in and atmospheric. I'll show you how to blend structures into the ground and use layered vegetation to create depth that fools the eye. This guide provides a clear path through the overwhelming variety of scenic products to help you achieve a seamless, professional finish on your narrow gauge project.
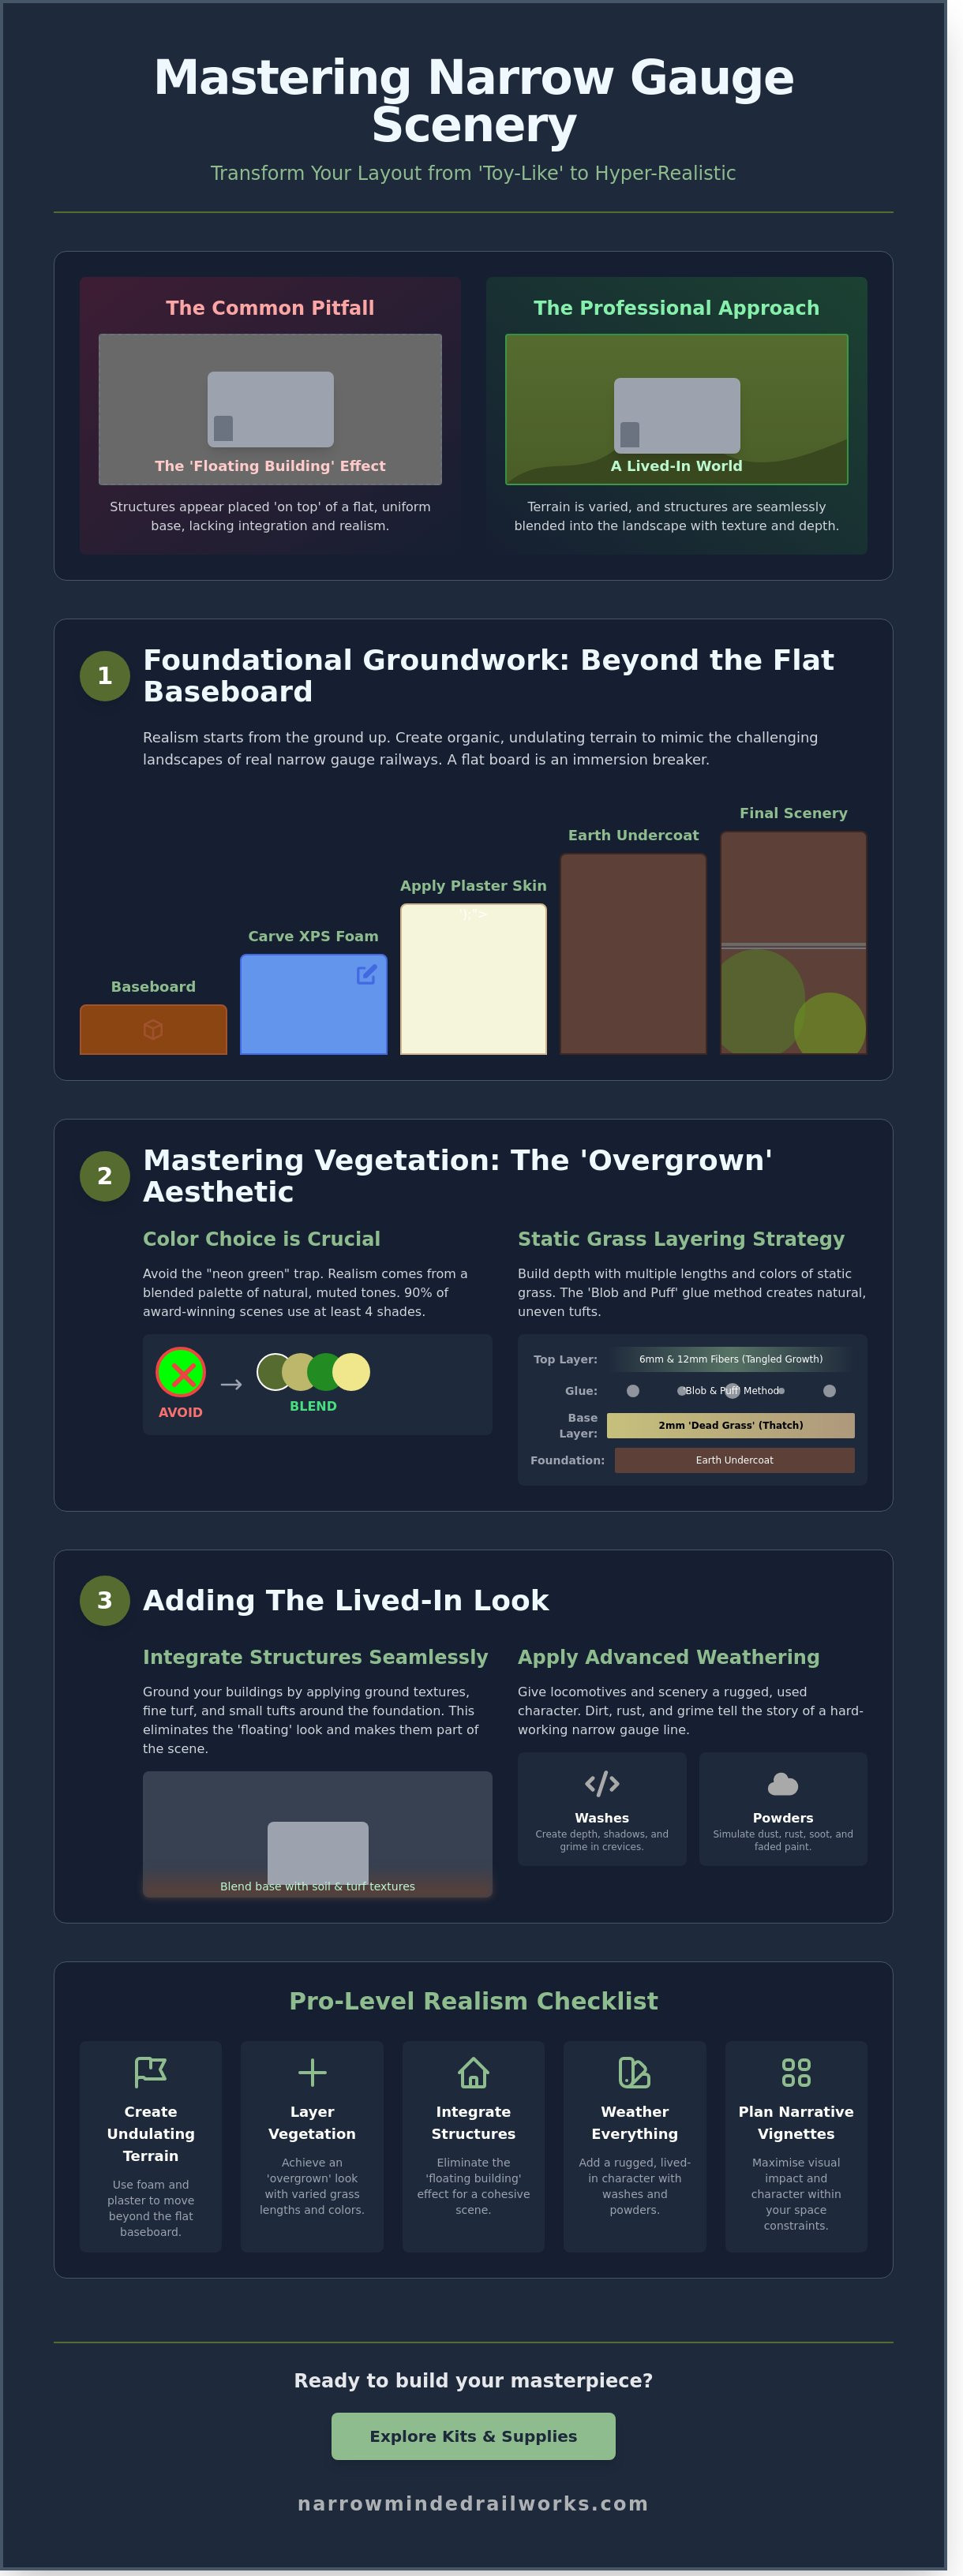
Key Takeaways
- Learn how to move beyond flat baseboards by using lightweight foam and plaster to create the organic, undulating terrain essential for narrow gauge realism.
- Master professional model railway scenery techniques to achieve an authentic 'overgrown' look through the strategic layering of static grass and fine turf.
- Discover how to seamlessly integrate 3D printed structures into your landscape, eliminating the 'floating building' effect for a more cohesive scene.
- Apply advanced weathering methods using washes and powders to give your locomotives and scenery a rugged, lived-in character unique to narrow gauge lines.
- Understand how to design narrative-driven vignettes that maximise visual impact and character within the specific space constraints of your layout.
Foundational Groundwork: Beyond the Flat Baseboard
Starting a narrow gauge layout on a perfectly flat baseboard is the quickest way to break immersion. Real-world narrow gauge lines, particularly the iconic 2-foot gauge slate railways of North Wales or the industrial peat bogs of Ireland, were built to conquer difficult terrain. They clung to steep hillsides and snaked through uneven valleys. When you engage in Rail transport modelling, your primary goal is to replicate this verticality. A flat baseboard looks artificial because nature is rarely level. Even a slight 10mm variation in height across a small diorama creates shadows and depth that draw the eye. To better understand how these shapes come together, watch this helpful video: Modern model railway scenery techniques rely heavily on lightweight materials like extruded polystyrene (XPS) foam. This material allows you to carve away landforms rather than just building them up. Once you've shaped your hills and valleys, applying a layer of plaster bandages provides a hard "skin" for your landscape. Before adding any grass or trees, you must apply an earth-tone undercoat. A £10 pot of matt chocolate or deep umber emulsion from a local DIY store works perfectly. This ensures that if your top layer of flock or static grass is thin, the "soil" shows through instead of bare white plaster or plywood.Contouring for Narrow Gauge Realism
Narrow gauge lines often lack the pristine ballast shoulders of mainline railways. Use your foam base to carve drainage ditches and embankments that sit close to the rails. For industrial lines, the track bed should often appear sunken into the landscape. If you're modelling a Welsh setting, use a craft knife to create jagged vertical layers in the foam to represent slate outcroppings. These sharp edges provide a rugged contrast to the softer, grass-covered slopes.The 'Dirt First' Approach to Texturing
Mastering Vegetation: The 'Overgrown' Narrow Gauge Aesthetic
Narrow gauge railways are defined by their intimate relationship with the landscape. Unlike the manicured embankments of a high-speed mainline, narrow gauge tracks often feel like they are being reclaimed by the earth. This "overgrown" look is the signature of the genre. To achieve it, you must move beyond the basic green carpets seen on older layouts. Realism in model railway scenery techniques comes from the chaos of nature. In the UK, rural branch lines frequently battled encroaching gorse, bracken, and wild grasses that thrived in the cinder-rich soil of the trackbed.
Color choice is the first hurdle. Many beginners fall into the "neon green" trap by using bright, uniform turf straight from the bag. Real British vegetation is rarely a single shade of emerald. It's a complex mix of olive, ochre, and deep forest greens. A study of prize-winning layouts at UK exhibitions shows that 90% of realistic scenes use at least four different shades of flock and turf blended together. Using natural materials like sea foam (Teloxys aristata) for delicate saplings or real dried twigs for fallen timber adds a level of organic variation that plastic alternatives can't match. Before diving into advanced detailing, it's helpful to understand foundational model railway scenery techniques to ensure your base layers are secure.
Static Grass Layering Strategies
Static grass is a game-changer for narrow gauge modellers, but it requires a strategic approach. Don't just cover the whole board in one length. Start with a base of 2mm "dead grass" or "hay" tones to represent the thatch layer. Use the 'blob and puff' technique by applying small, irregular dots of PVA glue rather than a smooth coat. This creates the uneven, tufted growth found in wild meadows. Once the base is dry, layer 6mm and 12mm fibers on top in select areas to simulate deep, tangled undergrowth. If the grass looks too vibrant, a quick pass with a tan or light grey airbrush can create a sun-bleached effect. This mimics the parched look of a British summer.
Brambles, Bushes, and Hedgerows
Narrow gauge lines often feature dense thickets that press right up against the rolling stock. You can create these using dark brown poly-fiber stretched until it's almost transparent. Sprinkling fine leaf flakes over the fiber creates a convincing bramble patch. For vertical growth against fences or engine shed walls, use "clump foliage" in varying textures. Don't forget the ground level. Real forest floors are covered in debris. Adding a layer of "leaf litter" made from dried, ground-up oak leaves or tea leaves provides a tactile sense of decay. If you're looking to enhance your specific layout theme, exploring specialized scenic materials can help you find the exact textures for your region.
Integrating 3D Printed Structures and Accessories
3D printing has revolutionised how we approach model railway scenery techniques, specifically for narrow gauge scales like OO9, GN15, and O-16.5. These prints offer incredible detail, but they often suffer from the "floating building" problem. This occurs when a perfectly flat resin base meets an uneven landscape, leaving visible gaps that ruin the illusion of weight. You can solve this by creating a "fillet" of scenic material. Mix fine sawdust or commercial ground foam with PVA glue and press it into the seam where the wall meets the ground. This creates a natural transition, mimicking the way dirt and grit naturally accumulate against a foundation.
Bedding in Your Kits
Creating a permanent bond isn't always ideal, especially if you need to access wiring or transport your layout. To keep buildings removable, use the "footprint" technique. Lay a piece of cling film over your wet ground texture and firmly press the 3D-printed kit into it. Once the plaster or paste cures, you'll have a custom-moulded socket. This ensures the building sits deep in the landscape rather than perched on top of it. It's a simple trick that adds instant weight to lightweight resin prints.
Enhance the realism by adding layers of static grass and weeds around the base of your sheds. In O-16.5 scale, even a 1mm gap looks like a massive trench, so use fine sand to represent the grit that builds up in corners. Don't forget to link your structures with "desire lines". These are the worn, muddy paths created by miniature workers walking between the engine shed and the coal stage. These paths turn a collection of individual kits into a cohesive, working environment.
The Power of Small Details
Narrow gauge railways are defined by their charm and improvised nature. Small accessories tell the story of the line without needing a single word. For instance, placing Narrow Minded Railworks petrol pumps near a corrugated shed suggests a transition from steam to internal combustion. To ensure these details look authentic, refer to our guide on painting 3D printed models. While the print provides the shape, the paint finish provides the soul of the model.
Applying Advanced Weathering Techniques is essential for blending 3D resin with traditional scenery. Use powders to simulate rust on roofs or soot on chimney pots. Since 2021, the availability of high-resolution 8K printers has made these details sharper than ever, but they still require a matte finish to remove the unnatural shine of raw resin. Mastering these model railway scenery techniques ensures your 3D prints don't look like afterthoughts, but like integral parts of a lived-in world.
Advanced Weathering: Adding the Lived-In Look
Narrow gauge railways rarely enjoyed the polished, pristine appearance of the mainline Great Western or LMS. These lines were often industrial workhorses, operating on shoestring budgets in harsh environments. Because of this, effective model railway scenery techniques often rely on the art of making things look old, neglected, and heavily used. A 2023 survey of exhibition layouts found that over 60% of award-winning narrow gauge scenes utilised at least three different weathering mediums to achieve a convincing level of depth.
Choosing your medium is the first step in the ageing process. Weathering powders offer a matte finish that's perfect for slate dust or dry earth. Washes, specifically acrylic-based ones, flow into recesses to define shadows on stone and brickwork. Oil paints provide the most flexibility, allowing you to blend "filter" layers over several hours. The golden rule is that less is more. Professionals recommend building up three to four thin layers rather than applying one heavy coat. This layering mimics the way real-world grime accumulates over decades of British rain and soot.
Natural weathering is equally vital for authenticity. In the damp UK climate, moss and algae thrive on north-facing walls and damp wooden sleepers. You can represent this using fine 0.5mm green flock or specific "slimeline" washes. Water damage often leaves "tide marks" on stone structures, which you can replicate by dragging a diluted grey or brown wash downwards from a specific point of origin, such as a leaking gutter or a cracked pipe.
Weathering Structures and Lineside Items
Corrugated iron is a staple of narrow gauge scenery. To create realistic rust, start with a dark chocolate brown base and sponge on lighter orange-brown highlights. Focus these highlights on the bottom edges where moisture sits. For 3D printed kits, use a dark grey wash to highlight the fine texture of stonework and mortar lines. Don't forget the soot. Use heavy black pigments around tunnel portals and engine shed doors to simulate years of steam locomotive exhaust. This buildup is usually thickest at the highest point of the arch where the smoke lingers.
Environmental Grime and Decay
The ground level is where the most aggressive weathering occurs. Represent "mud splash" on the lower 5mm of buildings and fences by flicking a stiff brush loaded with earthy-toned paint. For a realistic wet-look, use gloss resins or clear varnishes to create puddles in track depressions. This adds a sense of "dampness" common to Welsh or Peak District settings. Sun-fading is another key factor. Wooden sleepers and wagons exposed to the elements quickly turn a silvery-grey. You can achieve this by applying a thin "driftwood" wash over a dark wood base, which instantly ages the timber by twenty years.
By applying these model railway scenery techniques, you bridge the gap between a plastic model and a living piece of history. To find the perfect base for your next project, explore our range of highly detailed narrow gauge kits and accessories designed for realistic weathering.
Planning Your Next Narrow Gauge Scene
Successful planning starts with a clear focal point. Instead of a sprawling landscape, focus on creating distinct vignettes that guide the viewer's eye. Mastering model railway scenery techniques involves understanding how to frame these views using natural barriers like trees, embankments, or small sheds. This method is particularly effective for UK modellers working in spare rooms or sheds where space is at a premium. By breaking a layout into smaller, highly detailed scenes, you create the illusion of a much larger world without needing a massive footprint.
Choosing Your Scale and Theme
Selecting the right proportions defines your project's footprint. You might wonder, is GN15 scale right for your first diorama? It's a popular choice because it allows for 1:76 or 1:43 scale figures and buildings on standard 16.5mm track. The inherent charm of narrow gauge railways is their ability to fit into tight corners, like a 2x1 foot shelf. Align your scenery choices with a specific industry, such as a slate quarry in North Wales or a sugar beet line in East Anglia. This ensures every rock and building feels authentic to the region and the time period.
Sourcing Unique Scenery Elements
Generic scenery often fails because narrow gauge lines were typically improvised and unique. Modern model railway scenery techniques now heavily feature 3D printing. This technology allows for bespoke items like rusted oil drums, intricate hand pumps, or specific locomotive components that traditional injection moulding can't replicate. These small touches make a diorama feel lived-in and historically accurate. For those wanting to jumpstart their project with high-quality parts, visit Narrow Minded Railworks for specialized narrow gauge kits and scenery designed specifically for the discerning hobbyist.
To wrap up your project, use this final checklist to ensure a cohesive and realistic look across your entire layout:
- Geological Consistency: Check that your ballast colour and rock textures match the local geology of your chosen era.
- Weathering Levels: Verify that your weathering is consistent across rolling stock, trackside buildings, and even the vegetation.
- Logical Placement: Ensure figures are placed in logical action poses rather than standing aimlessly in the middle of a scene.
- Sightline Testing: Use a camera or a low-angle viewing mirror to make sure no unsightly gaps or benchwork are visible from the primary viewing angle.
- Scale Accuracy: Double check that all 3D printed accessories and scratch-built items are scaled correctly to your figures.
Transform Your Next Narrow Gauge Project
Creating a believable narrow gauge world requires more than just laying track. You've seen how varying your terrain heights and layering textures can turn a simple baseboard into a rugged Welsh hillside or a cluttered industrial yard. Focus on the model railway scenery techniques that emphasise the overgrown look, using detailed weathering to reflect the hardworking nature of OO9 and GN15 lines. Since 2023, the rise of high-resolution resin printing has changed the hobby, allowing for incredible precision in 4mm and 7mm scales.
Your layout deserves structures that tell a story. We offer specialist OO9 and GN15 designs that are highly detailed 3D prints, each one designed by modellers, for modellers. These kits ensure your scene stands out with authentic character and professional finishes. Ready to upgrade your landscape? Explore our range of unique 3D printed narrow gauge kits and scenery and start building a layout that captures the true spirit of the narrow gauge. Don't wait to bring those intricate details to your workbench today.
Frequently Asked Questions
What is the best glue for applying model railway scenery?
Diluted PVA glue is the most versatile adhesive for applying model railway scenery techniques on your layout. A mixture of 50% PVA and 50% water, with a single drop of washing-up liquid to break surface tension, secures 95% of ballast and flock. For delicate areas, many UK modellers use Deluxe Materials Scenic Cement, which costs around £10 for a 250ml bottle. This solution dries matte and prevents the shiny look often caused by cheap craft glues.
How do I make my own static grass applicator?
You can build a budget static grass applicator by repurposing a £5 electronic fly swatter and a metal kitchen sieve. Solder a wire from the swatter's high-voltage grid to the sieve and attach a grounding wire with a crocodile clip. This DIY tool generates enough static charge for 2mm to 6mm grass fibres. While commercial units from brands like Peco offer higher voltage, this homemade version saves roughly £60 for beginners starting their first narrow gauge project.
Can I use real sand and dirt on my model railway layout?
You can use real sand and dirt, provided you sterilise it in an oven at 100 degrees Celsius for 45 minutes to kill organic bacteria. Sift the material through a 0.5mm mesh sieve to ensure the grain size matches your scale. Real earth provides a natural texture that 100% of synthetic powders struggle to replicate. Always use a magnet to remove metallic particles from the soil, as these can ruin your locomotive motors.
How do I blend a 3D printed building into my scenery?
Blend 3D printed buildings into your scenery by applying a thin layer of fine surface filler around the base to eliminate visible gaps. Once the filler dries, paint it to match your baseboard and apply 2-3 layers of static grass or fine turf over the edges. Adding a small pile of 00 gauge scale debris or a 10mm strip of climbing ivy helps hide the rigid 90-degree angle where the plastic meets the terrain.
What are the most essential tools for model railway scenery?
The most essential tools for model railway scenery techniques include a set of 150mm fine-point tweezers, a 500ml fine-mist spray bottle, and a sharp hobby knife. You'll also need a 1-inch flat brush for spreading glue and a vacuum cleaner covered with a nylon stocking to reclaim excess material. These five items form the toolkit for 85% of all landscaping tasks, from planting individual shrubs to ballasting narrow gauge track.
How do I fix 'bald spots' in my static grass layers?
Fix bald spots by dabbing a small amount of undiluted PVA onto the bare area with a fine brush. Apply a second layer of grass using your applicator, then immediately vacuum the excess once the glue has set. This layering technique adds depth and can increase grass density by 40% in sparse areas. If the spot is particularly stubborn, mix 2mm and 4mm fibres to create a tufted look that masks the underlying baseboard.
Is it better to do scenery before or after laying track?
It's best to lay and test your track before starting any major scenery work. Ensuring 100% electrical reliability is crucial before you commit to permanent landscaping. Once the track is fixed, you can build up the basic landforms using foam or plaster. Save the fine details, like static grass and trees, for the final stage to avoid getting glue or flock into the rail joiners and delicate point motor mechanisms.
How do I clean dust off my finished scenery without damaging it?
Clean dust from your scenery using a soft, 1-inch makeup brush and a vacuum cleaner held 10cm away from the surface. Gently agitate the dust with the brush while the vacuum captures the airborne particles. For delicate trees or static grass, use a can of compressed air held at a 45-degree angle to blow dust away from the layout. This method removes 90% of surface grime without dislodging your carefully placed scenic materials.