

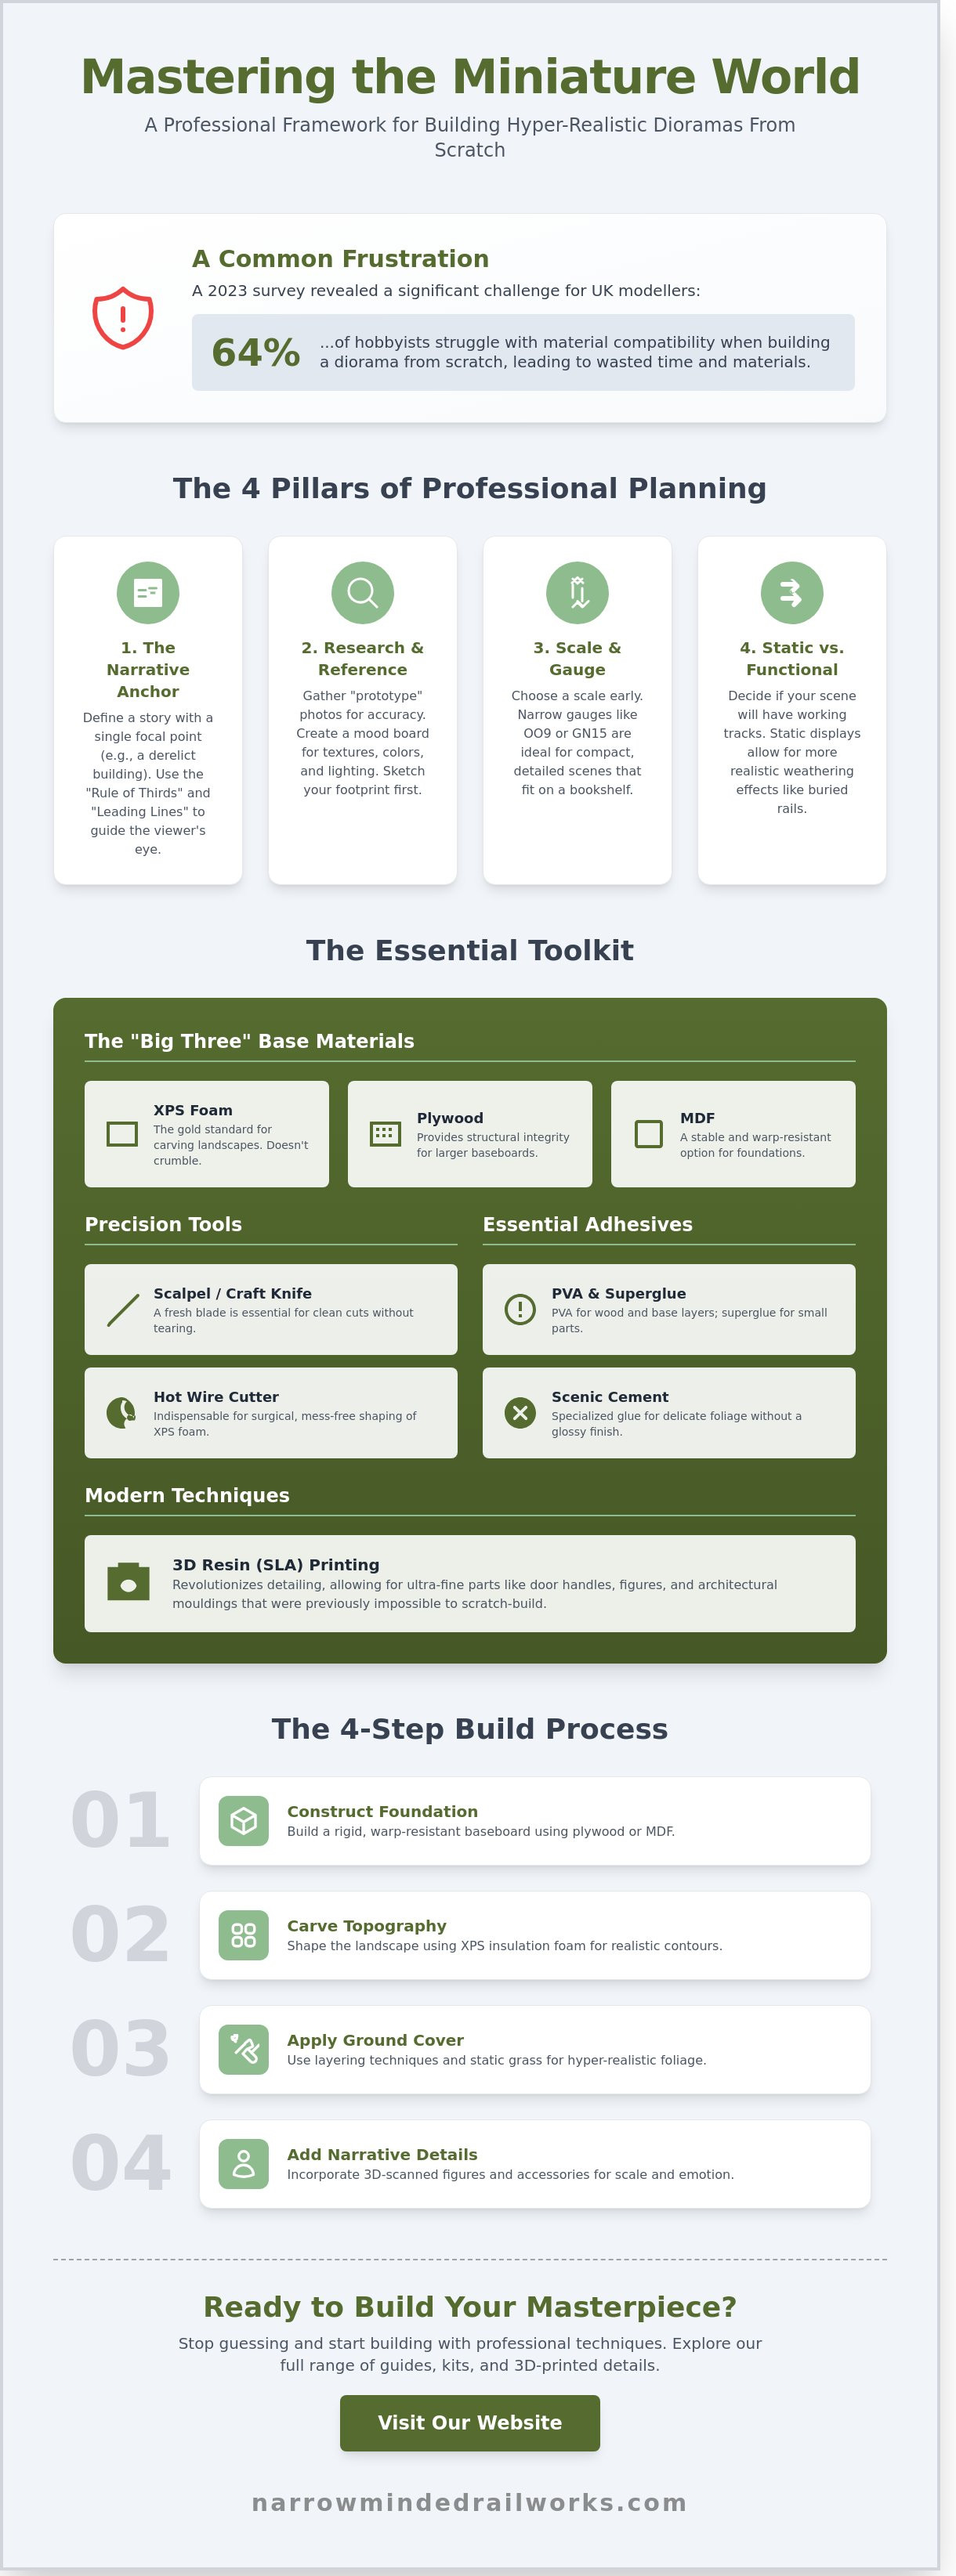
Last Tuesday, David sat in his workshop in Manchester staring at a £50 pile of ruined XPS foam and a tub of cracked plaster. He'd followed a "simple" video, but his attempt at a rural landscape looked more like a school art project than a professional display. It's a common frustration; a 2023 hobbyist survey revealed that 64% of UK modellers struggle with material compatibility when building a diorama from scratch. You want your vision to translate perfectly to the display shelf, but the gap between raw materials and a finished masterpiece often feels impossible to bridge.
We understand that the overwhelming amount of conflicting advice online can make you feel stuck before you've even opened a bottle of glue. You deserve a clear path to success that doesn't involve guessing which paints will melt your baseboard. This guide promises to turn you into a master of hyper-realistic miniature scenes by providing a structured, professional framework for your project. We'll walk through selecting the right materials, mastering terrain textures, and applying the final weathering touches that bring your story to life.
Key Takeaways
- Master the "Narrative Anchor" concept to transform your miniature scene into a compelling story with a clear focal point.
- Identify the professional tools and materials essential for building a diorama from scratch, including expert advice on choosing the right baseboards.
- Learn the step-by-step process for constructing rigid, warp-resistant foundations and carving realistic topography using XPS insulation foam.
- Discover the professional layering technique for ground cover and how to use static grass applicators for hyper-realistic foliage.
- Elevate your project’s realism by incorporating 3D-scanned figures and accessories that provide an authentic human scale and candid emotion.
Conceptualising Your Diorama: The Power of Narrative Planning
A diorama is far more than a simple model; it's a three-dimensional miniature scene designed to tell a specific story. If you're asking What is a diorama?, think of it as a frozen moment in time where every texture and figure contributes to a larger plot. When you start building a diorama from scratch, your first task isn't picking up a hobby knife. It's deciding what story you want to tell. Without a clear narrative, even the most technically perfect build can feel hollow and disjointed.
To better understand this concept, watch this helpful video:
Successful modellers use a "Narrative Anchor" to focus their work. This is a single focal point, such as a derelict locomotive or a crumbling stone cottage, that dictates every subsequent detail. If your anchor is a rusted industrial engine, your scenery should reflect that specific decay. Use the "Rule of Thirds" by placing your anchor off-centre to create a more dynamic and natural look. Leading lines, such as a winding path or a rusted fence, help direct the viewer’s eye toward your focal point, ensuring the story is easy to read at a glance.
Research and Reference Gathering
Accuracy begins with "prototype" photos. Whether you're recreating a 1920s slate quarry in North Wales or a modern industrial estate, real-world images ensure geological and historical consistency. Create a mood board to track specific textures, paint colours, and seasonal lighting. A winter scene in the Scottish Highlands requires different foliage and light levels than a summer afternoon in the Cotswolds. Sketch your footprint on paper before cutting any wood. Keeping the base small often leads to better results, as it forces you to pack more detail into every square centimetre.
Choosing Your Scale and Gauge
Scale selection is a critical early decision because it dictates your material choices and the level of visible detail. Narrow gauge scales like OO9 or GN15 are excellent for building a diorama from scratch because they allow for tight curves and compact scenes that fit on a bookshelf. You can learn more about these specific layouts by reading about what is a narrow gauge railway. Consider whether your diorama will be a static display or if it will feature functional trackwork. Functional tracks need careful wiring and clean rails, while static scenes allow you to experiment with heavy weathering and "buried" track effects that look incredibly realistic.
Essential Tools and Materials for Professional Scratch Building
When you start building a diorama from scratch, the foundation dictates the longevity and realism of your project. Most UK modellers rely on the "Big Three" base materials: XPS foam, plywood, and MDF. XPS foam (extruded polystyrene) is the gold standard for landscape carving because it doesn't crumble like white bead foam. Plywood and MDF provide the structural integrity needed for larger displays. Many experts refer to professional-grade materials used in museum settings to ensure their work remains stable for decades without warping.
Precision requires the right edge. You should never settle for a dull craft knife. A fresh scalpel blade ensures clean cuts through card and plastic without tearing the fibres. For large-scale foam shaping, a hot wire cutter is indispensable. It glides through XPS foam with surgical accuracy, preventing the "snowstorm" of debris caused by manual sawing. Your adhesive choice is equally vital. Use PVA for wood and base layers, superglue for small metal parts, and specialized scenic cement for fixing delicate foliage without leaving a glossy residue.
Modern diorama construction has been transformed by 3D printing. While traditional scratch building relies on hand-carving, resin (SLA) printing allows for ultra-fine details like 1:72 scale door handles or intricate architectural mouldings. These digital additions complement hand-built structures to create a level of fidelity that was previously impossible for the average hobbyist.
Building Your Modelling Toolkit
A professional finish starts with a well-organized workbench. Essential hand tools include fine-point tweezers for placing tiny details and steel rulers for making perfect 90-degree cuts. Sanding sticks in various grits, from 120 to 600, help smooth out joins in plastic or wood. Always work on a self-healing cutting mat to protect your surfaces and maintain blade sharpness. You can explore a curated selection of essential diorama tools to help round out your personal workshop.
Sourcing Scenic Materials
Nature often provides the best textures for building a diorama from scratch. Sifted garden soil and crushed stones look far more realistic at scale than many synthetic alternatives. It's a good idea to bake natural materials at 100°C for 20 minutes to sterilize them before use. For vegetation, a blend of static grass, foam flocks, and dried lichen creates depth. If you're looking for budget-friendly options, used tea leaves make excellent forest floor mulch once dried, and old sponges can be ground down into custom foliage flocks. If you're looking for professional components to finish your scene, consider checking out the latest scenic arrivals at Narrow Minded Railworks.
Constructing the Foundation: Baseboards and Landscaping
Building a diorama from scratch starts with a solid substructure. A flimsy base leads to cracked plaster and derailed trains later in the process. Modellers in the UK often prefer 9mm birch plywood for the top surface, supported by a 2x1 inch timber ladder frame. This setup provides the rigidity needed to support heavy scenery without the weight of solid MDF. Bracing the frame every 30 to 40 centimetres prevents the wood from bowing under the weight of wet plaster or changes in humidity.
Once the baseboard is ready, stack sheets of XPS insulation foam to build height. Don't worry about precision at this stage; focus on the general mass of the landscape. After the glue cures, carve the topography using a hot wire cutter or a simple kitchen knife. If your scene includes structures, ensure you leave flat "hardstanding" areas. These provide a stable, level footprint for buildings, sheds, or railway platforms, ensuring they don't look like they are floating on the grass.
The "scenic shell" is the final structural layer. Use plaster-impregnated bandages to cover the foam. This hides the seams between foam blocks and creates a continuous surface. For a more organic texture, apply a layer of Sculptamold over the bandages. This material gives you about 30 minutes of working time to press in rock moulds or create wheel ruts. Finish by priming the entire scene in a dark, neutral earth tone using water-based acrylics. This prevents the bright blue or pink foam from showing through if the top layer of turf gets scuffed during a move.
Working with XPS Foam
XPS is superior to white expanded polystyrene because it doesn't crumble into messy beads. Use a snap-off blade to carve rock faces; vertical, jagged cuts create realistic cliff textures. Remember that XPS is sensitive to heat and chemicals. Never use solvent-based spray paints or contact adhesives directly on the foam, as they'll dissolve the material instantly. To smooth the transition between the flat base and vertical cliffs, use lightweight interior filler to bridge the gaps before applying your scenic shell.
Laying Track for Narrow Gauge Scenes
For those building a diorama from scratch featuring railway elements, track integration is vital. In narrow gauge modelling, tracks often appear "sunken" into the ground rather than perched on a high ballast shoulder. Check the advice on getting started in GN15 to understand how track spacing and scale influence the overall footprint. Use fine kiln-dried sand for ballast rather than traditional "OO" scale gravel to maintain the correct appearance. Secure it with a 50/50 mix of water and PVA glue, adding a drop of washing-up liquid to help the mixture soak into the grains.
Bringing the Scene to Life: Ground Cover and Foliage
Building a diorama from scratch requires a geological approach to landscaping. You aren't just decorating a surface; you're simulating natural deposition. Realism begins with the layering technique. Professionals never start with green grass. Instead, they begin with the "earth" layer using sifted garden soil or fine tile grout. This provides a gritty, matte foundation that prevents the "plastic" look often seen in beginner projects. Once the dirt is down, you can build upwards with low-lying moss, transition into mid-sized weeds, and finish with tall, structural vegetation.
Colour theory is your most powerful tool for creating depth. Nature is rarely a single shade of green. Even a well-maintained lawn contains yellows, browns, and deep forest greens. Use at least four different shades of flock and turf to avoid a flat, toy-like appearance. For water effects, epoxy resins are the industry standard. A 2:1 ratio resin typically cures in 24 hours. If you're creating a stream, pour in thin layers of no more than 3mm. This prevents "flash curing," a chemical reaction that generates heat and can warp your baseboard or melt delicate plastic details.
Mastering Ground Textures
To secure your base dirt, use the "mist and soak" method. First, spray the area with 70% isopropyl alcohol to break the surface tension. Immediately follow with a 50/50 mix of PVA glue and water. The alcohol allows the adhesive to penetrate deep into the grains rather than beading on top. For industrial scenes, you can create realistic mud by mixing gloss varnish with dark brown acrylic paint and a pinch of plaster. This creates a permanent "wet look" for tyre tracks and footpaths that won't dry matte over time.
Advanced Vegetation Techniques
While premade kits are available, building trees from 28-gauge wire armatures offers total control over the scene's composition. Twist the wires to form a trunk and branches, then coat them in a mixture of sawdust and PVA to mimic bark texture. For smaller details, apply "micro-foliage" using fine-leafed pepper or sea foam to represent creeping vines and moss. Once your greenery is glued, use an airbrush at a low 15 PSI to mist a light tan or dusty grey over the foliage. This simple weathering step blends the plants into the environment, making them look like they've actually grown in the soil rather than being stuck on top.
To find the professional-grade materials needed for building a diorama from scratch, explore the high-quality selection at Narrow Minded Railworks for your next project.
Adding Narrative with 3D Printed Details and Figures
Building a diorama from scratch requires more than just realistic grass and rocks. It needs a sense of life. 3D printed accessories provide the "human scale" that helps viewers understand the proportions of your world. Without a figure or a familiar object like a tool chest, a landscape can feel empty and abstract. Using 3D-scanned people is a modern solution that moves beyond the stiff, toy-like poses of older kits. These figures capture candid moments, such as a worker wiping sweat from their brow or two people sharing a quiet conversation. These tiny details transform a static model into a frozen moment in time.
Integrating structures into your base is the next step in creating a convincing environment. You should never just sit a building on top of your scenery. This makes it look like a toy. Instead, you need to "plant" the structure. This involves carving a shallow footprint into your base material so the foundation sits slightly below the surface. You then bridge the gap with fine soil, static grass, or "concrete" filler. This ensures the building looks like it has weight and history within the landscape.
Selecting and Preparing 3D Printed Kits
Choosing high-detail kits is vital for a realistic finish. Suppliers like Narrow Minded Railworks offer resin prints that capture textures often missed by traditional injection moulding. Before you start, you must remove the supports carefully. Use a pair of fine nippers to avoid pitting the surface. If you see small bumps, sand them down with 400-grit paper. For the best results, follow this guide on painting 3d printed models to ensure your primer adheres correctly. Resin is non-porous. You'll need a high-quality primer to prevent paint from flaking off later.
The Final "Dusting": Unifying the Scene
Once your structures are integrated and your 3D printed details and figures are in place, the final step is to unify the entire scene. This "dusting" phase involves applying subtle weathering and blending techniques to make sure every element looks like it belongs. Use fine pigments, airbrushed dust, or a light coat of matte varnish to eliminate any artificial shine and create a cohesive, weathered appearance across all surfaces. This critical step ensures that your diorama, built from scratch with meticulous detail, tells a believable story and feels like a truly lived-in world.
Take Your Miniature World to the Next Level
Mastering the art of building a diorama from scratch transforms a simple hobby into a detailed study of history and atmosphere. You've seen how a strong narrative drives the placement of every texture and why a sturdy foundation prevents warping over time. By layering ground cover and using professional techniques for foliage, you create a scene that feels alive. Success lies in the fine details that draw the viewer into your world.
Narrow Minded Railworks supports your creative journey with precision-engineered components. Our range includes 3D-scanned figures for ultimate realism and bespoke narrow gauge locomotive and wagon kits that meet the exacting standards of the UK modelling community. With worldwide shipping available, professional-grade details are accessible to every workshop. These kits provide the authentic finishing touches that set your work apart from the rest.
Explore our range of high-detail 3D printed kits and accessories to bring your diorama to life.
Your next project is a blank canvas waiting for your unique touch. Don't wait to start your next build. Your masterpiece begins with the right tools and a bit of imagination.
Frequently Asked Questions
What is the best material for a diorama base?
High-density extruded polystyrene (XPS) foam is the superior choice for a diorama base. It's lightweight, holds its shape, and allows you to carve terrain features easily. You can find 25mm sheets at UK retailers like Wickes or B&Q. When building a diorama from scratch, avoid corrugated cardboard as a base because it warps when you apply wet plaster or PVA glue.
How do I make a diorama look realistic on a budget?
You can achieve realism on a budget by sourcing 90% of your textures from nature or your kitchen. Dried tea leaves or coffee grounds create realistic forest floors, while sieved garden soil provides authentic dirt paths. Use discarded cardboard for brickwork and sprue offcuts for rubble. These methods keep your costs under £10 while adding unique character that store-bought kits often lack.
Can I use real plants in my diorama?
You shouldn't use untreated real plants because they'll decay or turn brown within 10 to 14 days. If you want to use natural flora, you must preserve it first using a 1:3 mixture of glycerine and water. Most professionals prefer using sea foam or static grass. These materials stay vibrant for years and won't introduce pests or mould into your display case.
What is the best glue for scratch-building dioramas?
PVA glue, specifically a high-quality wood glue like Evo-Stik, is the most versatile adhesive for this hobby. It creates a strong bond on porous surfaces like wood, foam, and paper. For sticking metal or resin parts, use a cyanoacrylate super glue. Always avoid solvent-based glues on XPS foam because they'll melt the plastic, ruining hours of careful work.
How long does it typically take to build a diorama from scratch?
A medium-sized project measuring 30cm by 30cm usually takes between 25 and 50 hours of active work. When building a diorama from scratch, you must also account for drying times. Plaster layers and oil-based washes often require 24 hours to cure fully before you can move to the next step. A complex historical scene might take three months of dedicated weekend sessions to finish.
How do I protect my finished diorama from dust?
A custom-built acrylic or glass case is the most effective way to prevent dust build-up. You can order 3mm acrylic sheets cut to size from UK suppliers to build your own enclosure. If a case isn't an option, use a soft makeup brush or a can of compressed air every 30 days. This prevents dust from settling into the fine textures of your scenery.
What scale is best for a beginner diorama project?
The 1:35 scale is the best starting point for a first-time project. This scale is large enough to show significant detail without requiring microscopic precision. It's the most popular scale in the UK for military and civilian vehicles, so you'll find a massive range of accessories and figures. Smaller scales like 1:72 are often too fiddly for those still learning basic construction techniques.
Do I need an airbrush to build a professional-looking diorama?
You don't need an airbrush to create a professional finish on your model. While airbrushes help with smooth gradients, 80% of the weathering process relies on traditional hand-brushing techniques. Using dry-brushing and oil washes can produce incredible depth and realism. Invest in three high-quality synthetic brushes from a brand like Winsor & Newton to handle most of your painting requirements.