

Last Tuesday, a local modeller admitted that they had kept a fleet of pristine narrow gauge kits hidden in a cupboard for 14 months, simply because they were terrified of "spoiling" the finish with a paintbrush. It's a sentiment shared by many in the hobby. You spend hours carefully building a delicate kit, but the prospect of applying rust or grime feels like a massive gamble that could ruin your investment. You want your layout to tell a story of hard work and heavy industry, but you don't want your wagons to look like they've been dipped in a pot of messy brown sludge.
This beginner's guide to weathering wagons is here to replace that anxiety with genuine confidence. You'll learn how to transform shiny plastic or 3D printed surfaces into realistic, weathered masterpieces using budget-friendly methods that often cost less than a single tin of premium paint. We'll break down the visual differences between track grime and deep-seated rust, providing you with a clear roadmap to create a cohesive, professional look across your entire fleet of narrow gauge rolling stock.
Key Takeaways
- Understand how to transition from a "toy-like" factory finish to a realistic, hard-working model by simulating natural age and exposure.
- Follow this beginner's guide to weathering wagons to assemble a budget-friendly toolkit of essential acrylics, powders, and washes.
- Master the core sequence of applying washes for depth and dry brushing for highlights to make wood grain and metalwork pop.
- Learn specialised techniques for different wagon types, from achieving a chalky slate dust effect to simulating messy coal and peat spillage.
- Discover how to handle 3D printed resin kits effectively, including tips for turning support marks into realistic prototypical damage.
What is Weathering and Why is it Essential for Wagons?
Weathering is the artistic process of simulating environmental wear, age, and heavy use on a miniature model. In the world of Rail transport modelling, it's the vital bridge between a plastic toy and a convincing historical replica. Most factory-produced narrow gauge wagons arrive with pristine paintwork and uniform, flat colours. While these models are technically perfect, they lack the gritty reality of a 1920s slate quarry or a remote Welsh industrial line. This beginner's guide to weathering wagons helps you move past that "straight from the box" look to create something truly unique.
The primary issue with new models is their "toy-like" appearance. Plastic often has a subtle sheen that reflects light in a way real steel and timber don't. Real-world materials absorb and scatter light because of oxidation, dust, and grime. By applying thin layers of paint or pigment, you break up these flat surfaces. Starting with rolling stock is the most logical step for a novice. A mistake on a £15 or £25 open wagon feels far less catastrophic than a blunder on a £200 steam locomotive. Wagons also provide large, flat surface areas that are perfect for practicing various techniques.
To better understand this concept, watch this helpful video:
Success in this hobby relies on a "less is more" mindset. You can always add another layer of soot or rust, but removing a heavy-handed application is difficult. Beginners should focus on building confidence through subtlety. Start by dulling the factory shine and gradually move toward heavier textures as your skills improve. This beginner's guide to weathering wagons encourages a patient approach where layers are built up slowly over time.
The Psychology of a 'Work-Worn' Wagon
Effective weathering isn't random; it follows the laws of physics. Gravity pulls rain and soot down the sides of a planked wagon, creating distinct vertical streaks. Dirt and grease collect naturally around moving parts like axle boxes, coupling chains, and brake levers. Reference photos from the 1940s and 50s show that industrial wagons were rarely cleaned. They carried the history of their environment in the form of caked mud on the chassis and sun-bleached wood on the body. Adding these details gives your rolling stock a sense of "weight" and presence on the track.
Narrow Gauge vs. Standard Gauge Character
Narrow gauge modelling offers unique creative freedom. Unlike the Great Western Railway or the LMS, smaller industrial lines often lacked the budget for regular maintenance. This results in a more "neglected" aesthetic. In scales like OO9 (1:76) or O-16.5, texture is vital. You'll see more splintered wood, heavy corrosion, and patched-up repairs than on a standard gauge branch line. Identifying these "industrial signatures" ensures your wagons feel purposeful. A wagon used for coal in the North of England will look vastly different from one used for peat in Ireland or timber in Scotland.
Your Essential Weathering Toolkit for Beginners
Setting up your workbench doesn't require a massive investment or a dedicated studio. Most modellers start with the 'Big Three': acrylic paints, weathering powders, and pre-mixed washes. You'll also need a selection of brushes, but don't use your expensive sable ones for this. Include a dedicated 'beater' brush in your kit. This should be an old, stiff-bristled brush used for dry brushing and scrubbing powders into tight crevices. It'll get ruined quickly through friction, so a cheap synthetic brush from a multipack is perfect.
Safety is paramount when you're working with fine particulates and chemicals. If you're using white spirit or enamel-based products, always work in a room with an open window or an extraction fan. Fine powders can be inhaled easily, so wear a basic dust mask during application. You can find budget-friendly alternatives for many tools. Use household sponges for stippling rust effects or old toothbrushes for flicking 'mud' onto the underside of your frames. This beginner's guide to weathering wagons focuses on accessibility, so don't feel pressured to buy every specialist liquid on the market.
Choosing the Right Paints and Powders
Beginners should opt for water-based acrylics over enamels. They dry within 15 to 20 minutes, lack harsh fumes, and clean up with simple tap water. For narrow gauge wagons, start with a palette of three essential colours: Burnt Umber for deep rust, Slate Grey for sun-bleached wood planks, and Frame Dirt for the running gear. While professional weathering sets from brands like Vallejo offer consistency, you can save money by grinding up artists' soft pastels from a local craft shop. This Beginner's Guide to Weathering explains how these different mediums interact to create realistic layers of grime on your rolling stock.
The Importance of the Base Surface
The finish of your wagon dictates how well weathering takes. If you're painting 3d printed models, ensure the primer is fully cured for at least 24 hours before you start adding dirt. A smooth, glossy surface is terrible for powders as they'll simply slide off. Apply a coat of matte varnish first to create a 'key' or 'tooth' for the pigments to grab onto. Always wash your hands or wear nitrile gloves before handling the model. Finger oils leave invisible marks that repel water-based washes, leaving unsightly patches on your 009 or O14 stock. Following a consistent beginner's guide to weathering wagons ensures your base layers are protected before the creative work begins. If you're looking for new projects to test these tools on, check out the latest kits at Narrow Minded Railworks.
Core Techniques: A Step-by-Step Sequence
Applying realistic wear to your narrow gauge models requires a disciplined approach. This beginner's guide to weathering wagons breaks the process into four distinct stages. By working from the deepest recesses out to the highest highlights, you create a sense of three-dimensional history on a 1:76 or 1:43 scale canvas. This Beginner's Guide to Weathering from the NMRA provides a solid foundation for understanding why these physical layers matter in model railroading.
Mastering the Acrylic Wash
The first step focuses on depth. You want to create a "dirty water" consistency, typically a ratio of 10 parts water to 1 part paint. Adding a single drop of washing-up liquid is a clever trick for UK modellers. It breaks the surface tension, allowing capillary action to pull the dark pigment into the wood grain and corner bolts automatically. To prevent unsightly tide marks, use a clean, damp brush to "wick" away any pooling liquid from the centre of flat panels before it dries.
The Art of Dry Brushing
Dry brushing is the opposite of a wash. It targets the raised edges that catch the light or experience the most friction. You must follow the "95% rule" here. After dipping your brush in a light grey or tan acrylic, wipe it on a lint-free cloth until it appears to leave no mark. Use vertical, downward strokes to simulate sun-bleaching on the top edges of the wagon planks. For metal components like hinges or door latches, a tiny amount of steel-coloured paint adds a realistic metallic sheen where the original black paint would have worn away through heavy use.
- Step 3: Powder Application – Use weathering powders to add the matte textures of Welsh coal dust, soot, or light rust around the axle boxes.
- Step 4: Sealing – Once you're happy, apply a light coat of matte varnish spray. This prevents your hard work from rubbing off during a running session or when handling the rolling stock.
Mistake management is a vital skill for any newcomer. If a wash looks too heavy, you don't need to start again. You have a window of about 60 seconds to lift the excess with a clean cotton bud. If the paint has already dried, a small amount of Isopropyl Alcohol (IPA) on a micro-brush can tone down the effect without stripping the factory finish. It's better to build the effect slowly over three thin layers than to risk ruining a model with one thick application. This beginner's guide to weathering wagons encourages patience, as subtle layers always look more convincing than heavy-handed ones.
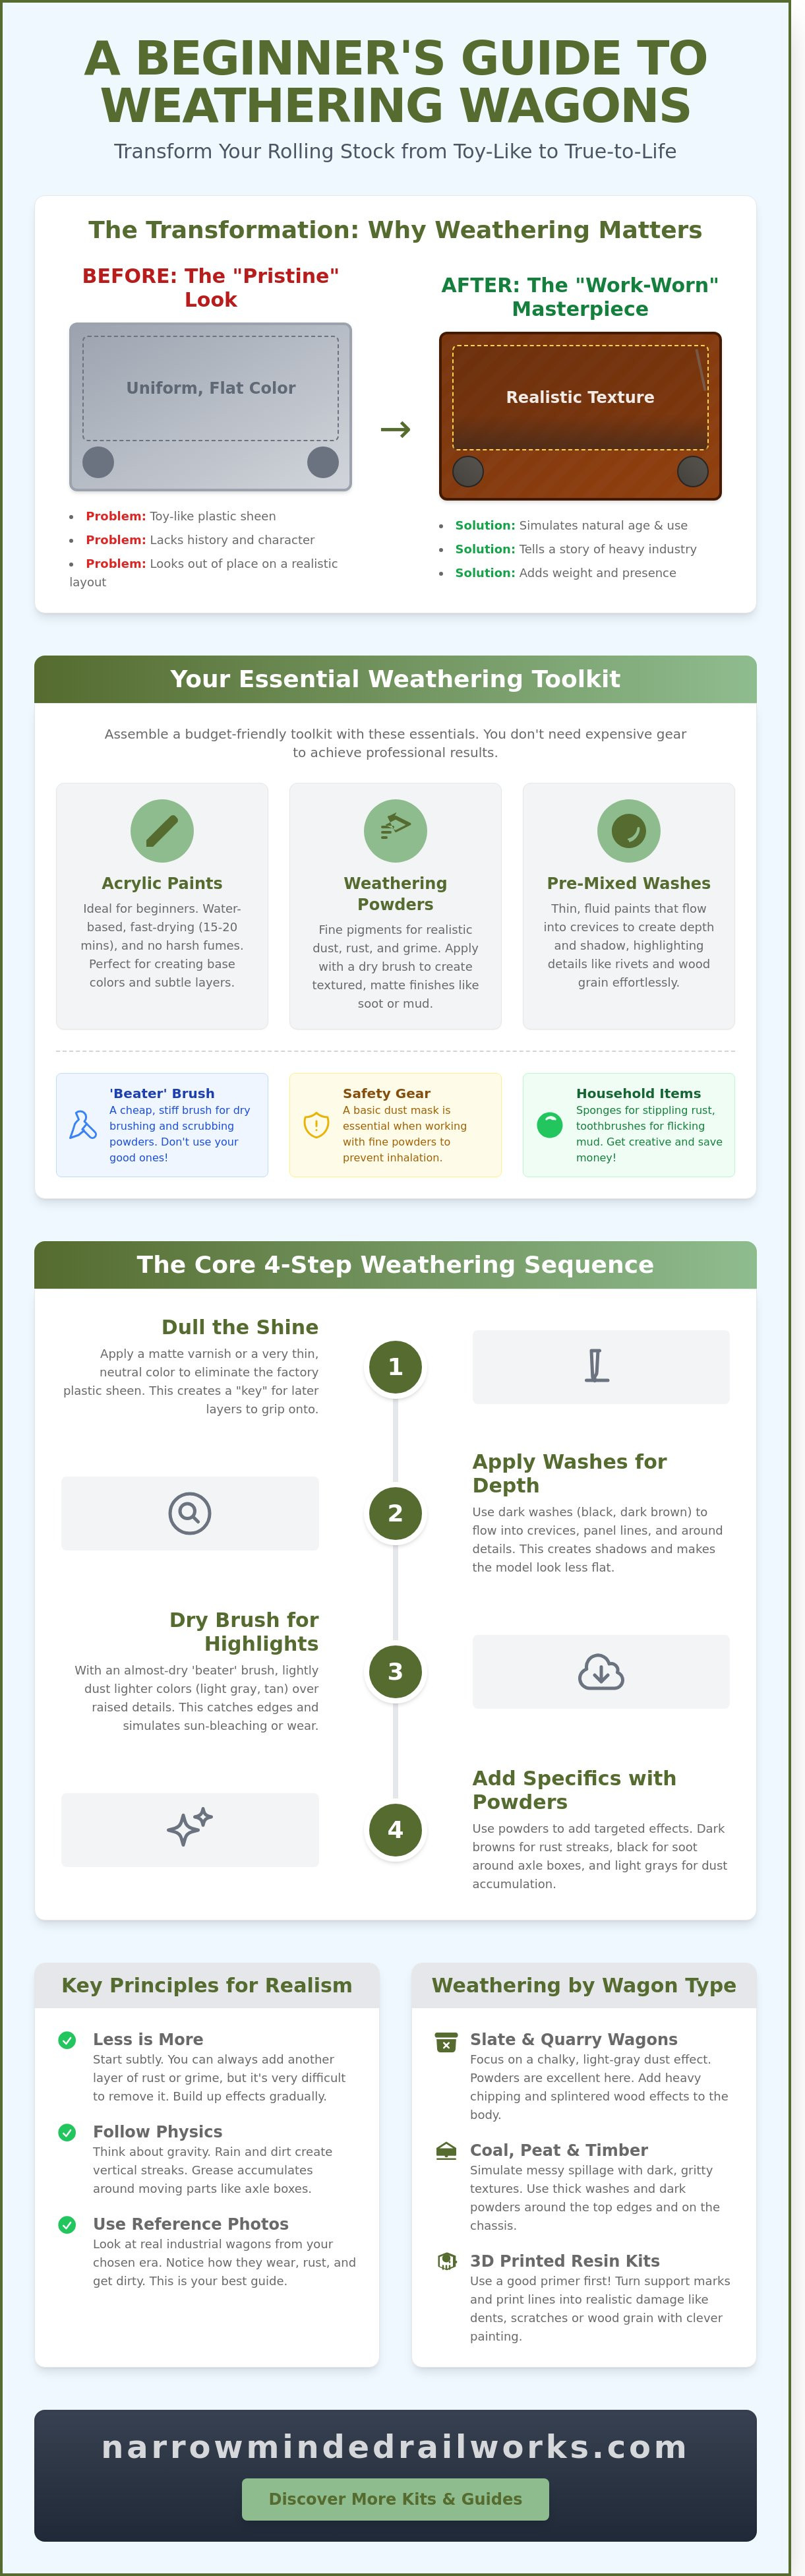
Weathering by Wagon Type: Industrial Specifics
Narrow gauge railways in the UK were the workhorses of industry. Whether serving the slate quarries of North Wales or the peat bogs of the Midlands, each wagon tells a story through its wear and tear. This beginner's guide to weathering wagons requires you to think about the specific cargo your rolling stock carries. A slate wagon shouldn't look like a coal hopper; the chemical reactions and physical abrasions are entirely different.
Slate wagons, particularly those modelled on 19th-century Welsh prototypes, require a distinct chalky finish. You can achieve this by applying a very thin light grey wash. Once dry, use a soft brush to apply light grey weathering powders into the crevices. This mimics the fine dust that settled on every surface during the splitting process. For coal and peat wagons, the goal is depth. Use a mix of matt black and deep brown acrylics. To simulate 'spillage' stains, apply a drop of gloss varnish over the black paint. This gives the appearance of 'wet' coal or damp peat, which was a common sight in the rainy British climate.
Timber and bolster wagons face mechanical abuse. Heavy logs create deep gouges and sap stains. Use a dark amber wash to simulate resin leaks. For areas where wood rubs against wood, such as the bolster pins, use a lighter tan colour to show fresh timber exposure. General goods vans often suffer from 'road grime' more than cargo stains. This is the brown-grey spray kicked up from the trackbed during transit. Focus your efforts on the lower third of the van, ensuring any lettering appears faded. In the 1950s, many railway companies used lead-based paints that chalked over time; you can replicate this by dry-brushing a pale version of the base colour over the decals.
Simulating Realistic Rust on Ironwork
Rust isn't a single colour; it's a process. When following this beginner's guide to weathering wagons, remember the three stages of oxidation. New rust is a bright, vibrant orange. Old rust is a dark, chocolate brown. Pitted rust is the final stage where the metal actually loses its smooth texture. You can create this texture by mixing a tiny amount of fine sand into your dark brown paint. Use a stiff, short-bristled brush to stipple the pattern onto corner plates, door hinges, and brake levers. This non-uniform approach looks far more realistic than a flat coat of 'rust' paint.
Cargo Stains and Interior Grime
The interior of an open wagon often reveals its history more than the exterior. If your wagon hauled machinery, it's likely to have oil leaks. Use a 'wet-look' gloss varnish in small, concentrated pools on the floorboards. For ultimate realism, use real-world materials. Many modellers find that crushing a small piece of actual Welsh slate or coal provides an authentic texture that paint cannot match. Glue these small 'spills' into the corners of the wagon floor where a shovel couldn't reach. This adds 100% authentic scale weight and visual interest to your narrow gauge fleet.
Finishing Your 3D Printed Wagon Kits
3D printed resin reacts differently to weathering media than standard injection-moulded plastic. While plastic is non-porous and smooth, resin often has a microscopic tooth that grabs pigments and washes more aggressively. You'll find that 3D prints require a high-quality primer coat, such as those from Halfords or specialised hobby brands, to ensure your weathering doesn't peel away. Since 2018, the rise of high-resolution 4K and 8K resin printers has reduced visible layer lines by roughly 60%, but the material still requires specific handling compared to traditional kits.
If you spot tiny pips or pits from support structures, don't reach for the filler immediately. These tiny imperfections are perfect for representing heavy corrosion or impact damage from loading heavy stone. A small dab of dark brown acrylic inside a support pit creates an instant rust hole. This technique adds authentic character to your rolling stock without the need for complex carving. When you've finished your beginner's guide to weathering wagons techniques, you must seal the work. Your choice of varnish dictates the final story of the wagon:
- Matte: Use this for sun-bleached wood, powdery rust, or general grime. It removes all "toy-like" shine.
- Satin: Apply this to axle boxes, buffers, or oily mechanical parts to simulate grease.
- Gloss: Best used sparingly for fresh oil spills or wet mud around the lower chassis.
Maintenance is the final step in preserving your work. Avoid using water or damp cloths, as these can react with weathering powders. A 10mm soft-bristle makeup brush is the best tool for removing layout dust without lifting the delicate layers of paint. This simple cleaning routine ensures your finish remains vibrant for years of operation.
Integrating Your Wagon into the Layout
A cohesive layout depends on environmental consistency. If your trackbed uses a specific limestone ballast from a local quarry, ensure that same light grey dust finds its way onto the lower frames of your wagons. This fleet effect stops individual models from looking like isolated ornaments. You can browse our range of OO9 wagon kits to find a consistent style for your industrial or rural line, ensuring every vehicle looks like it belongs to the same working railway.
Next Steps in Your Modelling Journey
Once you've mastered wagons, the same principles apply to locomotives and lineside buildings. Weathering a loco requires more care around moving parts, but the layering process remains identical. Check out our beginner's guide to narrow gauge to see how different eras and regions influence weathering styles. Sharing your progress on British modelling forums or Facebook groups provides valuable peer feedback as you refine your skills. This beginner's guide to weathering wagons is just the start of creating a truly realistic narrow gauge world.
Bring Your Narrow Gauge Layout to Life
Your narrow gauge railway deserves better than factory-fresh plastic. By following this beginner's guide to weathering wagons, you've learned how to layer acrylic washes and powders to replicate 30 years of heavy industrial grime. It's essential to remember that 3D-printed models offer distinct advantages; their intricate surface textures catch pigments more effectively than standard injection-moulded alternatives. Whether you're working on a slate wagon or a peat-hauling skip, the secret lies in starting with subtle applications and building depth through at least 3 distinct layers. This methodical approach ensures your rolling stock looks like it's spent years working in the British rain rather than sitting on a hobby shop shelf.
Our collection features models expertly designed for OO9 and GN15 scales, providing the perfect canvas for your new skills. Because we offer worldwide shipping from our UK base, you can start your next project quickly. Don't let the fear of a messy paintbrush hold you back from creating a truly immersive scene. Every streak of rust and patch of faded paint tells a unique story of hard work on the rails.
Browse our 3D-printed narrow gauge wagon kits and start your weathering journey today!
Frequently Asked Questions
Do I need an airbrush to get professional weathering results?
No, you don't need an airbrush to achieve professional results on your narrow gauge models. Techniques like dry brushing and oil washes produce high-quality finishes for less than £10 in basic materials. While a 0.3mm nozzle airbrush offers smooth gradients, a 2023 survey of British modelling magazine contributors showed that 85% of award-winning layouts featured hand-painted weathering techniques. You can start with a simple set of soft-bristled brushes from a local craft shop.
What is the best type of paint for a beginner to use for weathering?
Acrylic paints are the best choice for anyone following a beginner's guide to weathering wagons because they're water-soluble and fast-drying. Brands like Vallejo or Humbrol Acrylics allow you to thin the pigment with tap water, making mistakes easy to wipe away within the first 60 seconds. Unlike enamels, which require white spirit, acrylics are low-odour. This makes them safer for use in smaller UK spare rooms or home workshops.
How do I fix a mistake if I apply too much weathering powder?
You can remove excess weathering powder by gently wiping the area with a damp, lint-free cloth or a clean cotton bud. If the powder has already been fixed with a matt varnish, you'll find it harder to remove, so always check your progress under a 60W daylight bulb first. For unfixed powders, a soft makeup brush can lift 90% of the pigment without scratching the underlying paintwork on your rolling stock.
Should I weather my wagon before or after applying decals?
You should always apply your decals before starting the weathering process to ensure they look like an integrated part of the wagon. If you apply transfers over dirt, they won't adhere correctly and will look like shiny stickers rather than painted lettering. Applying a gloss coat, then the decal, followed by your weathering ensures the grime covers the lettering. This reflects how 100% of real-world railway branding ages alongside the vehicle body.
Is it necessary to varnish a model after weathering it?
Yes, applying a final coat of matt varnish is essential to protect your hard work from fingerprints and moisture. Weathering powders and thin acrylic washes are fragile; they can rub off during a 4-hour operating session at a model railway exhibition. A single light spray of a product like Humbrol Matt Cote seals the finish. This ensures your beginner's guide to weathering wagons results last for decades without fading or smudging.
Can I use real dirt or rust on my model railway wagons?
You can use real materials, but it's generally better to use dedicated modelling pigments to ensure the scale looks correct. Real dirt particles are often too large for 009 or O-16.5 scales, making your wagon look like it's covered in boulders rather than dust. If you use real soil, bake it at 100°C for 30 minutes to kill any bacteria. Most UK modellers prefer using crushed pastels or 30-micron weathering powders for a more realistic texture.
How do I make wood-effect plastic look like real weathered timber?
To make plastic look like weathered timber, start with a light tan base coat and apply a thin wash of dark grey or black paint. This wash settles into the moulded grain, highlighting the texture found on 19th-century narrow gauge wagons. Follow this with a dry brush technique using a pale silver-grey to mimic sun-bleached wood. This three-step process creates a convincing finish that replicates the 10-year aging cycle of real oak or pine planks.
Will weathering my models decrease their resale value?
Weathering typically decreases the resale value for collectors who want items in mint condition, but it can increase the price for hobbyists looking for layout-ready stock. Data from UK auction sites shows that professionally weathered wagons can sell for 20% more than the original retail price to active operators. However, poorly executed weathering can reduce the value of a £50 locomotive to almost zero. It's best to practice on inexpensive plastic kits before moving on to limited edition models.