

Did you know that building a locomotive from a kit can save you over 60% compared to purchasing ready-to-run models? Despite this significant saving, many hobbyists hesitate because they're unsure about the technical differences between OO9 and N gauge or fear choosing an incompatible motor. Selecting your first kit-009 project shouldn't feel like a gamble. It is actually a straightforward process once you understand the relationship between a high-detail 3D printed body and a reliable donor chassis.
You likely want to expand your narrow gauge roster with unique prototypes that aren't available in shops. While the fear of ruining a kit with poor painting or choosing the wrong parts is common, we're here to provide a proactive solution. This guide promises to help you master the essentials of OO9 modelling by simplifying the selection and assembly process. We will provide a clear list of necessary components, explain how to fit a body to the new Kato 11-109 chassis, and build your confidence in 3D printed kits. By the end of this article, you'll have a structured plan to create a professional-grade locomotive for your layout.
Key Takeaways
- Understand the fundamental scale of OO9, which utilizes 4mm scale bodies on 9mm N gauge track to create characterful narrow gauge models.
- Identify the essential "donor" chassis required for a smooth-running locomotive, focusing on the industry-standard Kato 11-109 motor.
- Compare the benefits of modern 3D printed resin against traditional materials to choose the most user-friendly kit-009 for your skill level.
- Discover the necessary workspace preparations and cleaning techniques required to ensure a professional finish on your first 3D printed build.
- Gain the confidence to match a high-detail locomotive body with a reliable commercial chassis for a successful marriage of form and function.
What is OO9 and Why Start with a Kit?
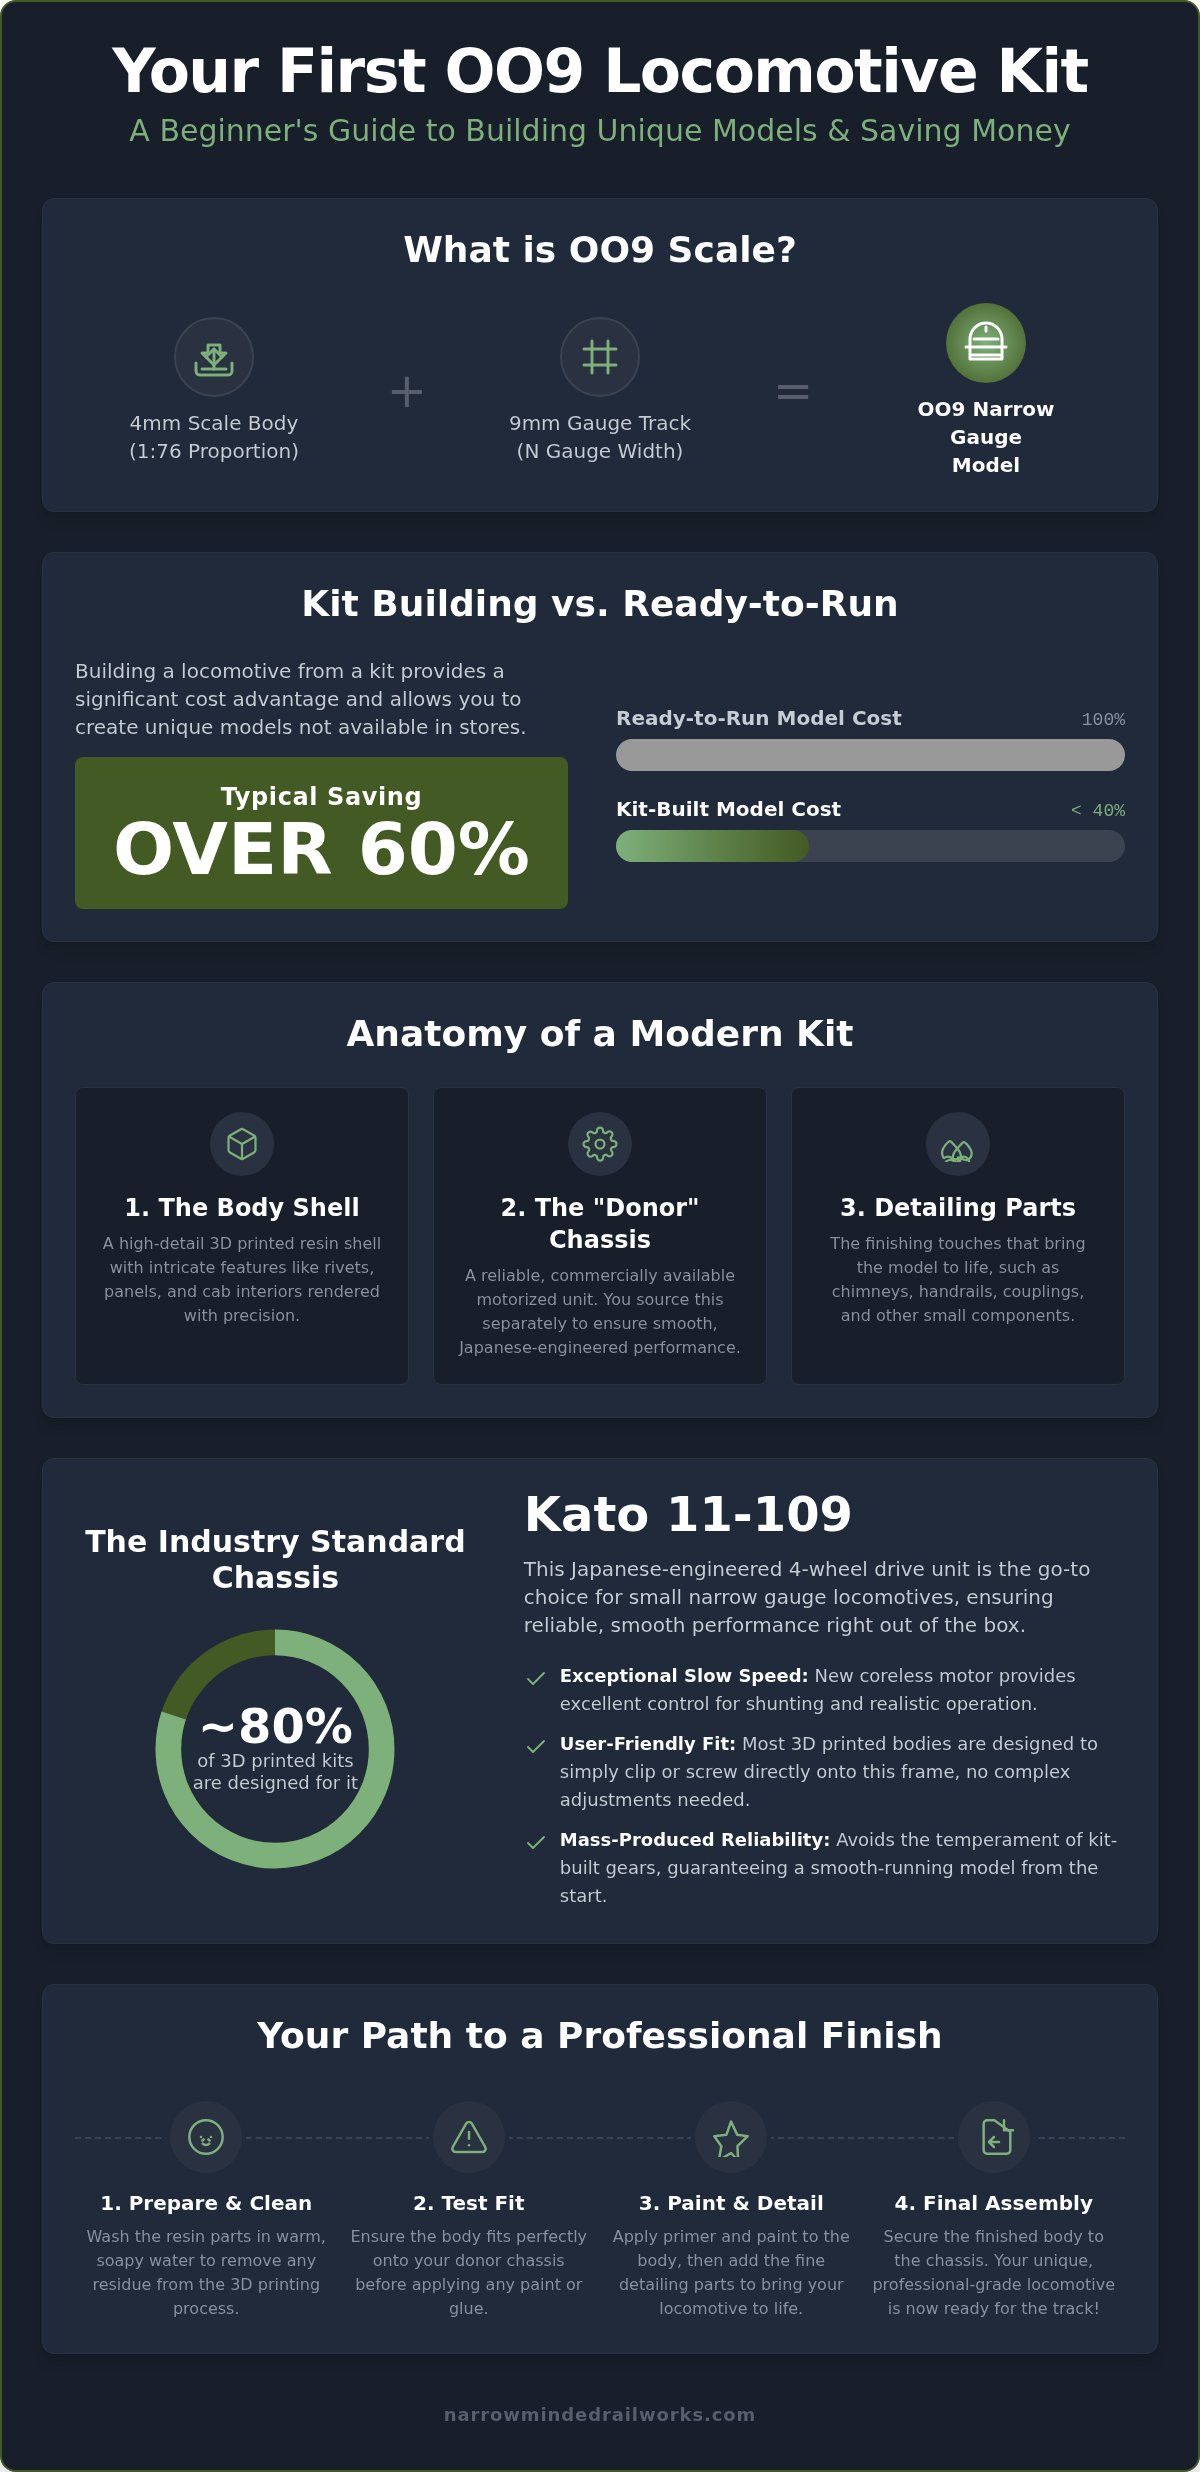
Narrow gauge modelling offers a level of character and charm that standard gauge often lacks. If you're wondering What is OO9?, it's a scale that uses 4mm to the foot (1:76) proportions running on 9mm track. This combination represents the narrow gauge railways found in slate quarries, industrial sites, and rural corners of the UK. Because these prototypes are smaller than their standard counterparts, you can build a detailed, realistic scene on a bookshelf or a small diorama. It's a space-saving hobby that doesn't compromise on detail.
While ready-to-run models exist, they're often expensive and limited to a few specific prototypes. This is why the kit-009 movement is the true heart of the hobby. Building from a kit allows you to create unique locomotives that aren't available in shops. It also provides a significant cost advantage. Research shows that building from a kit can save you over 60% compared to purchasing a factory-finished model. By taking a proactive approach to assembly, you gain a deeper understanding of how your rolling stock functions while creating a one-of-a-kind fleet.
OO9 vs N Gauge: The Track Connection
Confusion often arises because OO9 and N gauge share the same 9mm track width. While the metal rails are the same distance apart, the visual appearance is very different. N gauge track features small, closely spaced sleepers designed for 2mm scale models. In contrast, OO9 track uses larger, irregularly spaced sleepers to reflect the rugged nature of narrow gauge railways. A proactive solution for beginners is to use standard N gauge track for testing your kit-009 builds. It's affordable and widely available, though you'll likely want to switch to dedicated narrow gauge track for your final layout to achieve the correct aesthetic.
The Anatomy of an OO9 Locomotive Kit
Understanding the components of a kit is the first step toward a successful build. Modern kits have moved away from the complex engineering of the past, focusing instead on a "perfect marriage" of parts. A standard kit typically includes:
- The Body: This is the high-detail resin shell that defines the locomotive's look. 3D printing allows for intricate features like rivets, hinges, and cab interiors to be rendered with precision.
- The Chassis: This is the motorized unit. We don't sell these ourselves, but our kits are designed to fit reliable commercial units like the Kato 11-109.
- Detailing Parts: These are the finishing touches, such as chimneys, handrails, and couplings, that bring the model to life.
By splitting the model into a detailed body and a reliable pre-made motor, you eliminate the hardest part of locomotive building. You can focus on the creative aspects of assembly and painting without worrying about complex gear ratios or motor mounting.
The Secret to a Working Model: Choosing the Right Chassis
A beautifully detailed body is only half of the equation; a locomotive is only as good as its motor. Most manufacturers of 3D printed bodies don't supply the internal mechanics. While this might seem like a hurdle, it's actually a proactive strategy. By sourcing a separate "donor" chassis, you ensure your model benefits from mass-produced Japanese engineering rather than temperamental kit-built gears. This approach guarantees smooth slow-speed running right from the start.
Reliability is the primary reason why Kato chassis have become the gold standard for the kit-009 community. Approximately 80% of the 3D-printed bodies currently on the market are designed to fit these specific units. When you choose a body kit, you must match the wheelbase of the prototype to the donor chassis to ensure the wheels sit correctly under the splashers or cab. Because we specialize in bodies rather than motors, you'll need to source your chassis from specialist retailers like Rails of Sheffield or other N gauge suppliers. You can explore our range of OO9 locomotive bodies to find a prototype that fits your chosen motor.
The Kato 11-109: The Industry Workhorse
The Kato 11-109 has recently replaced the older 11-103 as the primary choice for small narrow gauge locomotives. It features a new coreless motor that provides exceptionally smooth performance at low speeds. This unit is a 4-wheel drive system, making it ideal for the small steam and diesel prototypes common in OO9. Most 3D printed bodies are designed to simply clip or screw directly onto this frame. It's a user-friendly solution that removes the need for complex soldering or mechanical adjustment.
Alternative Chassis Options
While the 11-109 is the current standard, you may encounter kits designed for the discontinued 11-103 or the 11-105. It's vital to check the kit specifications before purchasing. For larger or more powerful prototypes, some modellers utilize Graham Farish N gauge chassis, such as those from the Class 08 shunter. These conversions require more skill but offer a different look for specific industrial designs. If you're just starting, following a Your First OO9 Loco Kit: A Beginner’s Guide to Choosing and Buying compatible design is the safest path. To begin your journey, check out the options at Narrow Minded Railworks for high-detail 3D printed bodies.
3D Printed vs. Traditional Kits: What’s Best for Beginners?
Choosing the right material for your first project is a pivotal decision that impacts both the building experience and the final look of your layout. Traditional kits often utilize whitemetal or etched brass. While these materials have served the hobby for decades, they present a steep learning curve for novices. Etched brass requires precise folding and soldering; whitemetal often needs complex cleaning and epoxy resins or low-melt solder to assemble. In contrast, a modern kit-009 project typically features a 3D printed resin body, which offers a more accessible entry point for those without specialized metalworking tools.
One primary difference lies in the level of detail. 3D printing technology captures intricate textures, such as fine rivets, door hinges, and cab interiors, with a crispness that traditional casting often struggles to match. However, we must acknowledge a constraint: resin is significantly lighter than whitemetal. While a whitemetal locomotive has the "heft" to pull long trains, a resin body requires a proactive solution to ensure reliable traction. Most modellers solve this by adding lead ballast or tungsten putty into the internal voids of the 3D print. This simple step gives the model the weight it needs to stay on the rails and pull a prototypical load without the frustration of wheel slip.
The Advantages of 3D Printed Resin
For a beginner, the biggest draw of 3D printed resin is the lack of heavy engineering. You don't need a soldering iron or a blowtorch to assemble these models. Modern high-resolution prints arrive with smooth surface finishes that require minimal sanding. Because the body is often printed as a single piece or a few large components, you can focus your energy on the creative aspects of the build. Once you have cleaned the parts, you can move straight to the aesthetic stage. We recommend following our guide on Painting 3D Printed Models: A Beginner’s Guide to ensure your first locomotive looks as good as it runs.
When to Consider Whitemetal or Plastic
There are still scenarios where traditional materials have their place. Whitemetal is excellent for small, open-cab locomotives where there isn't much room for hidden ballast. You might also find plastic kits for rolling stock and wagons, which are lightweight and easy to glue with standard polystyrene cement. A common proactive approach among experienced modellers is to mix materials. You might choose a 3D printed body for its superior detail but fit whitemetal chimneys or brass handrails to add strength and variety. This hybrid method allows you to enjoy the best of both worlds as your confidence in the kit-009 world grows.
Building Your First Kit: From Box to Track
Transitioning from a box of parts to a working model requires a structured workspace and a few essential tools. While narrow gauge modelling is intricate, you don't need an industrial workshop to succeed. A proactive builder should gather a basic "shopping list" before starting: a set of needle files, fine-grit sandpaper (400 to 1000 grit), tweezers, and high-quality cyanoacrylate (superglue). You will also need your 3D printed kit-009 body and your chosen donor chassis, such as the Kato 11-109. Organizing these components early prevents frustration during the assembly process.
Before any glue touches the model, you must prepare the resin surfaces. 3D printed parts can sometimes retain a slight oily residue from the printing process, which prevents paint from adhering correctly. A proactive solution is to wash the body in warm, soapy water and allow it to air dry completely. This simple step ensures a professional finish and prevents the paint from peeling later. Once dry, you can begin the creative journey of transforming a grey shell into a characterful locomotive. To find your next project, browse our collection of OO9 locomotive kits today.
Preparation and Priming
While 3D printing offers incredible detail, the process often leaves tiny marks where supports were attached. A proactive approach involves using 600-grit sandpaper to gently smooth these areas. You may also notice faint "print lines" on curved surfaces. While these are often invisible to the naked eye, they can become prominent once painted. A high-quality automotive or plastic-specific primer is non-negotiable here. It acts as a filler for minor imperfections and provides a "key" for your topcoat. If lines persist after the first coat, a light sanding followed by a second thin layer of primer usually solves the issue.
The Final Fitment
Securing the body to the chassis is the most rewarding part of the build. Most of our designs are engineered for a friction fit or utilize the original Kato clipping system. However, resin bodies are inherently light. While the Kato 11-109 provides smooth movement, its low weight can limit pulling power on gradients. A proactive builder will secure lead shot or tungsten putty inside the water tanks, coal bunkers, or smokebox of the resin body. This added ballast significantly improves track adhesion and electrical pickup.
Finally, you must consider your coupler options. While many beginners start with the standard Kato hook couplers, you may prefer the prototypical look of Greenwich or Bemo couplings. Ensure these are mounted at a consistent height across your fleet to prevent accidental uncoupling during operation. With the weights secured and the couplers fitted, your locomotive is ready for its first test run on the layout.
Finding Your Perfect OO9 Locomotive Body
Selecting your first kit-009 project is about more than just aesthetics; it's about defining the operational story of your layout. While the sheer variety of narrow gauge prototypes can be overwhelming, the proactive solution is to select a locomotive that matches the specific theme of your scene. Whether you are building a Welsh slate quarry, a rural agricultural line, or a busy passenger branch, your locomotive should reflect the work it was designed to do. At Narrow Minded Railworks, we focus on providing high-detail 3D printed bodies that allow you to bypass the generic look of mass-produced models and build a fleet with genuine character.
Building a cohesive collection requires a plan. A common constraint for beginners is the fear of choosing a model that is too complex to finish. A proactive strategy is to start with a prototype that has flat surfaces and simple lines, making the painting and weathering process much more manageable. As you gain confidence, you can move toward more intricate designs with exposed pipework and delicate cab fittings. Our goal is to support your journey from a novice builder to a confident modeller by offering kits that are specifically engineered for reliable commercial chassis.
Popular Prototypes for Beginners
If you are looking for an iconic starting point, the Quarry Hunslet is a staple of the OO9 world. These small steam engines are synonymous with North Wales and fit perfectly onto the Kato 11-109 chassis. For those who prefer internal combustion, Baguley Drewry diesels offer a proactive solution for a first build. Their boxy shapes are incredibly easy to paint and mask, providing a professional-looking result with minimal effort. While steam locomotives often have more "personality," diesels are frequently simpler to assemble because they lack the complex external valve gear found on larger steam prototypes. If you are particularly concerned about detailing, you might consider a tram engine, as the side skirts hide much of the mechanism. You can learn more about these unique designs in A Modeller’s Guide to Tram Locos.
Beyond the Loco: Wagons and Scenery
A locomotive needs a purpose, which means pairing your new build with appropriate rolling stock. While we don't sell ready-to-run wagons, we provide a range of kits that complement our locomotive bodies. A quarry engine looks best with a string of slate wagons, while a rural diesel might be seen hauling timber or agricultural produce. If you are still exploring the wider context of this scale, our guide on What is a Narrow Gauge Railway? provides an excellent foundation. Once your first kit-009 locomotive is complete, consider building a small diorama to showcase your work. This proactive approach allows you to practice scenery techniques on a small scale before committing to a full layout.
Start Your Narrow Gauge Journey Today
Building your first locomotive doesn't have to be a complex engineering challenge. While the technical differences between scales might seem daunting, the proactive use of 3D printing makes the hobby more accessible than ever. By pairing a reliable Kato chassis with a high-detail resin body, you can create a unique model for a fraction of the cost of ready-to-run alternatives. This guide has demonstrated that with the right tools and a structured approach to assembly, anyone can successfully complete a kit-009 project.
We recognize that finding specific narrow gauge prototypes in local shops is often difficult. To solve this, we provide precision 3D printed kits in high-resolution resin, designed specifically for easy fitment on Kato chassis. We offer worldwide shipping from our UK base to ensure every modeller can access quality components. Explore our range of 3D printed OO9 locomotive kits and begin crafting a fleet that truly reflects your layout's character. There is no greater satisfaction than watching a locomotive you built yourself pull its first train across your track.
Frequently Asked Questions
What is the best chassis for a first-time OO9 kit builder?
The Kato 11-109 is currently the most reliable chassis for a first-time builder. It features a modern coreless motor that provides smooth performance at low speeds, which is essential for narrow gauge layouts. While we provide the high-detail body shell, you must purchase the motorized unit separately from an N gauge specialist. This pairing ensures your model has the best possible mechanical foundation for a successful build.
Do I need to solder to build a 3D printed locomotive kit?
You don't need to solder when building a 3D printed locomotive. Unlike traditional whitemetal or etched brass kits that require heat and flux, resin bodies are assembled using superglue. This makes a kit-009 project a proactive choice for beginners who want to avoid the cost and complexity of metalworking tools. You can focus your energy on the creative stages of painting and weathering your new locomotive.
Can I run OO9 locomotives on standard N gauge track?
Yes, you can run these models on N gauge track because both use a 9mm gauge. However, N gauge track features sleepers that are too small and closely spaced for 4mm scale. For testing your kit-009 project, standard N gauge track is a proactive solution. For your permanent layout, we recommend dedicated OO9 track to ensure the rugged, irregular appearance of a true narrow gauge railway is correctly represented.
How do I add weight to a lightweight 3D printed resin body?
Adding weight is a proactive solution to improve traction and electrical pickup on lightweight resin models. You should secure lead shot, tungsten putty, or small liquid lead weights into internal voids such as water tanks, coal bunkers, or the smokebox. Ensure the weights are glued firmly in place so they don't shift and interfere with the motor or the moving parts of the donor chassis during operation.
What glue should I use for 3D printed model railway kits?
High-quality cyanoacrylate, or superglue, is the essential adhesive for resin kits. Standard plastic cement will not work because it cannot chemically melt the surface of the resin to create a bond. For a proactive assembly experience, use a medium-viscosity superglue that offers a few seconds of adjustment time. Always ensure the parts are degreased in warm soapy water before gluing to ensure the strongest possible bond between components.
Are OO9 kits compatible with DCC (Digital Command Control)?
Compatibility with Digital Command Control depends on the donor chassis you select rather than the resin body. While Narrow Minded Railworks doesn't sell DCC systems, we design our locomotive bodies with enough internal clearance to house small decoders. A proactive builder can hard-wire a micro-decoder into a Kato 11-109 chassis. You should always verify the space requirements of your specific decoder before finalizing the assembly of your model.
Where can I find instructions for my specific locomotive kit?
We provide digital assembly guides for our kits to ensure you have access to the most current information. While some older kits used paper inserts, our proactive solution involves offering downloadable PDFs that cover cleaning, painting, and chassis fitment. These guides are designed to help beginners navigate the specific nuances of 3D printed resin. If you have questions about a particular build, our professional team is available to offer guidance.
How do I remove support marks from a 3D printed loco body?
Removing support marks requires a proactive approach using a sharp hobby knife and fine-grit sandpaper. Start by carefully trimming any remaining pips, then sand the area with 600-grit paper followed by 1000-grit for a smooth finish. Once you apply a high-quality primer, any minor surface variations will disappear. This preparation is a non-negotiable step if you want to achieve a professional, factory-quality look for your completed locomotive.