

Would you pay over $500 for a single switcher? With Atlas listing new SW8/9 units at $579.95 in their May 2026 catalog, many hobbyists are feeling the sting of sticker shock. It's frustrating when the specific narrow gauge prototype you love isn't available or costs more than your monthly hobby budget. You shouldn't have to choose between high detail and a healthy bank account. This guide shows you how to bypass these costs by exploring alternatives to expensive ready-to-run locos that look just as good on your layout.
You'll discover how to build a high-detail narrow gauge fleet for a fraction of the cost of premium ready-to-run models. We'll show you how to source secondhand donor chassis on eBay for as little as $30.50 and pair them with 3D printed shells. You'll get a clear roadmap to building your fleet, the confidence to try 3D printed kits, and the knowledge to turn a basic power unit into a bespoke masterpiece. It's time to stop waiting for manufacturers to release your favorite loco and start building it yourself.
Key Takeaways
- Understand why decoupling the locomotive body from the motor provides the best alternatives to expensive ready-to-run locos for budget-conscious hobbyists.
- Discover how 3D printed kits offer a high-fidelity entry point into narrow gauge modeling at a fraction of the cost of premium factory models.
- Learn how to identify and source reliable, mass-produced donor chassis from other scales to power your custom fleet.
- Master the basic assembly techniques and essential tools required to build professional-looking models without needing years of workshop experience.
- Develop a strategic roadmap to grow your locomotive and wagon collection through a sustainable, step-by-step monthly budget.
The Rising Cost of Ready-to-Run (RTR) Locomotives
Ready-to-Run (RTR) locomotives are the industry standard for convenience. These models come fully assembled, painted, and tested, allowing you to go from the box to the track in seconds. However, this convenience now commands a staggering premium. As of May 2026, a high-end Atlas HO scale switcher like the SW8/9 can cost as much as $579.95. Even basic diesel units with sound, such as the Bachmann PRR ALCO FA2, sit around $139.95. For many, these prices create a massive barrier to enjoying the hobby, forcing enthusiasts to look for alternatives to expensive ready-to-run locos.
Narrow gauge modellers in OO9 or O-16.5 often face even higher costs. Because these prototypes are niche, manufacturers produce them in smaller batches, which drives up the per-unit price. This shift toward high-fidelity detailing and factory-fitted digital systems has moved the hobby away from its roots. Looking back at the history of scratch building, modellers once relied on their skills to create unique fleets. Today, the "collector’s tax" on limited production runs means that if you miss a release, you might pay double on the secondhand market just to get a standard locomotive.
To better understand how these costs compare across different eras of the hobby, watch this helpful video:
Why RTR Prices Are Climbing in 2026
Several factors have pushed prices to record highs this year. Specialized resin and plastic manufacturing costs have risen, and global shipping rates remain volatile. Major brands have also shifted their default standards to "Museum Quality," adding intricate pipework and cab interiors that drive up labor costs. Additionally, licensing fees for famous railway prototypes add a hidden cost to the retail price. When you buy a branded loco, a portion of your money goes straight to the legal department of the prototype's current owner rather than into the model itself.
The Limitations of "Off-the-Shelf" Modelling
Relying solely on off-the-shelf models limits your creative freedom. You are essentially stuck with whatever the big brands decide to manufacture. This leads to the "cloned layout" problem, where every OO9 exhibition layout features the same three locomotive types. For younger modellers or those on a strict budget, the $300 to $600 entry price for a single locomotive is simply unsustainable. By searching for alternatives to expensive ready-to-run locos, you break away from the mass-produced crowd and gain the ability to model obscure prototypes that the big manufacturers will never touch.
3D Printed Kits: The Ultimate Budget Alternative
3D printing has completely changed the landscape of the hobby, offering the best alternatives to expensive ready-to-run locos for those willing to pick up a paintbrush. In the past, modellers were limited by what major manufacturers chose to mass-produce. Today, high-resolution resin printing allows for the creation of obscure prototypes that would never be commercially viable as RTR models. This technology allows hobbyists to apply their interests and education to the workbench, turning a digital design into a physical, running locomotive. While some critics suggest 3D prints are only for static displays, modern engineering resins are incredibly robust, handling the vibrations and heat of a running motor with ease.
The financial shift is even more dramatic. While a premium factory-finished locomotive might set you back £180 to £200, a high-quality 3D printed body shell typically costs between £20 and £30. Even after adding a donor chassis and paint, the total investment is often less than half of the retail price of a "big brand" model. This approach doesn't just save money; it also solves the "cloned layout" problem by ensuring your locomotive fleet is unique to your railway. If you are looking to start your journey, you can browse our latest OO9 and O-16.5 body kits to see the variety available.
Body Kits vs. Full Kits: What’s the Difference?
Understanding the "Body Kit" concept is essential for budget modelling. A body kit provides the highly detailed upper shell of the locomotive, including the boiler, cab, and tanks, but leaves the mechanical "brain" to a separate donor unit. This allows you to choose your own level of mechanical complexity, whether you want a basic DC setup or a high-end sound-equipped runner. This modular approach has a long history in the narrow gauge railway community, where kit-bashing has always been a badge of honor. By focusing on the body shell, you get maximum visual impact without the high cost of factory assembly.
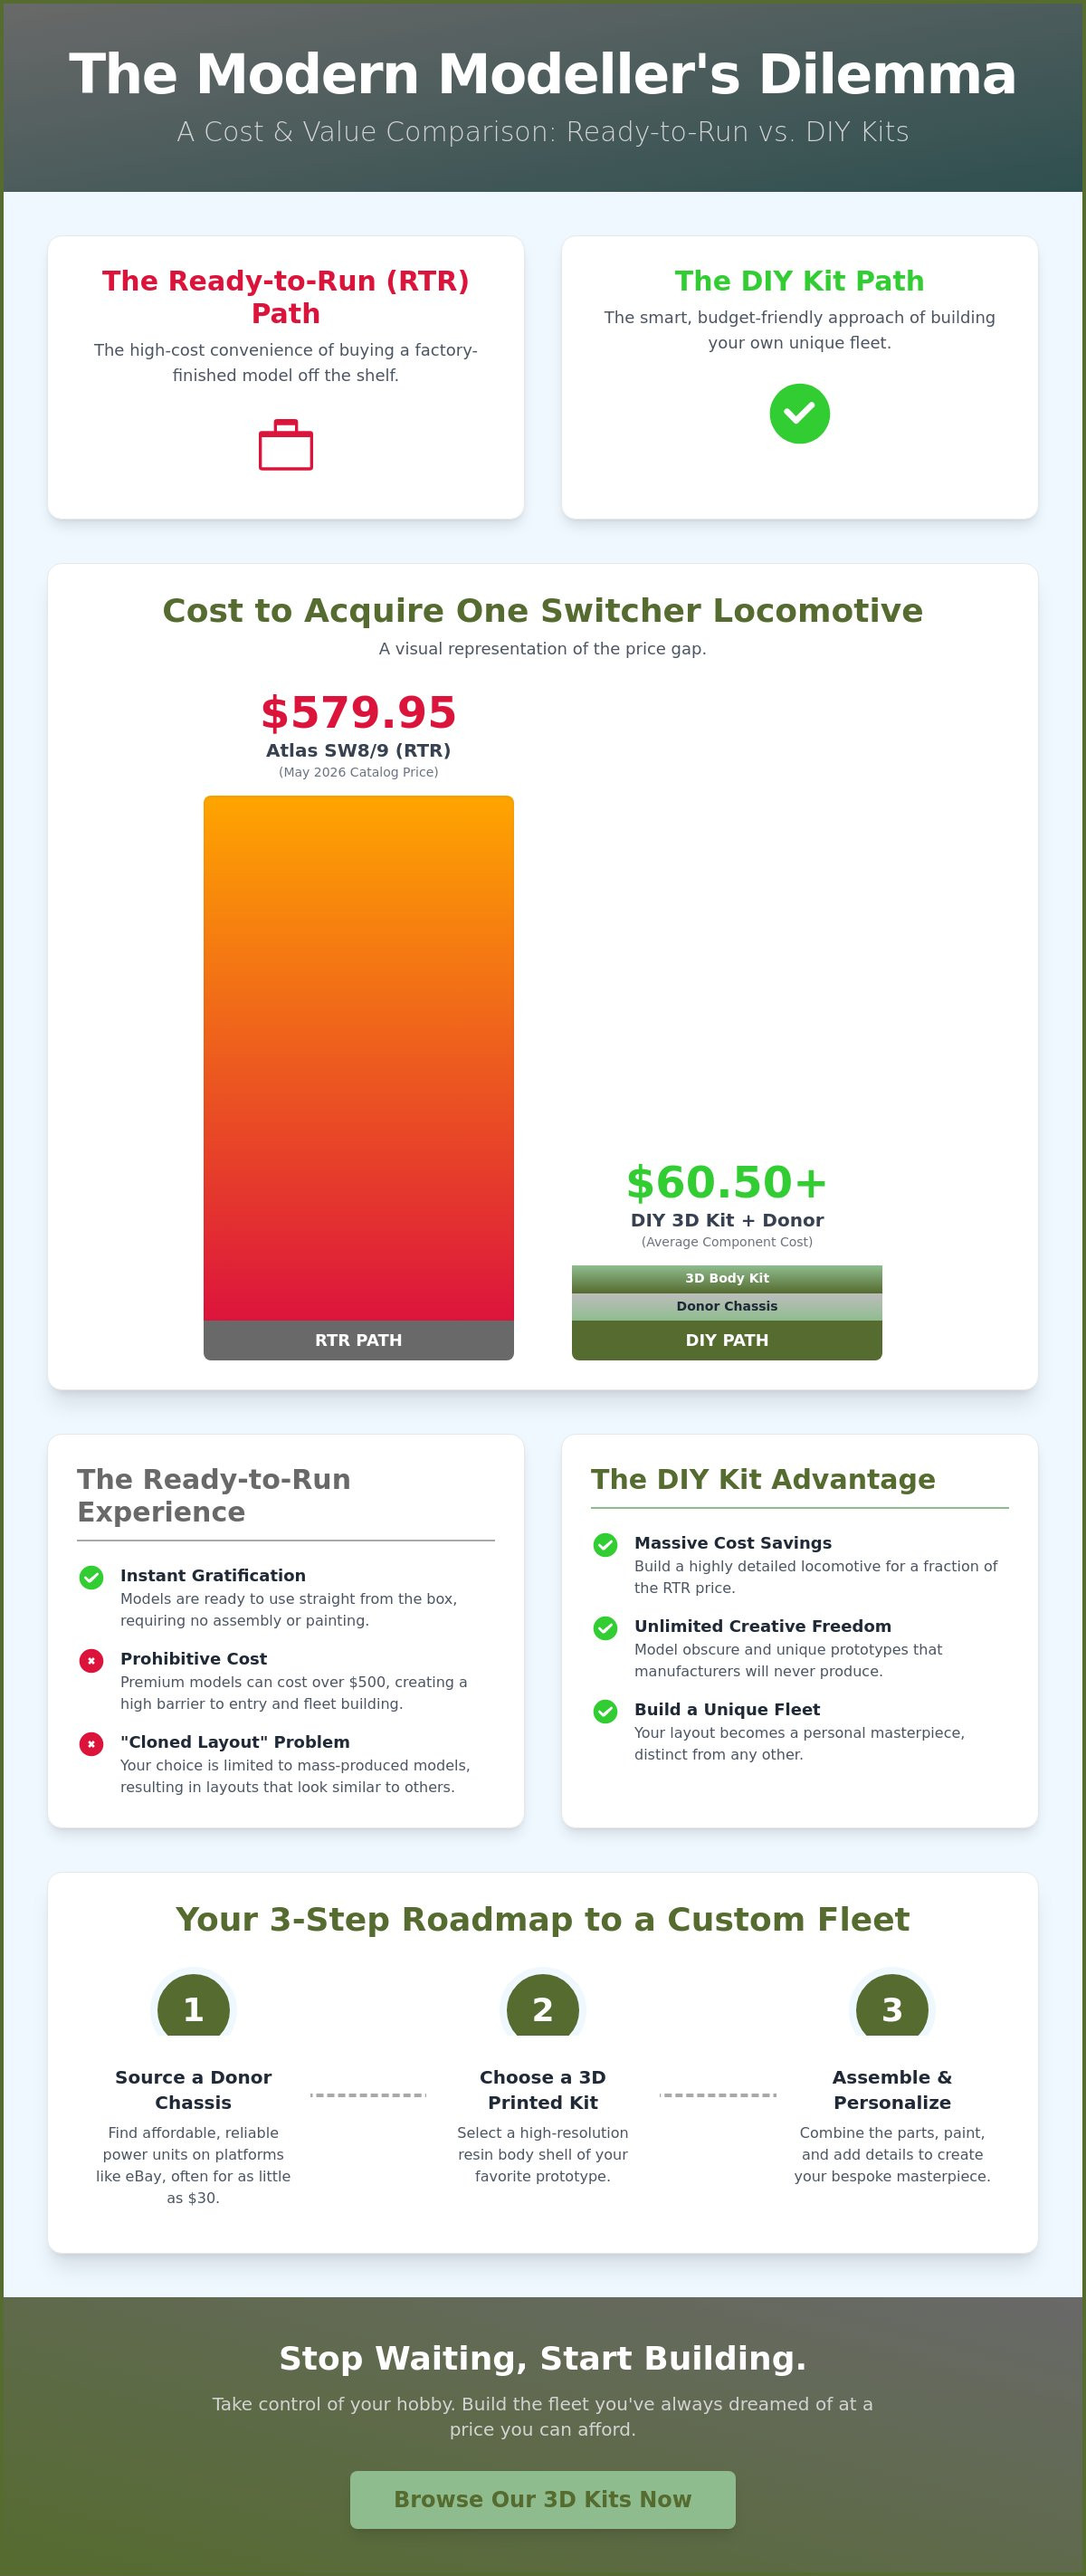
Cost Breakdown: RTR vs. Narrow Minded Railworks Kit
To see the real-world savings, look at how the costs stack up for a typical narrow gauge engine. This comparison highlights why 3D kits offer better value per millimetre of detail than any mass-produced alternative.
- Ready-to-Run Locomotive: £200.00 (Average retail price)
-
3D Body Kit Approach:
- 3D Body Kit: £25.00
- Donor Chassis (eBay/Secondhand): £30.00
- Paint and Decals: £10.00
- Total: £65.00
Choosing the kit-built route saves you £135.00 per locomotive. Beyond the monetary savings, the "Pride of Build" provides a level of satisfaction that you simply can't buy off a shelf. You aren't just a consumer; you're a creator building a bespoke fleet that reflects your specific vision for your layout.
Sourcing Affordable Donor Chassis and Power Units
The real secret to building a fleet on a budget lies in the "chassis swap." Instead of buying a finished model, you source a reliable, mass-produced mechanism from a different scale to act as the "brain" of your engine. This is the foundation of alternatives to expensive ready-to-run locos. While the National Model Railroad Association sets the standards for track and wheel compatibility, you have the creative freedom to mix and match bodies and power units. Brands like Kato, Tsugawa Yokou, and Graham Farish offer high-quality N gauge chassis that fit perfectly under narrow gauge shells.
Finding these units doesn't have to be expensive. The secondhand market is your best friend. On eBay, "spares or repairs" lots for brands like Athearn or Mantua can start as low as $30.50. Often, a locomotive with a damaged body still has a perfectly functional motor and gears. Before you buy, measure the wheelbase of your kit. A digital caliper is an essential tool here. Ensure the distance between the axles on the chassis matches the wheel arches or axle boxes on your 3D printed body to ensure a professional finish.
Best Budget Chassis for OO9 and HOe
The Kato 11-103 and 11-109 remain the undisputed champions for powering OO9 locomotive kits. These units are affordable, smooth-running, and incredibly compact. Repurposing N gauge chassis is a time-tested method for HOe and OO9 because the track gauge is identical. To secure your 3D body, you don't always need complex screws. A small amount of Blue-Tac or double-sided tape allows for easy removal during maintenance. If you want a more permanent fix, drilling small holes for mounting screws into the chassis frame provides maximum stability.
Powering Larger Scales: GN15 and O-16.5
Moving up in scale requires more "heft" and pulling power. For GN15 scale projects, the classic Hornby 0-4-0 "Smokey Joe" style chassis is a versatile workhorse. It's cheap, easy to find at swap meets, and fits many industrial locomotive designs perfectly. If you're working in 7mm scale, check the second-hand market for on30 gauge mechanisms. These offer the torque needed for larger models while keeping costs significantly lower than bespoke O scale power units. By hunting for these "hidden" power sources, you can build a heavy-duty fleet without the heavy-duty price tag.
Overcoming the Skill Barrier: Building Your First Kit
Many modellers hesitate to move away from the box because they fear ruining a kit. It's a common anxiety. However, modern 3D printed resin has made kit building more accessible than ever. Unlike older white metal or brass kits that required soldering and heavy filing, resin kits are largely "plug and play." With digital files for locomotive shells priced as low as $16.10 on platforms like CGTrader as of May 2026, the cost of "making a mistake" is lower than it's ever been. You aren't risking a $500 investment; you're experimenting with alternatives to expensive ready-to-run locos that are designed for easy assembly.
The secret to success is the "Two-Foot Rule." Most layouts are viewed from a distance of approximately 60cm. At this range, tiny paint smudges or slightly uneven handrails completely vanish. You don't need to be a professional artist to produce a locomotive that looks fantastic as it rattles through a scenic diorama. To get started, you only need a basic toolkit: a set of needle files, medium-viscosity superglue, and fine-grit sandpaper (400 and 800 grit). These items usually cost less than $20 combined, making the entry price for kit building incredibly low. If you're ready to take the plunge, you can start your first narrow gauge project with one of our beginner-friendly body kits.
Preparation and Cleaning of 3D Prints
Before you reach for the glue, you must prepare the surface. 3D prints often have "support pips," which are small bumps left from the manufacturing process. Use a sharp hobby knife to flick these off and a needle file to smooth the area. Always sand resin under a small amount of water to prevent dust from becoming airborne. Once the surface is smooth, applying a high-quality plastic primer is the most important step. Primer reveals any hidden imperfections and provides a "key" for your topcoat to stick to. For more detailed advice, check out our guide on painting 3D printed models to ensure a professional finish.
The "Kit-Bashing" Mindset
One of the best ways to hide assembly mistakes is through clever kit-bashing and weathering. 3D printed shells are naturally lightweight, so you'll need to add "heft" to improve haulage and electrical pickup. Using lead shot or tungsten putty inside the side tanks or boiler can increase a small loco's weight by 30 to 50 grams. Once the model is weighted, a simple wash of thinned black or brown paint can settle into the crevices, highlighting detail while masking small gaps in the resin. This approach turns a basic budget kit into a unique piece of rolling stock that reflects your personal modelling style.
Building Your Fleet: A Budget-Friendly Roadmap
Building a diverse narrow gauge fleet doesn't require a massive upfront investment. The most successful budget modellers treat their workshop like a marathon rather than a sprint. Instead of dropping $579.95 on a single Atlas switcher, you can allocate a small monthly "modelling fund" to gradually acquire kits and donor parts. By focusing on alternatives to expensive ready-to-run locos, you can build a full shelf of rolling stock for the price of one high-end factory model. Start with an "easy win" like a simple slate wagon or a small industrial loco body to build your confidence before moving on to more complex projects.
Joining the community is a vital part of this journey. Online forums and local narrow gauge societies are filled with enthusiasts who have already figured out which N gauge chassis fits which specific body. Sharing your progress on social media or at exhibitions provides valuable feedback and helps demystify the kit-building process for others. Remember that every expert modeller started with a single, imperfect kit. Taking the plunge into 3D printed models isn't just about saving money; it's about reclaiming the creative spirit of the hobby.
Your First 3 Months of Budget Modelling
A structured approach prevents you from feeling overwhelmed. Follow this 90-day plan to get your first custom locomotive on the tracks:
- Month 1: Invest in your basic toolkit and your first Narrow Minded Railworks body kit. Spend this time cleaning the resin and applying your first coat of primer.
- Month 2: Scour eBay for a donor chassis. As of May 2026, you can often find suitable N gauge power units for parts starting around $30.50. Test the motor and ensure a smooth crawl before fitting the body.
- Month 3: Apply your final livery, add weathering to hide any assembly marks, and enter your new locomotive into service.
Where to Buy Narrow Gauge Kits Online
The Narrow Minded Railworks shop is designed to be a one-stop resource for budget-conscious modellers. Our range covers everything from industrial tram locos to rugged quarry hunslets, all designed to fit common, affordable chassis. We focus specifically on OO9, GN15, and O-16.5 scales, ensuring that narrow gauge enthusiasts have access to the prototypes they actually want to build. To stay updated on our latest 3D printed releases and limited runs, check our site regularly as we frequently add new designs based on historical prototypes. Visit our shop today to find your next project and start building a unique, affordable fleet that stands out from the crowd.
Take Control of Your Narrow Gauge Fleet
You don't have to let rising manufacturer prices stall your progress on the layout. By choosing 3D printed kits and sourcing secondhand donor units, you can sidestep the $579.95 price tags seen in May 2026 catalogs. We've explored how decoupling the chassis from the body shell offers the best alternatives to expensive ready-to-run locos, allowing you to model the exact prototypes you want. Whether you're hunting for a $30.50 eBay bargain or cleaning up your first resin print, the path to an affordable fleet is now wide open. This approach gives you a unique roster that reflects your personal modelling style rather than a mass-produced catalog.
Our kits are designed by modellers for modellers, focusing on unique prototypes that major brands often ignore. We provide worldwide shipping on all our OO9, GN15, and O-16.5 kits to ensure every hobbyist can access high-quality components. Browse our affordable 3D printed loco kits and start building today! It's time to pick up your tools and turn your vision for a detailed, budget-friendly railway into a reality.
Frequently Asked Questions
Is it cheaper to build a loco kit or buy a second-hand RTR model?
Building a kit is often the most cost-effective path, especially when searching for alternatives to expensive ready-to-run locos. While a rare secondhand RTR model might appear at a bargain, prices on eBay for older units often remain high due to collector interest. By combining a new 3D printed shell with a $30.50 donor chassis, you control the final cost and avoid the "collector's tax" found on auction sites.
What is the best donor chassis for a beginner OO9 kit?
The Kato 11-103 and 11-109 N gauge chassis are the top choices for beginners. These units are mass-produced, reliable, and fit perfectly under many OO9 industrial locomotive bodies. They provide a smooth-running foundation without the complexity of traditional kit-built mechanisms. Because they are so common, you can find them easily through hobby retailers or secondhand marketplaces for a fraction of the cost of a bespoke power unit.
Do I need special glue for 3D printed resin kits?
Standard Cyanoacrylate (CA) glue, commonly known as superglue, is the best choice for resin kits. Plastic cement used for injection-moulded kits won't work because it relies on melting the surfaces together, and resin does not react to it. A medium-viscosity CA glue gives you a few seconds to align parts before it sets. For smaller detail parts, using a "gel" version of superglue provides better control and prevents messy runs.
Can I use DCC with a budget 3D printed locomotive?
You can absolutely use DCC, provided your chosen donor chassis has enough space for a decoder. Many modern N gauge chassis from brands like Bachmann or Kato are either DCC-ready or can be hard-wired with a micro-decoder. While the 3D printed body shell itself is just a static piece, the flexibility of the kit approach means you can choose a high-end digital chassis or a simple DC unit depending on your layout's requirements.
How long does it take to build a 3D printed loco body kit?
Most modellers can complete a basic body kit assembly in 3 to 5 hours, spread over a weekend. This includes cleaning the support pips, test-fitting the chassis, and applying the initial primer coats. The longest part of the process is usually waiting for paint to dry between stages. Because these kits have fewer parts than traditional brass or white metal alternatives, you can move from a bare shell to a running engine very quickly.
Are 3D printed models as durable as plastic injection-moulded ones?
Modern engineering resins used in 2026 are highly durable and comparable to injection-moulded plastic for normal layout use. They aren't as brittle as early 3D prints and can withstand the heat and vibrations of a running motor. While you should still handle them with care, they won't shatter if accidentally bumped. Applying a good quality primer and clear varnish further protects the surface from handling wear and UV light exposure.
Where can I find instructions for Narrow Minded Railworks kits?
Detailed assembly guides and tips are available directly on our website's blog section. We provide step-by-step instructions that cover everything from preparing the resin surface to fitting specific donor chassis. These guides are designed to help you succeed even if this is your first time moving away from ready-to-run models. You can also find community-driven advice on our social media pages where other modellers share their finished builds.
What scale is best for a budget-conscious narrow gauge modeller?
OO9 scale is often the best choice for those seeking alternatives to expensive ready-to-run locos because of the abundance of cheap N gauge donor chassis. However, GN15 is also excellent for budget modellers as it uses standard HO/OO gauge power units that are widely available secondhand. Both scales allow you to use mass-produced mechanisms from other branches of the hobby, keeping your total build cost significantly lower than buying premium factory models.