

A neat airbrushed finish depends less on a steady hand than on controlling air, paint and distance. If you’re learning how to use an airbrush for models, setup and paint consistency can feel uncertain, especially with small model railway parts. Overspray, clogs and wasted paint are common concerns, but you can avoid many problems by practising the basic controls before spraying a model.
This beginner’s guide explains how to set up your airbrush, adjust air pressure and paint flow, and find a useful spray distance. You’ll also learn a repeatable practice routine, how to build colour with controlled passes, and how to clean the airbrush to help prevent clogs. These techniques suit narrow-gauge projects and delicate 3D-printed resin parts, where careful preparation and handling matter. Practise on scrap, change one variable at a time, and assess the result before adjusting your technique.
Key Takeaways
- Learn how to use an airbrush for models by balancing air pressure, paint flow and spray distance before working on a finished project.
- Compare airbrush, compressor, hose and paint options to find a setup suited to your model size, detail needs and painting frequency.
- Build a repeatable routine: prepare your workspace, test the spray, apply light passes and assess the finish as you go.
- Follow the paint-maker’s instructions for mixing, thinning and drying to help avoid splatter and uneven coverage.
- Protect delicate model parts through careful preparation and handling, and troubleshoot problems before adding more paint.
What Does an Airbrush Do for Model Painting?
An airbrush uses compressed air to apply a fine mist of paint. It can produce smooth base coats, soft colour transitions and controlled layers without visible brush strokes. For an overview of the tool’s development and uses, see airbrush technology and applications.
On a model railway locomotive, an airbrush can lay colour evenly across a body or wagon side. Light passes let you build coverage gradually instead of flooding the surface with one heavy coat. You can also blend a darker lower edge into a lighter upper area for a subtle shaded effect. Preparation still matters: an airbrush won’t hide surface flaws, and a brush is often more practical for small fittings, sharp edges and local details.
When is an airbrush useful on a model?
Choose the tool to suit the task. An airbrush is useful for larger surfaces that benefit from consistent coverage, such as a locomotive body, wagon panels or scenery pieces. A fine brush is often more direct for tiny components, control levers and narrow trim. For small parts, mask areas that should remain unpainted and use light passes to limit overspray. The right method depends on the part, the finish you want and your experience.
Think of airbrushing as building a finish, not applying it all at once. Several light passes can deepen colour while keeping edges and details visible. For a gradual transition, change the colour in small increments rather than trying to create a sharp change in one sweep. You can combine airbrushing with hand painting to complete the model.
What results should a beginner expect?
Expect to learn the feel of the trigger before producing a consistent finish. Practise on scrap material or an unimportant part, repeating passes to see how distance, movement and paint delivery affect coverage. Where possible, choose a test surface similar to the model. At first, focus on starting and stopping cleanly and applying paint evenly, rather than achieving perfect colour or weathering.
Practice builds repeatable control, but it doesn’t replace surface preparation. Dust, grease, rough marks or an unsuitable base can affect how paint sits and adheres. Inspect and prepare each component before spraying, and follow the paint-maker’s instructions for compatibility and use. If a result looks uneven, pause to identify the cause before adding paint. Another heavy coat could obscure fine detail.
Learning how to use an airbrush for models means balancing tool choice with judgement. An airbrush can make broad coverage and soft effects easier to manage, but it isn’t essential for every finish. Use it where controlled, even layers are useful, and keep a fine brush handy for work the spray can’t reach cleanly.
How Air Pressure, Paint Flow and Distance Shape the Spray
An airbrush creates a spray when compressed air meets a controlled flow of paint, breaking it into fine droplets that travel towards the surface. Pressure, paint consistency, trigger movement, distance and hand speed all affect where those droplets land. The aim is to adjust these factors so paint reaches the model as an even, controlled layer.
How do airbrush controls work together?
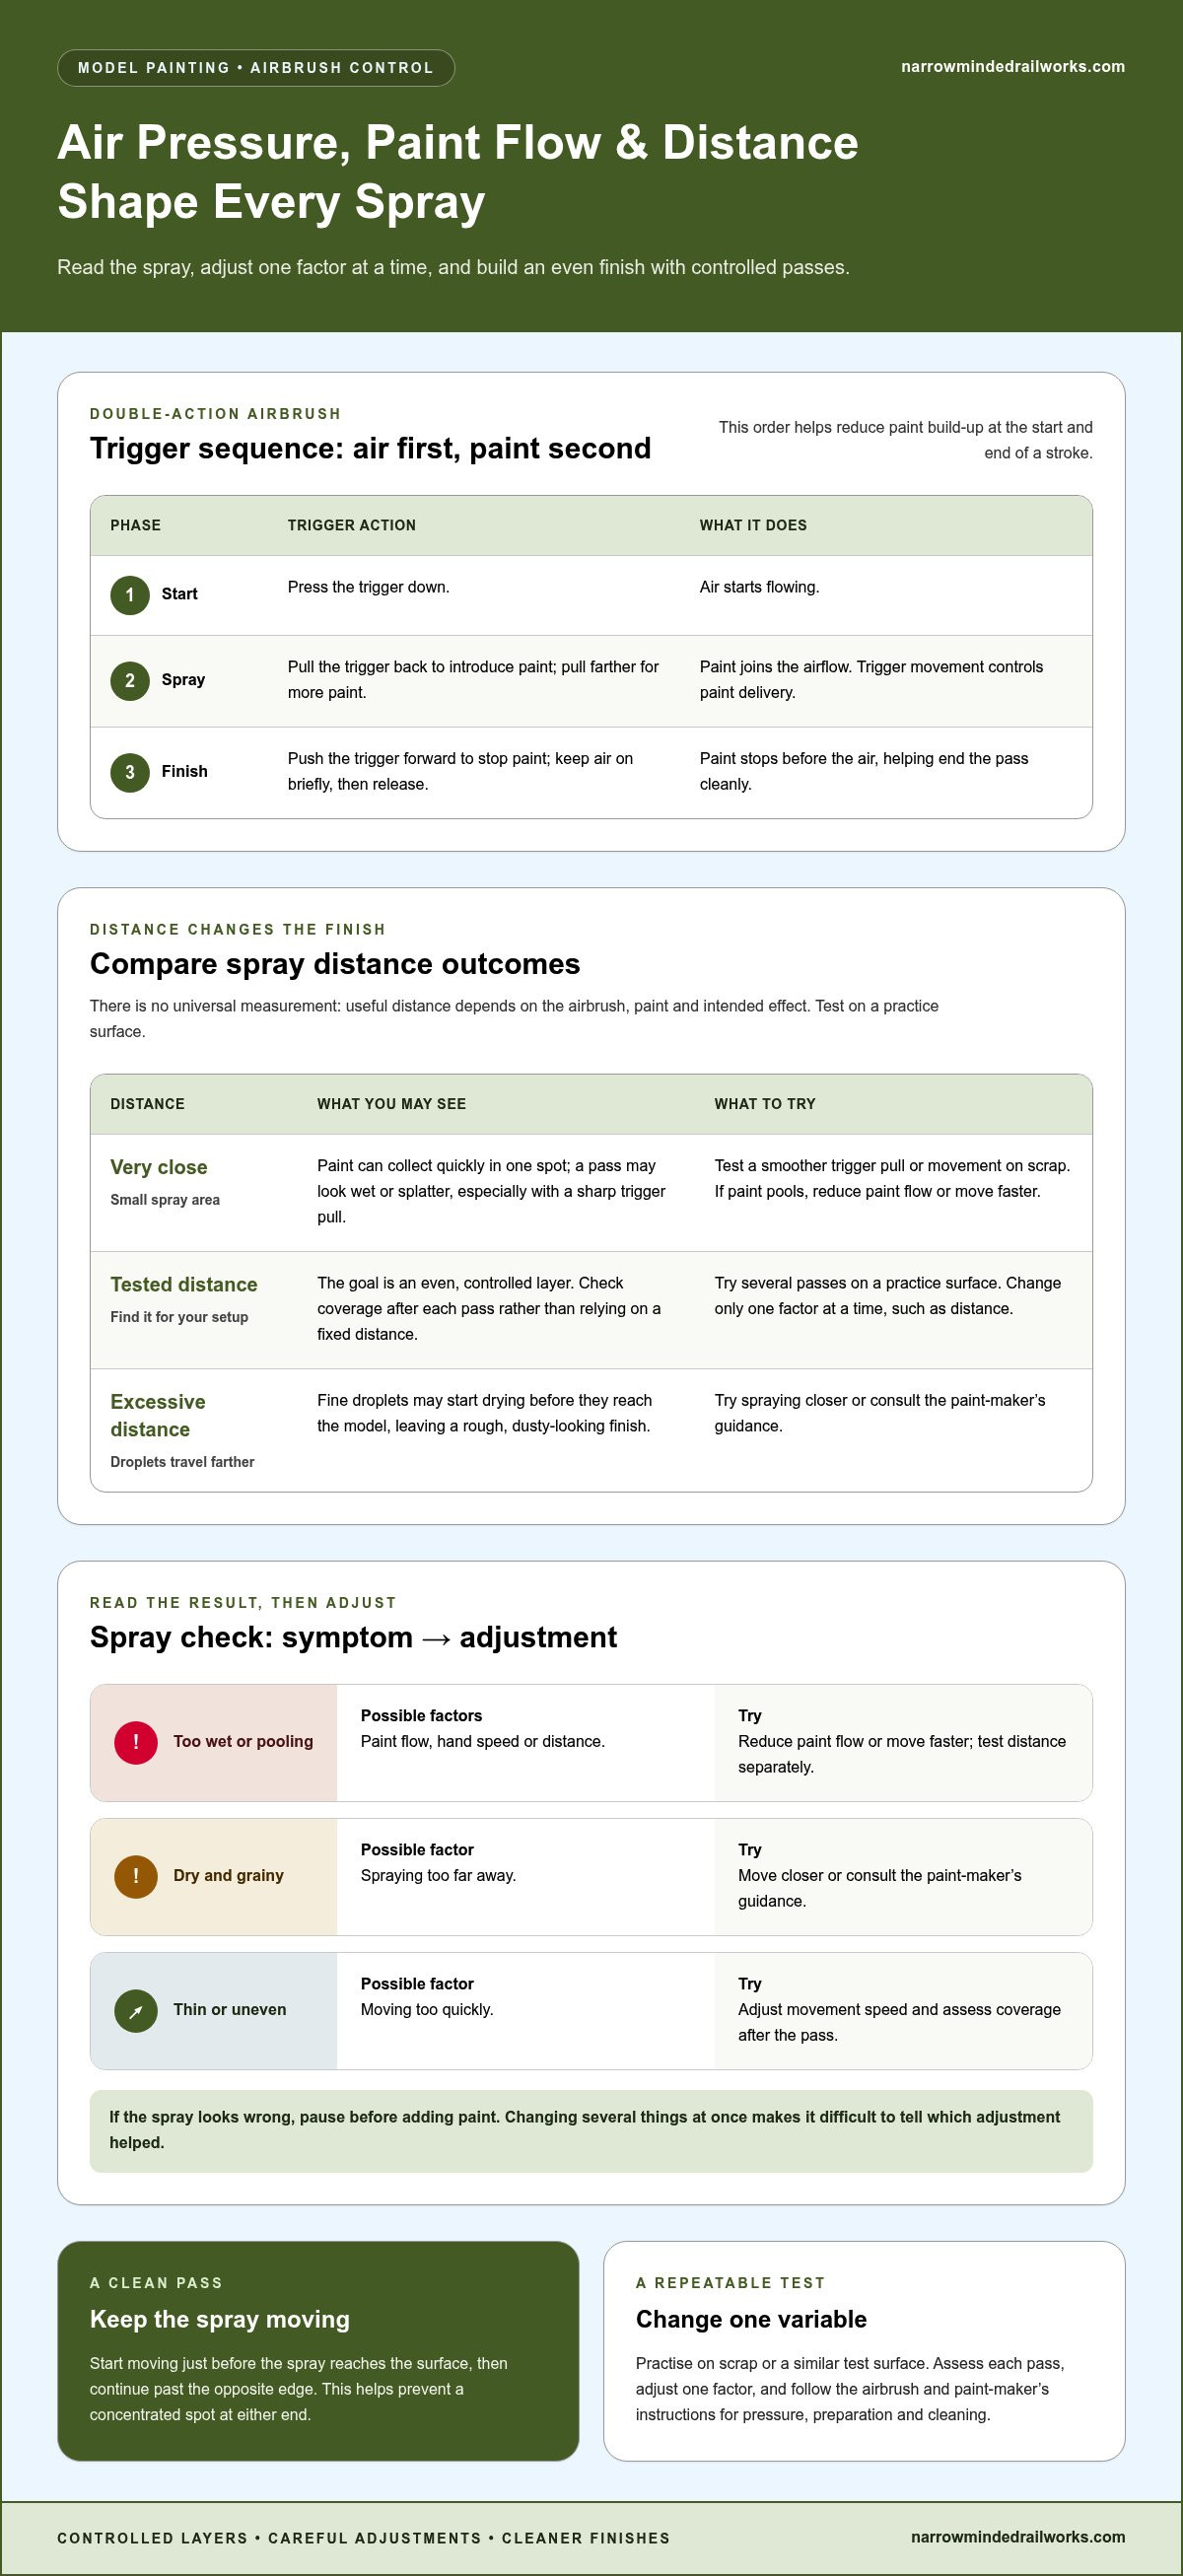
On a double-action airbrush, press the trigger down to start the air, then pull it back to introduce paint. Pulling it farther back releases more paint. To finish a pass, push the trigger forward to stop the paint while keeping the air on briefly, then release it. This air-first, paint-second sequence helps reduce paint build-up at the start and end of a stroke.
Keep your hand moving steadily as you spray. Moving slowly while releasing plenty of paint can leave a wet patch; moving too quickly may produce thin or uneven coverage. For example, when spraying a wagon side, start moving just before the spray reaches the surface and continue past the opposite edge. This helps prevent a concentrated spot at either end.
During practice, change one variable at a time. If the spray looks too wet, adjust your trigger pull or movement speed before changing the pressure. Changing several things together makes it hard to tell which adjustment helped. Follow the airbrush and paint-maker’s instructions for pressure, paint preparation and cleaning. There isn’t one pressure setting or thinning ratio that suits every setup.
What does spraying distance change?
At very close range, the spray covers a smaller area and paint can collect quickly in one spot. A pass may look wet or splatter, especially if you pull the trigger back sharply. At excessive distance, fine droplets may start drying before they reach the model, leaving a rough, dusty-looking finish. The useful distance depends on your airbrush, paint and intended effect, so test it rather than relying on a universal measurement.
Use a practice surface to test several passes, changing only one factor at a time, such as distance. Keep your wrist relaxed and move your whole hand smoothly instead of pivoting at the wrist and directing the spray unevenly. Check the coverage after each pass. If paint is pooling, reduce paint flow or move faster. If the finish looks dry and grainy, try spraying closer or consult the paint-maker’s guidance.
These small tests make how to use an airbrush for models easier to understand because they connect each adjustment with a visible result. Practising on a simple panel before painting a finished locomotive helps you develop a repeatable approach. Narrow-gauge railway kits can give you projects to practise your finishing technique.
Which Airbrush Setup Suits Your Model Painting?
A useful setup is one you can control, clean and use safely, not simply the most elaborate one. For narrow-gauge railway projects, your choice may depend on whether you’re coating a locomotive body, adding a soft colour effect to scenery or painting a small component. Consider the level of detail you need, the size of the surfaces and how often you expect to spray.
What equipment does a basic airbrush setup need?
The core setup consists of an airbrush, a compatible compressor and a hose to connect them. Airbrushes differ in how they hold paint and control airflow. A gravity-feed, double-action design gives you separate trigger control over air and paint, while other designs may suit different preferences or tasks. Before use, check the manufacturers’ instructions for compatible connections, operating limits, paint guidance and cleaning requirements.
| Setup choice | Role | Trade-off to consider |
|---|---|---|
| Double-action airbrush | Lets you control air and paint delivery with the trigger, which can help with gradual layers and detail. | Requires practice to coordinate trigger movement and hand speed. |
| Single-action airbrush | Offers a simpler control style, with paint flow set separately on some designs. | May provide less immediate adjustment while spraying; check the specific airbrush instructions. |
| Compressor | Supplies the compressed air needed to create the spray. | Models differ in airflow, controls and operating limits. Match the compressor to the airbrush rather than assuming all combinations suit. |
| Hose | Connects the compressor and airbrush. | Connections and handling vary, so check compatibility and keep the hose positioned to avoid pulling on your hand. |
| Paint | Provides the colour and finish for the model. | Paints vary in compatibility, thinning and cleaning needs. Follow the paint-maker’s instructions rather than relying on a universal mix. |
Airbrush, brush or spray can: which method fits?
An airbrush gives you control over layered coverage and gradual transitions, but it requires setup, cleaning and practice. A brush is easy to reach for when painting a small detail or isolated touch-up, though broad areas may show brush marks if the paint or technique isn’t suitable. An aerosol can cover a larger surface, but its spray pattern and paint delivery offer a different level of control from an airbrush.
Choose based on the job. An airbrush may help lay down consistent coats on a wagon side or locomotive body; a fine brush may be more practical for a tiny fitting. A can may suit a broad area when its spray pattern is appropriate. Consider your workspace, time for practice and cleaning, and how much control the finish requires. No single method is right for every model.
Prepare the spraying area before choosing paint. Provide good ventilation, especially for solvent-based products, and follow the paint label and safety instructions, including any guidance on protective equipment. When learning how to use an airbrush for models, a setup that suits your project and workspace makes practice more manageable. Follow product guidance throughout.
How to Airbrush a Model: A Beginner’s Step-by-Step Process
A repeatable routine makes it easier to spot what’s working and correct what isn’t. Light, controlled passes are easier to adjust than one heavy coat, which can pool, obscure detail or take longer to dry. Use this sequence for a locomotive body, wagon or other model component, adapting it to the paint and surface.
- Prepare the workspace and model. Set up a stable, well-ventilated spraying area and protect nearby surfaces from overspray. Check the model for dust, grease and surface marks before painting. Narrow Minded Railworks kits are supplied unpainted, unprimed and unassembled. Resin is delicate, so handle parts carefully by thicker sections and avoid dropping them. Fine support marks or layer lines may remain; if needed, sand gently with fine-grit 800-1200 paper. Parts are cleaned and UV-cured before dispatch, though many modellers may wish to wash them in mild soapy water before priming.
- Prepare the paint and airbrush. Follow the paint-maker’s instructions for compatibility, mixing, thinning and airbrush cleaning. Don’t assume one thinning ratio or setting suits every paint. Fill the airbrush as directed, connect it to the compressor and check the equipment instructions before spraying.
- Test the spray. Use scrap material before each new paint mix, even if you’ve used the airbrush before. Make straight passes, then simple curves, keeping your hand moving steadily. Check whether the spray is even and whether paint is landing wet, dry or patchy. Change one setting or technique at a time so you can tell what made the difference.
- Apply light passes. Start moving the airbrush before directing paint at the model, and keep it moving as you spray. Use overlapping passes to build coverage gradually rather than trying to cover the surface in one go. On a small wagon side, move across the panel in steady strokes and continue past its edge before turning back for the next pass. This helps reduce paint build-up at the ends.
- Assess, dry and finish. Pause to inspect the coat under good light. If coverage is thin, add another controlled pass instead of flooding the surface. Allow each coat to dry for the time stated by the paint manufacturer before applying more paint or handling the model. Clean the airbrush according to its instructions when finished.
How should you practise before painting the model?
Use a scrap piece with a similar surface to learn how your paint and airbrush work together. Practise straight lines and curves, keeping your distance and movement steady. If the spray pattern changes unexpectedly, stop and check your technique or the equipment instructions before continuing on the model.
How do you build colour in controlled layers?
Think in light coats: each pass adds a little colour, and each pause gives you a chance to assess coverage. Keep the airbrush moving to avoid concentrating paint in one spot, and follow the manufacturer’s drying guidance between coats. Taking your time gives you more opportunity to adjust the finish as you go.
Ready to practise on a narrow-gauge project? Explore narrow-gauge model kits as a starting point for your next painting project. We cannot be held responsible for breakages once your item has arrived. If the piece is broken in the post, please provide images and we will see what we can do to help.
How to Protect, Troubleshoot and Finish Delicate Model Kits
Airbrushing a delicate model takes more than adjusting the spray. Surface preparation and careful handling matter too, particularly with 3D-printed resin parts. Narrow Minded Railworks kits are supplied unpainted, unprimed and unassembled, so preparation and finishing are part of the modelling process.
How should you prepare and handle a 3D-printed resin model?
Resin is delicate. Avoid dropping parts, and hold them by thicker sections rather than thin handrails, fittings or edges. Parts are cleaned and UV-cured before dispatch, but many modellers may wish to wash them in mild soapy water before priming. Let parts dry fully before applying primer, following the relevant product instructions.
Fine support marks or layer lines may remain after cleaning. For a smoother surface, sand gently with fine-grit 800-1200 paper if needed. Use light pressure and take extra care around small details, since firm sanding can damage delicate features. Inspect the surface before priming, and don’t sand areas that don’t need it.
What should you do when the spray finish goes wrong?
Pause when the finish looks unexpected instead of adding more paint straight away. Change one factor at a time, then test on scrap before returning to the model. This helps you identify the cause without creating another problem on a delicate surface.
- Splatter: Check your spraying distance, paint consistency and trigger movement one at a time. Consult the paint-maker’s instructions for mixing and thinning, and avoid pulling the trigger back abruptly.
- Uneven coverage: Practise steady passes on scrap, then build coverage with light layers. Keep the airbrush moving across the surface instead of lingering over one patch.
- Dry-looking paint: Reassess your spraying distance and follow the paint-maker’s application guidance. If the paint appears to dry before reaching the surface, test a closer distance on scrap before adjusting your approach on the model.
For more preparation and finishing guidance, the related article Painting 3D Printed Models: A Beginner’s Guide to a Perfect Finish covers the broader process. Keep the model supported and handle it gently between coats.
Narrow Minded Railworks uses eco-friendly packaging: the outer packaging is partly made from recycled materials and is fully recyclable. The interior packing is acid-free and made from approximately 99% recycled pulp fibres. After delivery, continue to handle resin components with care. We cannot be held responsible for breakages once your item has arrived. If the piece is broken in the post, please provide images and we will see what we can do to help.
Put Your Airbrush Skills to Work on a New Project
Your next step doesn’t need to be a complex finish. Choose a model part or practice piece, decide what you want the coat to achieve, and give yourself room to learn from each pass. As you build confidence with how to use an airbrush for models, small improvements in control can help you create a finish that suits your railway.
Ready to choose a project? Explore Narrow Minded Railworks kits, hand-crafted, 3D-printed narrow-gauge models for OO9, GN15 and 16 mm layouts. Narrow Minded Railworks is a UK-based manufacturer, with worldwide shipping options and orders dispatched by Royal Mail.
Take your time, keep experimenting and let each project teach you something new. Your next carefully painted model can be the start of a more confident approach to the hobby.
Frequently Asked Questions
Can you use an airbrush on a model after it has been assembled?
Yes, but fitted parts can make some areas harder to reach and increase the risk of overspray. Mask surfaces that should stay unpainted, and test the masking material somewhere inconspicuous before applying it to a visible area. If a component is awkward to reach or needs a different colour, consider whether it would be easier to paint separately before assembly. Protect moving parts, and follow the paint-maker’s guidance on drying and handling.
Is an airbrush suitable for small model railway details?
It can be useful for controlled base coats or gradual colour changes, but a fine brush is often more practical for tiny fittings, sharp edges and isolated touch-ups. Check that the spray has a clear path to the part, and avoid directing a concentrated flow at delicate details. Before using an airbrush on a valued model, practise on a similar scrap piece to see how the paint behaves at that scale.
Can you use ordinary model paint in an airbrush?
Sometimes, but suitability depends on the paint and the airbrush. Some model paints are made for airbrushing, while others may need preparation before they spray reliably. Follow the paint-maker’s guidance for compatibility, thinning and cleaning instead of relying on a universal ratio. Only strain or mix paint if the product instructions recommend it, then test the prepared paint on scrap before loading it for the model.
Do you need to prime a model before airbrushing?
Primer can provide a consistent base and help paint adhere, but whether to use it depends on the model material and paint system. Follow the instructions for both products, including how long to let primer dry before adding colour. Resin kits are supplied unprimed, so prepare the surface with the material in mind. If you’re unsure how the layers will behave together, test the primer and colour sequence on spare material first.
How can you avoid overspray when airbrushing a model?
Protect the work surface, mask areas that should remain unpainted and test the spray pattern on scrap before starting. Position small parts so the spray is aimed away from nearby surfaces, and use a card shield where suitable. Keep the airbrush moving rather than concentrating paint in one spot. Ventilate the workspace and follow the paint’s safety instructions. Check masking edges during the job to catch unwanted spray early.
How often should you clean an airbrush when painting models?
Clean it when changing colours and at the end of a painting session, following the airbrush and paint manufacturers’ instructions. Even a short pause can allow paint to dry in the paint path, so follow the equipment guidance if you stop for a while. Use cleaning products compatible with the paint and airbrush components. Work gently around small parts, and don’t force or bend anything if the airbrush becomes difficult to clean.