

Getting your kit-built loco to run smoothly starts with finding the cause of slow, jerky movement, not assuming the motor is faulty. Dirty track, poor wheel contact or a body rubbing against the chassis can all lead to stalls and surges.
A clear order of checks helps you narrow down the problem without forcing delicate parts. Test the track first, then inspect the wheels and running gear, and finally check how the body sits on the chassis. This guide explains what to look for, how to handle resin parts carefully, and when persistent binding may need closer mechanical attention.
Key Takeaways
- Diagnose the track, wheels, pickups and chassis in order rather than assuming the motor is at fault.
- Use the symptom as a clue: note whether the fault happens at one spot, across the layout or during movement, then test safely before making adjustments.
- Clean and inspect the track and running gear first, then retest. Avoid forcing parts or changing several things at once.
- If the loco still runs poorly, check whether the body is rubbing against or binding on its specified, separately sourced chassis.
- Resin is delicate: handle it by thicker sections and avoid dropping it. Fine support marks or layer lines may remain after cleaning; gently sand with 800 to 1200 grit if needed. Parts are cleaned and UV-cured before dispatch, but many modellers may wish to wash them in mild soapy water before priming. Outer packaging is partly recycled and fully recyclable; interior packing is acid-free and approximately 99% recycled pulp fibres. We cannot be held responsible for breakages once your item has arrived. If the piece is broken in the post, please provide images and we will see what we can do to help.
Why Does a Kit-Built Loco Run Poorly? Start With the Symptoms
A locomotive that runs slowly, stops unexpectedly or moves in fits and starts can have several causes. Track condition, electrical contact, wheel movement and body fit can all affect performance. Changing or forcing parts before identifying the symptom can make diagnosis harder, so start with a simple test rather than an adjustment.
Separate track, electrical and mechanical causes before deciding what to inspect. A short, clean, level section of continuous track gives you a useful baseline. In railway modelling, a locomotive depends on both its running gear and its contact with the rails. Observe how and where the fault occurs before deciding what to check.
For a closer look at the kit-building process, watch this introduction:
What do slow running, stalling and surging suggest?
Look for a pattern, not just the fact that the loco runs poorly. A stall that repeats at one location may point to a rail, track join or electrical-contact issue at that spot. If it hesitates across different sections, inspect wheel cleanliness and pickups. Slow running has several possible causes, so compare behaviour at a consistent controller setting before drawing conclusions.
Surging or uneven movement offers a different clue. Notice whether the motion changes with direction or speed. If you hear or feel rubbing, or the wheels appear to struggle, check for binding or interference between the body and chassis. These are possibilities, not proof of a particular fault. Avoid pressing parts into place. If something resists, stop and inspect it carefully.
Set up a useful baseline test
Choose a clean, level, continuous piece of track and use one controller setting at a time. Run the locomotive in both directions if safe, and observe whether the fault repeats in the same place, occurs only in one direction or appears within a particular speed range. A fault that follows the loco across the test track points to a different area of investigation from one that occurs at a fixed point.
Before making changes, write down what you observed, such as “hesitates in both directions at low speed” or “stops at the same join.” Keep the test conditions consistent when you try again. This gives you a fair comparison and makes it easier to tell whether an adjustment helped.
Getting your kit-built loco to run smoothly begins with careful diagnosis, not a rapid strip-down. Once you’ve recorded the baseline, check track, electrical contact and mechanical movement in a controlled order. Note any change in the symptom during testing, as it may help narrow down the next safe check.
How Track, Pickups and Chassis Affect Smooth Locomotive Running
A locomotive needs more than a working motor to move steadily. Its wheels must travel over a clean, continuous rail path, while the pickups maintain electrical contact with the rails. A small interruption in either can cause hesitation, even if the chassis moves freely. Keep track checks separate from locomotive checks so you can narrow down the source.
If you have access to known-good track, test the same locomotive there without changing anything else. If its behaviour improves, inspect the original track more closely. If the fault remains, turn your attention to the wheels, pickups and chassis. Change one variable, then retest, so you can tell what affected the result.
Check the rails, wheels and electrical pickups
Start where the locomotive hesitates. Look along the rail tops for visible dirt, uneven joins, damage or a gap that could interrupt wheel movement or electrical contact. If the fault occurs across the layout, inspect a longer section rather than focusing on one spot. A rail join can look connected but still be uneven, so check the surface as well as the gap.
Next, examine the wheel treads for visible grime. Clean them gently with a suitable modelling method, such as a cotton bud used sparingly with isopropyl alcohol of 70% or higher. Avoid scraping or using a rough abrasive that could damage the surface, and don’t pour liquid onto the chassis. Check the pickup contacts visually for any contact that appears displaced or no longer touches as intended. Don’t bend delicate contacts just to see whether it helps; adjust only when there’s a clear reason.
Look for chassis binding and body interference
Disconnect power before inspecting the running gear. If the wheels or accessible moving parts can be checked by hand, move them gently and notice whether rotation feels smooth or catches at a particular point. Don’t force movement, especially if the mechanism resists. Look for a body edge, detail or sub-chassis part touching a wheel or another moving component.
A body that sits too tightly on its specified chassis may restrict movement, so inspect the fit if track and pickup checks haven’t explained the fault. Resin is delicate: hold it by thicker sections, avoid dropping it and handle it gently while checking clearance. Narrow Minded Railworks’ OO9 locomotive body kits are designed for specified, separately sourced chassis. Assess the fit without assuming the chassis is included. Adding weight won’t correct binding; identify the point of contact first and stop if the cause isn’t clear.
Use the same short test track and controller setting after each check. If cleaning the rails changes the symptom, record that before moving on. If the locomotive behaves the same on known-good track, continue with the running gear and fit checks rather than repeating track adjustments. This methodical approach helps you get to the cause without making unnecessary changes.
Which Running Fault Should You Fix First? A Practical Comparison
A symptom helps you choose where to look, but it doesn’t prove that a specific part is faulty. Use the comparison below to prioritise low-risk checks before dismantling or modifying the locomotive. Start with the external conditions you can inspect easily, then move towards the chassis if the pattern points there.
| Symptom | First area to inspect | Next safe check |
|---|---|---|
| Stalls at one spot | Rail cleanliness, joins and alignment at that location | Run another suitable locomotive over the same section, if available |
| Stalls or hesitates across the layout | Wheel condition and electrical pickup contact | Retest the loco on a different known-good track section |
| Jerky motion | Track continuity and wheel movement | With power disconnected, check for catching or restricted movement |
| Rubbing sound or restricted movement | Clearance around the wheels and moving parts | Inspect for body or detail interference without forcing anything |
Match the symptom to a sensible first check
If a stall consistently happens at the same point, start with that section of track. Look for dirt, an uneven join or misalignment before changing anything on the locomotive. If another suitable loco also falters there, that supports investigating the track, although it doesn’t identify the exact issue by itself.
If the problem follows your locomotive across different sections, inspect its wheels and pickup contacts, then consider whether the chassis moves freely. For rubbing or restricted movement, disconnect power before checking clearances. A body or detail may be touching a moving part, but confirm what you see rather than assuming the cause.
Separate track faults from locomotive faults
Where practical, try the same loco on another known-good section, keeping the controller setting and direction consistent. Then, if available, run another suitable locomotive over the original section. These comparisons help distinguish a problem tied to one location from one that follows the model. If you change the track, controller setting and locomotive together, you won’t know which change affected the result.
Keep a brief note of each test: where the fault occurred, which loco you used, the direction of travel and whether the behaviour changed. This is especially useful when a fault is intermittent. Repeat a test if the result is unclear rather than making several adjustments based on one run.
Prioritise reversible checks, such as inspecting the rail or testing on another section, before taking the body apart or altering components. Stop if a part resists or the cause isn’t clear. Getting your kit-built loco to run smoothly means narrowing down possibilities, not forcing a quick fix. After checking the track and running gear, you can review body-to-chassis fit. Our OO9 locomotive body kits are designed for specified, separately sourced chassis.
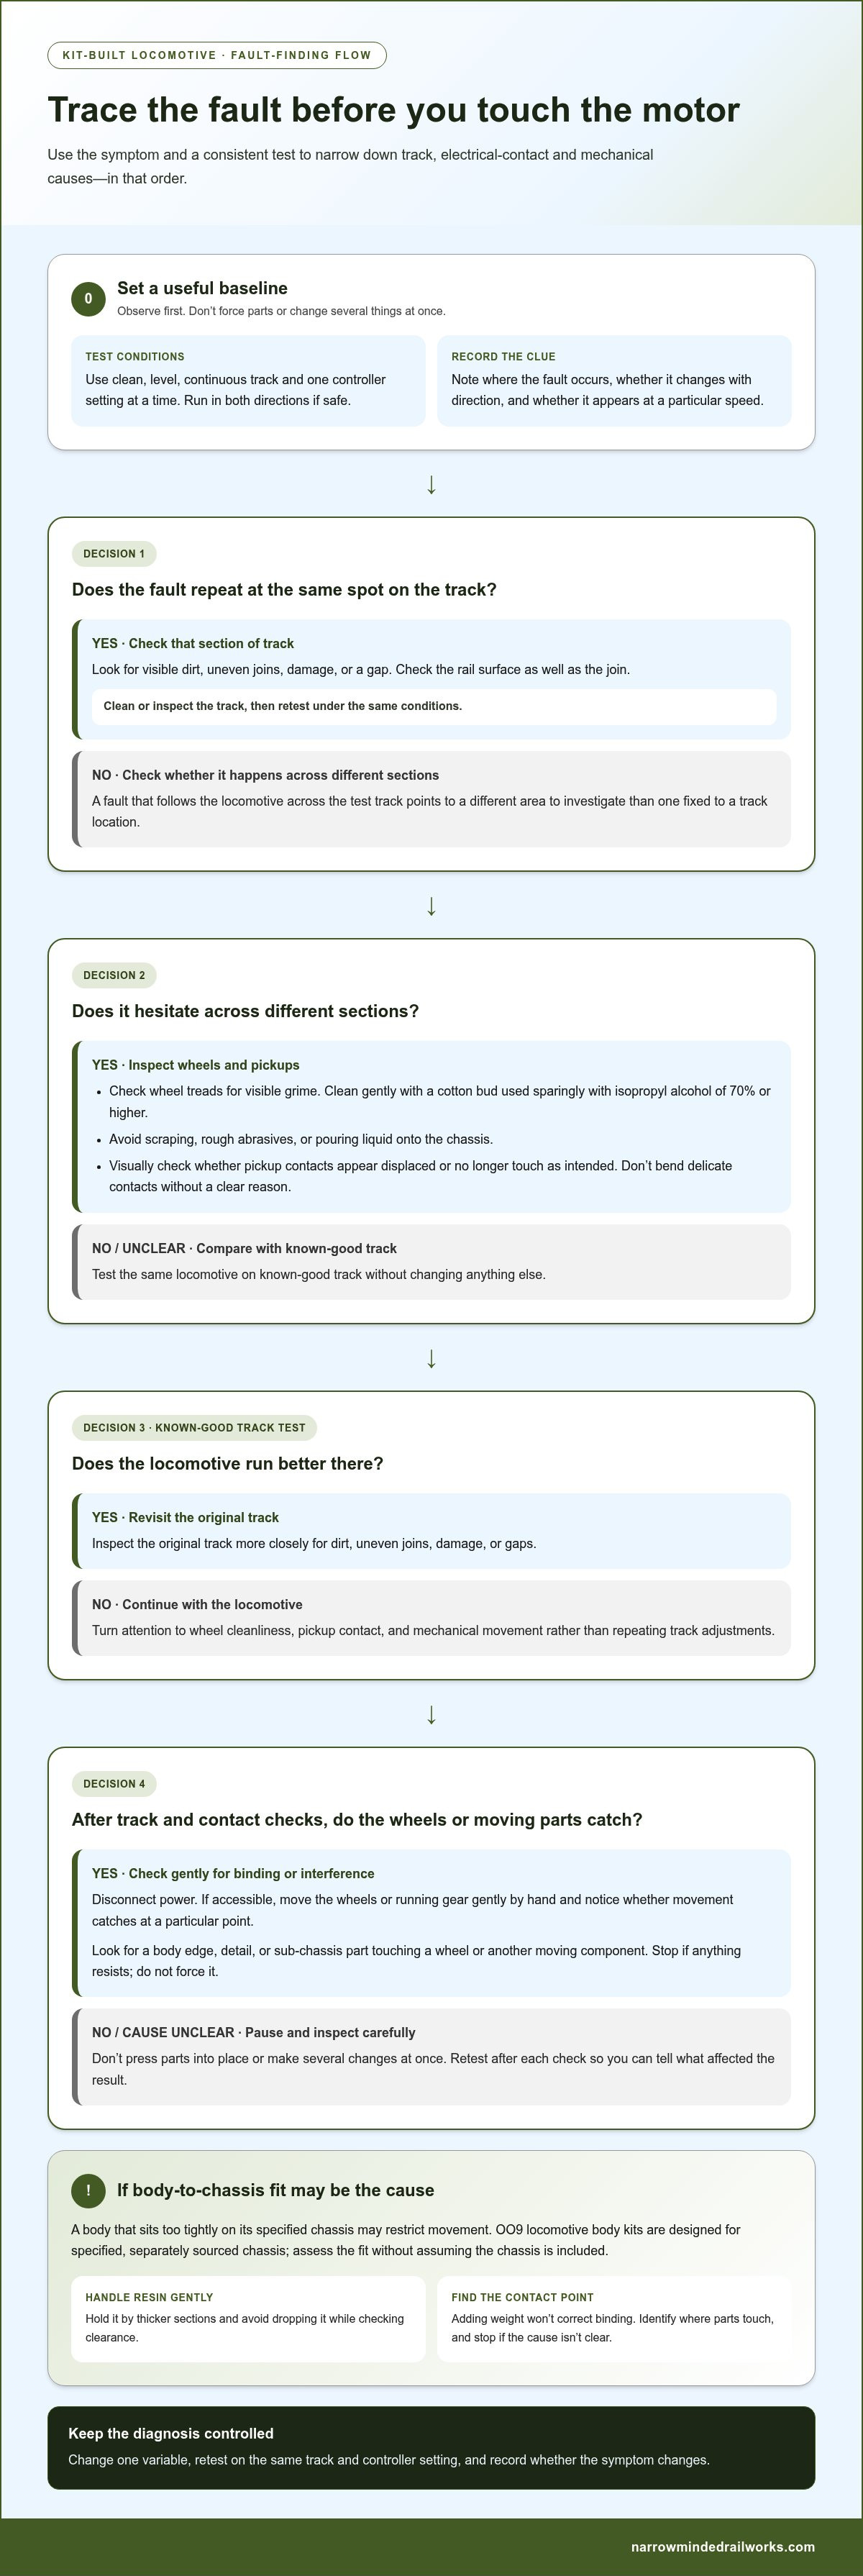
How to Improve a Kit-Built Loco’s Running Without Damaging It
A careful sequence is safer and more useful than changing several things at once. Start with the track, move on to the wheels and pickups, then inspect movement and retest. Disconnect power before examining the body, chassis or accessible moving parts. If a part resists, or you can’t identify the cause, stop rather than forcing it.
Follow a safe inspect-adjust-retest routine
Keep the test conditions consistent, including the track section, direction and controller setting. Make only one small, reversible change at a time, then run the same test again. A brief note of what you changed and what happened helps you track progress and avoid repeating adjustments that made no difference.
- Clean and inspect the track. Check the rail tops, joins and alignment, especially where the loco falters. Clean gently using a suitable modelling method, and avoid abrasive treatment that could mark the rails.
- Check wheels and pickups. Look for visible dirt on the wheel treads and for pickup contacts that appear displaced. Clean carefully and don’t bend delicate contacts without a clear reason.
- Inspect movement. With power disconnected, check accessible wheels and moving parts gently. Look for catching or anything touching the running gear. Don’t force a wheel or body part that feels stuck.
- Retest under the same conditions. Compare the result with your initial observation. If the symptom persists, return to diagnosis rather than making a larger adjustment without understanding its cause.
Handle resin bodies and printed details carefully
Resin is delicate. Avoid dropping parts, handle them carefully and hold them by thicker sections rather than fine details. Parts are cleaned and UV-cured before dispatch, although many modellers may wish to wash them in mild soapy water before priming. Fine support marks or layer lines may remain after cleaning. If needed, sand gently with fine-grit 800 to 1200.
Surface preparation is separate from running adjustment, but it matters during a build. Avoid sanding or handling a fitted body in a way that changes its clearance against the chassis. For finishing context, see this guide to painting and finishing 3D-printed models.
Narrow Minded Railworks’ locomotive body kits are supplied unpainted, unprimed and unassembled, and are designed to fit specified, separately sourced chassis. If you’re choosing a kit for a future build, explore OO9 locomotive body kits and include the intended chassis fit in your planning.
Outer packaging is partly recycled and fully recyclable; interior packing is acid-free and approximately 99% recycled pulp fibres. We cannot be held responsible for breakages once your item has arrived. If the piece is broken in the post, please provide images and we will see what we can do to help.
When to Revisit Kit Fitment and Pre-Run Checks
If track and running-gear checks haven’t explained the problem, revisit how the body sits on the chassis. Some locomotive body kits are designed for specified, separately sourced chassis, and a tight or incorrect fit may interfere with wheel movement. A body kit is not a complete, assembled locomotive: assembly and fitting are part of the build, so don’t treat resistance as something to overcome by pressing harder.
Check clearances before changing the body or chassis
Disconnect power, then look closely at the gap around the wheels and accessible moving parts. Check whether the body, sub-chassis or a detail visibly touches or restricts them. Compare the fit with the relevant kit information and specified chassis. Check that the parts are seated as intended without forcing a push-fit. Resin is delicate, so hold it by thicker sections and avoid dropping or squeezing fine details.
If the body doesn’t sit naturally, pause before sanding, bending or cutting anything. A small contact point may be enough to hinder movement, but removing material without locating the cause can damage the part or make the fit worse. The first OO9 loco kit guide explains what to consider when choosing and understanding an OO9 kit, including the importance of its intended chassis.
Know when to pause and get more specific guidance
Stop testing if a part cracks, begins to bind more tightly or needs force to move. Don’t keep running the locomotive if you can hear or feel persistent rubbing. Before discussing the fault, make a concise note of what you’ve observed: the track section used, direction of travel, speed range where the fault occurs, whether the symptom repeats, and which checks or adjustments you’ve already tried. These details make it easier to describe the problem clearly.
Fine support marks or layer lines may remain after cleaning. If needed, sand gently with fine-grit 800 to 1200. Resin parts are cleaned and UV-cured before dispatch, although many modellers may wish to wash them in mild soapy water before priming. Follow the kit’s finishing guidance and handle the body carefully throughout.
Taking time to confirm fitment can help you continue getting your kit-built loco to run smoothly without risking damage through force or guesswork. Orders are dispatched by Royal Mail, with worldwide shipping options available.
Once you’re ready to choose a project, explore Narrow Minded Railworks narrow-gauge kits.
Take Your Next Build One Careful Step Further
Use your test notes as a starting point for the next running session or build. A clear record of what changed, and what didn’t, can help you make informed decisions instead of repeating adjustments or forcing delicate parts. That steady approach gives you a better basis for deciding when a fit or mechanism needs closer attention.
Narrow Minded Railworks is a UK-based maker of hand-crafted 3D-printed kits for narrow-gauge layouts. Its locomotive body kits are designed for specified, separately sourced chassis, so fitment is an important part of planning your build. Orders are dispatched by Royal Mail, with worldwide shipping options available.
Explore the range of Narrow Minded Railworks narrow-gauge kits to plan your next modelling project.
Take your time, make each adjustment with care, and enjoy bringing your next locomotive project to life.
Frequently Asked Questions
Why does my kit-built locomotive keep stopping on the track?
Repeated stopping can result from interrupted electrical contact, a track irregularity or resistance in the running gear, so the motor isn’t the only possibility. Note whether the stop occurs during a curve, over a rail join or at different points around the layout. A pattern tied to one feature gives you a useful lead; an unpredictable stop may require checking both the locomotive and its electrical path.
How can I tell whether poor running is caused by the track or the locomotive?
Compare the locomotive with another suitable model on the same track, then try the affected locomotive on a different section you know runs reliably. Keep the controller setting unchanged for both comparisons. If the other model also falters at the same point, focus first on that stretch of track. If only your kit-built loco struggles in both places, inspect its wheels, pickups and movement more closely.
Can dirty wheels or pickups make a model locomotive run slowly?
Yes. Dirt on the wheel treads or poor contact between pickups and wheels can interrupt the electrical supply, causing slow movement, hesitation or stopping. Check the contact surfaces in good light and clean them carefully with a suitable modelling method. Avoid scraping the wheels or bending pickup contacts without a clear reason. If cleaning doesn’t change the behaviour, look for another cause rather than repeating it aggressively.
What should I check if my locomotive runs jerkily at low speed?
At low speed, small interruptions or resistance can become easier to notice. Check that the rail surface and wheel treads are clean, then observe whether the motion changes with direction or occurs at a particular point in each wheel’s rotation. With power disconnected, look for anything touching or restricting the moving parts. Don’t raise the controller setting to push through a catch; investigate the resistance first.
Should I add weight to a kit-built locomotive to improve its running?
Don’t add weight as a first response to poor running. It won’t correct dirty contact, a binding mechanism or a body that interferes with moving parts, and extra load may make an unresolved mechanical issue harder to assess. First identify the cause of the fault. Consider weight only if the chassis and track checks are satisfactory and you have a sound reason based on that model’s design.
Does a Narrow Minded Railworks locomotive body kit include the chassis?
No. A Narrow Minded Railworks locomotive body kit is not a complete, assembled locomotive and does not include the chassis. The body kits are designed to fit specified, commercially available chassis that are sourced separately. Check the relevant kit information to identify its intended chassis before assembly, then compare the fit carefully. Don’t force the body onto a chassis if it doesn’t seat as expected.
Can I sand resin parts if they rub against the chassis?
Resin is delicate, so don’t sand the body immediately just because you notice rubbing. First locate the contact point and compare the fit with the kit’s specified chassis and instructions. If gentle finishing is appropriate, use fine-grit 800 to 1200 and remove material sparingly, checking the fit as you go. Parts are cleaned and UV-cured before dispatch; some modellers may still wish to wash them in mild soapy water before priming. Fine support marks or layer lines may remain after cleaning. Explore Narrow Minded Railworks’ narrow-gauge kits for your next build.