

The easiest narrow gauge kit isn’t necessarily the one with the fewest parts. It’s the one with a clear chassis fit and manageable hands-on work, so you know what the build involves before you begin. If you’re looking for easy to build narrow gauge kits, it’s sensible to compare more than the word “easy”.
It’s understandable to wonder whether a kit is a complete model or a body that needs your own chassis, and what preparation delicate resin parts will require. Narrow gauge kits are hands-on projects: they’re supplied unpainted, unprimed and unassembled, and the chassis isn’t included. Parts are cleaned and UV-cured before dispatch, but careful handling and finishing are still part of the process.
This guide compares kit fit, included parts and practical build demands, including resin preparation, so you can choose a project suited to your experience. Handle resin carefully, avoiding drops and holding parts by thicker sections. We cannot be held responsible for breakages once your item has arrived. If the piece is broken in the post, please provide images and we will see what we can do to help.
Key Takeaways
- Choose easy to build narrow gauge kits by comparing chassis fit, supplied parts and finishing work, rather than relying on the word “easy”.
- Identify your layout scale and the specified chassis before deciding whether a body kit suits your project.
- Expect hands-on assembly and painting: kits arrive unpainted, unprimed and unassembled, with resin supports removed.
- Parts are cleaned and UV-cured before dispatch; a mild soapy-water wash before priming and gentle sanding of any fine marks may help with preparation.
- Handle delicate resin carefully, avoid drops and hold parts by thicker sections. We cannot be held responsible for breakages once your item has arrived. If the piece is broken in the post, please provide images and we will see what we can do to help.
Easy to build narrow gauge kits: what makes a first project manageable?
“A beginner-manageable narrow gauge kit is one whose chassis fit, supplied parts, assembly and finishing demands are clear enough to match your skills and workspace.” That’s a more useful measure than a promise of a quick or effortless build. The phrase easy to build narrow gauge kits should point to a project you can plan with confidence, not one that requires no modelling work.
Start by separating a body kit from a complete locomotive. A body kit provides parts for the model’s body, but it isn’t a ready-to-run model: you need to source the specified chassis and carry out assembly and painting yourself. Narrow Minded Railworks kits are supplied unpainted, unprimed and unassembled, with resin supports removed. Knowing this upfront helps you decide whether the project fits the time, tools and working space you have available.
Scale and gauge also affect whether a kit suits your layout, while the chassis determines how the body is intended to fit. If you’re still getting to grips with those terms, Understanding Narrow Gauge Railway Modelling offers an overview of the different combinations used in the hobby.
What should beginners look for in a narrow gauge kit?
Look for two clear pieces of information: the stated chassis compatibility and a specific list of supplied components. A named chassis fit gives you a defined starting point; it doesn’t mean the kit fits every mechanism. An itemised contents list helps you see what the kit provides and what you’ll need to supply separately. Fewer unknowns make it easier to plan, but don’t remove the work of building and finishing.
Then consider your own confidence. If small parts and careful assembly feel familiar, you may be comfortable with a project that needs patient handling. If you’re new to modelling, choose a build whose stated fit and contents you can understand, and whose assembly and painting feel like achievable next steps.
Why ‘easy’ depends on the modeller
A modeller used to working with small components may find a delicate body straightforward to assemble, while a newcomer may need more time to organise parts and work carefully. Neither response is a verdict on the kit; it reflects different experience, patience and workspace. Before ordering, think about where you’ll build, how you’ll keep small parts secure and whether you’re ready to paint as well as assemble.
Resin needs particular care. Parts are cleaned and UV-cured before dispatch, and you may wash them in mild soapy water before priming. Fine support marks or layer lines may remain; gentle sanding with 800-1200 grit may help. Avoid drops and hold delicate parts by thicker sections. We cannot be held responsible for breakages once your item has arrived. If the piece is broken in the post, please provide images and we will see what we can do to help.
A clear product description reduces surprises, not hands-on work. Use the fit, contents and finishing details to judge whether a project is right for you, then allow yourself time to assemble and paint it at a comfortable pace.
Check narrow gauge kit fit and contents before comparing models
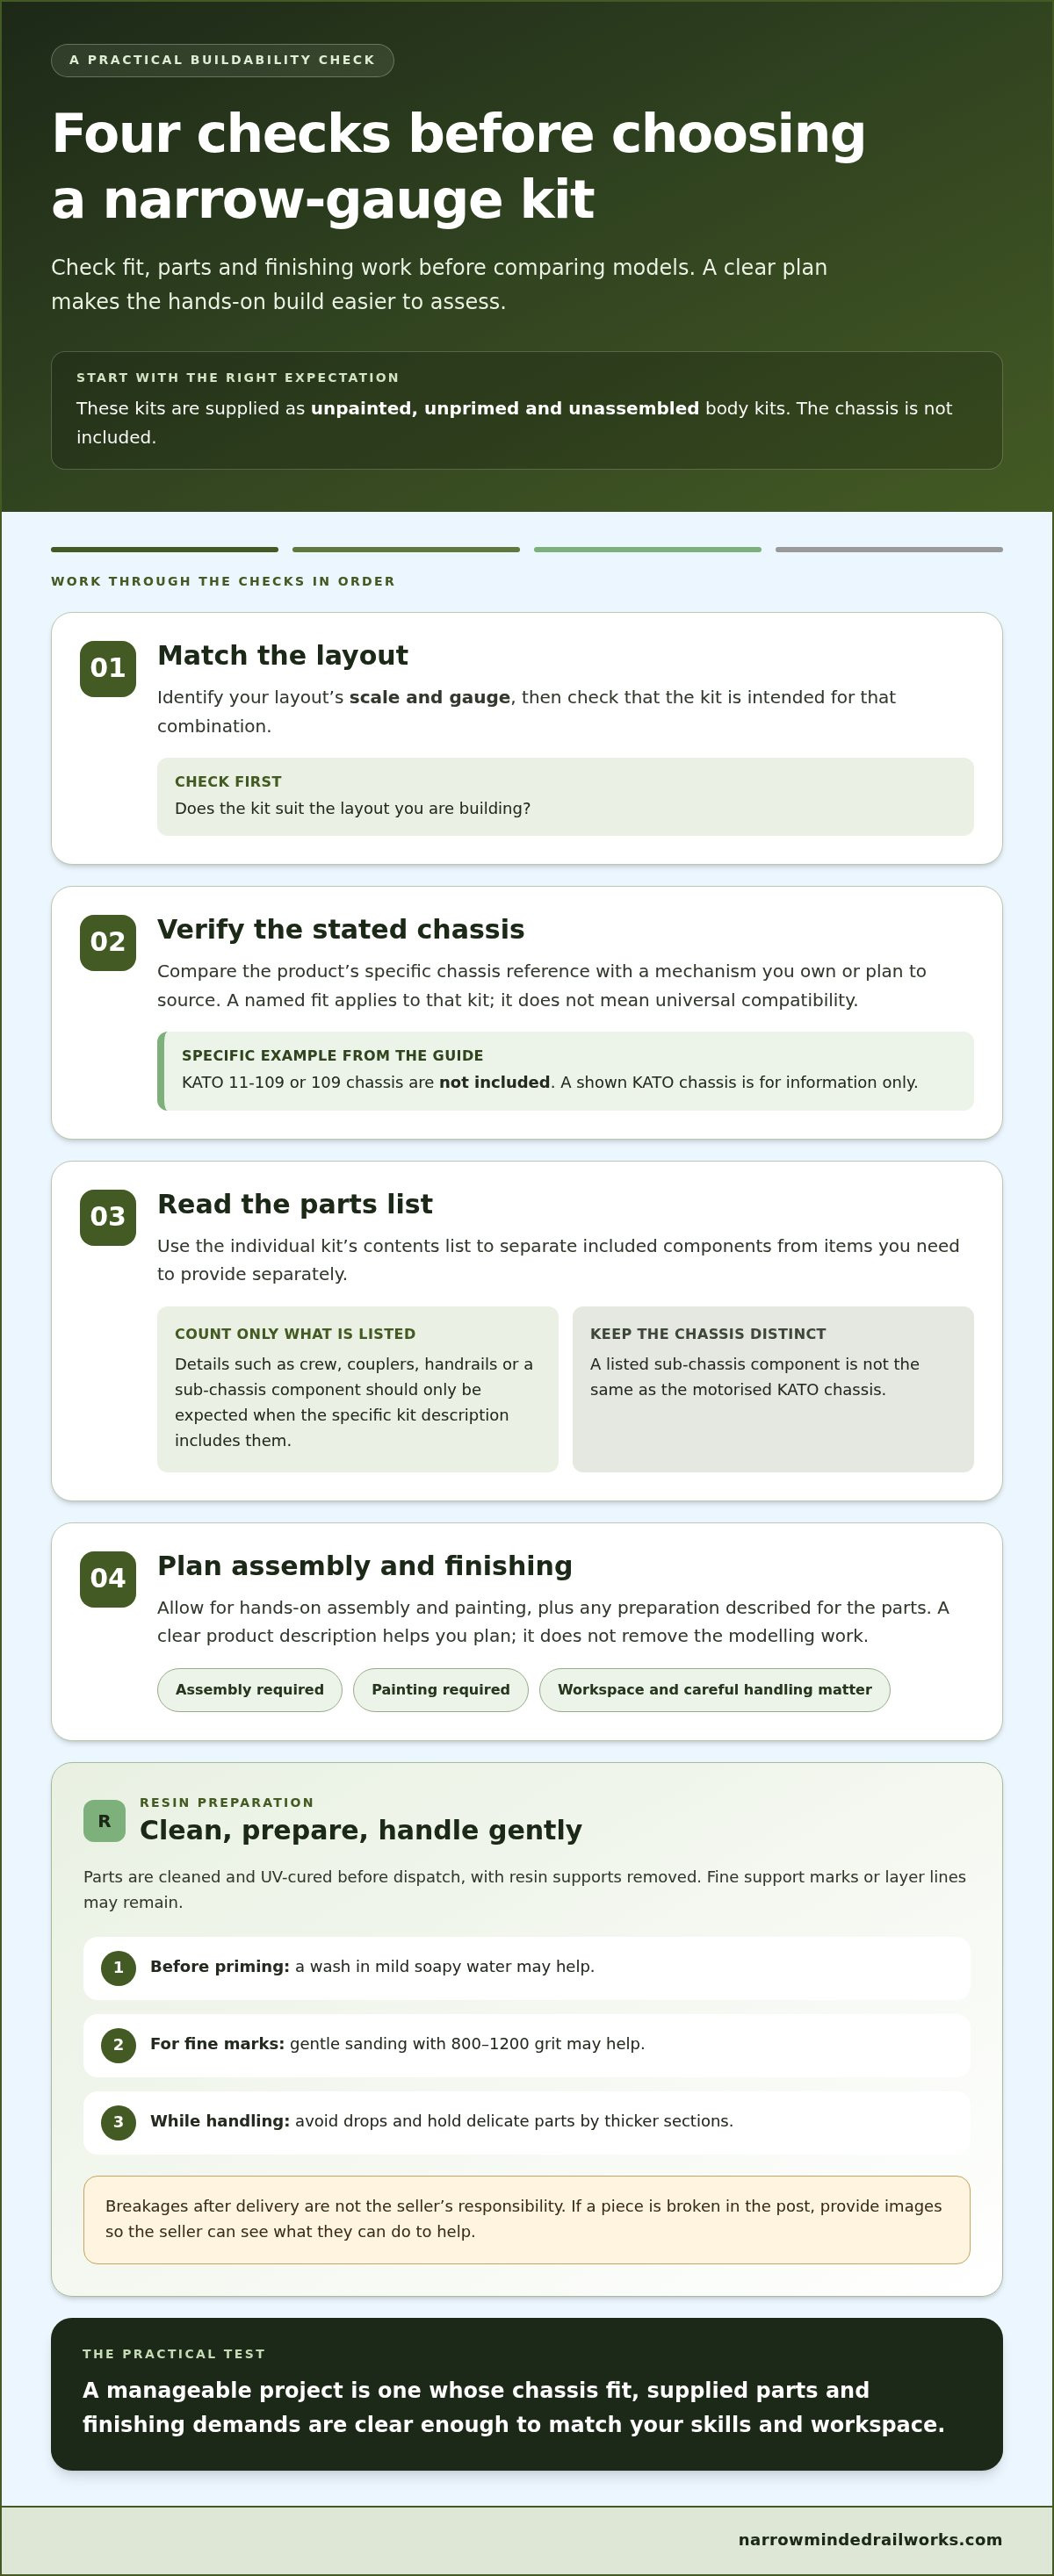
Before comparing shapes or levels of detail, work through the practical requirements in order. This quick check helps you see whether a kit matches your layout and what completing it will involve:
- Identify your layout scale and gauge. Make sure the kit is intended for the layout you’re building.
- Check the stated chassis. Match the product’s specific chassis reference to one you own or plan to source.
- Inspect the supplied parts. Read the contents list to distinguish kit components from items you’ll need separately.
- Note the finishing work. Account for assembly and painting, as well as any preparation described for the parts.
A stated chassis fit applies to that particular kit; it doesn’t establish universal compatibility across models. For broader modelling references, the National Model Railroad Association Standards may provide useful context, but the kit’s own chassis specification is what guides your choice of mechanism. This makes fit a more reliable point of comparison than appearance alone when assessing easy to build narrow gauge kits.
Match the kit to its stated chassis
Read the product page’s chassis reference carefully, then compare it with the mechanism you already have or intend to source. KATO 11-109 or 109 chassis are not included; where a KATO chassis is shown, it is for information only. Don’t assume compatibility with another chassis model unless it’s named for that particular kit. A precise match gives you a clearer basis for planning the build.
Read the contents list as a build plan
“A body kit supplies the listed model parts, while the separately sourced chassis provides the mechanism needed to complete the locomotive.” A kit may also list a sub-chassis component, but that’s distinct from the motorised KATO chassis and should only be counted when the individual contents list says it’s included.
Check each item in the product’s list rather than assuming that details carry over from another model. Crew, couplers and handrails, for example, should only be expected when they appear in that specific kit’s description. Separate parts can also indicate tasks to plan for, such as assembling components or fitting supplied details. A contents list is useful because it helps you identify what’s in the box and what remains part of your own build, without suggesting the kit is effortless.
For a more focused OO9 example of how to assess a first project, the first OO9 loco kit buying guide can help you connect chassis choice and kit contents to your plans. You can also browse narrow gauge locomotive and wagon kits with these checks in mind.
Remember that resin parts are delicate: avoid drops and handle them by thicker sections. Fine support marks or layer lines may remain, and gentle sanding with 800-1200 grit may help. If the piece is broken in the post, please provide images and we will see what we can do to help.
Compare narrow gauge kits with a practical buildability checklist
A comparison is most useful when it separates confirmed kit details from personal preference. Record the same four points for each option: scale, named chassis fit, supplied parts and finishing requirements. If a product description leaves a field unanswered, mark it “unknown” in your notes rather than assuming the kit will fit or that a part is included.
Scale comes first because it needs to suit your layout plans. GN15 and OO9 serve different modelling approaches, so consider the space and track arrangement you’re building before weighing up individual kits. The GN15 scale guide can help you think through that choice. Prototype appearance is a separate preference: historical context from the History of Narrow Gauge Railroading may help you decide which type of locomotive or railway interests you, but it doesn’t determine how demanding a kit will be.
Use a four-point comparison before choosing
Use this worksheet for each kit. Fill it from the individual product description; the prompts are not claims that every kit shares the same fit or contents.
| Comparison point | What to record | How it helps |
|---|---|---|
| Scale | The scale stated for the kit | Check that it matches your layout plan. |
| Chassis fit | The named chassis reference, or “unknown” if you can’t find one | Compare it with the chassis you own or plan to source. |
| Supplied parts | The exact components and accessories listed for that kit | Identify what the contents provide and what your build requires separately. |
| Finishing | Stated assembly, painting and preparation requirements | Decide whether the hands-on work suits your time and confidence. |
Keep the records product-specific. Don’t transfer a crew figure, coupler or handrail from one kit’s list to another. A longer list of separate components may mean more items to handle, but it doesn’t by itself prove that the build is harder; part size and the work involved also matter. Kits are supplied unpainted, unprimed and unassembled, so include painting and assembly in your comparison.
Choose a project that suits your current skills
Think about how comfortable you are handling small components, fitting parts carefully and painting a model. If you’re new to one of those tasks, note it as something to allow time for, rather than treating an “easy” label as a guarantee. For help planning the finish, see this guide to painting 3D-printed models. Parts are cleaned and UV-cured before dispatch; a mild soapy-water wash before priming is an option. Handle delicate resin by thicker sections and avoid drops. If the piece is broken in the post, please provide images and we will see what we can do to help.
Use your completed checklist to identify which requirements you understand and which need more planning. You can compare narrow gauge kits against those priorities without ranking one as easiest based on incomplete information.
Prepare for a resin narrow gauge kit with realistic expectations
Resin preparation is manageable when you know what the kit has already had done and what remains your responsibility. Parts arrive cleaned and UV-cured, with resin supports removed, but they’re still supplied unpainted, unprimed and unassembled. That means you’ll need to plan for assembly and painting, as well as a careful look at the surfaces before priming.
A useful preparation routine is simple:
- Set up a clear, stable workspace so delicate parts are less likely to be knocked or dropped.
- Look over the parts gently for any fine support marks or layer lines.
- If you wish, wash the parts in mild soapy water before priming.
- Where fine marks remain, consider gentle sanding with 800-1200 grit before you apply a finish.
These steps aren’t a promise of an effortless build. They help you approach a resin kit methodically, with a realistic idea of the handling and finishing involved in easy to build narrow gauge kits.
Handle delicate resin parts carefully
Resin parts can be delicate, so avoid drops and hold each piece by its thicker sections rather than by fine details. Take care as you inspect, wash or sand parts, since firm pressure on a thin feature can increase the risk of breakage. A stable surface and unhurried handling make preparation easier to manage.
If the piece is broken in the post, please provide images and we will see what we can do to help.
Plan the finish without assuming extra supplies
Because the kit arrives unpainted and unprimed, priming and painting are part of your work. A wash before priming is optional. So is sanding: fine support marks or layer lines may remain, and gentle work with 800-1200 grit may help if you find them. Avoid treating every surface as if it needs sanding; inspect first and take care around delicate details.
Plan your finishing stage around the parts actually supplied. Don’t assume paint, tools, track or reference photos are included. The product’s contents list tells you what comes with that particular kit, while your own workspace and materials determine how you’ll carry out the preparation and finish. If you’re choosing among kits, include these tasks in your comparison rather than relying on the word “easy”.
Careful preparation can make the work clearer, but it doesn’t replace assembly or finishing. Handle resin gently, allow time for the steps you’ll undertake, and use only the kit-specific information when planning what else you need. Explore resin narrow gauge kits and their listed contents to find a project whose preparation and finishing requirements suit you.
Choose a Narrow Minded Railworks kit with its exact fit and contents
These OO9 examples give you specific fit and contents to compare, but they aren’t ranked as the easiest builds. Each is a body kit, not a complete locomotive: you’ll need to provide the specified chassis and carry out assembly and painting. All are supplied unpainted, unprimed and unassembled, with resin supports removed, so use the product details to decide which project fits your plans and experience.
OO9 Hungarian Forestry Diesel Narrow Gauge Locomotive Body for KATO 109
The listed price is £25.00. The kit includes a resin body, separate headlamps, brass 0.3 mm wire for handrails, and sub-chassis only. The KATO 109 chassis is not included; it is shown for information only. The sub-chassis is a kit component, not the motorised chassis needed to complete the model.
OO9 Diema DS60 Style Diesel Locomotive Shunter Body for KATO 109
This kit is also listed at £25.00. Its exact contents are a resin body, sub-chassis, brass hand-rails, and 3D-driver figure. The KATO 109 chassis is not included and is shown for information only. Compare this list with the Hungarian Forestry kit’s rather than assuming their separately supplied parts are interchangeable or identical.
OO9 Peckett & Sons Narrow Gauge kit to fit onto the KATO 11-109 chassis
The listed price is £25.00, and the dimensions are 58 mm L × 25.5 mm W × 38 mm H. The included items are a resin body, clip-on chassis frame, two 3D-scanned crew figures, and two Peregrine couplers. The KATO 11-109 chassis itself is not included. The stated fit is specifically for that chassis, so don’t treat it as a universal fit reference for the other kits.
These product-by-product differences make the contents list useful for planning: a separate component is part of the hands-on build, while the specified KATO chassis remains a separate requirement. Handle delicate resin carefully, avoid drops and hold parts by thicker sections. Fine support marks or layer lines may remain; gentle sanding with 800-1200 grit may help if needed. Parts are cleaned and UV-cured before dispatch, and you may wash them in mild soapy water before priming.
Narrow Minded Railworks is a UK maker, and orders are dispatched by Royal Mail. Worldwide shipping options are available. Packaging uses partly recycled, fully recyclable outer packaging; acid-free interior packing with approximately 99% recycled pulp fibres.
For a practical next step, browse the Narrow Minded Railworks kits and compare each product’s stated chassis fit and exact contents with your project requirements. If the piece is broken in the post, please provide images and we will see what we can do to help.
Turn your kit shortlist into a first-build plan
Before choosing, write down the chassis you’ll use, the parts each kit supplies and the finishing tasks you’re comfortable taking on. That gives you a practical way to judge easy to build narrow gauge kits against your own layout and experience, rather than relying on a broad label. A first project doesn’t need to be rushed; it needs to be one you understand and feel ready to tackle.
Narrow Minded Railworks is a UK-based maker of hand-crafted 3D-printed narrow gauge kits. Product-specific chassis fit and included-item details are available for the featured OO9 kits, helping you plan around the requirements of each model. Packaging uses partly recycled, fully recyclable outer packaging and acid-free interior packing with approximately 99% recycled pulp fibres.
When you’re ready to compare options against your plan, browse Narrow Minded Railworks narrow gauge kits. Choose the project whose fit, contents and hands-on work make sense for you, then enjoy building it one considered step at a time.
Frequently Asked Questions
Can a beginner build a narrow gauge kit without previous experience?
Yes, a beginner can build a narrow gauge kit if the fit and tasks suit their confidence and patience. Start by choosing a project with a clearly specified chassis and contents, then set aside a stable workspace where small parts can be handled carefully. Easy to build narrow gauge kits still need assembly and painting, so treat your first model as a hands-on learning project rather than a ready-made locomotive.
How long does it take to assemble a narrow gauge kit?
There isn’t a set assembly time: it depends on the specific kit, your experience and how much time you can give each task. Painting and preparation also add work beyond assembling the parts. For a practical plan, separate the build into stages, such as checking the contents, preparing the resin, assembling the body and completing the finish. You can then work at a pace that suits your schedule.
Are the KATO chassis included with Narrow Minded Railworks body kits?
No. KATO chassis are not included, even when a particular kit is designed to fit a specified KATO model or shows one for information. You’ll need to source the chassis separately and match it to the product’s stated fit. For example, a reference to a KATO 109 isn’t interchangeable with a reference to a KATO 11-109 unless the product description specifies that fit.
Can I return a kit if I change my mind?
Yes, Narrow Minded Railworks accepts returns on unused items within 30 days. If you’re still deciding whether a kit suits your layout, compare its stated chassis fit and contents before beginning assembly. Keep the item unused while you make your decision, since the returns policy applies to unused items. This gives you a clear reason to plan the project before starting work on the parts.
Does Narrow Minded Railworks ship narrow gauge kits outside the UK?
Yes, worldwide shipping options are available, and orders are dispatched by Royal Mail. Narrow Minded Railworks ships to over 40 countries. If you’re ordering from outside the UK, consider the destination and delivery arrangements as part of your project planning, particularly if you’re coordinating the kit with a separately sourced chassis. No delivery time is guaranteed here, so allow for the shipping process when planning your build.
What should I do if a resin piece arrives broken in the post?
Take clear images of the broken piece and provide them so the issue can be reviewed. Handle the remaining delicate resin carefully, avoid drops and hold parts by thicker sections. The stated policy is: “ If the piece is broken in the post, please provide images and we will see what we can do to help.”