

What makes an Inglenook satisfying isn’t copying a familiar track plan, but measuring how many wagons your sidings can actually hold. If you’re designing an inglenook siding layout for a shelf or small board, that distinction matters: the classic 5-3-3 arrangement uses eight wagons across three sidings, while the headshunt needs enough usable length for your locomotive and the wagons it must move. Let your rolling stock, not a standard footprint, guide the plan.
A compact layout can feel cramped if the sidings are too short or the locomotive can’t make the required moves. You can adapt the Inglenook’s operating logic to your space and equipment while keeping the challenge of assembling five wagons in a chosen order. This guide explains the classic capacity pattern, shows how to calculate track lengths using your own stock, and outlines how to test variations before fixing track in place. The result is a shunting puzzle that works in practice, not just on paper.
Key Takeaways
- Build your plan around the wagons and locomotive you intend to run, allowing for couplers and practical clearance.
- When designing an inglenook siding layout, treat published footprints as examples and adjust the plan to your space and track system.
- Compare classic and compact arrangements by the space they need and the shunting moves they allow.
- Test the full sequence with your actual rolling stock before fixing track in place, then revise awkward moves or restrictions.
- Add narrow-gauge scenery and distinctive rolling stock to support the setting while keeping the shunting puzzle easy to follow.
What Makes an Inglenook Siding Layout a Shunting Puzzle?
An Inglenook is a compact shunting layout built around a wagon-ordering puzzle. Rather than simply moving traffic between sidings, the operator rearranges wagons to form a train in a specified order. In the classic version, eight wagons start across the sidings, and five are selected for the finished train. The required order can change between turns, so the same track plan can present a different problem each time.
An Inglenook is a puzzle, not just a three-siding yard: limited track capacity makes assembling the correct wagon sequence the operating challenge. That distinction matters when designing an inglenook siding layout, because track lengths need to support both the starting arrangement and the moves required to reach the target. The Inglenook Sidings Wikipedia page gives further background on the puzzle’s origins, rules and variations.
How the classic five-three-three arrangement works
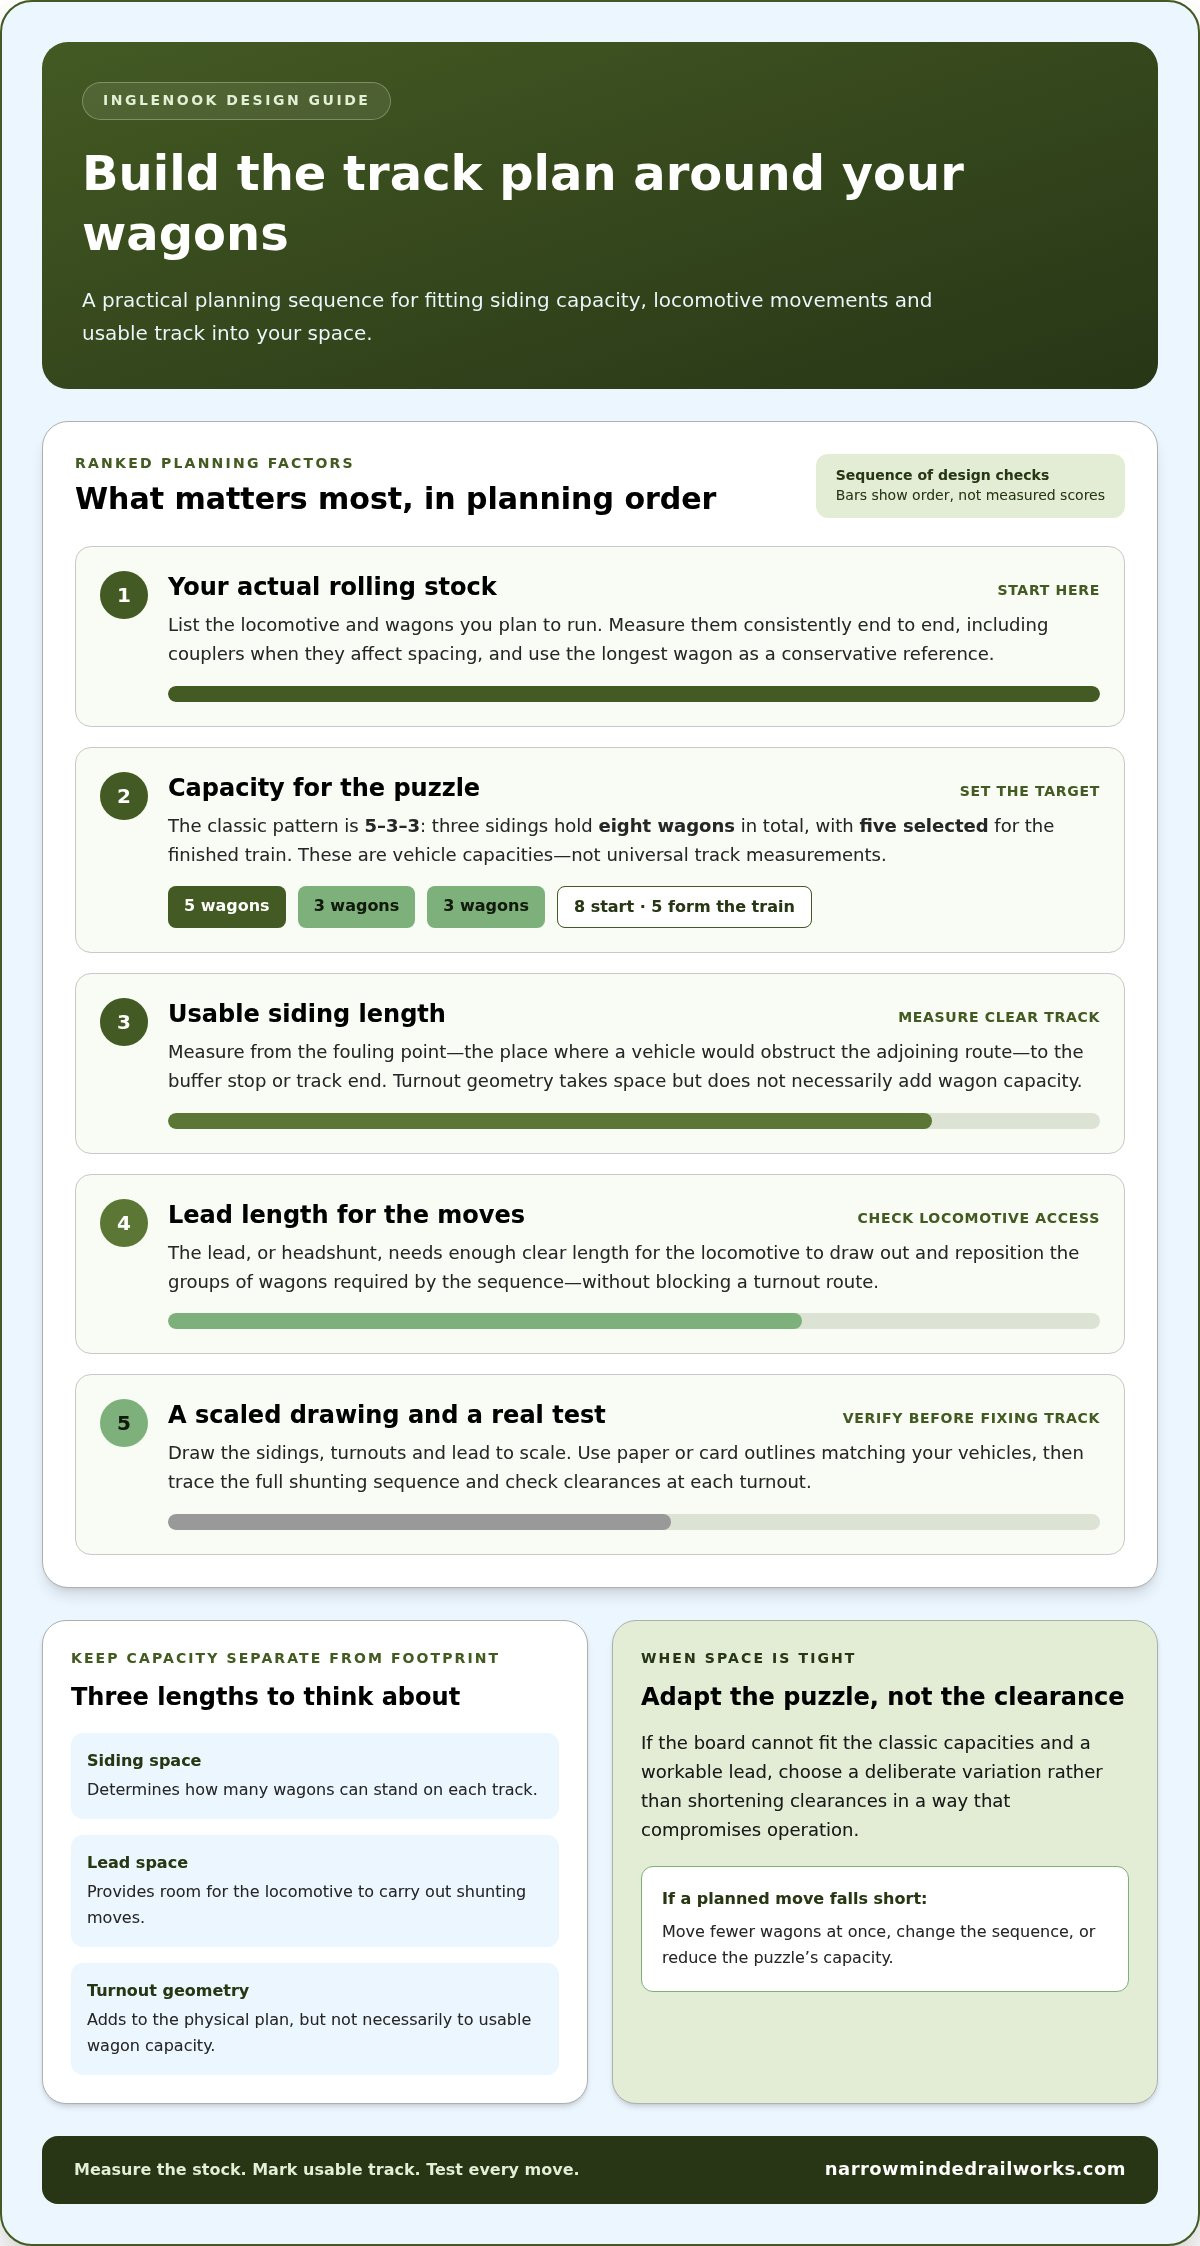
The standard arrangement has three sidings with practical capacities of five, three and three wagons. The eight-wagon puzzle uses the five-wagon siding as the destination track, while the other two provide room to sort and temporarily hold stock. The locomotive works from the lead, coupling to groups of wagons and moving them between sidings until the five selected vehicles sit on the destination siding in the required order.
Capacity means usable vehicle spaces, not a universal measurement in centimetres. A siding’s five-wagon capacity depends on the length of the wagons and the clear track available beyond the turnout. The same applies to the two shorter sidings. “5-3-3” describes what the tracks must hold, rather than guaranteeing one footprint across every scale and track system.
What the shunting lead needs to do
The lead, or headshunt, is the track the locomotive uses to access the sidings and move wagons between them. Its usable length determines how many vehicles can be handled together without blocking the turnout or requiring an unintended move. If it’s too short for the planned manoeuvres, the operator may not be able to draw out and reposition a group of wagons as intended.
Separate the puzzle’s vehicle capacities from the layout’s overall length. Usable siding space determines how many wagons each track holds; the lead provides room for shunting; and turnout geometry adds length to the physical plan. Turnouts and connecting track occupy space but don’t necessarily add usable wagon capacity. Measure clear track from the fouling point, where a vehicle would obstruct movement on the adjoining route, rather than counting every centimetre from the board edge.
These distinctions help you assess the classic pattern before choosing a footprint. If your board can’t accommodate all three siding capacities and a workable lead, consider a deliberate variation rather than shortening clearances in a way that compromises operation. The next step is to use your actual rolling stock to turn capacity targets into practical track lengths.
How to Plan Inglenook Track Lengths Around Your Wagons
Start with the vehicles you’ll operate, not a track plan copied from another layout. Design siding capacity around the vehicles that need to fit, not a copied diagram. This makes the design more dependable across different scales, wagon types and track systems. A reference such as Inglenook Sidings Track Plan and Layout Size can help you compare examples, but treat published dimensions as a starting point, not a guaranteed fit.
Use this four-step process before settling on track positions:
- Measure your rolling stock. List the locomotive and every wagon you plan to use. Measure each consistently from end to end, including couplers if they affect how closely vehicles can stand together. Use the longest wagon as your conservative reference.
- Set the target capacity. Decide how many wagons each siding and the lead need to accommodate for your chosen puzzle. As a cautious first estimate, allow a five-wagon siding for five vehicles at the length of your longest wagon, then account for couplers and small operating clearances.
- Draw the track to scale. Sketch the sidings, turnouts and lead on graph paper, or make a scale drawing. Mark usable track separately from turnout geometry, then place vehicle outlines along each siding to check the proposed capacity.
- Test the moves. Trace how the locomotive will collect and rearrange the wagons. Check that the required groups can move without standing across a turnout route or blocking access to another siding.
Measure usable track, not just the drawn length
A siding’s nominal length can be misleading because the turnout and its fouling point reduce the space available for wagons. Mark where a vehicle must stop to leave the adjoining route clear, then measure from that point to the buffer stop or track end. Repeat this for every siding. Leave enough space for wagons to stand without obstructing the route the locomotive needs next.
Check the locomotive’s access and the lead
The locomotive needs room to reach the wagons involved in each move, not merely to fit on the board. Trace the intended sequence and note when it must pull a group beyond the yard throat before reversing into another siding. Compare the longest such movement with the clear lead available. If it falls short, consider moving fewer wagons at once, changing the sequence or reducing the puzzle’s capacity.
Before fixing track in place, cut paper or card outlines to match your measured vehicles and lay them over the drawing. Move the outlines through the planned sequence, checking clearances at each turnout. This can reveal a cramped siding or awkward locomotive movement while the plan is still easy to change. For further narrow-gauge modelling ideas, explore narrow-gauge locomotives and wagons as possible sources of character for your rolling stock.
Classic or Compact Inglenook: Which Plan Suits Your Space?
The right arrangement depends on two practical limits: the usable space on your board and the length of the vehicles you want to run. The classic 5-3-3 plan provides more capacity and sorting options, while a 3-2-2 version reduces the track and stock required. Neither is automatically better. Compare the operating challenge you want with the space your measured rolling stock needs.
| Arrangement | Capacity | Space implications | Design checks |
|---|---|---|---|
| Classic 5-3-3 | Sidings hold five, three and three wagons; the traditional puzzle uses eight wagons and forms a five-wagon train. | Needs longer sidings, a workable lead and room for turnout approaches. | Check the longest wagons fit in the five-capacity siding and that the locomotive can make the required moves. |
| Compact 3-2-2 | Sidings hold three, two and two wagons, giving a smaller sorting puzzle. | Can reduce siding lengths and stock needed, but still requires space for turnouts and shunting. | Test the intended wagons and confirm the lead supports the planned operating sequence. |
Any published footprint is an example, not a guaranteed dimension for your scale, track system or rolling stock. The complete plan includes more than the sidings: turnout geometry and the lead also take up board space. When designing an inglenook siding layout, compare usable capacity first, then check whether the whole arrangement fits.
When to choose the classic five-three-three puzzle
Choose 5-3-3 if your measured stock and available footprint can support its capacities. The eight-wagon starting group offers a wider selection to sort into a five-wagon train, creating more possible combinations than a reduced version. That added choice brings a richer operating challenge, but the longer sidings and lead need room. Allow space for turnout approaches too, or the nominal capacities may not be usable in practice.
When a three-two-two version may fit better
A 3-2-2 arrangement is a practical adaptation when a shelf or small board can’t accommodate the classic plan. Its shorter sidings can make the layout easier to fit, but the reduced wagon count also limits the number of possible orders and sorting moves. Measure the vehicles you’ll use and test their clearances. Don’t assume a compact diagram will fit simply because its capacity is smaller.
How scale and track geometry change the footprint
Scale affects how much physical track each vehicle occupies, while turnout geometry changes how tracks meet and how much straight length remains beyond the points. For a narrow-gauge plan, consider the scale and intended rolling stock together. This guide to GN15 scale offers relevant context. Choose the arrangement that preserves usable siding capacity and enjoyable moves within your board, rather than chasing a universal footprint.
How to Test an Inglenook Plan Before Building It
A plan can look convincing on paper and still prove awkward to operate. Before permanent construction, test the full shunting sequence with the locomotive and wagons you intend to use. This reveals whether vehicles clear the turnouts, whether you can reach the couplings and whether every move works within the space shown on your plan. A workable Inglenook plan must allow every required move without relying on impossible clearances or unintended shortcuts.
Use the same repeatable process each time you revise the design:
- Lay out the track. Arrange temporary track on the board, or draw the complete plan at full size on paper, including turnout routes and the lead.
- Place the stock. Put the actual locomotive and wagons into the starting positions. If you’re working from a drawing, use vehicle outlines cut to their measured lengths.
- Run the moves. Follow the intended shunting sequence from the starting arrangement to the target order. Check the longest wagon and locomotive through every turnout and siding entrance.
- Record and revise. Note any vehicle that overhangs usable track, blocks a route or can’t be reached as planned. Adjust track positions, capacities or operating restrictions, then repeat the test.
Run the puzzle with real stock or paper templates
Real vehicles give the clearest test because their couplers, wheelbase and movement through turnouts are represented directly. If the track isn’t available yet, full-size paper templates provide a useful alternative. Mark where each vehicle sits and slide the outlines through the planned moves. Record any manoeuvre that requires a wagon to stand beyond the usable track, even briefly. That’s a sign to change the plan, not assume the vehicle will fit later.
Check operating access and repeatability
Try uncoupling at every working point using your hands or the tool you expect to operate with. A move may be technically possible but frustrating if a finger can’t reach the coupling or a turnout is hard to access. Run the sequence more than once, returning stock to the same starting positions. If success depends on nudging a wagon past an obstruction or using an unplanned shortcut, revise the clearances or operating rules.
Set up fair, varied shunting challenges
Define the starting positions and write down the required destination order before each session. Random selection can add variety, but use only combinations that fit the track’s capacities and can be completed through the intended moves. Try different target orders with the same starting stock; this changes the challenge without requiring a new layout. As you refine your plan, explore narrow-gauge modelling ideas for inspiration suited to a compact railway.
Bring Character to a Narrow-Gauge Inglenook Layout
Once the track plan works, a clear setting can make a compact Inglenook feel like a complete place. Choose one operating story, such as a small quarry, forestry railway or industrial yard, then use scenery and rolling stock to support it. A loading area or a few carefully placed details can suggest the work being done without hiding turnouts, obstructing uncoupling or making the wagon-ordering puzzle harder to follow.
Choose rolling stock that supports the layout’s story
Keep vehicle lengths compatible with the capacities you tested. A distinctive wagon may add character, but if it is longer than the stock used to plan the sidings, it could reduce usable capacity or complicate shunting. Build the scene around a consistent setting, and keep scenic features clear of the routes and standing positions needed for operation. If you’re developing a narrow-gauge scene, these narrow-gauge modelling basics can help frame your choices.
Set accurate expectations for narrow-gauge kits
Narrow Minded Railworks offers hand-crafted 3D-printed narrow-gauge locomotive and wagon kits for OO9, GN15 and 16 mm layouts. These are kits, not ready-to-run models. They are supplied unpainted, unprimed and unassembled, and the buyer supplies the chassis. Assembly and painting are required. Factor that work into your project plans, particularly if you want new rolling stock ready before final operating tests.
Resin is delicate. Handle parts carefully by thicker sections and avoid dropping them. Parts are cleaned and UV-cured before dispatch, but many modellers may wish to give them a quick wash in mild soapy water before priming. Fine support marks or layer lines may remain after cleaning. If needed, sand gently with fine-grit 800-1200 sandpaper, taking care not to damage fine details.
Finish with practical next steps and transparent delivery details
Before adding scenery, confirm that it won’t interfere with handling the stock or reaching the track. Finish the scene in stages and test access as you add scenic elements. This keeps the operating area practical while giving the railway an intentional setting.
Orders are dispatched by Royal Mail, with worldwide shipping options available. Outer packaging is partly made from recycled materials and is fully recyclable; interior packing is acid-free and made from approximately 99% recycled pulp fibres. Please handle resin parts carefully after delivery. We cannot be held responsible for breakages once your item has arrived. If the piece is broken in the post, please provide images and we will see what we can do to help.
If narrow-gauge rolling stock would suit your scene, explore narrow-gauge kits as an option for adding character to the layout.
Turn Your Track Plan into a Railway with a Story
Your next step is to make the plan your own. Once the shunting works, decide what job the railway performs and let that story guide the details you add. A modest loading point, a recognisable wagon mix or a carefully chosen scene can give the layout purpose without taking space away from operation. Keep testing as you develop it, so scenery and rolling stock remain part of the puzzle rather than obstacles to it.
Designing an inglenook siding layout is an opportunity to create a small railway with its own character as well as a satisfying operating challenge. For a narrow-gauge setting, hand-crafted 3D-printed locomotive and wagon kits for OO9, GN15 and 16 mm layouts can provide a starting point. Narrow Minded Railworks is a UK-based maker, with worldwide shipping options and orders dispatched by Royal Mail.
Explore Narrow Minded Railworks narrow-gauge kits for ideas to complement your scene. Take the next step by choosing stock that suits your setting, then test it against your track plan.
Frequently Asked Questions
Can one person operate an Inglenook siding layout?
Yes, one person can operate the layout by moving the locomotive and wagons between sidings. Before starting, write down the initial wagon positions and target order so the task is clear. For a solo session, draw a fresh target order for each round. With another operator, take turns setting or solving the same puzzle to add variety without changing the track plan.
Do I need a run-round loop for an Inglenook layout?
No, a separate run-round loop isn’t essential to the Inglenook puzzle. The locomotive shunts wagons using the lead and siding connections, rather than running around a train to change ends. Before settling on the plan, trace the moves your chosen puzzle requires. If the locomotive can’t reach or reposition a wagon as needed, alter the track arrangement or operating sequence.
What happens if my wagons are different lengths?
Mixed lengths mean a siding that holds a set number of short wagons may not hold the same number of longer ones. For example, a group containing one unusually long wagon can occupy more track than a group of similar short wagons. Measure the combinations you intend to use, not just individual vehicles. A consistent operating set makes capacity easier to predict and the puzzle easier to repeat.
Can I build an Inglenook on a shelf?
Yes, a shelf can suit an Inglenook, provided the complete track arrangement fits the available length and depth. Include room for the turnouts and lead as well as the sidings, and consider whether you can comfortably reach the wagons. Published compact plans are useful references, but their dimensions won’t necessarily suit your stock or track system. When designing an inglenook siding layout on a shelf, test a full-size sketch before fixing track.
How can I make an Inglenook puzzle more challenging without adding track?
Change the initial wagon positions or target order while keeping the track unchanged. You could also select different combinations from the available wagons, provided the required train can be assembled with the siding capacities and lead. Before using a new setup, try solving it yourself and confirm that no move depends on an unintended shortcut. This creates variety through operating choices rather than extra track.
Does the locomotive count as one of the cars in an Inglenook puzzle?
No, the locomotive isn’t counted as one of the wagons in the puzzle’s siding capacities. It provides the power for shunting, so its length still matters when checking whether it can stand on the lead or access wagons. If you use a different locomotive from your usual one, repeat the operating test: its size or coupling position could affect how easily it performs the planned moves.