

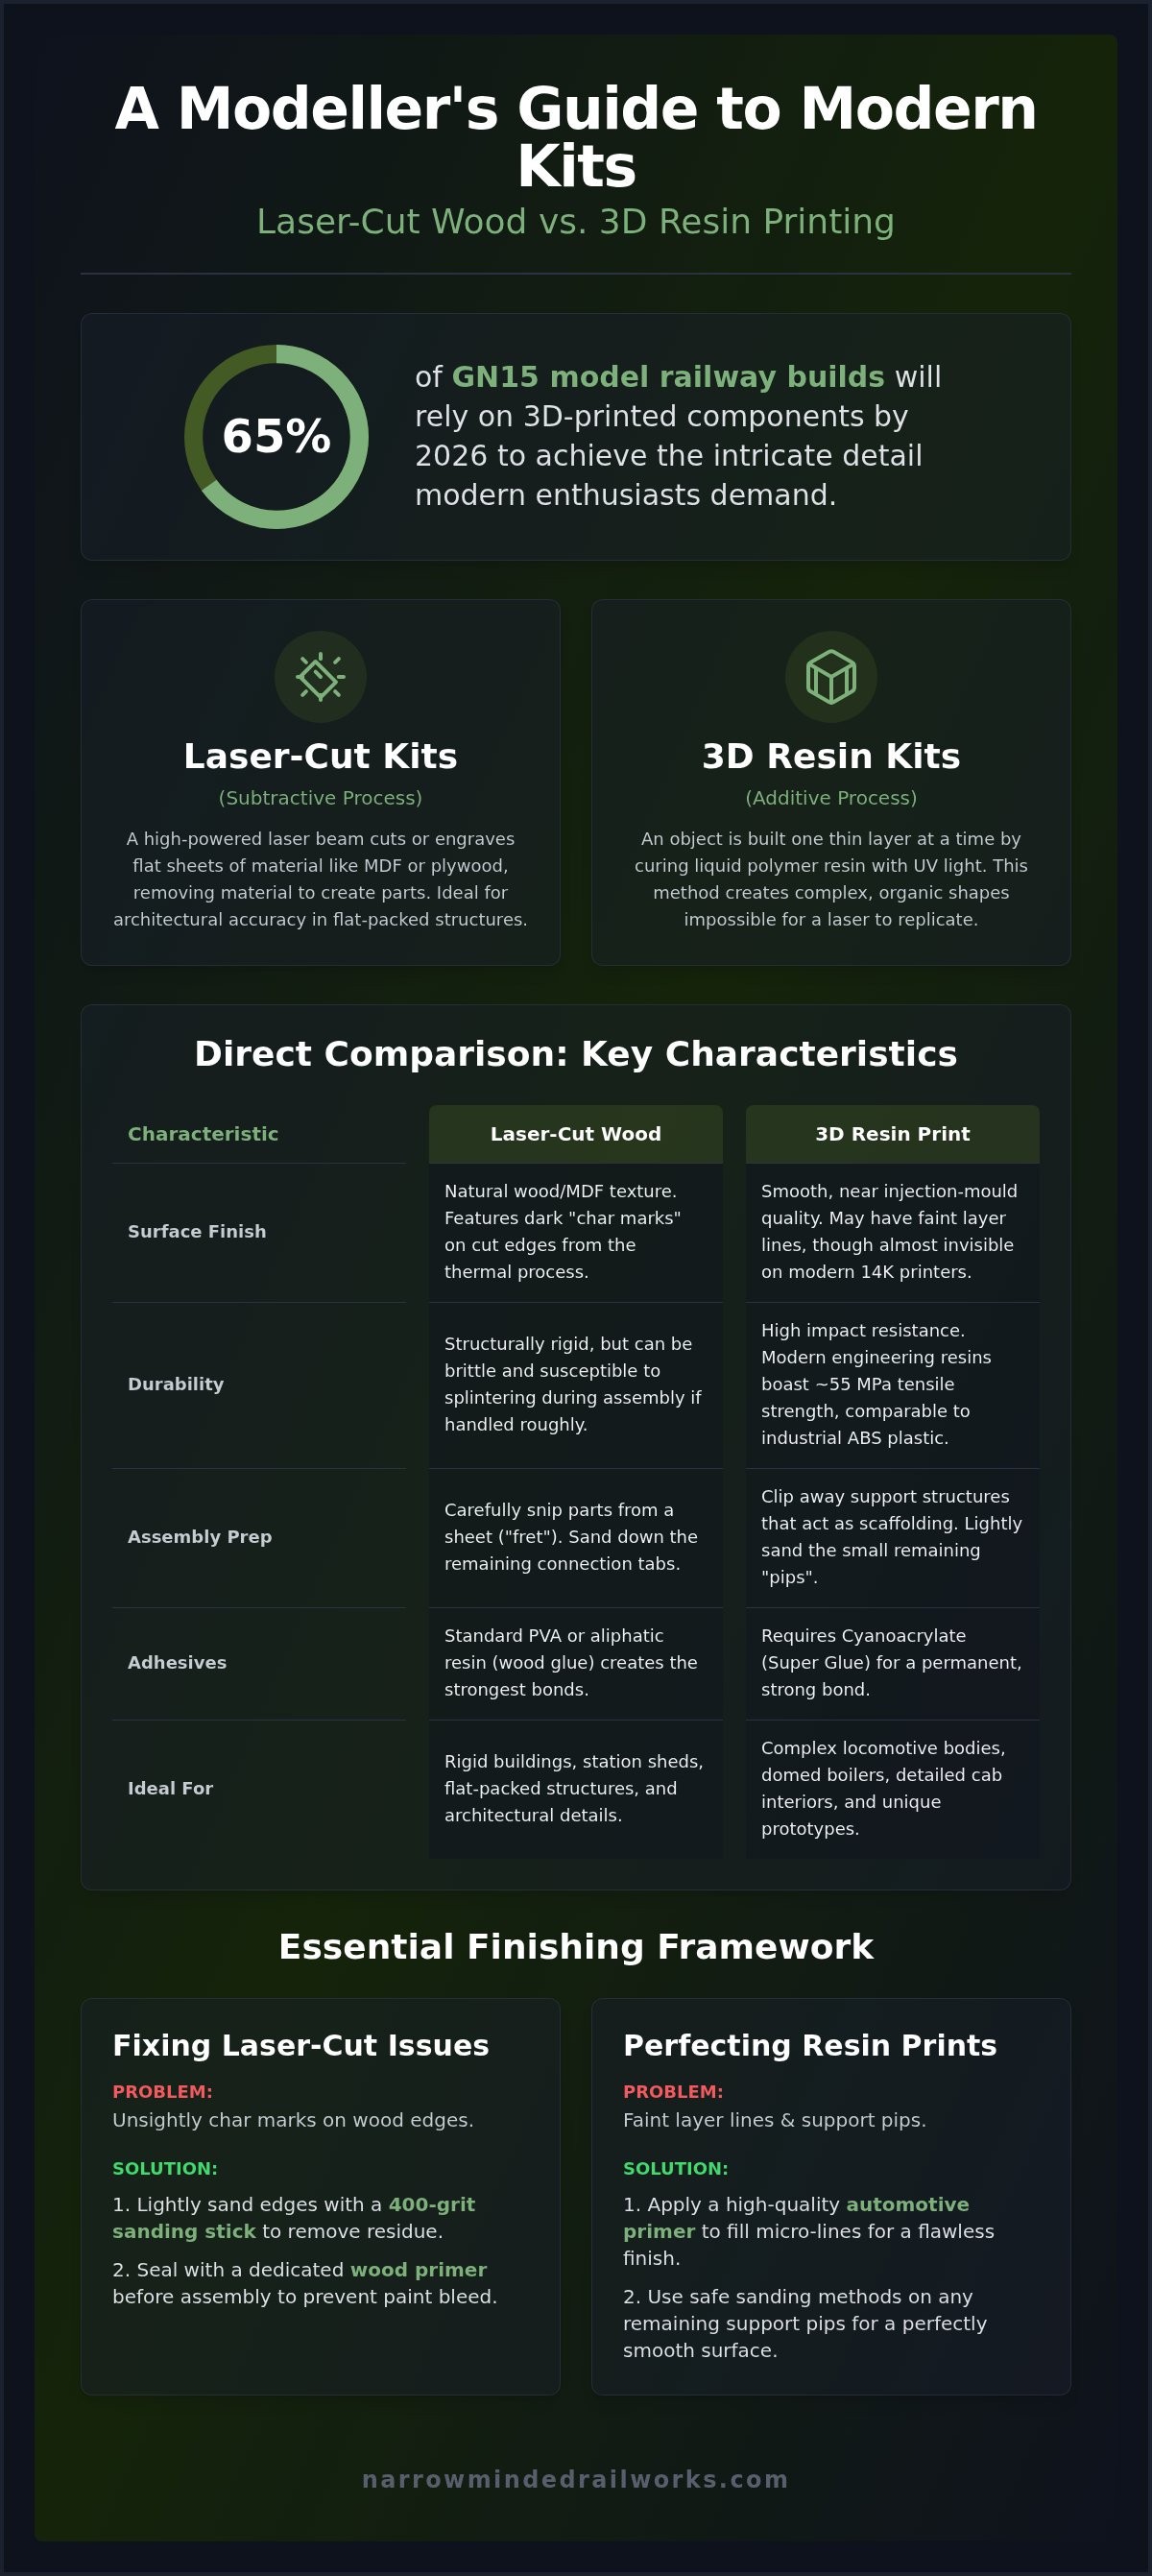
Did you know that as of 2026, approximately 65% of GN15 model railway builds rely on 3D-printed components to achieve the level of detail modern enthusiasts demand? You likely recognise the frustration of opening a new kit only to find visible layer lines or unsightly char marks on laser-cut wood. Although resin printing introduces specific surface constraints, applying the correct finishing techniques provides a professional solution that brings out the finest architectural details. Mastering the art of customising 3d printed model railway kits is the key to turning a raw print into a museum-quality locomotive.
This guide provides the definitive comparison between laser-cut and resin technologies, helping you choose the right material for every shed, wagon, or narrow gauge body. You will learn which specific primers and glues create the strongest bonds on engineering-grade resins, ensuring your OO9 or O-16.5 models are as durable as they are detailed. We will outline the essential finishing tools you need to remove imperfections and share a framework for blending hybrid technologies into one cohesive, professional-looking scene.
Key Takeaways
- Understand the structural and aesthetic differences between subtractive laser cutting and additive 3D printing for narrow gauge projects.
- Identify the best applications for each technology, such as using high-resolution resin for complex locomotive curves and laser-cut MDF for rigid buildings.
- Master the specific techniques for customising 3d printed model railway kits, focusing on safe sanding methods and the use of automotive primers for a flawless finish.
- Select the correct glues and finishing tools to address common issues like resin layer lines and laser-cut char marks effectively.
- Explore how modern 3D kits integrate directly with commercial chassis to simplify the assembly of unique narrow gauge prototypes.
The Modern Kit Building Revolution: Laser Cut and 3D Printed Basics
Digital design has fundamentally altered the landscape of narrow gauge railway modelling, moving the hobby far beyond the era of heavy white metal castings and etched brass. In previous decades, modellers were limited by the high costs of mass production, which often meant niche prototypes were never produced. Digital manufacturing has removed these barriers. Today, enthusiasts use two primary technologies to populate their model railway layouts: subtractive laser cutting and additive 3D printing. While both methods rely on computer-aided design (CAD), they serve very different purposes on a workbench.
Laser-cut kits are created by a high-powered beam that cuts or engraves flat sheets of material, such as MDF, plywood, or acrylic. This subtractive process is exceptionally efficient for creating flat-packed structures. In contrast, 3D printing is an additive process where a machine builds a three-dimensional object one thin layer at a time. For those customising 3d printed model railway kits, the primary advantage is the ability to create complex, organic shapes that a laser simply cannot replicate. Narrow gauge modellers were among the first to embrace these tools, as they allowed for the creation of unique, small-run locomotives and rolling stock that reflect the character of obscure industrial lines.
How Laser Cutting Works for Rail Modellers
Precision CO2 lasers follow 2D vector paths to produce parts with architectural accuracy. This technology is most effective when working with plywood, MDF, and thin card for fine overlays. Although the process is precise, it naturally leaves dark char marks on the edges of the wood. A proactive solution is to lightly sand these edges or seal them with a dedicated wood primer before assembly. Most laser-cut kits utilise a tab-and-slot assembly method, which ensures the structural rigidity required for large buildings and station sheds.
The Rise of Resin 3D Printing in Narrow Gauge
For small scales like OO9 and GN15, resin-based Stereolithography (SLA) is vastly superior to traditional filament (FDM) printing. Filament printers often struggle with the tiny dimensions of narrow gauge parts, leaving behind coarse ridges. Resin printing cures liquid polymer layer-by-layer using UV light, producing a surface finish that is nearly injection-mould quality. This technology allows for "impossible" geometries, such as perfectly domed boilers and fully detailed cab interiors. When customising 3d printed model railway kits, modellers can benefit from these high-resolution details, though they must account for the specific cleaning and priming requirements of resin to ensure a professional result.
Direct Comparison: Surface Detail, Durability, and Ease of Assembly
Choosing between laser-cut and 3D-printed kits often involves balancing surface aesthetics against assembly speed. Laser-cut kits typically present dark char marks on the edges due to the thermal cutting process. While these marks are a natural byproduct, a quick pass with a 400-grit sanding stick effectively removes the residue before painting. In contrast, 3D prints may show faint layer lines from the additive process. When customising 3d printed model railway kits, you'll find that modern 14K resolution printers produce layers as thin as 17 microns, making these lines almost invisible to the naked eye after a single coat of primer.
Structural integrity also varies significantly between the two mediums. Traditional laser-cut wood is susceptible to splintering if handled roughly during the "tab-and-slot" assembly. Resin was once considered fragile, yet the 2026 generation of engineering-grade resins boasts a 15% higher impact resistance than previous materials. These modern resins offer a tensile strength of approximately 55 MPa, which is comparable to industrial ABS plastics. This durability ensures that your locomotive bodies can withstand the rigours of a working layout without the risk of shattering during a minor derailment.
Preparation and adhesive choices are the final hurdles in the assembly process. Laser kits require you to carefully snip parts from a sheet and sand down the remaining tabs. 3D-printed kits arrive with support structures that act as a scaffold; these must be clipped away, leaving small pips that require light sanding. Your choice of glue is equally specific. Wood kits rely on standard PVA or aliphatic resins for a strong bond, whereas resin kits require Cyanoacrylate (Super Glue). If you are looking for high-detail narrow gauge subjects that utilise these advanced materials, our OO9 locomotive and wagon kits are specifically designed for ease of assembly and superior surface finish.
Detail vs. Texture: Which Looks More Realistic?
Laser cutting is the superior choice for flat, repetitive textures such as brickwork, roof slates, or timber planking on station buildings. However, it cannot easily replicate "volumetric detail"-the three-dimensional depth found in curved cab roofs, domed boilers, or intricate rivet heads. 3D printing excels here, allowing for complex geometries that remain crisp even in 7mm or OO9 scales. When customising 3d printed model railway kits, this volumetric precision allows you to add fine pipework and interior fittings that would be impossible to achieve with flat-packed wood sheets.
Longevity and Material Stability
Environmental factors play a significant role in the lifespan of your models. Laser-cut wood is an organic material that reacts to humidity; without proper sealing, it can warp or swell over time in a damp shed or garage. Resin is chemically stable and won't warp, but it does require protection from prolonged sunlight. Applying a UV-resistant clear coat or a standard paint finish is a proactive solution that prevents the resin from becoming brittle over several years. For a permanent layout, ensuring both kit types are stored in a temperature-controlled environment will maintain their structural alignment for decades.
Maintaining your equipment is essential for any hobby, and for those who enjoy the camping and caravan lifestyle, wyecamping.co.uk offers a range of high-quality accessories to keep your leisure gear in peak condition.
Choosing the Right Technology for Your Specific Model
Selecting the appropriate manufacturing method depends entirely on the geometric requirements of your subject. Locomotives represent the pinnacle of 3D printing application because their designs frequently involve complex compound curves and intricate cab interiors. While traditional manufacturing methods struggle with the small production runs required for narrow gauge prototypes, high-resolution resin printing allows for the creation of highly specific models without the need for expensive industrial tooling. This makes it the gold standard for boilers, domes, and the delicate pipework that defines the character of a steam engine.
Buildings and larger structures present different challenges that often favour laser-cut MDF or plywood. These materials provide the necessary physical weight and perfectly straight lines required for station sheds or engine houses. Although resin is excellent for detail, using it for large, flat walls can be unnecessarily expensive and may lead to slight warping if not properly supported. By choosing laser-cut wood for the primary structure, you ensure a rigid foundation that feels substantial on the layout. Rolling stock often sits in the middle ground; many modellers find that customising 3d printed model railway kits for wagon bodies while using laser-cut underframes offers an ideal balance of detail and structural strength.
Scenery and layout accessories also benefit from the precision of 3D printing. Items like petrol pumps, platform luggage, and figures are often too small for effective laser cutting. These ultra-small details are essential for creating a lived-in atmosphere. A proactive solution for modellers is to use 3D prints for these focal points while relying on traditional methods for the broader landscape, ensuring every pound spent contributes to the visual impact of the scene.
Why 3D Printing Dominates the OO9 and GN15 Market
Modelling obscure narrow gauge lines on a budget was historically difficult due to the lack of ready-to-run options. 3D printing has solved this by allowing niche manufacturers to produce rare locomotives that would otherwise never exist in kit form. When you are customising 3d printed model railway kits, one of the greatest advantages is the ability to use OO9 locomotive kits designed to fit directly onto standard commercial chassis. This eliminates the need for complex scratch-building of motors and gears, letting you focus on the aesthetic finish of your unique prototype.
The Hybrid Approach: The Best of Both Worlds
The most realistic layouts often combine both technologies to play to their respective strengths. You can use a laser-cut building shell for its structural integrity and then add 3D-printed windows, doors, and chimneys for superior architectural detail. This hybrid method is particularly effective when getting started in GN15 scale, where the larger size makes fine details even more noticeable. To ensure material cohesion, always use a consistent painting and weathering strategy across both wood and resin components. Applying a uniform primer layer is a proactive step that hides the different material textures, creating a seamless look across your entire collection.
Essential Tools and Techniques for Customising Your Kit
Mastering the finish of a model is the definitive step where a raw kit transforms into a realistic miniature. When customising 3d printed model railway kits, your choice of tools must account for the non-porous nature of resin compared to the organic, absorbent qualities of laser-cut wood. While both materials require surface preparation, the techniques for achieving a professional result differ significantly. A proactive solution for any modeller is to maintain a dedicated toolkit that includes high-grit sanding sticks, sharp side cutters, and specialized primers designed for industrial plastics.
Sanding strategies require a tailored approach. For laser-cut MDF or plywood, you should always sand with the grain to avoid tearing the fibres. Resin requires a different touch; using a 600 to 1000-grit sanding stick under a trickling tap prevents the build-up of heat and keeps fine dust out of the air. If you encounter support pits in your resin or visible tab joints in your laser kits, applying a fine modelling putty is the standard fix. Once dry, these areas can be sanded flush to create a seamless surface that disappears under a coat of paint. Weathering also reacts differently across these mediums. Wood and card will naturally soak up liquid washes, often requiring a light touch to avoid over-darkening, while resin allows washes to pool naturally around rivets and vents for a high-contrast look.
Priming is perhaps the most critical stage of the process. Standard hobby acrylics often struggle to "bite" into the smooth surface of a 3D print, leading to potential flaking. A proactive solution is to use a high-quality automotive primer, which provides a robust foundation for subsequent layers of paint. For those looking to expand their workbench capabilities, our selection of diorama tools and scenery provides the essential components needed to achieve these professional finishes on any narrow gauge project.
Preparing 3D Prints for Painting
Success with resin begins with the safe removal of support structures. You should always use sharp side cutters to snip the supports a millimetre away from the model's surface, rather than pulling them off, which can cause deep pits. After removal, wet sanding is the best method to achieve a glass-smooth finish on locomotive water tanks or boilers. For a deeper dive into these methods, you can refer to our guide on painting 3D printed models, which covers advanced airbrushing and masking techniques.
Finishing Laser-Cut Structures
Laser-cut wood and MDF are highly porous and will "drink" paint if not properly sealed. Applying a dedicated wood sealer or a thin coat of shellac before your main colour prevents the grain from rising and ensures a smooth finish. When painting etched brickwork, a proactive technique involves applying the brick colour first, followed by a thin, light-grey wash to represent mortar lines. Finally, using weathering powders on the corners and joints is an excellent way to hide any remaining laser-burnt edges, blending the structure into your layout's environment.
The Narrow Minded Railworks Advantage: Expert 3D Printed Kits
At Narrow Minded Railworks, we understand that technology is only useful if it serves the modeller's vision. We specialise in high-detail 3D-printed narrow gauge kits, focusing on locomotive bodies and wagons that are designed to fit standard commercial chassis. This proactive design choice removes the traditional barrier of scratch-building complex running gear, allowing you to focus on the creative aspects of customising 3d printed model railway kits. By utilising modern 14K resolution printers, we achieve layers as thin as 17 microns. This high-fidelity approach virtually eliminates the visible lines often associated with earlier additive manufacturing, providing a superior canvas for your paintwork.
Our commitment extends beyond the print itself. We support the narrow gauge community by providing unique subjects that major manufacturers often overlook, from industrial oddities to obscure branch line rolling stock. We maintain transparency regarding 3D print preparation, providing clear guidance on support removal and surface finishing. This ensures you start your project with a realistic understanding of the assembly process, leading to a more satisfying build experience that results in a professional finish.
Why We Choose Resin Over Laser Cutting
While laser cutting is a reliable choice for the straight lines of a goods shed, it cannot replicate the complex, organic curves of a narrow gauge locomotive. Resin allows us to replicate complex prototypes with absolute fidelity to the original design, including volumetric details like rivet heads and boiler bands that are printed as part of the shell. This technology also allows for rapid iteration. We can perfect our designs based on direct modeller feedback much faster than traditional tooling allows. You can explore these high-detail designs in our range of OO9 and GN15 locomotive kits, each designed with the enthusiast in mind.
Start Your Next Project with Confidence
We provide proactive support for beginners to ensure success from the moment you open the box. Whether you need advice on chassis selection or tips for final painting, we are here to help you master the art of customising 3d printed model railway kits. We understand that resin components can be delicate, so we utilise robust packaging to ensure your kit arrives in perfect condition, whether you are in the UK or ordering via our worldwide shipping service. Browse our collection of kits today and discover how high-resolution resin can transform your narrow gauge layout.
Elevate Your Layout with Professional Finishing Techniques
Integrating different manufacturing technologies requires a clear understanding of material constraints. While laser-cut wood provides the structural base for your buildings, high-resolution resin remains the superior choice for the complex curves and volumetric details of your locomotives. By applying the sanding and priming strategies discussed, you can achieve a seamless look across your entire collection. Mastering the specific art of customising 3d printed model railway kits ensures that every rivet and pipe on your OO9 or GN15 model stands out with absolute clarity.
We provide a proactive solution for modellers seeking unique prototypes that aren't available through traditional mass production. Our kits are specifically designed to fit standard commercial chassis, simplifying the assembly process while maintaining high-resolution standards. Whether you're building a quirky industrial line or a rural branch, we're here to support your journey with specialist designs and worldwide shipping. Explore our range of high-detail 3D printed narrow gauge kits today and bring a new level of realism to your workbench. Your unique vision for a narrow gauge railway is now more achievable than ever.
Frequently Asked Questions
Which is better for a beginner: a laser-cut or a 3D-printed kit?
Laser-cut kits are generally easier for building larger structures due to their intuitive tab-and-slot assembly. However, 3D-printed kits are the superior choice for beginners who want to model locomotives without the difficulty of scratch-building complex curves. A proactive solution for newcomers is to start with a 3D-printed wagon or loco body designed to fit a commercial chassis, which bypasses the most difficult mechanical hurdles while delivering high levels of detail.
Do 3D-printed resin kits require special glue?
Resin kits require Cyanoacrylate, commonly known as super glue, because standard plastic cement or wood glue won't form a chemical bond with cured resin. While this adhesive sets quickly, it can be unforgiving during the assembly of small narrow gauge parts. A proactive solution is to use a gel-based Cyanoacrylate, which provides a few extra seconds to align components perfectly before the bond becomes permanent.
Can I paint 3D-printed models with standard acrylic hobby paints?
You can use standard acrylic hobby paints on 3D-printed models, provided the surface has been properly prepared. Acrylics don't naturally adhere well to the smooth, non-porous surface of cured resin, which can lead to peeling. A proactive solution is to apply a high-quality automotive primer first; this creates a robust surface for your topcoats and ensures the paint doesn't flake off during handling or operation on your layout.
Are laser-cut kits more durable than 3D-printed ones?
Laser-cut wood kits offer high structural rigidity for buildings, but modern engineering-grade resins are now comparably durable for locomotives and rolling stock. Earlier 3D prints were often brittle, but the 2026 generation of resins has a 15% higher impact resistance than previous materials. A proactive solution for ensuring longevity is to seal wood against humidity and protect resin from direct UV light to prevent either material from becoming unstable over time.
How do I remove the burnt smell from laser-cut wood kits?
The burnt smell is a natural byproduct of the laser-cutting process and usually fades once the parts are removed from their packaging. If the odour persists and becomes distracting in your hobby room, it can be sealed away. A proactive solution is to lightly sand the charred edges and apply a coat of shellac or wood sealer, which traps the scent and provides a better surface for your final paint layers.
What is the best way to hide layer lines on a 3D-printed locomotive?
Wet sanding with 600 to 1000-grit paper is the most effective method for smoothing out visible layer lines. When you are customising 3d printed model railway kits, you might still see faint ridges even after careful sanding. A proactive solution is to use a high-build automotive primer, which fills these microscopic gaps and results in a glass-smooth finish that looks like professional injection-moulded plastic.
Do I need a 3D printer to build these kits?
You don't need to own a 3D printer to enjoy the benefits of high-detail narrow gauge models. We handle the printing process using industrial-grade 14K resolution machines and ship the physical resin kit directly to your door. This allows you to focus on the traditional aspects of the hobby, such as assembly, painting, and customising 3d printed model railway kits to suit the specific era of your layout.
Will 3D-printed resin models warp over time like wood?
Resin models are chemically stable and won't warp due to humidity, unlike organic wood materials that can swell in damp sheds. However, resin can become slightly brittle if it's left in direct sunlight for extended periods. A proactive solution is to apply a UV-resistant clear coat or a standard paint finish, which shields the material from light and ensures the locomotive body remains structurally sound for decades of use.