

A model railway without a history is just a collection of plastic and wood. It's the narrative that turns a static diorama into a destination. If you've ever looked at your layout and felt it was a series of random kits rather than a real place, you're experiencing a common hurdle in the hobby. Many enthusiasts face indecision when choosing their next locomotive or worry that their fictional history won't feel "prototypically plausible." However, creating a backstory for your model railway provides a logical solution that turns these constraints into creative opportunities.
You likely want a layout that feels cohesive and tells a story to visitors without any verbal explanation. We'll show you how to transform a generic layout into a living, breathing world with a professional framework for railway world-building. This guide covers how to establish a timeline, define an economic purpose for your line, and use your new narrative to guide every future purchase for your OO9 or 7mm scale kits.
Key Takeaways
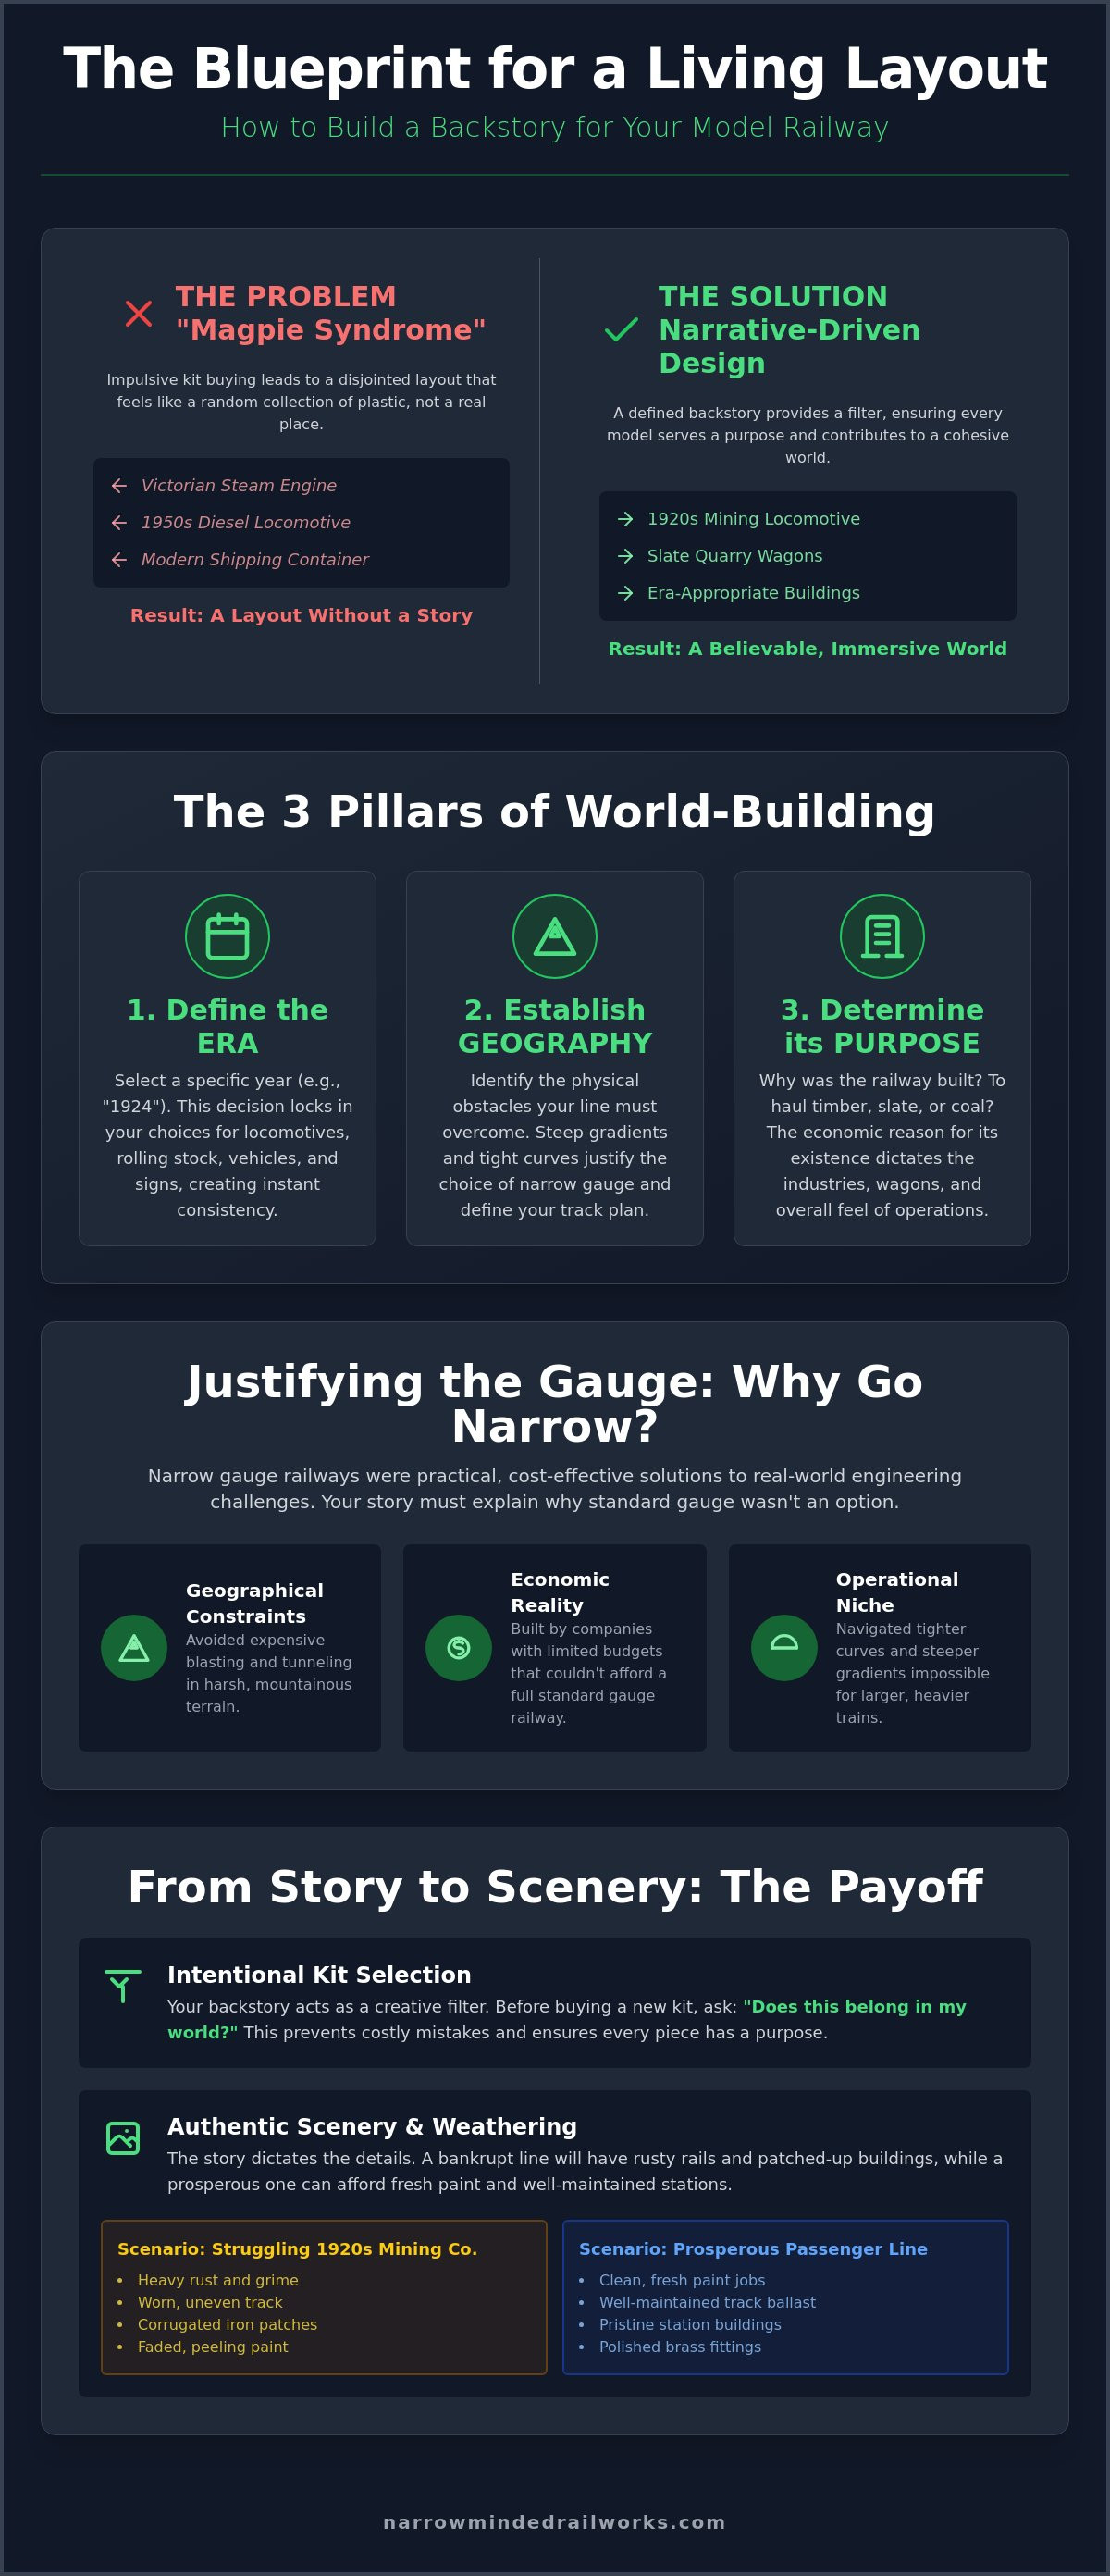
- While impulsive kit buying often leads to a disjointed layout, a defined narrative provides a professional filter that ensures every model serves a specific purpose.
- Creating a backstory for your model railway can feel overwhelming; however, establishing a "Founding Father" and a "Golden Age" provides a logical structure for your world-building.
- Narrow gauge lines require a realistic reason to exist, so defining geographical constraints helps justify why your fictional company utilizes OO9 or GN15 locomotive kits.
- Generic scenes often lack depth, but you can increase immersion by using diorama tools to add "layers of time" and micro-stories that reflect your railway's history.
Defining the Narrative: Why a Backstory is Essential for Your Layout
A model railway backstory represents the fictional history, geography, and purpose of your specific line. It serves as the strategic foundation for every design choice you make. Without a narrative, layouts often suffer from "magpie syndrome." This happens when a modeller buys random kits because they look appealing, only to find they don't work together on the baseboard. By creating a backstory for your model railway, you establish a logical reason for specific track plans and operational quirks that define your world.
While your story is entirely fictional, it should be rooted in "prototypical plausibility." This means the history should follow the basic rules of engineering and economics that governed real railways. If your line exists to haul timber, the gradients and loading gauges must reflect that industrial reality. This attention to detail makes the fictional world feel authentic to you and your visitors alike.
To better understand how narrative and visuals work together in a professional setting, watch this helpful video:
The history of railway modelling demonstrates that the most immersive layouts are those that feel like real destinations. Whether you're building a tiny industrial spur or a mountain pass, the story dictates the scenery. If the railway was built by a struggling mining company in the 1920s, the tracks should look worn. The buildings should appear patched with corrugated iron rather than expensive slate. These details emerge naturally once the history is written.
The Difference Between a "Theme" and a "Backstory"
Many hobbyists confuse these two concepts, but they serve different purposes. A theme is a visual style, such as "North Wales in the 1930s." It tells you what colors to use and what locomotives might be appropriate. A backstory is the specific reason why that station was built in that particular valley. Themes are what you see on the surface, but backstories are the underlying reasons why those elements exist in the first place.
How a Story Simplifies Your Modelling Decisions
Identifying a clear narrative helps you justify the presence of specific narrow gauge railway types. If your story involves a remote slate quarry, OO9 locomotive kits become the obvious choice for their ability to navigate tight curves. Your story also dictates the level of weathering. A prosperous line can afford fresh paint, while a bankrupt branch line will show significant rust. Establishing a clear "Era" narrows down your choices for wagon kits, ensuring you don't waste time on items that don't belong in your world. By creating a backstory for your model railway, you make every future purchase more intentional.
Setting the Scene: Defining Era, Geography, and Purpose
When creating a backstory for your model railway, selecting a specific year or a very narrow range is the first step toward achieving rolling stock consistency. If you decide your railway operates in 1924, you immediately eliminate the risk of placing a 1950s diesel next to a Victorian steam engine. This decision also dictates your scenery choices, from the style of enamel signs on station walls to the types of road vehicles parked at the level crossing. While prototype research can feel daunting at first, it provides a proactive foundation for your creativity. By narrowing your focus, you don't limit your imagination; you simply give it a framework to thrive within.
The geography of your layout is the next critical constraint. You must determine the physical obstacles that forced your fictional company to choose narrow gauge over standard gauge. Was it the sheer cost of blasting through granite? Or perhaps the terrain was too steep for traditional locomotives? Creating a backstory for your model railway requires you to think like an engineer with a limited budget. You aren't just placing tracks; you're solving a problem that the landscape has presented to your fictional company.
The "Why Narrow Gauge?" Question
Narrow gauge lines didn't exist for novelty. They were practical solutions to specific industrial problems. For instance, the OO9 scale is historically logical for lines that needed to navigate steep grades or incredibly tight curves in mountainous regions. If your layout depicts a sprawling country estate or a compact industrial yard, the "minimum space" logic of GN15 scale makes perfect sense. Geography also dictates locomotive choice. In urban settings where tracks might run along public roads, the need for specialized tram loco designs with side skirts and cowcatchers becomes a functional necessity rather than a cosmetic choice.
Identifying Your "Anchor" Industry
Every railway needs a reason to move, and your anchor industry is the primary revenue source that keeps the fictional company afloat. This industry dictates your track layout. A mining line might require extensive sidings for sorting wagons, while a passenger-focused line needs longer platforms and run-round loops. Slate quarries remain a classic inspiration, particularly for those looking to recreate the atmosphere of North Wales. Alternatively, agricultural lines provide a wealth of modeling opportunities as they move produce from fields to a standard gauge railhead. You might even consider "What If" scenarios, such as a rural branch line that narrowly survived the Beeching cuts of the 1960s. Whatever you choose, ensure the industry matches the landscape you've built. If you're ready to start building the rolling stock for your specific era, consider exploring our range of specialized kits to find the right fit for your narrative.
The "Lies and Legends" Method: How to Build a Logical History
Creating a backstory for your model railway doesn't have to be a complex literary exercise. You can follow a structured four-step framework to build a history that feels lived-in and authentic. This "Lies and Legends" method helps you justify the presence of every locomotive and structure on your baseboard. By establishing a clear timeline, you create a logical reason to mix "shiny" new kits with heavily weathered older stock, reflecting the natural aging process of a working line.
Step 1: The Founding Father. Every line began with an individual's ambition. You should decide who built the line and why. Was it a local industrialist seeking to move ore to the coast, or a rural community desperate for a link to the main line? Identifying this "Founding Father" helps you choose the initial architectural style of your railway. If he was a wealthy aristocrat, your stations might feature ornate stonework; if he was a cost-cutting mine owner, they might be simple timber sheds.
Step 2: The Golden Age. Define the period when the railway was at its most prosperous. This era represents the peak of your fictional company's wealth. It's the time when they could afford the best locomotive kits and most elaborate station buildings. These elements often remain on the layout as "grand" but aging features that provide a sense of history.
Step 3: The Decline. Railways rarely stay at their peak forever. Perhaps the local timber was exhausted, or a new motorway diverted the passenger traffic. This decline explains why certain sidings are overgrown with weeds or why a once-busy engine shed now has a rusted roof. It provides the "visual friction" that makes a layout look real rather than like a toy.
Step 4: The Modern Intervention. If your layout is set in a more recent era, you must explain its survival. Is it a heritage society keeping the past alive, or a bare-bones industrial operation? This step justifies why a modern diesel might sit alongside a Victorian steam engine. This narrative consistency ensures your layout remains "prototypically plausible" even when mixing eras.
Naming Your Locations with Meaning
Naming locations can feel arbitrary; however, using local dialect or geographic features provides immediate authenticity. You should avoid generic names and instead look for titles that reflect the industry of your line. Names like "Crusher's End" or "Foundry Lane" tell a story without a single word of text. You can also create a sense of distance by mentioning "off-layout" destinations on your station signage, making your world feel much larger than the baseboard itself.
Creating Fictional "Motive Power" Histories
Your locomotives should have their own individual stories. You might decide a specific engine was bought second-hand from a defunct neighboring line, explaining why its livery doesn't quite match the rest of the fleet. Perhaps a local engineer "bodged" two engines together to create a unique hybrid. This logic is perfect for those utilizing 3D printed kit bashing techniques to create one-of-a-kind models. When you are creating a backstory for your model railway, these small details turn a generic locomotive body kit into a character with a unique history.
Translating Fiction into Detail: Scenery, Figures, and Dioramas
Once you have established the "Lies and Legends" of your line, the next challenge is manifesting that history through physical modeling. Creating a backstory for your model railway remains a theoretical exercise until you translate it into visual "layers of time." Standard building kits often lack the specific character required for a unique narrative; however, you can modify these structures to reflect decades of fictional use. Incorporating elements like a bricked-up window or a partially lifted, abandoned siding tells a story of change and adaptation. These physical details act as silent witnesses to the economic shifts you defined in your timeline.
Precise dating of your scene is often achieved through the careful selection of small accessories. A specific style of petrol pump or a red K6 phone box can anchor your layout to a very narrow window of time. While mass-produced scenery can sometimes feel generic, 3D printed scenery offers a professional finish and a level of unique detail that standard kits might lack. These high-definition components allow you to include specific industrial clutter that matches your anchor industry, whether that involves slate offcuts or specialized timber cradles.
The Power of "Miniature Drama"
Figures should never be placed randomly across a baseboard. To create a living world, you should use figures to act out "micro-stories" that suggest a larger narrative. You might place a foreman in a heated argument with a locomotive driver, or a group of workers huddled together during a tea break. Using unique, scanned figures provides a level of realism that generic plastic "clones" cannot match. Every person on your layout must have a specific "job" or a logical reason to be in that spot. This focus on individual purpose ensures that your scenes feel like a snapshot of a working environment rather than a static display. In real-world industrial settings, such coordination often relies on clear radio contact, and you can check out Earpiece Hub for the professional accessories used by modern teams.
Weathering as a Storytelling Tool
Weathering is not merely about making models look dirty; it's about showing the activity level of your fictional company. Rust patterns on a wagon can suggest it has been sitting in a damp siding since the "Golden Age" you established earlier. You can achieve these realistic textures by following professional techniques for painting 3D printed models, which helps bridge the gap between a raw kit and a weathered artifact. Using debris and "clutter" around industrial buildings further emphasizes the age and health of the business. If you are ready to bring these details to life, you can browse our diorama tools and scenery to find the professional materials needed for creating a backstory for your model railway.
Selecting Kits and Rolling Stock that Fit Your World
The final stage in creating a backstory for your model railway involves curating a fleet that reflects your fictional company's financial status and operational needs. Many enthusiasts struggle with a disjointed collection of locomotives that don't share a common history. Evaluating locomotive kits based on their "fit" for your company’s budget is a professional way to filter your choices. A struggling agricultural line wouldn't possess the latest high-specification engines; instead, it would rely on rugged, economical workhorses. By aligning your purchases with your narrative, you ensure that every wagon and engine serves a specific purpose in your world.
Your choice of scale also plays a role in the narrative's scale. While OO9 is ideal for narrow mountain passes, On30 gauge kits can effectively represent larger, more robust industrial lines that require a heavier presence. Regardless of the scale, 3D printed bodies offer a proactive solution for modellers who want a unique fleet without the uniformity of mass-produced models. These kits allow you to maintain narrative consistency while ensuring your rolling stock matches the specific goods, such as timber or ore, that your backstory claims the line carries.
Kit Bashing for Narrative Accuracy
Standard locomotive kits may not perfectly match your specific history; however, utilizing 3D printed parts provides the flexibility needed to customize your fleet. You can adapt a standard locomotive body to look like a "local workshop" modification by adding unique chimneys, cabs, or water tanks. Narrow gauge history is full of "Frankenstein" engines that were cobbled together from various parts to keep a line running during lean years. Mixing and matching chassis with 3D printed bodies allows you to recreate this authentic, slightly mismatched look that defines many independent railways.
Building Your Roster Over Time
Building a complete roster can feel like a significant financial and time commitment; however, starting with a single "flagship" locomotive allows you to define the line's character immediately. Once your flagship is established, you can gradually add "workhorse" wagons that support your primary industry. This incremental approach prevents the "magpie syndrome" mentioned earlier and ensures that your collection remains manageable and focused. If you are ready to begin this process, you can browse our range of narrow gauge locomotive and wagon kits to find the perfect fit for your story. Creating a backstory for your model railway is a rewarding journey that turns a simple hobby into a detailed exercise in historical world-building.
Bring Your Railway History to Life
A static layout can often feel like a collection of disjointed parts; however, a robust narrative provides the professional framework needed to unify your creative vision. You've seen how defining a "Founding Father" and a specific era prevents the common pitfall of buying mismatched stock. By focusing on the geographical constraints and industrial purpose of your line, you turn every modeling decision into a logical solution that enhances realism. Creating a backstory for your model railway is the most effective way to ensure your future purchases serve a clear, strategic goal.
This approach transforms generic scenery into a living world with distinct layers of history. As specialists in 3D printed narrow gauge bodies and unique scenery items scanned from real-life prototypes, we provide the tools to make your fiction feel authentic. We offer worldwide shipping for global modellers to ensure you have access to professional-grade kits regardless of your location; in the meantime, you can buy specialty coffee online to bring a taste of old-world Italian tradition to your modeling workbench.
Start building your story with our OO9 and GN15 kits and watch your layout become a true destination. Your railway has a history waiting to be told, and it's time to let the world see it.
Frequently Asked Questions
How long should a model railway backstory be?
A backstory should be concise enough to serve as a practical reference without becoming a creative burden. Most modellers find that a single page or a series of bullet points covering the "Founding Father" and "Golden Age" provides sufficient detail. You don't need a novel; you simply need a framework that helps you decide which locomotive kit to buy next for your layout.
Do I need to follow real-world history for my model railway?
You don't have to follow real-world history strictly, but your narrative should remain "prototypically plausible." This means that while the location and company are fictional, the reasons for its existence should follow basic economic and engineering principles. If your line hauls timber, the track plan and rolling stock must reflect that industrial reality to feel authentic to visitors and yourself.
What is the best era for a narrow gauge model railway?
The "best" era depends on your personal interest, though many find the late 19th century to the 1930s ideal for narrow gauge. This period represents the height of industrial diversity before the rise of road transport. Alternatively, the modern preservation era allows you to mix vintage steam with modern figures and vehicles, providing a logical reason for a diverse collection of rolling stock.
Can I change my backstory after I have started building?
You can certainly evolve your narrative after construction begins; however, significant shifts may require physical updates to your scenery. If you change your line's purpose from mining to passengers, you might need to add platform extensions or update station signage. Creating a backstory for your model railway early in the process minimizes these retroactive changes but doesn't prevent the story from growing as you build.
How do I explain my backstory to visitors?
Visual storytelling is the most effective way to communicate your history to visitors without constant explanation. Use figures to act out micro-stories and place "layers of time" like abandoned sidings or weathered structures to show the railway's age. A small "Company History" card placed on the layout fascia can also provide professional context for the specific industrial purpose of your fictional line.
Is it better to model a real place or a fictional one?
Modelling a fictional place often provides more creative freedom for those interested in narrow gauge. While real locations offer a strict template, a fictional world allows you to justify unique track plans and specialized kits that fit your specific space. Whether you choose a real or imaginary setting, creating a backstory for your model railway ensures the final result feels cohesive and intentional.
How do I choose names for my railway company and stations?
Select names that reflect the geography or the primary industry of your line to provide immediate context. Use titles like "Quarry Rise" or "Mill Creek" to hint at the railway's purpose. You should avoid generic names; instead, look at historical maps of your chosen region to find local dialect or naming patterns that add a layer of professional authenticity to your world-building.
What details are most important for telling a story on a layout?
The most critical details are those that show activity and the passage of time across your scenery. Weathering on rolling stock suggests years of hard work, while "layers of time" in the buildings, such as a bricked-up window, indicate structural changes. These small, deliberate touches tell a story of a working environment that feels lived-in rather than a sterile museum display.