

What if the most important step in assembling 3D printed locomotive kits happens before you open the glue? A careful start protects delicate resin parts and helps you catch a fit problem before the body and chassis are joined.
Before you begin, be clear about what the kit contains and what you’ll need to supply. A locomotive body kit is not a complete, ready-to-run model: its parts are unpainted, unprimed and unassembled, and you’ll need your own compatible chassis. Resin is delicate, so handle parts by their thicker sections and avoid dropping them. This guide covers checking the kit, preparing the parts, dry-fitting the body and chassis, and planning assembly and finishing. Parts are cleaned and UV-cured before dispatch, though many modellers may prefer a quick wash in mild soapy water before priming.
Fine support marks or layer lines may remain after cleaning. If needed, reduce them with gentle sanding using fine-grit paper from 800 to 1200. The outer packaging is partly made from recycled materials and fully recyclable; interior packing is acid-free and made from approximately 99% recycled pulp fibres.
Key Takeaways
- A locomotive body kit is a modelling project, not a restoration of an existing locomotive or a ready-to-run model. You’ll need to supply a compatible chassis.
- Before assembling 3D printed locomotive kits, identify the chassis specified for that particular kit, then inspect and test-fit the parts before joining them.
- Prepare a clean, well-lit work area and keep small parts together. Resin is delicate, so hold pieces by thicker sections and avoid dropping them.
- Kits are supplied unpainted, unprimed and unassembled. Fine support marks or layer lines may remain, so use gentle 800 to 1200-grit sanding only where needed.
- The outer packaging is partly made from recycled materials and fully recyclable; interior packing is acid-free and made from approximately 99% recycled pulp fibres.
Before assembling a 3D-printed locomotive kit, check what you are building
A 3D-printed locomotive body kit is an unassembled body and associated parts that need a separately sourced, compatible chassis or running gear to become a working model. It is not a complete locomotive: parts are supplied unpainted, unprimed and unassembled, so assembly and finishing are part of the project. Knowing this before assembling 3D printed locomotive kits helps you plan the body, chassis and finishing as distinct tasks.
“3D-printed” describes how the parts are made, not what the kit contains. For a general overview of the process and its applications, see What is 3D printing? Contents vary by kit, so use the individual product description as your parts checklist. Don’t assume that a component listed for one kit is included with another.
For a visual example of a 3D-printed locomotive mechanism being assembled, watch this video:
What does a 3D-printed locomotive kit include?
There is no universal parts list. Check the description for the specific kit to see which body parts and other components are supplied, and plan to source the compatible chassis separately. Chassis shown in product imagery, including KATO chassis, are for reference only and are not included. Track is not included either. A photograph of a model on track does not mean that either the chassis or track comes with the kit.
Kits are not ready-to-run. Resin parts are delicate and are cleaned and UV-cured before dispatch, but fine support marks or layer lines may remain. Hold parts by thicker sections and avoid dropping them. Before priming, many modellers may prefer to give the parts a quick wash in mild soapy water. If marks need attention, use gentle sanding with fine-grit paper from 800 to 1200 rather than forceful reshaping.
How does a kit relate to restoring a vintage model locomotive?
Restoring an existing locomotive means repairing or refurbishing that model and its original components. Building a body kit is different: you assemble a new body and fit it to running gear specified for that kit. An older chassis is not automatically compatible just because it looks similar. Use the kit’s stated chassis requirements and test the fit before joining parts.
Think of a body kit as its own modelling project, not as a guaranteed way to restore a particular locomotive. Choose by scale, intended layout and chassis compatibility, then plan for assembly, painting and finishing. If you’re deciding which OO9 project suits your experience and layout, the beginner’s guide to choosing an OO9 locomotive kit can help you make a considered start.
Prepare the workspace and parts before assembling a 3D-printed locomotive kit
Good preparation reduces the risk of losing small components or putting stress on delicate resin. Choose a clean, well-lit work surface with enough room to lay out the parts without crowding them. A shallow tray can keep loose pieces together, and a clear area gives you room to compare components without knocking them onto the floor. Resin is delicate: hold parts by thicker sections, support fine details where possible and avoid dropping them.
How should resin locomotive parts be handled and cleaned?
Parts are cleaned and UV-cured before dispatch, but many modellers may prefer a quick wash in mild soapy water before priming. Handle them gently rather than gripping narrow steps, handrails or other fine details. When turning the body, keep delicate projections clear of the work surface instead of using them as handholds.
After washing, let every part dry fully before test-fitting or applying a finish. A clean, dry surface makes it easier to assess the fit and prepare for primer. Fine support marks or layer lines may remain after cleaning. These can be traces of the manufacturing process, rather than evidence that a part is damaged.
If a remaining mark needs attention, sand only that area using fine-grit paper from 800 to 1200 and light pressure. Check your progress often. Heavy sanding or forceful reshaping can remove surface detail or put stress on the resin, so stop once the mark is sufficiently reduced. The aim is to prepare the surface without sacrificing detail.
What should you check before test-fitting the body?
Lay out the received components and compare them with the contents listed for that particular kit. Inspect the visible surfaces in good light and note any marks that may need gentle attention. Not every fine print line needs to be removed. Keep the parts organised as you inspect them so that small items do not get mixed up or misplaced.
Next, refer to the kit information for the intended chassis and any sub-chassis arrangement. Designs differ, so do not assume a body or push-fit arrangement will suit another kit just because it looks similar. Keep parts unglued until you have checked the fit. If you’re planning the later paintwork, the guide to painting 3D-printed models covers that finishing stage.
For a project to prepare, paint and assemble, explore the narrow-gauge locomotive kits. The outer packaging is partly made from recycled materials and fully recyclable; interior packing is acid-free and made from approximately 99% recycled pulp fibres.
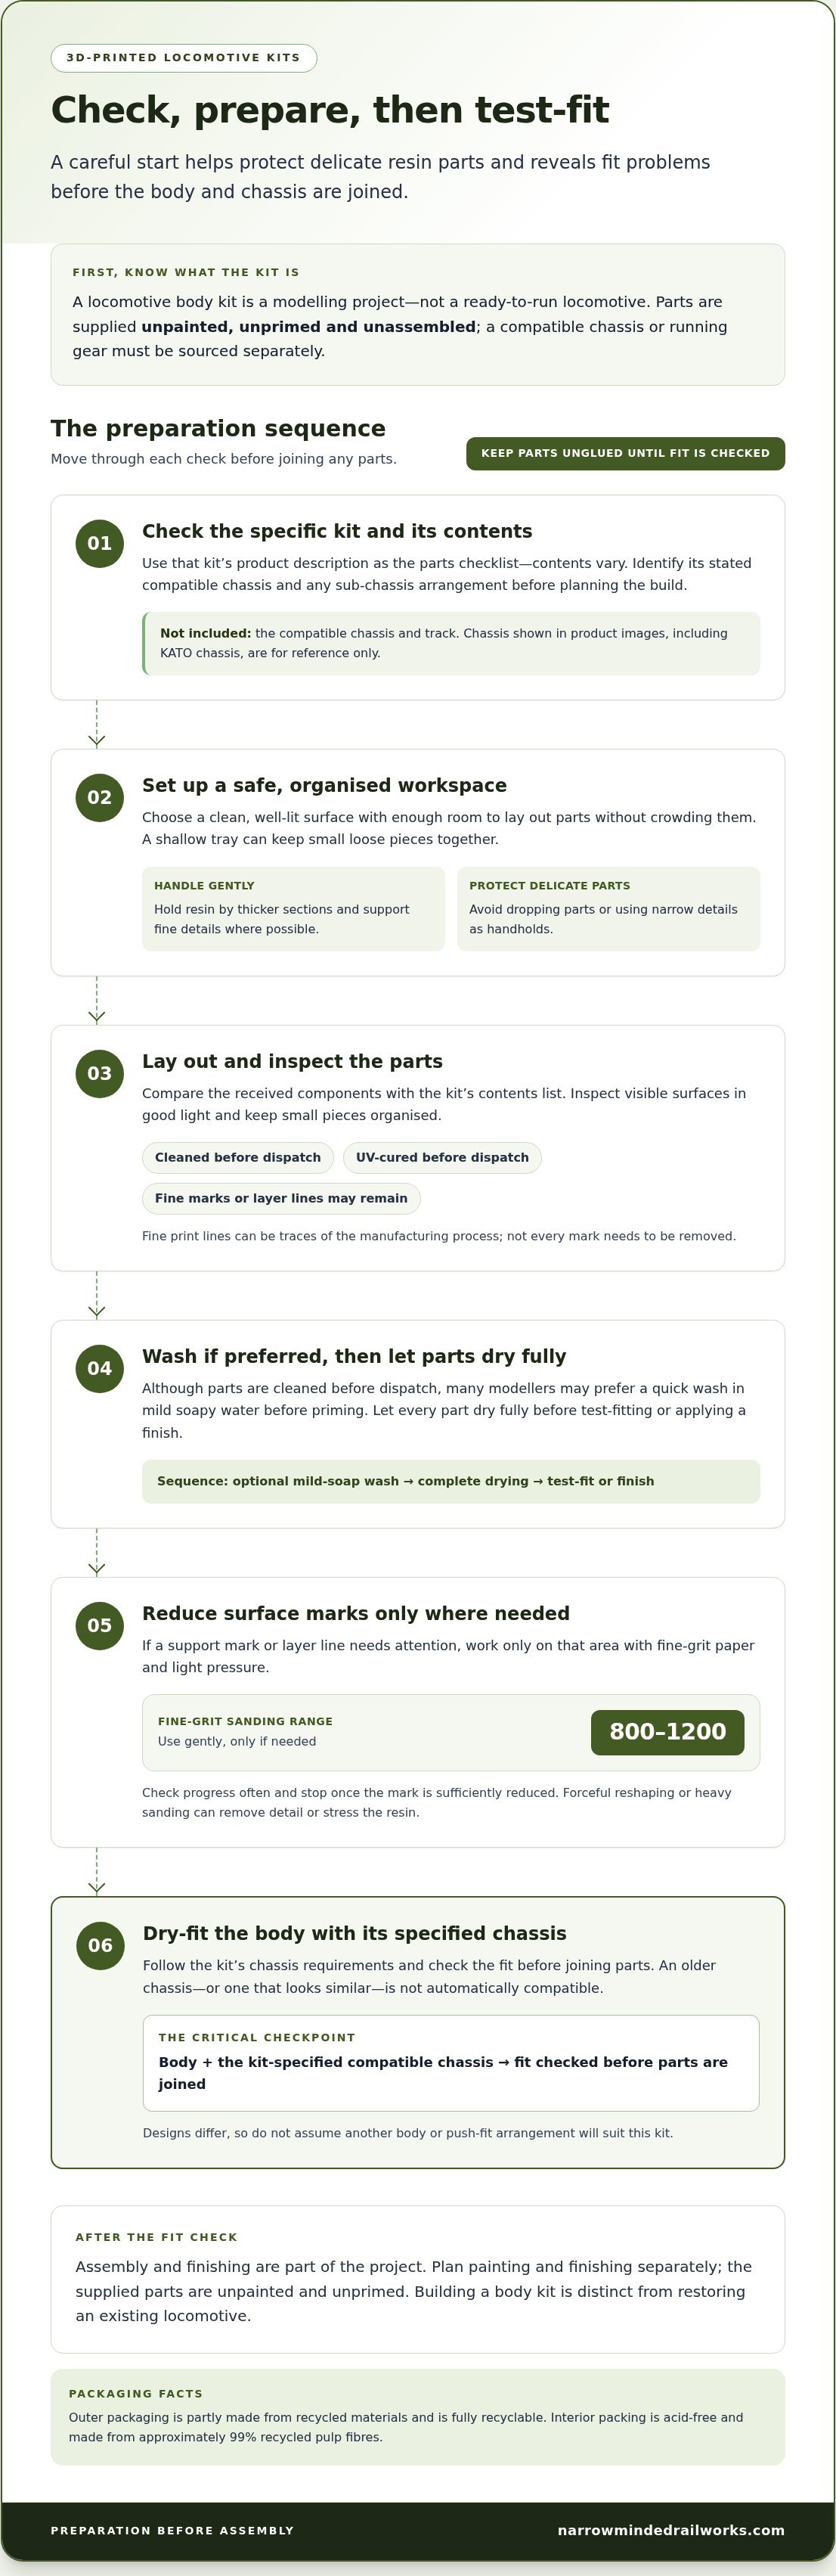
Test-fit the locomotive body and compatible chassis before joining parts
A body can look close to the right size and still sit poorly on its running gear. Before assembling 3D printed locomotive kits, treat chassis fit as a separate check, not something to solve by pressing the resin into place. Compatibility depends on the individual kit’s design, so follow its product description and instructions rather than assuming a chassis suited to one locomotive will fit another.
How do you check chassis compatibility and body alignment?
Use this sequence to catch problems while the parts are still separate:
- Identify the specified chassis. Read the individual product description and instructions. If a kit is designed for a particular KATO chassis, use that information for that kit only. The modeller supplies the chassis; it is not included with the body kit.
- Inspect the parts. Check the body, chassis and any specified sub-chassis for visible damage or anything that could prevent them from sitting together. Support the delicate resin body by thicker sections. Do not grip thin details or force them out of the way.
- Test-fit without adhesive. Place the body onto its intended sub-chassis or running gear as described for that kit. If the design specifies a push-fit arrangement, bring the parts together gently. Do not press harder to overcome resistance.
- Check alignment and clearance. Look from the front, sides and above. The body should sit squarely in its intended position, without rocking or leaning. Check that it does not foul components beneath it or catch on moving parts.
A mismatch is a reason to pause and review the kit-specific fit information, not to reshape delicate resin by force. Do not transfer measurements, sub-chassis parts or assumptions from another model, even if the kits look similar. A KATO chassis shown for reference on a product page does not mean every kit uses that chassis, and it is not included.
When should you join the kit components?
Join parts only after a dry-fit shows how they sit together and you can align them without strain. If the body shifts during the fit check, or a thin printed feature bends under pressure, separate the pieces gently and reassess before proceeding. This helps avoid unnecessary stress on fragile details.
Follow the assembly guidance for the specific kit and apply adhesive only at the intended joins. Do not use adhesive to bridge a poor fit or hold misaligned parts in place. Once joined, handle the assembly carefully as you move on to finishing.
Painting comes later: kits are supplied unpainted and unprimed. For a particular design, you may find it easier to keep the body and chassis separate during fitting or painting. If you’re choosing a project, browse the narrow-gauge locomotive kits and use each kit’s stated chassis requirements to guide your selection.
Finish and troubleshoot a 3D-printed locomotive kit without damaging it
Resin is delicate, so finishing calls for patience rather than force. Once you have checked the body and chassis fit, follow a considered order: complete the intended assembly, prepare the surface, then prime, paint and finish. Kits are supplied unpainted, unprimed and unassembled, so painting is the modeller’s task. General modelling tips can help, but the individual kit’s instructions take priority for its specific parts and fit.
- Finish the fit and assembly. Resolve alignment issues before moving to the next stage. Do not use pressure to force parts into position.
- Prepare only where needed. Fine support marks or layer lines may remain. If a mark needs attention, sand it gently using fine-grit paper from 800 to 1200.
- Clean and dry before priming. Parts are cleaned and UV-cured before dispatch, though many modellers may prefer a quick wash in mild soapy water before priming. Let them dry fully.
- Prime, paint and finish. Follow the instructions for your chosen materials and take care not to obscure fine detail.
During sanding, use light pressure and check your progress often. Concentrate on the mark itself rather than sanding an entire panel unnecessarily. If the surface looks different under changing light, inspect it again before removing more material. Not every visible line needs to be eliminated, and aggressive sanding or reshaping can damage the body instead of improving it.
How can you reduce the risk of breaking delicate resin details?
Hold the body by thicker sections and avoid dropping parts. Support the model securely while fitting, sanding or painting, and keep your fingers away from narrow details that could bend under pressure. If something resists, stop and reassess rather than pushing harder. Careful handling helps preserve small printed features throughout the build.
How should you approach primer and paint?
Before priming, many modellers may prefer a quick wash in mild soapy water, even though parts are cleaned and UV-cured before dispatch. Let them dry fully first. Apply your chosen primer and paint in a way that preserves the model’s detail, following the product instructions rather than assuming one paint system suits every project. Allow each stage to dry as directed before handling or adding the next finish.
For more advice on finishing, use this 3D-printed model painting guide. To plan a project around a body kit, explore the narrow-gauge locomotive kits.
Choose a suitable next step for your narrow-gauge locomotive project
Once you understand the work involved in assembling 3D printed locomotive kits, choose a project that fits your layout and the running gear you can use. Start with scale, then consider the space available and how the model will sit alongside your existing stock. A locomotive body kit is a hands-on build, not a restored vintage model or a ready-to-run locomotive, so plan to do the assembly and painting yourself.
Compatibility matters as much as appearance. Match the scale and intended layout to the individual kit’s stated chassis requirements, and do not assume one chassis suits every design. If you already have running gear, treat it as a suitable match only when the product information specifies compatibility. Choose a kit with chassis requirements you can meet, rather than selecting by appearance alone.
Which narrow-gauge kit-building guide should you explore next?
For an OO9 layout, the first OO9 locomotive kit buying guide can help you think through a suitable first project and its chassis considerations. If you’re planning a GN15 layout, use the complete guide to getting started in GN15 for advice relevant to that scale. Keep each guide’s recommendations within its scope, and refer to the chosen kit’s own compatibility details when planning a build.
What should readers expect when ordering a kit?
Locomotive kits are supplied unpainted, unprimed and unassembled. You supply the compatible chassis, and the kit is not a complete, ready-to-run locomotive. Resin is delicate, so handle parts carefully and plan to complete the assembly and finish yourself. This is a modelling project, rather than a service for restoring an existing vintage locomotive.
Orders are dispatched by Royal Mail, with worldwide shipping options available to over 40 countries. Unused items are covered by a 30-day returns policy.
Choose your next step by matching the layout scale, project scope and specified chassis compatibility. Then explore narrow-gauge locomotive kits to find a body-kit project that suits your plans.
Make your next narrow-gauge build your own
Approach assembling 3D printed locomotive kits as the start of a personal layout project, not simply a sequence of bench tasks. Your choices about scale, chassis and finish can help the model feel at home in its setting, whether you’re adding a single locomotive or planning a broader narrow-gauge scene.
Narrow Minded Railworks is a UK-based maker of hand-crafted 3D-printed narrow-gauge kits designed to fit readily available chassis. Orders are dispatched by Royal Mail, with worldwide shipping options. Choose a project that suits your layout and the modelling you’re keen to take on, then build at a pace that lets you enjoy the process.
Explore Narrow Minded Railworks locomotive kits and find a starting point for your next build. With a clear plan and careful work, you can create a model that brings fresh character to your railway.
Frequently Asked Questions
Can beginners assemble a 3D-printed locomotive kit?
Yes. Beginners can approach a build in manageable stages. Before assembling 3D printed locomotive kits, read the individual kit’s contents and chassis requirements, then plan the fit before joining parts. These kits are not ready-to-run: you’ll need to supply the compatible chassis and carry out assembly and finishing. Resin is delicate, so hold parts by thicker sections and avoid dropping them. Taking time over each check makes the project easier to manage.
Does a 3D-printed locomotive body kit include a KATO chassis?
No. A KATO chassis shown in product imagery is for reference and is not included. The modeller supplies the compatible chassis specified for the particular kit. Do not assume a chassis that fits one body will suit another, even if both are narrow-gauge models. A body kit supplies parts for a modelling project, not a complete locomotive, and an unrelated vintage chassis should not be assumed to fit.
Should resin locomotive kit parts be washed before painting?
Parts are cleaned and UV-cured before dispatch, but many modellers may prefer a quick wash in mild soapy water before priming. If you choose to wash them, let every piece dry fully before applying primer. Handle resin carefully during washing and drying, supporting the body by thicker sections rather than gripping fine details.
How do you remove marks from a 3D-printed locomotive kit?
Fine support marks or layer lines can remain after cleaning, and they may not all need removing. For a mark that stands out on a visible surface, use fine-grit paper from 800 to 1200 with light pressure, checking the area as you work. Resin is delicate, so avoid aggressive sanding or extensive reshaping. Preserve the surrounding detail and stop if the surface begins to change more than intended.
Can you use a 3D-printed body kit to restore any vintage model locomotive?
No. A new body kit is not a universal restoration solution. Restoring an existing model involves its original body and components, while a body-kit build pairs a new body with running gear specified for that kit. A vintage locomotive’s chassis may not match. Check the relevant kit information for its intended chassis compatibility before planning a retrofit, and do not treat visual similarity as proof of fit.
What should I do if a resin locomotive part arrives broken?
We cannot be held responsible for breakages once your item has arrived. If the piece is broken in the post, please provide images and we will see what we can do to help.