

The locomotive that catches your eye may not be the one that suits your layout. With 7mm narrow gauge kits, scale, track gauge and chassis compatibility all matter. A mismatch can mean extra work or a model that does not fit the railway you are building.
It’s easy to see why the terms can be confusing: 7mm scale describes the model’s size, while O-16.5 describes the 16.5mm track gauge it runs on. Before choosing a kit, check how these details relate to your track and what chassis the kit is designed to use.
This guide explains the difference between scale and gauge, how to assess a kit’s stated chassis fit, and how its intended role might suit your layout. It also sets realistic expectations for building: O-16.5 / 7mm kits are supplied unassembled, unpainted and unprimed, and you provide the required chassis. Resin parts are cleaned and UV-cured before dispatch, though fine support marks or layer lines may remain. Careful handling, gentle sanding if needed, a wash before priming, assembly and painting are all part of the process. With these points in mind, you can choose a kit with a clearer idea of both fit and finish.
Key Takeaways
- Separate model scale from track gauge: 7mm describes the model’s scale, while O-16.5 refers to 16.5mm track.
- Compare the stated scale, track, chassis compatibility, kit contents and assembly needs before choosing among 7mm narrow gauge kits.
- Match a locomotive, rolling-stock or scenery kit to the role you want it to play, the space available and the project you have in mind.
- Expect resin kits to need preparation and finishing. Parts are unpainted, unprimed and unassembled, and you supply any required chassis.
- Handle resin carefully by thicker sections and avoid dropping it. Fine support marks or layer lines may need gentle sanding with 800 to 1200-grit paper. Parts are cleaned and UV-cured before dispatch, but many modellers may wish to wash them in mild soapy water before priming. We cannot be held responsible for breakages once your item has arrived. If the piece is broken in the post, please provide images and we will see what we can do to help.
What Does 7mm Narrow Gauge Mean for a Model Railway Kit?
For a model railway kit, scale describes how large the model is compared with its real-world subject. Track gauge is the distance between the two rails. These measurements answer different questions, so a scale label alone does not tell you which track a model is designed to run on.
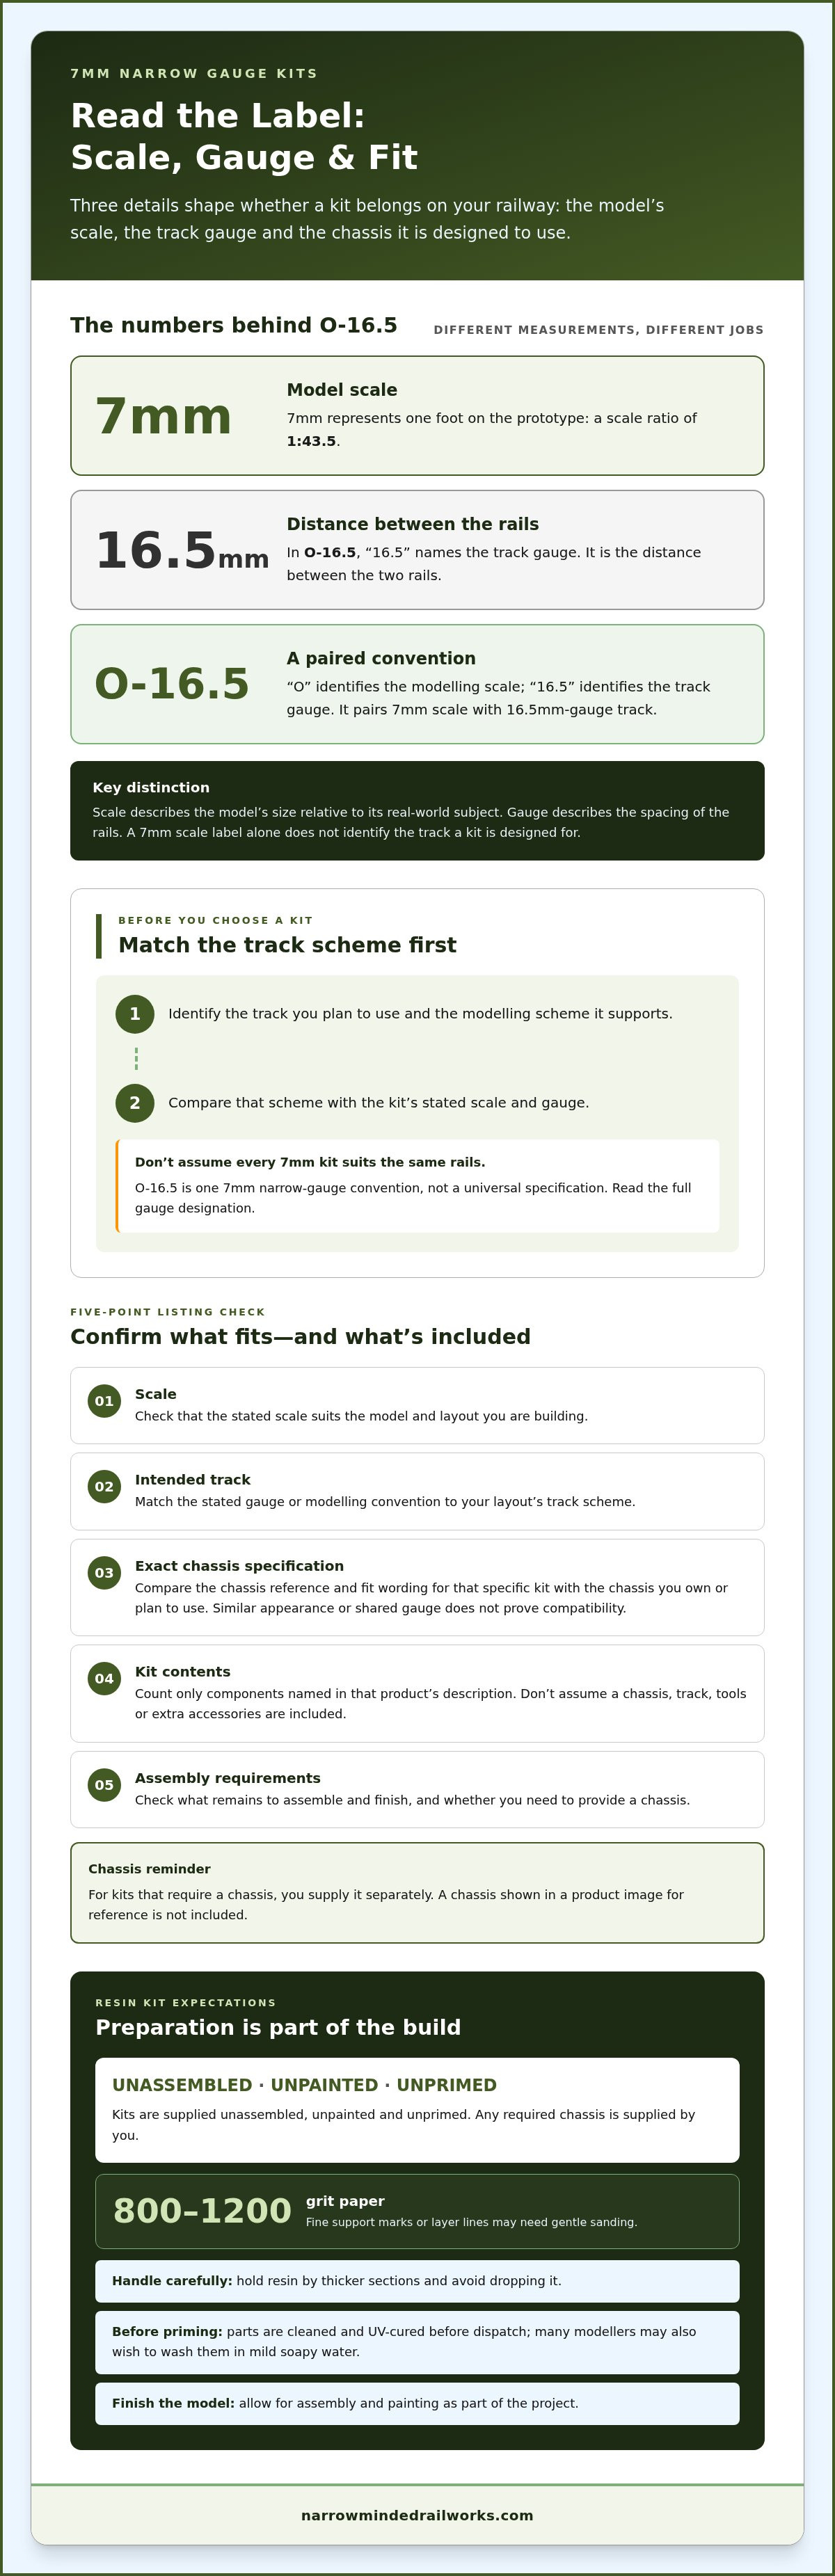
In British modelling, 7mm scale means 7mm represents one foot on the prototype, a ratio of 1:43.5. It’s also known as 7mm scale (British O scale). O-16.5 combines that scale with 16.5mm-gauge track. The “O” identifies the modelling scale, while “16.5” identifies the distance between the rails.
Scale and track gauge answer different questions
Think of scale as the model’s measuring rule and gauge as the track specification. A 7mm-scale locomotive depicts its subject at 1:43.5, but the track beneath it could follow different narrow-gauge conventions. O-16.5 is one example, not a universal specification for every 7mm kit.
O-16.5 uses track also commonly associated with OO and HO modelling, but the model scale is different. In this convention, 16.5mm track represents a narrow-gauge railway rather than standard gauge at 7mm scale. Other 7mm narrow-gauge schemes use different track widths, so don’t assume that a model will suit your rails just because its scale is 7mm.
Scale versus track gauge
- 7mm scale: the model’s size relative to the real subject, at 7mm to one foot.
- O-16.5: a modelling convention pairing 7mm scale with 16.5mm-gauge track.
- Practical check: match both the stated scale and intended track gauge to your layout.
This distinction is useful when comparing 7mm narrow gauge kits: two models can share a scale while being intended for different track. Read the full gauge designation, not just the largest number or letter on a listing.
Where 7mm narrow gauge fits on a layout
Narrow-gauge railways use rails set closer together than standard-gauge railways. That difference lets you represent a distinct type of railway, but it also affects how a locomotive or wagon relates to the track and other models on the layout. Treat the intended gauge as a planning decision, not a detail to leave until after buying a kit.
Start by identifying the track you plan to use and the modelling scheme it supports. Then compare that with the kit’s stated scale and gauge. For example, a kit marked O-16.5 is intended for a 7mm-scale narrow-gauge setting using 16.5mm track. It should not be treated as a fit for every 7mm narrow-gauge layout. If you’re still building a foundation in the terminology, this narrow-gauge railway guide provides introductory context. Resolve the track scheme first, then assess whether an individual kit suits your project.
How to Check a 7mm Kit's Chassis Fit and Contents
A scale and gauge label tells you what modelling scheme a kit represents, but it won’t necessarily tell you whether the body fits a chassis you already own. The kit’s stated chassis fit is more useful than scale alone. Before choosing among 7mm narrow gauge kits, work through the listing and separate confirmed details from assumptions.
Match the listing to the chassis you own
Compare the exact chassis reference named for the individual kit with the model you have. Similar appearance, a shared gauge or a familiar brand name does not prove that the parts will fit together. Use the compatibility wording for that specific kit. Don’t transfer a fit statement from another product or scale.
For Narrow Minded Railworks kits that require a chassis, you supply it separately. The kit is a body or body-and-sub-chassis kit, not a complete locomotive. A chassis shown in a product image for reference is not included.
Read the kit contents before ordering
Check the product’s own contents description, then separate the named kit parts from anything you’ll need to source or provide yourself. Don’t assume that track, tools, a chassis or extra accessories are included unless the listing specifically says so. Likewise, don’t transfer dimensions or components from a different kit: each product’s description applies to that product alone.
- Scale: Check that the stated scale suits the model and layout you’re building.
- Intended track: Match the kit’s stated gauge or modelling convention to the track scheme on your layout.
- Chassis specification: Compare the exact chassis reference and fit wording with the chassis you own or plan to use.
- Kit contents: Note each listed component, and don’t count unmentioned parts as supplied.
- Assembly requirements: Identify what remains for you to assemble and finish, and whether you need to provide a chassis.
Follow the individual product listing for compatibility and included-items wording. Keep named parts distinct rather than broadening the description into a claim that the kit includes a complete mechanism or extra fittings. Check the exact price for the specific product, too, rather than substituting a figure from another listing.
With resin kits, check fit before preparation and assembly. Resin is delicate, so handle parts carefully by thicker sections and avoid dropping them. Parts are cleaned and UV-cured before dispatch, though fine support marks or layer lines may remain. If needed, sand gently with 800 to 1200-grit paper. Many modellers may also wish to wash parts in mild soapy water before priming. For more background on understanding 3D-printed resin kit preparation, see Phrozen’s guide.
Once you’ve matched your layout and chassis requirements against the product details, browse the O-16.5 / 7mm scale kits with those checks in mind.
Which 7mm Narrow Gauge Kit Suits Your Layout: Locomotive, Wagon or Scenery?
Start with the scene you want to build, not only the prototype that first caught your eye. A locomotive can anchor a composition, a wagon can suggest movement or provide context, and scenery can make the setting feel complete. The right choice depends on the role you want the model to play, the space available and the project you’re ready to take on.
Use the comparison below to organise your priorities. It describes general layout roles, not a promise that every category is available in 7mm scale. Check the scale and intended use on each individual product listing before planning a combination.
| Category | Layout role | Visual impact | Space and project fit |
|---|---|---|---|
| Locomotive | May be the focal point or a character detail within a scene. | Often draws the eye through its distinctive form and position. | Consider its placement, the track it needs to sit on and the assembly work involved. |
| Wagon or other rolling stock | Adds a rail vehicle to a train or a stationary scene. | Can support the scene’s story without taking the main focus. | Think about how it will sit with the available track and any other models you plan to include. |
| Scenery | Builds the setting around a railway or diorama. | Can add context and help connect separate elements visually. | Plan its footprint and position alongside the track, structures and models in your scene. |
Choose a locomotive kit for the job it will do
Decide whether you want a locomotive as the scene’s focal point, a vehicle for a planned working model or a character detail in a static composition. That decision helps you judge where it will sit and how much attention it should command. Then compare the specific kit’s stated chassis fit and assembly requirements with your project. Avoid relying on assumed prototype history or operating traits that the product details don’t state.
Choose rolling stock or scenery to complete a scene
If the layout already has a focal point, rolling stock or scenery may do more to finish the composition than another prominent model. Choose a wagon when the scene needs a rail vehicle, or consider scenery when the setting feels incomplete. Before combining items, check each listing’s scale and intended use. Keep its stated dimensions, contents and price tied to that product alone.
For 7mm narrow gauge kits, layout role is a useful first filter, but it doesn’t replace checking a product’s individual specifications. Narrow your options by asking what the scene needs, how much room you can allocate and what building work you want to undertake. If tools are part of that planning, the 7mm scale kit-building tools guide covers that separate consideration.
What to Expect When Preparing and Building a 3D-Printed Resin Kit
A resin kit is a project to prepare, assemble and finish, rather than a completed model. Narrow Minded Railworks kits are supplied unpainted, unprimed and unassembled. If the specific kit requires a chassis, you supply it separately. Knowing this before ordering helps you plan the build and gather what you need without assuming parts are ready for the layout.
Resin parts are cleaned and UV-cured before dispatch, but preparation may still be needed before priming. Fine support marks or layer lines can remain after cleaning. Inspect the surfaces and work carefully rather than sanding every part heavily. Follow any product-specific instructions for assembly.
Prepare delicate resin parts carefully
Resin is delicate. Avoid dropping parts and handle them by their thicker sections rather than thin details, which can be more vulnerable to damage. Set pieces down on a clear, stable work surface while you inspect them to avoid unnecessary handling.
Check the surfaces under good light. If fine support marks or layer lines remain, use fine-grit sandpaper between 800 and 1200 grit, applying gentle pressure only where needed. Work gradually and reassess the surface instead of trying to remove every mark in one pass. The aim is careful preparation, not aggressive reshaping.
Prime, paint and assemble with realistic expectations
Before priming, many modellers may wish to give the parts a quick wash in mild soapy water, then allow them to dry. Although the parts are cleaned and UV-cured before dispatch, this additional step can help prepare the surface. They arrive unprimed, so priming and painting remain part of your project.
Plan assembly around the actual contents of your chosen kit. You supply any required chassis, and don’t assume a general assembly order unless the individual product instructions specify one. Check how the supplied parts relate to the chassis and to one another before committing to assembly. For more background on finishing, the painting 3D-printed models guide covers painting considerations.
- Inspect: Look for fine surface marks before starting preparation.
- Handle: Support parts by thicker sections and avoid dropping them.
- Prepare: Sand gently with 800 to 1200-grit paper only where needed; consider a mild soapy-water wash before priming.
- Finish: Allow for priming, painting and assembly, and provide any required chassis yourself.
For 7mm narrow gauge kits, these steps help set a realistic expectation of the work involved before you begin. If you’re ready to choose a kit for a hands-on build, explore the O-16.5 / 7mm scale kits.
Explore Narrow Minded Railworks' 7mm Kits and Order with Clear Expectations
Narrow Minded Railworks’ O-16.5 / 7mm scale kits are designed for modellers planning a narrow-gauge layout. The kits are hand-crafted and 3D-printed, and each listing describes a particular model, its contents and any stated compatibility. Use those details to decide whether an individual kit suits your project rather than assuming every kit has the same parts or fit.
Allow for the work involved. Kits are supplied unpainted, unprimed and unassembled, and you supply any required chassis. Resin parts are cleaned and UV-cured before dispatch. They remain delicate, so handle them by thicker sections and avoid dropping them. Fine support marks or layer lines may remain; if needed, sand gently with 800 to 1200-grit paper. Many modellers may wish to wash the parts in mild soapy water before priming.
Know what ordering and delivery information means
Orders are dispatched by Royal Mail, and worldwide shipping is available to over 40 countries. Dispatch describes how an order is sent, not a guaranteed arrival date, so use the delivery information provided during ordering to understand the option for your destination.
The 30-day returns policy applies to unused items. Keep that condition in mind when considering a purchase and refer to the returns information for the applicable terms. The outer packaging is partly made from recycled materials and is fully recyclable. Interior packing is acid-free and made from approximately 99% recycled pulp fibres.
Choose a kit and review its own product details
Before ordering, open the individual listing and read its exact price, included-items description and compatibility wording. Don’t carry a chassis fit, component list or dimension across from another product: each listing applies to its own kit. Where a chassis is required, plan to provide it yourself. The stated contents help you distinguish the kit parts from anything you’ll need to source separately.
Check the scale, fit and listed contents. Those three points make a useful final review: does the model suit your layout’s scheme, does its stated fit match your planned chassis, and does the listing describe the parts you expect to receive? If any answer changes, reconsider the choice before ordering.
These checks make browsing 7mm narrow gauge kits more straightforward, while the product listing remains the place to review each model’s specific details. Browse the 7mm narrow-gauge kits and compare the O-16.5 / 7mm options with your layout plan in mind.
Choose a Kit That Fits Your Next Layout Project
Turn your layout idea into a specific modelling choice. Decide which part of the scene you want to develop, then compare the relevant listing with your planned track and build. This way, your choice of 7mm narrow gauge kits starts with the project you want to complete, not just a model that looks appealing on its own.
Narrow Minded Railworks is a UK-based maker of hand-crafted 3D-printed narrow-gauge kits. Review the individual kit details and consider the work you’re prepared to undertake, so the model becomes a planned part of your layout rather than an unexpected extra task. Orders are dispatched by Royal Mail, worldwide shipping is available to over 40 countries, and unused items can be returned within 30 days.
Ready to find a model for your project? Browse Narrow Minded Railworks' 7mm narrow-gauge kits and choose a kit that gives you a clear next step for your layout.
Frequently Asked Questions
Can I use a 7mm narrow-gauge model alongside standard-gauge stock?
Yes, if the layout gives the different railway types a convincing shared setting. For example, a narrow-gauge line might appear beside a standard-gauge route in a larger scene, but the models’ scales, track arrangements and relative sizes still need to look coherent. Plan how the lines relate, including any junctions or crossings, and check each model’s stated scale and intended use before placing it alongside other stock.
Are 7mm narrow gauge kits suitable for a first-time kit builder?
They can suit a beginner who’s comfortable with a hands-on project. These kits are unassembled and need priming and painting. You supply any required chassis, so allow for that alongside the build. The work varies by kit, so read its contents and fit details first. Resin is delicate: avoid dropping parts, handle thicker sections, and sand any fine marks gently with 800 to 1200-grit paper if needed.
How much do 7mm narrow gauge kits cost?
The price varies by product, so use the exact figure shown on the individual listing rather than a general estimate. Check that same page for the kit’s included parts and stated chassis fit, since details can differ between models. A body kit does not include a chassis. Comparing the listing price with the parts you’ll need to provide helps you plan the full project.
What should I do if a resin part breaks in the post?
Photograph the damaged part and packaging before trying to repair it, then provide the images. Resin is delicate, so avoid dropping parts and handle them by thicker sections. The outer packaging is partly made from recycled materials and fully recyclable; interior packing is acid-free and approximately 99% recycled pulp fibres. We cannot be held responsible for breakages once your item has arrived. If the piece is broken in the post, please provide images and we will see what we can do to help.
Can I adapt a 7mm kit to a chassis that isn’t named on its listing?
Don’t assume it will fit just because the chassis looks similar or shares the same scale. Compare the kit’s stated fit information with the exact chassis reference you intend to use. Treat an unlisted chassis as unverified, not as a confirmed match; adapting the parts may require extra modelling work. You supply any required chassis, so factor compatibility into your choice before starting assembly.
Can I weather a 3D-printed resin model after painting?
Yes, weathering can be part of your finishing approach once the model has been assembled and painted. Follow the instructions for the paints and weathering products you choose, and try an unfamiliar technique on a spare surface first. Parts are cleaned and UV-cured before dispatch, though many modellers may wish to wash them in mild soapy water before priming. Fine support marks or layer lines may remain; sand gently with 800 to 1200-grit paper only where needed.