

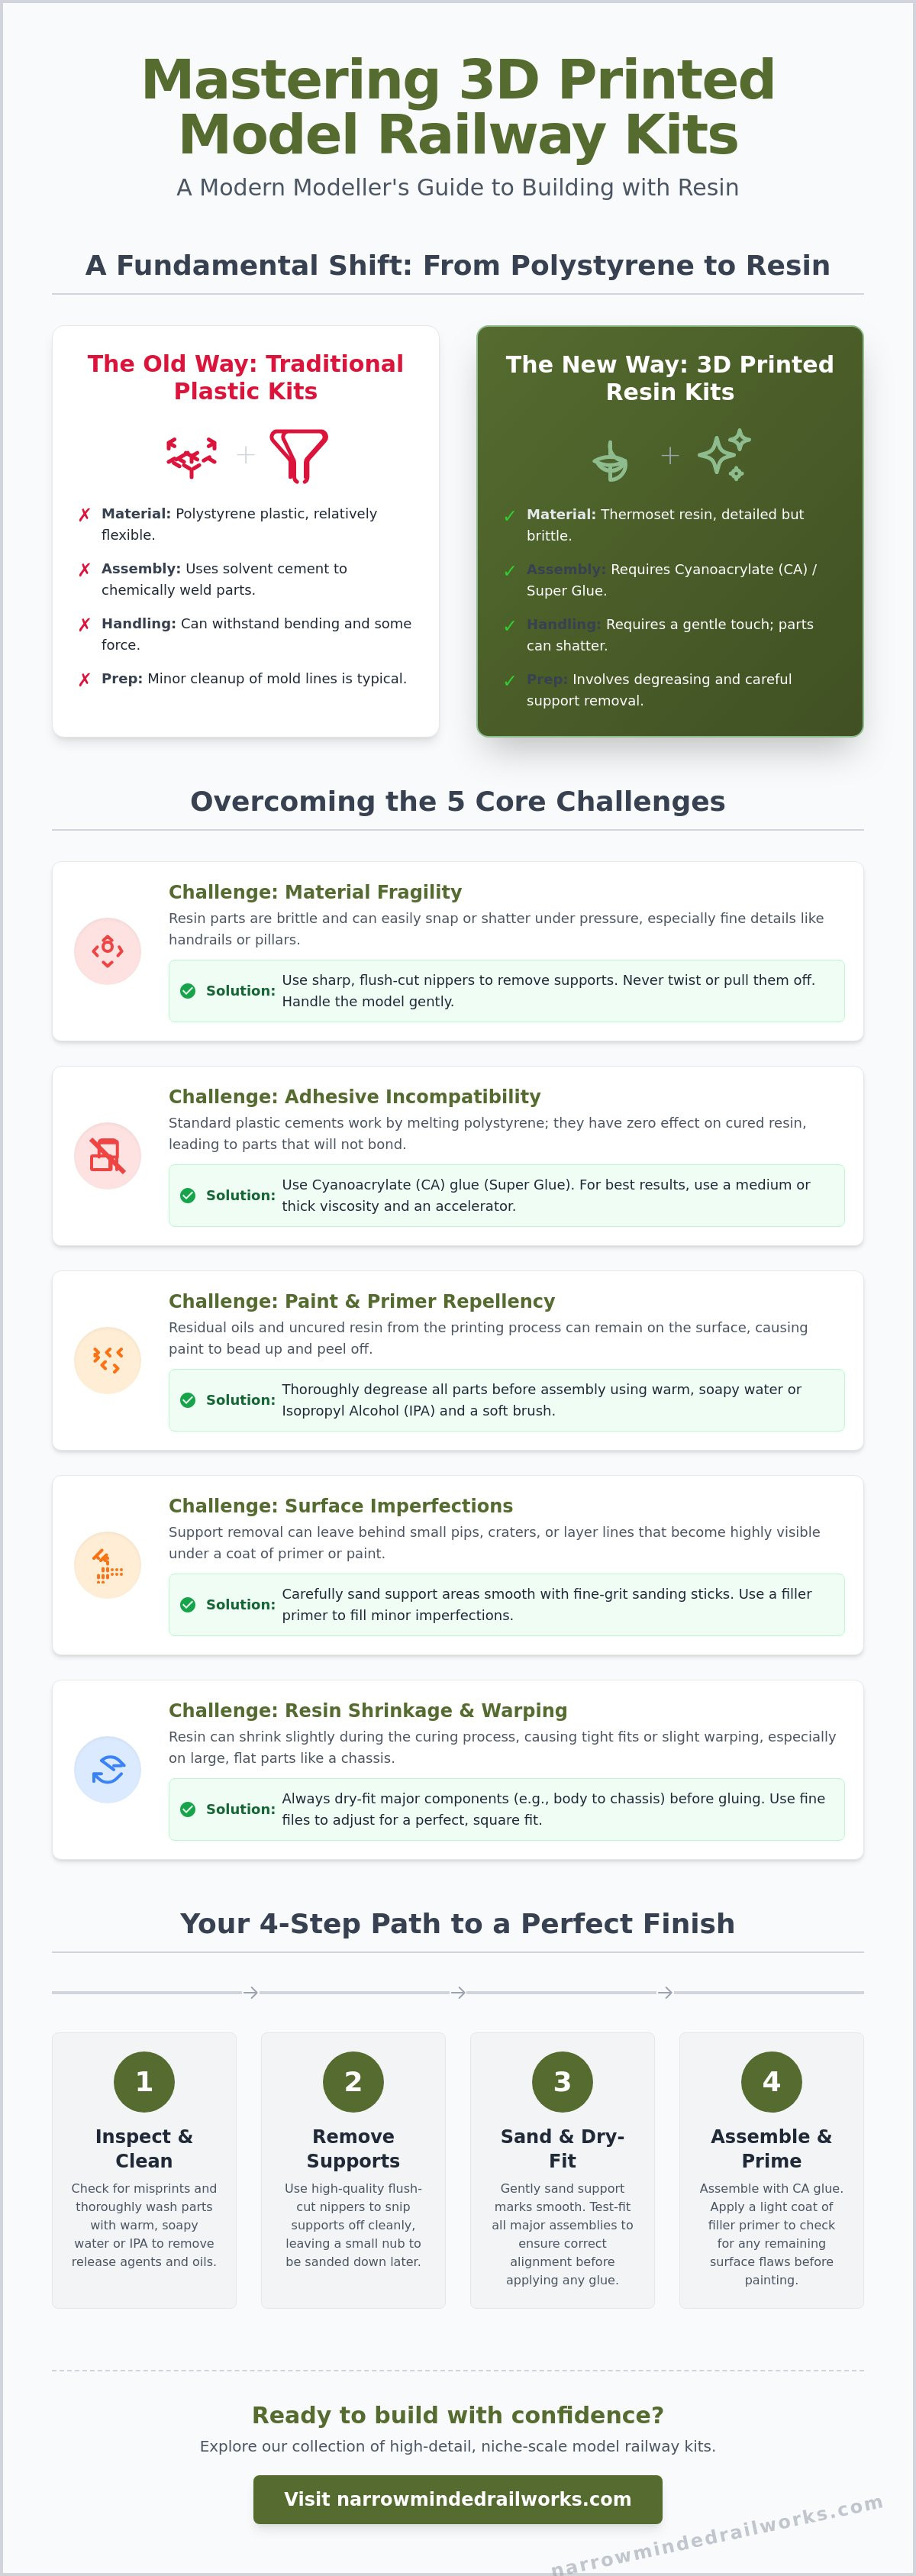
The arrival of high-resolution resin printing has ushered in a golden age for niche scales like OO9 and GN15, yet the reality on the workbench often feels less than golden when a delicate locomotive cab snaps during cleanup. Many modellers find that the challenges of building 3d printed kits stem from treating these modern materials exactly like traditional injection-moulded plastic. While 3D printed resin offers incredible detail, it requires a different set of techniques to avoid the heartbreak of shattered parts or stubborn layer lines.
You likely already know the frustration of seeing a beautiful print marred by visible supports or a paint finish that won't quite level out. This guide will help you master the unique hurdles of 3D printed model railway kits by providing expert advice on preparation, assembly, and finishing. While these materials present specific constraints, using the correct approach will give you the confidence to build with precision. We will explore the specific tools required for safe support removal, the adhesives that actually create a permanent bond, and the sanding methods that ensure your locomotive or wagon achieves a professional finish.
Key Takeaways
- Resin components are more brittle than traditional plastic, so you'll need to use specialized tools and careful handling to prevent breakage during cleanup.
- You'll discover why standard plastic cements fail to bond resin and how to use cyanoacrylate correctly to ensure your model stays together.
- Addressing the challenges of building 3d printed kits requires a thorough degreasing process to remove residual oils that would otherwise ruin your paint finish.
- Achieving a professional look depends on identifying and filling support pips early in the build before they become visible under a coat of primer.
- Precise alignment is necessary to account for natural resin shrinkage, ensuring your locomotive or wagon body sits perfectly square on its chassis.
Understanding the Shift to 3D Printed Railway Kits
Modern railway modelling is undergoing a significant transformation. For decades, traditional model kits relied on injection moulding or metal casting, processes that require expensive tooling and mass production to be viable. 3D printing, or additive manufacturing, creates objects by building them layer by layer from a digital file. This shift allows for the production of highly specific, niche prototypes that would never be commercially successful as mass-produced items. While this technology opens new doors, many enthusiasts encounter the challenges of building 3d printed kits when they assume these models behave like standard plastic.
Narrow gauge enthusiasts, particularly those working in OO9, GN15, or O-16.5 scales, have been the earliest adopters of this technology. Because many narrow gauge prototypes were "one-offs" or belonged to small, obscure lines, they were often ignored by major manufacturers. 3D printing provides unparalleled detail, capturing rivets, louvres, and intricate pipework that traditional casting often softens. However, moving from white metal or vacuum-formed plastic to resin requires a complete reset of your workbench habits. You'll need to swap your heavy files for fine sanding sticks and your soldering iron for high-quality cyanoacrylate.
To better understand the structural properties of these printed materials, watch this helpful video:
Resin vs. FDM: Which Kit Are You Building?
Most high-quality locomotive and wagon kits use UV-cured resin, often called Stereolithography (SLA). This process uses a laser or light source to harden liquid resin, resulting in the smooth surfaces and crisp edges required for small-scale modelling. In contrast, Fused Deposition Modeling (FDM) melts plastic filament and extrudes it through a nozzle. While FDM is excellent for larger-scale scenery or buildings, it often lacks the resolution needed for a delicate OO9 locomotive. Understanding which material you are handling is the first step in successful assembly, as the two materials respond differently to adhesives and paints.
The "Traditional Kit" Mindset Trap
It's easy to fall into the trap of using familiar techniques on new materials. If you apply your favorite plastic cement to a resin kit, you'll find it simply won't work. Plastic cement works by chemically melting the surfaces of polystyrene to fuse them together; resin is a thermoset plastic and won't react to these solvents. You must also account for the structural differences. While a cast metal part might bend under pressure, a 3D printed resin part is more likely to shatter. Preparing for the challenges of building 3d printed kits means accepting that you'll spend more time on careful surface preparation and less time on the actual assembly phase compared to a standard kit.
Navigating Material-Specific Build Challenges
Understanding the physical properties of your model is the first step toward a successful build. Unlike traditional styrene, most hobbyist resins are thermoset plastics that do not bend; they shatter. This inherent brittleness is one of the primary challenges of building 3d printed kits, especially when you are dealing with fine details like handrails, brake gear, or cab pillars. While these materials allow for incredible fidelity, they require a gentler touch than the heavy-duty handling used for white metal or die-cast parts.
Dimensional accuracy also plays a vital role in how parts fit together. Resin naturally shrinks by a small percentage during the UV curing process. This can lead to tight tolerances where a locomotive body meets its chassis. You should always perform a dry test-fit of all major components before reaching for the glue. If a part feels resistant, a light pass with a fine file is usually enough to correct the alignment without risking a fracture.
Managing Resin Fragility and Support Removal
Snapping supports by hand is the most frequent cause of kit damage. While it may seem efficient, the tension often pulls a small "crater" out of the model surface, leaving a hole that is difficult to fill. You should always use sharp, flush-cut nippers to snip the support slightly away from the body. If you encounter "tacky" or soft spots on the resin, the part may require further stabilization. Placing the model under a UV light source for a few minutes will resolve this issue before you begin the cleanup phase.
Layer Lines and Surface Texture
Even high-resolution prints possess microscopic steps known as layer lines. These are most prominent on curved surfaces, such as locomotive boilers, or as "aliasing" on flat wagon sides. You should inspect your kit under a strong, angled light to reveal these textures before you apply any paint. Understanding these 3D printing realities helps you prioritize which areas need the most attention. If you are ready to put these techniques into practice, exploring a range of OO9 locomotive and wagon kits provides an excellent opportunity to refine your skills on high-quality prints.
Visual inspection is different for 3D prints than for smooth injection-moulded plastic. You are looking for patterns rather than just surface scratches. While these lines are a constraint of the technology, they are easily managed with the right preparation. Using a dedicated primer designed to level minor surface artifacts will save you hours of unnecessary sanding later in the build.
Essential Tools and Adhesives for 3D Kit Success
Traditional modelling kits often rely on tools that can damage a delicate resin print. While your existing workbench is a good starting point, the challenges of building 3d printed kits often stem from using aggressive implements on materials that lack the flexibility of styrene. You'll need to curate a specialized set of tools to ensure a clean assembly without risking structural failure. Transitioning to these specific implements allows you to work with the material rather than against it.
Choosing the Right Adhesive
Resin is a thermoset plastic, which means it won't bond with standard solvent-based plastic cements. You'll need high-quality Cyanoacrylate (CA), specifically a medium-viscosity variety. Medium CA provides enough "grab" to hold parts in place while offering a few vital seconds for precise alignment. For heavy structural components, such as mounting a metal chassis to a printed OO9 or GN15 body, a 2-part epoxy is a safer choice. It offers superior shear strength and gap-filling properties that CA cannot match. Many modellers now utilize UV resin pens for instant repairs. These allow you to apply liquid resin to a joint and cure it immediately with a UV light, creating a bond that is chemically identical to the original print.
Specialised Sanding and Cutting Tools
Support removal is a critical phase where many kits suffer accidental damage. Standard side cutters often exert a "crush" force that can shatter brittle resin pillars. You'll find that high-quality flush cutters are essential for making clean snips that don't pull craters out of the model surface. When you move to the smoothing stage, avoid coarse metal files. Instead, use flexible sanding sticks or glass files that allow you to follow the curves of a locomotive boiler or wagon side without flattening the detail.
A successful finish requires a specific approach to grit ranges. You should start with 400 grit for the initial removal of support pips. Once the surface is level, move to 600 or 800 grit to remove the scratches left by the first pass. Always use wet sanding techniques by dipping your abrasive in water. This prevents fine resin dust from becoming airborne and keeps your sanding sticks from clogging, resulting in a much smoother surface. Finishing with 1000 grit or higher ensures that layer lines become invisible once you apply your first coat of primer.
Surface Preparation: Mastering the Finish
Achieving a smooth, professional surface is where many modellers encounter the most persistent challenges of building 3d printed kits. While a kit might appear ready for the paint shop immediately after assembly, the chemical nature of resin requires specific intervention. Resin surfaces are naturally non-porous and may retain microscopic residues from the printing process; however, a disciplined approach to cleaning provides the necessary mechanical key for your primer to bond effectively. You'll find that the time invested in preparation is directly reflected in the quality of your final locomotive or wagon.
The Degreasing and Cleaning Ritual
Residual oils or uncured resin act as a barrier that will cause even the best paints to flake or orange-peel. For most resin kits, a brief soak in high-purity Isopropyl Alcohol (IPA) followed by a gentle scrub with a soft toothbrush is the most effective method. If you are working with FDM filament kits, warm soapy water is often sufficient to remove handling oils. You can verify the cleanliness of the model by observing how water behaves on the surface. If the water beads up, oils are still present; if it sheets off evenly, the surface is ready. If the surface feels slightly sticky to the touch, the resin has reached a tacky stage that requires a few additional minutes of UV light exposure to fully stabilize.
Priming for Success
Your choice of primer is the most critical decision in the finishing process. One of the common challenges of building 3d printed kits is the temptation to use heavy automotive filler primers to hide layer lines. While these products are effective at leveling surfaces, they are often too thick for the delicate rivets and louvres found on OO9 or GN15 scale models. Instead, you should utilize a high-quality hobby primer applied in several light mist coats. This technique builds up a thin, even layer that highlights any remaining support pips or surface flaws without clogging the fine detail of the print.
- Grey Primers: These offer the best neutral base for spotting subtle layer lines or sanding marks.
- Oxide Primers: Excellent for steel-bodied wagons or locomotives, providing a natural base for later weathering.
- Visual Inspection: Use a strong, directional light source after the first mist coat to identify areas that need further filling or sanding.
Once your surface is perfectly prepped, you can move on to our detailed guide on painting 3D printed models to learn about professional color layering and weathering. Preparing the surface correctly ensures that your paint stays exactly where you want it. If you're ready to put these techniques to the test on a fresh project, browse our selection of OO9 and GN15 kits to find your next high-detail prototype.
Overcoming the Chassis Fit Challenge
The final hurdle in locomotive construction is marrying the 3D printed body to a functional chassis. This stage represents one of the most critical challenges of building 3d printed kits because commercial chassis from manufacturers like Kato or Bachmann are built to rigid tolerances, while resin prints can experience slight dimensional changes during the curing process. While a kit is designed to fit a specific power unit, natural resin shrinkage can occasionally lead to a tight fit that requires careful adjustment. You should always prioritize modifying the 3D print rather than the chassis, as filing away internal resin walls is safer than compromising the mechanical integrity of a motor unit.
Our OO9 and GN15 kits are specifically engineered to sit on proven commercial chassis, which reduces the complexity of this alignment. However, you must still account for the "squareness" of the model. If the body sits at an angle, it can cause tracking issues or uncoupling on tight curves. By identifying these alignment constraints early, you can use a fine flat file to level the mounting points, ensuring the locomotive looks and performs as intended on your layout.
Alignment and Mounting Techniques
Precise positioning is difficult to achieve on the first attempt. You'll find that using a small amount of "blu-tack" for temporary positioning allows you to test the clearance of moving parts without committing to a permanent bond. Before final assembly, inspect the internal cavity for any overlooked support remnants. These tiny resin pips can foul the motor housing or gears, leading to erratic running or permanent mechanical damage. If you are new to this process, reading about Your First OO9 Loco Kit will help you understand how to choose the right body and chassis combination for a successful build.
Weighting Your 3D Printed Locomotive
Resin is significantly lighter than traditional white metal or die-cast materials. This lack of mass is a constraint that directly impacts hauling capacity and electrical pickup. To solve this, you must strategically add weight to the model. Small narrow gauge locomotives often have limited internal space, so you'll need to be creative. Tucking small pieces of lead or tungsten into the side tanks, the hollow of the boiler, or even under the cab floor can make a substantial difference. Proper weighting ensures that the wheels maintain constant contact with the rails, which is essential for smooth slow-speed running on complex pointwork.
- Tungsten Putty: Excellent for filling irregular voids inside small locomotive boilers.
- Lead Shot: Can be poured into tanks and sealed with a drop of PVA glue.
- Balance: Try to distribute weight evenly over the driving wheels to maintain traction.
Mastering these final assembly steps transforms a static print into a reliable piece of rolling stock. While the material properties of resin require a different approach to weighting and mounting, the result is a locomotive with detail levels that were previously impossible in niche scales. By following these preparation and assembly techniques, you can overcome the common challenges of building 3d printed kits and enjoy a professional, high-performance model.
Take the Next Step in Your Modelling Journey
Transitioning from traditional materials to 3D printed resin requires a shift in mindset, but the rewards are visible in every fine rivet and crisp louvre. You've learned that success depends on using the correct adhesives, performing thorough surface degreasing, and carefully weighting your models for optimal performance. While the challenges of building 3d printed kits can seem daunting at first, they are easily managed with the right tools and a patient approach. By understanding the physical properties of resin, you can avoid common pitfalls like breakage or poor paint adhesion.
We're here to help you achieve a professional finish on your workbench. Our high-definition resin prints feature minimal support marks and are specifically designed to fit reliable commercial chassis, ensuring a smooth build from start to finish. We also provide expert support for narrow gauge modellers to help you navigate every stage of the process. Explore our range of 3D printed kits designed for easy assembly and discover how accessible high-detail modelling can be. Your next locomotive or wagon is just a few careful snips away.
Frequently Asked Questions
Why do 3D printed kits feel more brittle than traditional plastic models?
Resin is a thermoset plastic that undergoes a chemical change during curing, resulting in a rigid structure that lacks the flexibility of traditional styrene. While this allows for much finer detail, it means the material will shatter rather than bend under pressure. To manage this, you should use sharp, flush-cut nippers and avoid applying lateral force to delicate parts like cab pillars or handrails during the assembly process.
Can I use standard plastic cement to build my 3D printed railway kit?
Standard plastic cement won't work because it relies on a chemical reaction to melt polystyrene, whereas resin is a thermoset material that doesn't react to these solvents. You must use a high-quality cyanoacrylate (superglue) or a two-part epoxy to achieve a permanent bond. These adhesives create the strong mechanical connection necessary to overcome the specific challenges of building 3d printed kits and ensure structural integrity.
How do I remove the small white marks left behind by 3D print supports?
Those white marks are typically stress points or remnants of the support structures used during the printing process. You can remove them by gently sanding the area with a 600-grit sanding stick until the surface is level with the surrounding material. If a support has pulled a small crater out of the body, a tiny amount of model filler or UV resin will restore the surface before painting.
What is the best way to get rid of visible layer lines on a curved boiler?
Visible layer lines are best addressed through a combination of wet sanding and high-quality priming. Start with a 400-grit abrasive to knock back the ridges, then move to 800 or 1000 grit for a smooth finish. Applying a dedicated hobby primer will help fill the microscopic gaps between layers, resulting in a perfectly smooth boiler curve that looks professional once the final topcoat is applied.
Do 3D printed kits need to be washed before painting?
Washing your kit is a mandatory step because residual resin or processing oils will prevent paint from adhering to the surface correctly. A brief soak in Isopropyl Alcohol (IPA) or warm, soapy water followed by a thorough rinse will remove these contaminants. Once the model is completely dry and no longer feels tacky, you can proceed with confidence to the priming stage without worrying about paint flaking.
Is it safe to sand 3D printed resin kits at home?
Sanding resin kits is safe as long as you prevent the inhalation of fine dust particles. You should always use wet sanding techniques, as the water traps the dust and prevents it from becoming airborne. Working in a well-ventilated room and wearing a basic dust mask provides an extra layer of protection, ensuring your modelling environment remains clean while you address the challenges of building 3d printed kits.
How do I fix a part that snapped off my 3D printed locomotive?
If a delicate part snaps, you can create a seamless repair using a medium-viscosity cyanoacrylate or a UV resin pen for an instant bond. For structural components that experience stress, such as a coupling mount, you might need to "pin" the joint by drilling a small hole and inserting a piece of brass wire. This reinforces the repair and prevents the part from failing again under the weight of a train.
Can I use a 3D printed kit with a standard N gauge or OO gauge chassis?
Most 3D printed railway kits are designed to fit specific commercial chassis from manufacturers like Kato or Bachmann. While the bodies are engineered for these units, you may encounter slight variations due to natural resin shrinkage. Performing a dry test-fit allows you to identify where internal supports might need to be filed back slightly to ensure the body sits square and level on your chosen power unit.