

Why does a high-resolution 16K resin print often look like a plastic toy the moment you slide a decal onto it? You have likely spent hours perfecting a narrow gauge OO9 or GN15 locomotive kit, only to find that silvering or stubborn layer lines destroy the realism. It's a common hurdle; 3D printed surfaces possess a unique microscopic topography that differs from traditional injection-molded plastic. We understand that applying decals to 3d printed model railway kits can feel like a gamble when you are working with complex textures like rivets and panel lines.
This guide provides the technical roadmap to mastering waterslide transfers on resin surfaces for a professional, painted-on finish. While resin can be sensitive to certain solvents, we'll identify which 2026 setting solutions, such as Micro-Set or Mr. Mark Softer, are safe for your specific models. You will gain the confidence to settle film over the finest details without trapping air. We will walk through the essential stages of surface preparation, chemical application, and final sealing to ensure your numbering looks like it was applied at the works.
Key Takeaways
- Understand how 3D print layer lines create "micro-valleys" that trap air and learn the specific chemical methods to eliminate silvering.
- Master the "Step-Down" sanding technique and the use of high-build primers to create a glass-smooth foundation on narrow gauge resin kits.
- Discover the professional sequence for applying decals to 3d printed model railway kits using wetting agents and solvents to "melt" film into complex textures.
- Learn the "Zero Border" cutting method and optimal soaking temperatures to ensure waterslide transfers adhere perfectly to OO9 and GN15 models.
- Implement the "Varnish Sandwich" sealing technique to protect your work and achieve a prototypical sheen that matches the original locomotive.
Why 3D Printed Surfaces Challenge Traditional Decal Techniques
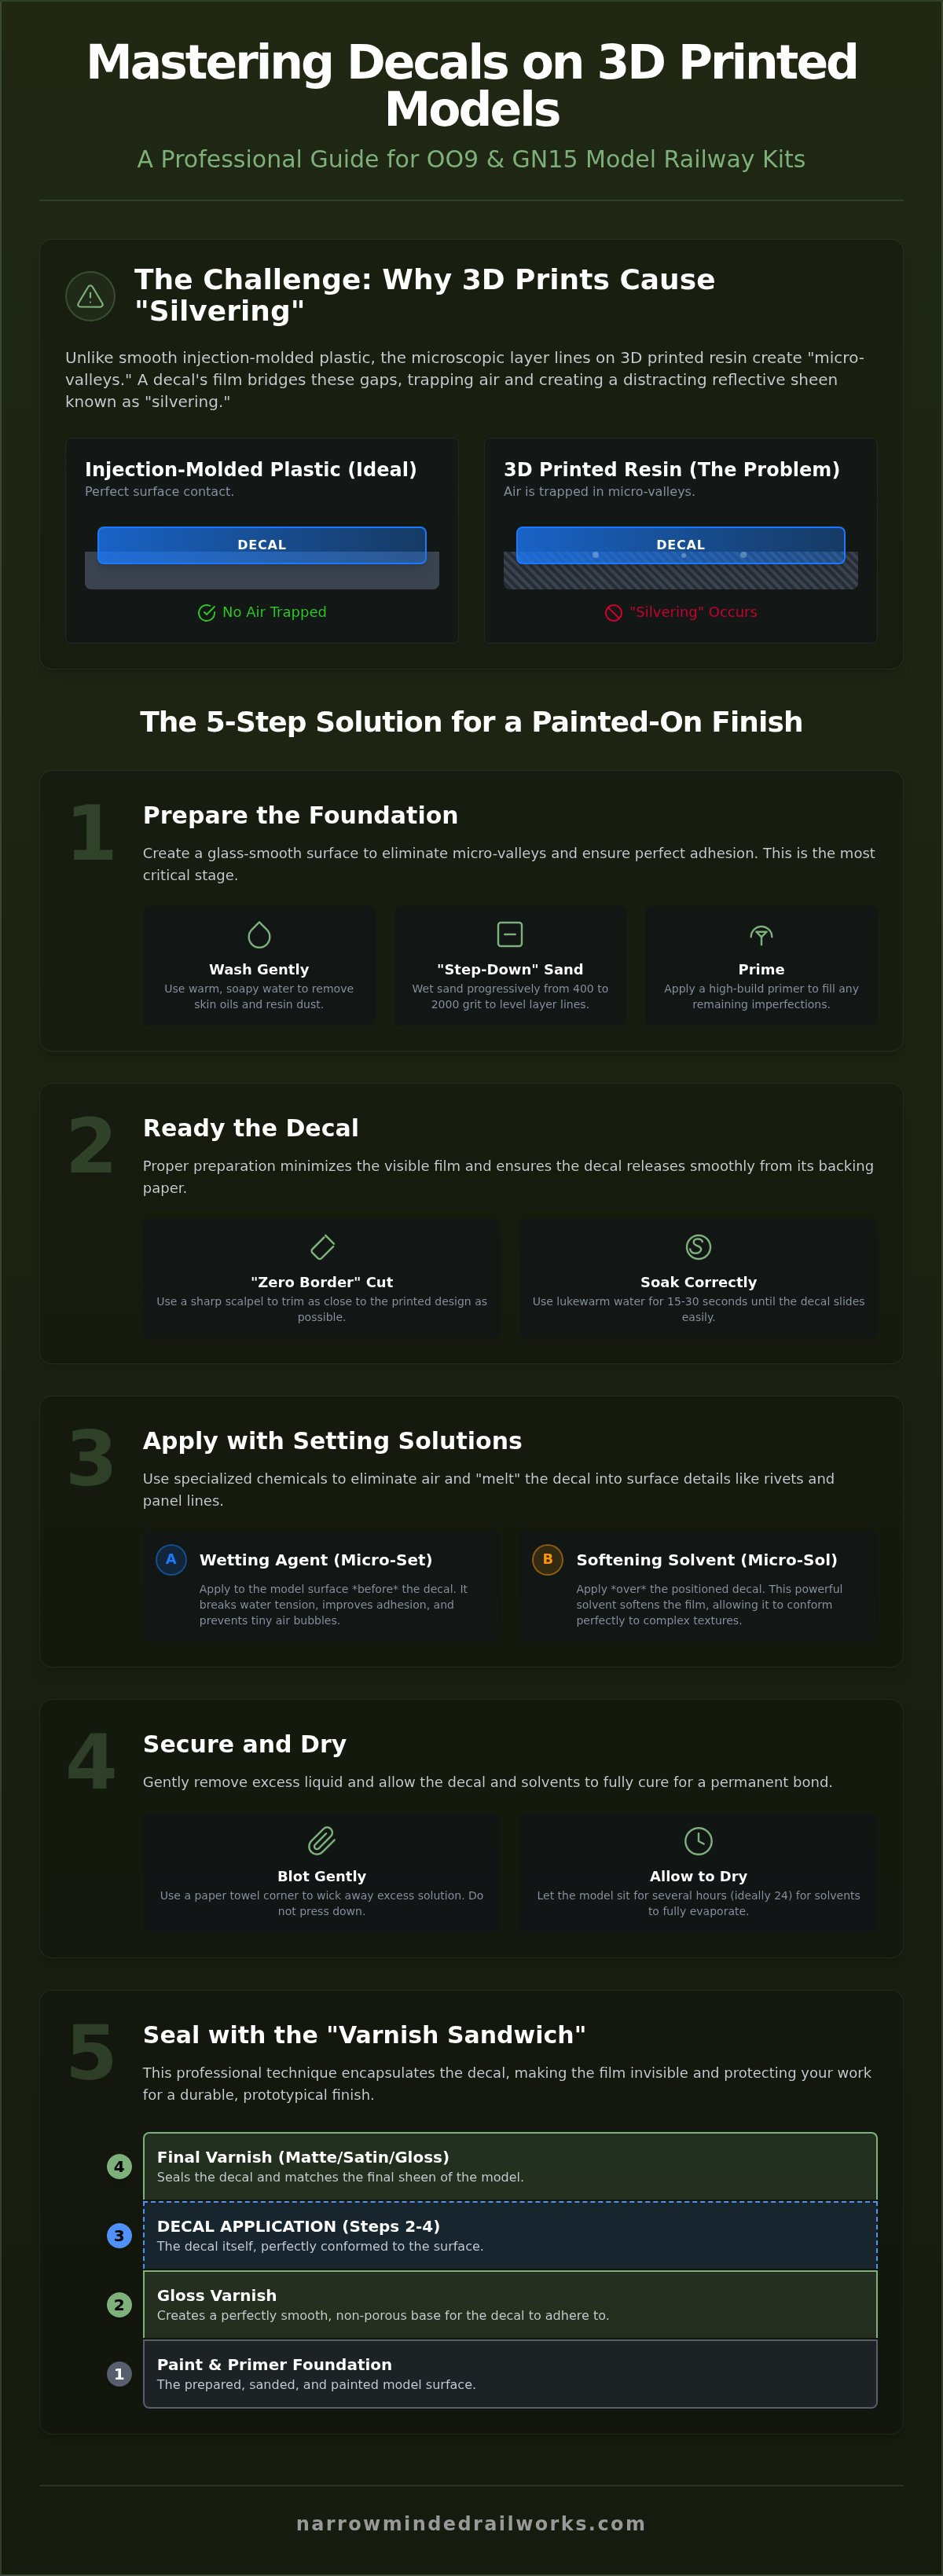
3D printing has changed the game for OO9 and GN15 kits, offering detail that was once impossible for home hobbyists. However, traditional methods for applying decals to 3d printed model railway kits often lead to frustration. The primary culprit is the microscopic texture inherent to the printing process. Unlike the mirror-smooth surface of injection-molded polystyrene, 3D printed resin consists of thousands of individual layers. Even with the latest 16K resolution printers producing layers as thin as 17 microns, the surface is not truly flat. It contains "micro-valleys" that trap air.
When you slide a transfer onto the model, the carrier film spans across these valleys rather than settling into them. This traps microscopic air bubbles. In the modeling community, we call this "silvering." It creates a distracting, reflective sheen that betrays the presence of the film. Understanding What are decals? helps clarify that these are thin, printed films requiring total surface contact to appear painted on. Standard water-only application fails here; water lacks the chemical power to pull the film into 17-micron crevices. Without a proactive approach to surface preparation, the decal will never look integrated into the resin body.
The Problem with Layer Lines and Porosity
Even if a print feels smooth, the "staircase" effect remains. These ridges act like a series of tiny speed bumps for your transfers. Without a robust sealing layer, the decal film sits on top of the ridges, leaving gaps beneath that catch the light. Modern engineering-grade resins, while boasting a tensile strength of 55 MPa, can be slightly more porous than traditional plastics. If you apply aggressive solvents directly to unprimed resin, they can seep into the material. This might cause the resin to soften or the decal to bond unevenly. Utilizing a high-build primer is a proactive solution to filling these microscopic voids before you begin the finishing process.
Narrow Gauge Specifics: Tiny Rivets and Beading
Narrow gauge models in OO9 or O-16.5 scales often feature dense rivet detail and intricate beading. These protrusions create a "tenting" effect. The decal film stretches over the rivet head like a tarp, leaving a ring of air around the base. Surface tension is another hurdle on tight curves, such as the boiler barrels of a small locomotive kit. The film naturally resists the wrap of the resin body. Because 1:76 and 1:43 scales are so small, any thickness in the decal film becomes magnified. This "scale effect" makes a seamless finish much harder to achieve without specific chemical assistance to melt the film into place.
Preparing the Perfect Foundation: Sanding and Priming for 3D Prints
While 3D printed resin is a remarkably detailed medium for OO9 and GN15 models, it possesses a microscopic texture that can interfere with paint adhesion. Utilizing a systematic approach to surface preparation offers a proactive solution to ensure your finish remains intact. Before you consider applying decals to 3d printed model railway kits, you must remove the invisible barriers to a professional finish. Skin oils from handling and pervasive resin dust from the printing process will prevent your primer from bonding. A gentle wash in warm, soapy water followed by a thorough air-dry is the first essential step for any kit.
The "Step-Down" sanding technique is the most effective way to eliminate stubborn layer lines. While coarse grits can damage fine details, starting with 400 grit allows you to level the most prominent ridges. You should then progress through 800 and 1200 grit, finishing with 2000 grit for a glass-smooth surface. This progression ensures that you aren't just creating new scratches, but truly polishing the resin. Once the surface is smooth, a high-build polyurethane primer should be applied. These primers are designed to settle into any remaining micro-valleys, creating the uniform surface energy required for the subsequent paint layers.
Levelling the Print Surface
Flat areas like locomotive cab sides or wagon planks are "trouble zones" where layer lines are most visible. While dry sanding can lead to heat buildup that softens fine resin details, wet sanding provides a proactive solution to keep the surface cool and the sandpaper clear. This is particularly important when you need to preserve rivet detail while removing layer lines. By using a flexible sanding stick, you can work around these tiny protrusions without flattening them, maintaining the character of your OO9 locomotive kits.
The Critical Role of Clear Gloss Varnish
Standard matt paints create a porous, microscopic landscape that traps air under decal film. Applying a high-gloss varnish offers a proactive solution by creating a perfectly flat bed for the transfer. For beginners, a "spot gloss" approach on the specific area for the decal is often easier than spraying the entire model. AK Interactive Intermediate Gauzy Agent Shine Enhancer is an excellent choice for this stage, typically retailing around $10.95 USD. You must allow the gloss coat to cure for at least 24 hours before applying decals to 3d printed model railway kits. Rushing this process can lead to the gloss layer reacting with the decal setting solutions used in the next stage.
The Science of Setting Solutions: Micro Set vs. Micro Sol
Once you've achieved a gloss finish on your resin kit, you must move beyond using plain water. Water alone cannot overcome the complex surface energy of 3D prints, especially on the intricate curves of OO9 or GN15 locomotives. Applying decals to 3d printed model railway kits requires a two-stage chemical process to ensure the film conforms to the microscopic ridges of the resin. Microscale Industries provides the industry standard with Micro Set and Micro Sol, which are widely available in 2026 for approximately $11.00 as a set. These solutions aren't interchangeable; they perform distinct roles in the decaling process.
Safety is a common concern when using aggressive chemicals on high-detail models. While the engineering-grade resins utilized in Narrow Minded Railworks kits are durable and boast a tensile strength of 55 MPa, your paint layers are more sensitive. Modern coatings like Scalecoat II ($9.95 MSRP) or Tru-Color Acrylic Paints ($12.98 MSRP) generally resist these solutions well. However, you must ensure your paint has cured for at least 24 to 48 hours before starting. If the paint is still outgassing, the setting solutions can bite into the surface and cause permanent damage.
Micro Set: Positioning and Adhesion
Micro Set is the "wetting agent" found in the blue bottle. It serves as a proactive solution by breaking the surface tension of the fluid on your model. By brushing a small amount onto the gloss surface, you create a "pool" that allows the transfer to slide into position without sticking prematurely. This is vital for narrow gauge models where alignment on tiny cab sides or wagon ends is difficult. Beyond positioning, Micro Set slightly softens the decal adhesive. This creates a superior long-term bond with the resin surface. You should use a soft, clean brush to wick away excess fluid and press out any trapped air bubbles while the film is still mobile.
Micro Sol: Conforming to Complex 3D Detail
Micro Sol is the "solvent" in the red bottle. Its primary job is to temporarily melt the carrier film so it can drape over rivets and into panel lines. When you apply this solution, the decal will often begin to distort and look ruined. This is the "Wrinkle Phase," and it's the most critical "no-touch" period of the entire process. Touching the film while it's in this softened state will tear it instantly. As the solution evaporates, the film shrinks back and pulls itself tight against the 3D printed texture. If you are applying decals to 3d printed model railway kits with particularly heavy detail, you might need a second or third coat of Sol once the first has dried completely.
Step-by-Step: Applying Waterslide Transfers to Narrow Gauge Models
Standard waterslide transfers often feature a wide, transparent carrier film that looks unsightly on small models. Utilizing the "Zero Border" technique provides a proactive solution to this issue. By using a fresh scalpel blade to cut as close as possible to the printed ink, you minimize the surface area of the film that could potentially silver. When you're applying decals to 3d printed model railway kits, every fraction of a millimeter counts. Reducing the carrier film ensures the transfer blends seamlessly into the resin body rather than sitting on top of it.
The soaking process requires careful timing and temperature control. While cold water eventually works, using lukewarm water offers a proactive solution by activating the adhesive more rapidly. You should submerge the cut decal for approximately 15 to 20 seconds. Once the transfer begins to slide on its backing paper, it's ready. You don't want to leave it in the water too long, or the glue will wash away entirely. Use tweezers to move the backing paper to the model, then use a fine brush to slide the film onto the pre-prepared pool of setting solution. If you're ready to start your next project, explore our range of high-detail OO9 locomotive and wagon kits.
Precision Positioning for Small Scales
Small scales like OO9 demand extreme accuracy. While the naked eye might miss a slight tilt, using a jeweler’s loupe or a desk magnifier provides a proactive solution to alignment errors. You can use a damp cocktail stick or a fine-tipped brush to nudge the transfer into place. It's vital to follow the "Check Twice" rule: verify the position against prototype photos before the film begins to set. Once you're happy with the placement, you can move on to securing the film. Applying decals to 3d printed model railway kits is a slow process; don't rush the alignment phase.
Managing Excess Moisture and Air
Excess water can cause a decal to float away from its intended position. Utilizing a lint-free cotton bud offers a proactive solution for removing moisture without leaving fibers behind. You should gently roll the bud from the center of the decal toward the edges. This action expels trapped air and setting solution without the risk of shifting the film. You must never "swipe" a fresh decal on a 3D print, as the friction will likely tear the thin film or pull it off the model entirely. Wicking away fluid from recessed corners with the corner of a paper towel ensures the decal settles firmly into the resin detail.
Finishing Touches: Sealing and Weathering Your Model
After the "wrinkle phase" has passed and your transfers have settled, you must perform a final inspection. Look closely at the model under a strong light to check for any remaining silvering. If the film still appears reflective or "cloudy" in certain spots, it indicates trapped air that wasn't fully expelled. Applying a final drop of solvent offers a proactive solution to melt those last stubborn areas before you lock the mistake under a clear coat. Once the surface is perfectly uniform, the "Varnish Sandwich" technique becomes the industry standard. This involves placing the decal between two layers of clear finish, ensuring it never peels or flakes away from the resin body.
Choosing the right sheen is vital for prototype accuracy. While the initial gloss layer was necessary for adhesion, most narrow gauge locomotives didn't maintain a high-shine finish during daily service. A satin or matt finish provides a proactive solution for matching the appearance of hard-working, painted metal. This final coat also levels the height difference between the thin decal film and the surrounding paint, effectively making the edges disappear. When applying decals to 3d printed model railway kits, this leveling effect is what creates the professional, "painted-on" look that distinguishes a kit-built model from a toy.
Sealing the Decal for Permanence
Using an airbrush for the final sealing stage is superior to using a brush-on finish. A traditional brush can catch the microscopic edge of a decal and lift it, even after setting solutions have been used. Airbrushing applies a fine, even mist that doesn't physically disturb the film. You must monitor environmental humidity during this process; spraying in damp conditions can cause "frosting," which is a white, opaque haze that ruins the finish. This protective layer is also essential if you plan to use oil-based weathering washes, as the mineral spirits in those washes can otherwise dissolve the decal adhesive and cause the transfer to slide off.
Integrating Decals into the Narrow Minded Railworks Aesthetic
Narrow Minded Railworks kits feature high-detail boiler bands and rivets that require careful blending to look convincing. If you are applying lining or company logos, ensure they align perfectly with these 3D features. To truly integrate the transfers into the model, you should weather over them rather than leaving them pristine. Using weathering powders or a light airbrush "dusting" offers a proactive solution to dulling the factory-fresh colors of the decal ink. This ensures the numbering looks like it has aged naturally alongside the locomotive's paintwork. If you're ready to begin your next high-detail project, explore our range of OO9 and GN15 kits to start your next project.
Bringing Your Narrow Gauge Vision to Life
Mastering the art of applying decals to 3d printed model railway kits is a significant milestone for any modeller. Success relies on a systematic approach that begins with a glass-smooth gloss foundation and ends with the careful chemical "melting" of the film into the resin's microscopic detail. While 3D printed textures present unique challenges, utilizing the correct setting solutions and sealing techniques provides a proactive solution for achieving a seamless, painted-on finish that stands the test of time. These methods ensure your numbering and lining look like they were applied at the works rather than sitting on top of the model.
Narrow Minded Railworks kits are specifically designed for 3D printing enthusiasts who demand the highest level of detail. We offer expertly scanned figures and intricate scenery to complement our OO9 and GN15 models. With global shipping available for narrow gauge modellers, you can easily access the high-quality components needed for your next layout. Browse our 3D printed narrow gauge locomotive kits today and apply these professional finishing techniques to your own fleet. Your path to a prototypical narrow gauge railway starts with a well-prepared surface and the right tools.
Frequently Asked Questions
Why do my decals look silver or cloudy on my 3D printed model?
Silvering occurs because the decal film spans across microscopic layer lines, trapping air in the valleys. Utilizing a high-gloss clear coat before applying decals to 3d printed model railway kits offers a proactive solution to this issue. The gloss layer fills the microscopic topography, creating a perfectly flat surface for the film. This ensures total contact between the transfer and the model, effectively eliminating the reflective air pockets that cause a cloudy appearance.
Can I apply decals directly onto a 3D printed resin surface?
You should avoid applying decals directly to raw resin because the surface energy is too high and the material remains slightly porous. A raw print contains microscopic irregularities that prevent the adhesive from bonding evenly. Applying a high-build primer and a smooth paint layer provides a proactive solution for creating the necessary foundation. This preparation ensures that the decal sits on a stable, non-porous surface, preventing the film from silvering or peeling over time.
How long should I let my paint dry before applying waterslide transfers?
You must allow your paint to cure for at least 24 to 48 hours before you begin the decaling process. While the surface may feel dry to the touch, modern acrylics and enamels continue to outgas as they harden. Applying waterslide transfers too early can trap these gases, leading to bubbles or a chemical reaction that softens the paint. Waiting for a full cure offers a proactive solution to ensure the setting solutions don't bite into the finish.
Will Micro Sol damage my 3D printed resin locomotive kit?
Micro Sol will not damage the high-quality engineering-grade resins used in our kits, as these materials boast a high tensile strength of 55 MPa. However, the solution is a powerful solvent that can react with certain paint types if they aren't fully cured. Ensuring you have a robust gloss barrier over your paint offers a proactive solution to protect the finish. Always test a small, hidden area if you're using a new brand of paint or varnish.
How do I get decals to sit over rivets and panel lines on small narrow gauge models?
Utilizing a strong setting solution like Micro Sol or Mr. Mark Softer is the most effective way to make decals conform to tiny rivets. These chemicals temporarily melt the carrier film, allowing it to drape over protrusions. You should use a soft brush to gently nudge the softened film into place without tearing it. This technique is essential when applying decals to 3d printed model railway kits with the dense rivet detail found on OO9 locomotives.
What is the best way to seal decals on a model railway wagon?
An airbrushed clear coat is the superior method for sealing transfers on a wagon or locomotive. Brushing on a varnish can physically lift the edges of the film, whereas airbrushing applies a fine mist that locks the decal in place. Using a "varnish sandwich" technique, where the decal is placed between two clear layers, offers a proactive solution for permanence. This protects the transfer from handling and future weathering processes using oils or powders.
Can I use decals on FDM (filament) 3D prints as well as resin?
You can use decals on FDM prints, but the prominent layer lines require significantly more preparation than resin surfaces. FDM prints often feature layers as thick as 100 to 200 microns, which will easily show through the thin decal film. Utilizing multiple layers of high-build primer and thorough wet sanding offers a proactive solution for smoothing the surface. Without this intense leveling, the decal will fail to adhere properly and silvering will be unavoidable.
What tools do I need for applying very small decals in OO9 scale?
Handling tiny transfers in OO9 or GN15 scales requires precision tools to avoid damage. You should utilize a pair of fine-tipped tweezers, a size 000 synthetic brush, and a jeweler's loupe for magnification. A damp cocktail stick is a proactive solution for nudging the decal into its final position without the risk of tearing the softened film. Finally, use lint-free cotton buds to roll out excess moisture and secure the decal against the resin body.