

Can a diesel engine provide the same industrial soul as a traditional steam locomotive? While many narrow gauge enthusiasts crave the vintage aesthetic of a steam-powered workhorse, the mechanical complexity of building one from scratch often acts as a significant barrier. Choosing an oo9 steam outline diesel shunter kit offers a practical solution by combining the rugged look of a steam engine with the reliable, easy-to-maintain power of a modern diesel mechanism.
It's common to want a layout that stands out with unique character while feeling hesitant about tackling intricate brass kits or sourcing obscure parts. We understand that finding the right components is difficult, yet following a structured approach ensures you can build a locomotive you are proud of. This guide will help you select, build, and finish the perfect steam-outline diesel shunter for your narrow gauge railway. We will examine donor chassis compatibility, simplify the assembly process for various skill levels, and provide techniques for a professional finish that brings your industrial scene to life.
Key Takeaways
- Gain a clear understanding of what a steam-outline locomotive is and how these unique industrial designs historically served noise-sensitive urban environments.
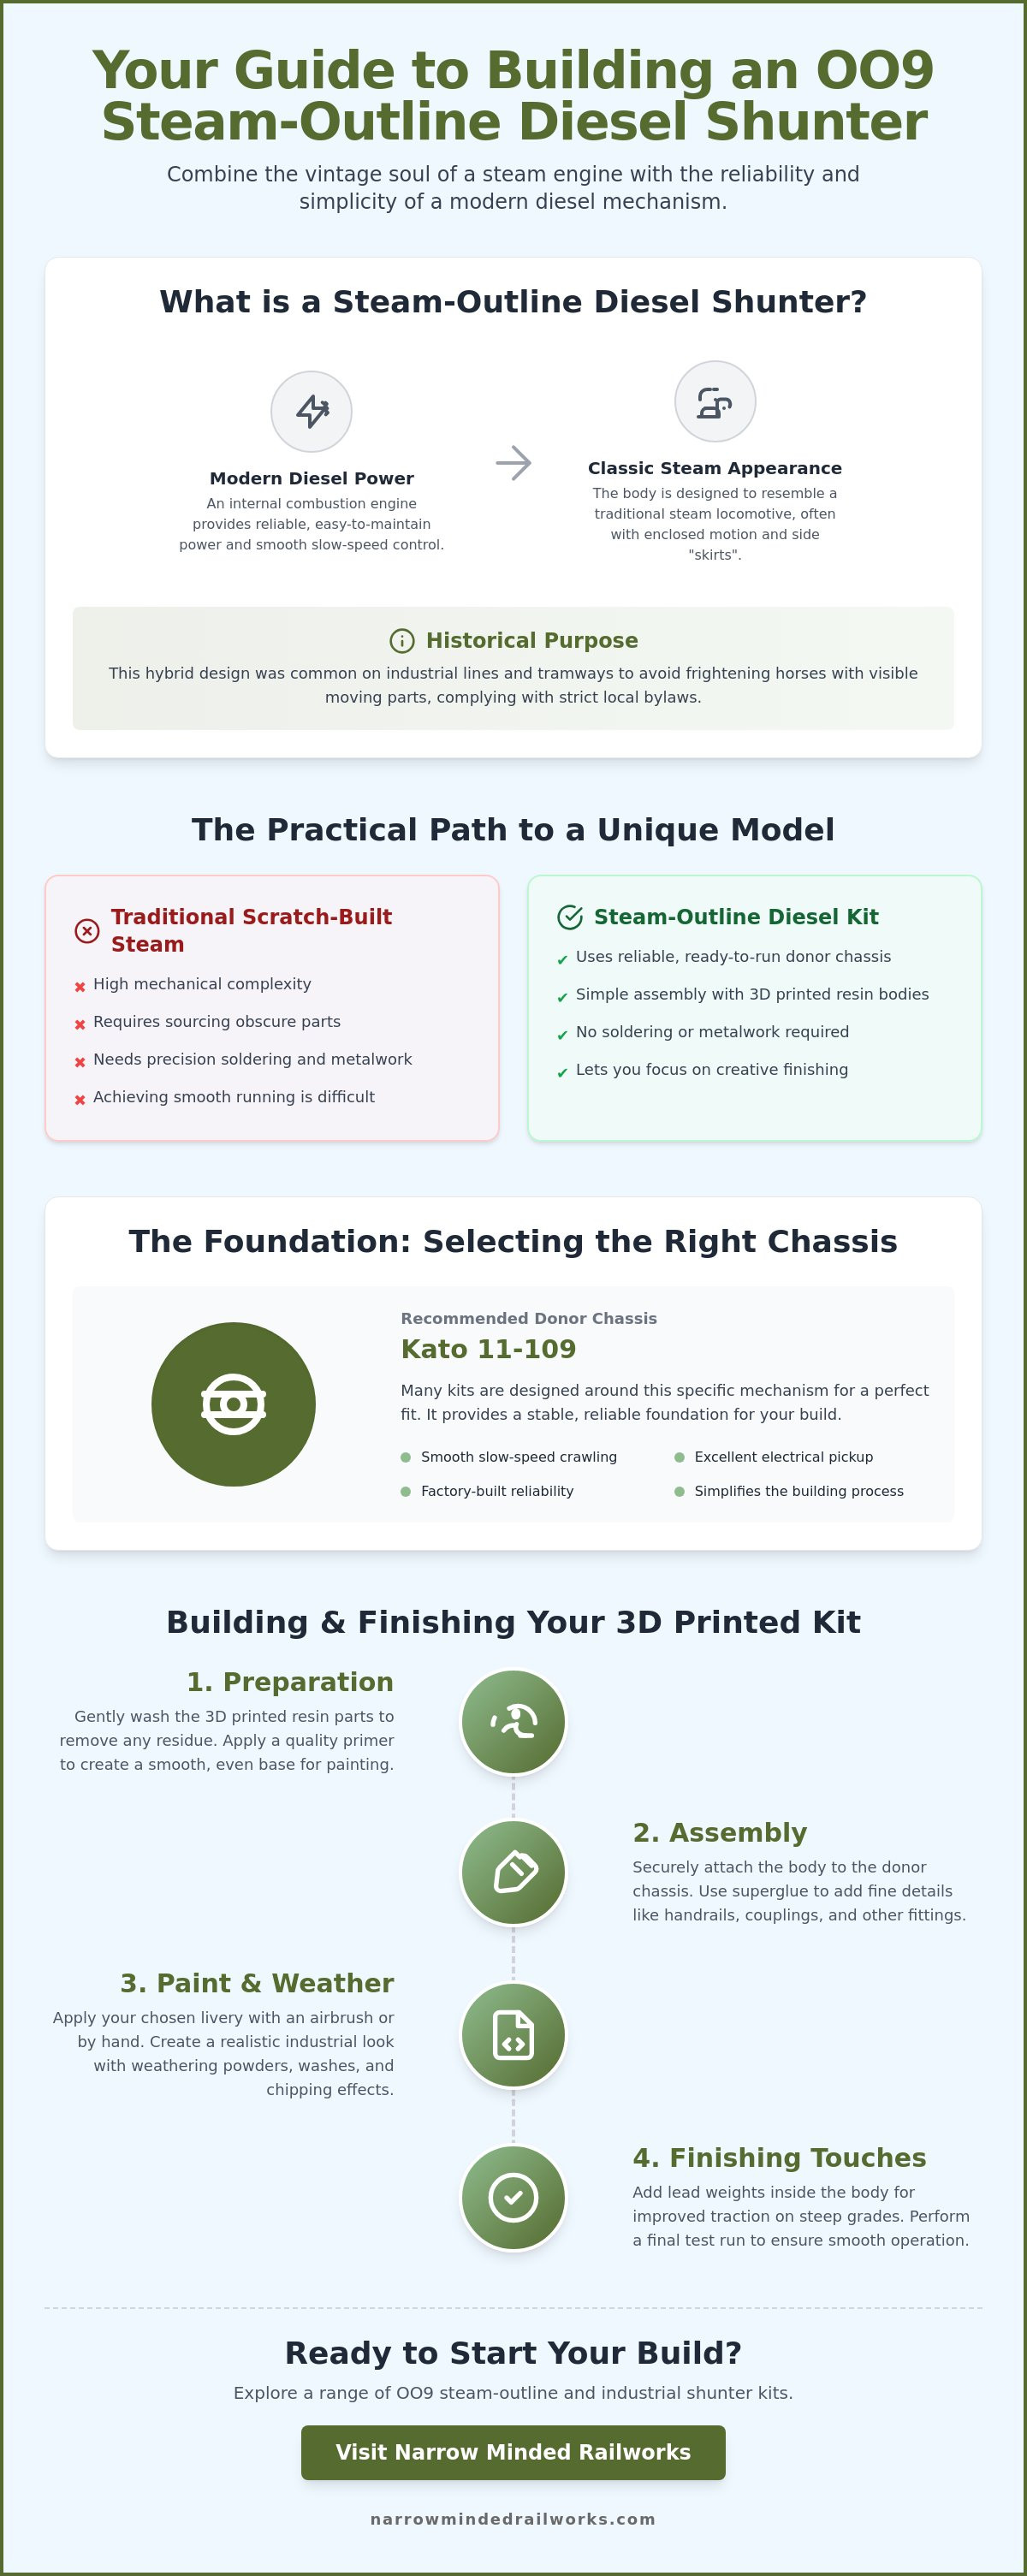
- Identify the best donor mechanisms, such as the Kato 11-109, to provide a reliable foundation for your oo9 steam outline diesel shunter kit.
- Explore various body styles, from the classic WG Bagnall look to diesel-mechanical profiles, to find a design that fits your layout's specific character.
- Learn the essential preparation and finishing steps for 3D printed resin kits to ensure professional results without the frustration of complex assembly.
- Discover how modern precision printing simplifies the modeling process by eliminating the need for traditional metalwork and soldering.
What is a Steam Outline Diesel Shunter in OO9?
In the world of narrow gauge modeling, a steam-outline locomotive is a fascinating hybrid. It's an internal combustion engine, usually powered by diesel or petrol, that has been specifically designed to resemble a traditional steam locomotive. This aesthetic choice wasn't just for show. It served a practical purpose on industrial lines and roadside tramways. While building a functioning steam engine in 4mm scale presents significant mechanical challenges, using an oo9 steam outline diesel shunter kit provides a simpler path to a high-detail model that runs reliably.
Historically, these locomotives were a response to strict local bylaws. In urban environments or along public roads, the sight and sound of exposed reciprocating parts were thought to frighten horses. To mitigate this risk, manufacturers produced engines with enclosed motion and low-hanging "skirts" that hid the wheels. This created a distinct industrial look that remains popular with modellers today. To grasp the technical context of this scale, it's helpful to research What is a Steam Outline Diesel Shunter in OO9? and how it fits into the broader narrow gauge hobby.
To see one of these unique industrial models in action, watch this helpful video:
The History of Industrial Steam Outlines
Manufacturers such as W.G. Bagnall and Baguley were masters of this niche. They recognized that while steam was the dominant power, internal combustion offered lower operating costs. These locomotives often started as petrol-driven units for timber lines or quarries where fire risks were high. Eventually, they transitioned to diesel power while keeping their steam-like silhouettes. This transition period created a variety of unique "transitional" locomotives that look right at home on a heritage or industrial layout.
Why Model Steam Outlines in 4mm Scale?
Modellers often find themselves restricted by the small footprint of narrow gauge layouts. While you might want the character of a steam engine, the tiny wheelbases can make smooth running difficult to achieve. Choosing an oo9 steam outline diesel shunter kit solves this problem by allowing you to use a modern, factory-made chassis. You get the visual "weight" of a steam engine with the "plug-and-play" reliability of a diesel mechanism.
This style is particularly effective for small dioramas. The enclosed bodies provide ample space for lead weights, which improves traction on steep industrial grades. The flat surfaces of the skirts and side panels offer a perfect canvas for heavy weathering. You can truly lean into the "industrial grime" look that defines many narrow gauge lines without worrying about damaging delicate valve gear.
Selecting the Right Chassis for Your OO9 Shunter Kit
Building a locomotive requires a stable foundation. For many enthusiasts, the most daunting part of an oo9 steam outline diesel shunter kit isn't the bodywork, but the mechanism beneath it. While some advanced modellers still prefer building etched brass power units, the majority of the hobby has moved toward ready-to-run donor chassis. These factory-built units offer smooth slow-speed crawling, which is essential for shunting operations. Building an etched brass chassis requires precision soldering and fine-tuning that can take hours. A ready-to-run unit lets you focus on the creative aspects of the build, like painting and weathering, without the mechanical frustration.
Before you start your build, it's vital to inspect your donor chassis. Check for smooth electrical pickup and ensure the gears aren't fouled by factory grease. Many kits are specifically designed around a specific wheelbase to ensure the wheels sit correctly within the wheel arches or behind the side skirts. To understand how these models reflect real-world engineering, you can spend time Comparing Popular OO9 Steam Outline and Industrial Kit Styles at heritage centers. This research helps you verify if the wheel diameter and wheelbase of your chosen chassis look prototypical for a narrow gauge engine.
A quick inspection checklist for your donor mechanism should include:
- Electrical Continuity: Are all wheels contributing to the electrical circuit?
- Mechanical Clearance: Does the motor sit low enough to fit under the kit's bonnet?
- Slow-Speed Performance: Does the unit stall on points or crawl smoothly at low voltage?
Kato 11-109 vs. 11-103: Which Should You Choose?
The Kato 11-109 is often considered the gold standard for modern 4mm scale narrow gauge kits. It's a four-wheel (0-4-0) motorized chassis that provides exceptional reliability for its size. Its slightly larger footprint compared to the 11-103 makes it easier to fit DCC decoders if you're planning a digital layout. The 11-103 is more compact, making it ideal for the smallest industrial "pugs" where space is at a premium. Both options are compatible with most high-quality 3D printed resin shells, but the 11-109 generally offers better electrical pickup over insulated frog points.
Alternative Power Units for Narrow Gauge Kits
While Kato dominates the market, other options exist for specialized builds. Tsugawa Yokou produces tiny "shorty" chassis that fit into incredibly tight spaces, though they often lack the pulling power of larger units. If you're struggling with traction, adding lead or tungsten weights inside the body shell is a proactive solution to improve rail adhesion. Some modellers experiment with 3D printed chassis frames that house standalone motors, but this requires significant mechanical skill. For those looking to start their journey with a proven combination, exploring a selection of locomotive kits designed for these specific chassis is a great first step. This ensures your oo9 steam outline diesel shunter kit fits perfectly without the need for complex modifications.
Comparing Popular OO9 Steam Outline and Industrial Kit Styles
Selecting a body shell that matches your layout's character is often difficult when multiple designs fit the same donor chassis. A proactive solution is to categorize kits by their prototype inspiration or functional design. For instance, an oo9 steam outline diesel shunter kit based on the WG Bagnall "Rye and Camber" style offers a very different aesthetic compared to a modern industrial diesel. The Bagnall designs feature prominent tanks and side valances that hide the motion. This creates a classic steam silhouette while housing a reliable diesel heart beneath the resin shell.
Tram-style locomotives represent another distinct category. These fully enclosed bodies were essential for roadside running where safety regulations required all moving parts to be shielded. If your layout features a village street or a busy dockside, these boxy, skirted engines provide the perfect industrial charm. Alternatively, Quarry Hunslet variants show the evolution of narrow gauge power. You might find kits that transition from the classic open-cab steam look to fully enclosed shrouds. These designs reflect how real-world industrial lines modernized their fleets while keeping existing frames.
The Bagnall and Baguley Aesthetic
Identifying the right era for your locomotive can be a constraint for historical accuracy. Most Bagnall-style kits utilize side valances and "boiler" tanks to maintain the steam appearance. Open-cab versions are ideal for early 20th-century quarries, while closed-cab Baguley Drewry designs suit mid-century industrial sites better. These kits often prioritize visibility for the driver while maintaining the rugged, enclosed look necessary for heavy industrial work in harsh environments.
Freelance vs. Prototype Kits
You might feel limited if you can't find a kit that matches a specific historical engine. A proactive solution is to embrace freelance modelling. Narrow gauge railways were notoriously idiosyncratic, often rebuilding locomotives with whatever parts were available in the workshop. You can use this guide to what is a narrow gauge railway to understand the historical context of these lines before choosing your style.
Mixing and matching parts from a freelance oo9 steam outline diesel shunter kit allows you to create a one-of-a-kind engine. This approach ensures your locomotive looks perfectly at home in a unique industrial setting without being tethered to a single prototype. This flexibility is exactly why 4mm scale narrow gauge modelling remains such a creative part of the hobby. It's about capturing the spirit of industrial rail rather than just following a blueprint.
Building and Finishing Your 3D Printed Shunter Kit
Building an oo9 steam outline diesel shunter kit is a rewarding phase that transforms a gray resin shell into a functional piece of industrial history. While the assembly is simpler than working with etched brass, resin requires specific handling to achieve a professional result. You might feel concerned about the brittle nature of 3D printed supports. A proactive solution is to use sharp, flush-cut nippers to remove these supports slowly, working from the outside of the model toward the center to avoid snapping delicate details like handrails or rivets.
Adhesion is another area where modellers often face constraints. Traditional plastic cement won't work on resin. Cyanoacrylate, commonly known as super glue, is a kit-builder's best friend for these projects. It provides a near-instant bond between resin parts and is equally effective for securing the body to a metal donor chassis. For larger gaps, a gel-based super glue offers more control and filling properties. Once the main components are joined, applying a fine gray primer is essential. This step does more than prepare the surface for paint; it reveals hidden print lines or support pips that need a final touch of sanding before you proceed.
Small narrow gauge locomotives often suffer from poor electrical pickup because they lack physical weight. Since an oo9 steam outline diesel shunter kit usually has an enclosed body, you have ample space to add ballast. Using lead shot or Liquid Gravity secured with a thin PVA glue or varnish is an effective way to improve traction. Focus on placing the weight directly over the driving wheels to ensure the chassis stays firmly on the rails during slow-speed shunting.
Surface Preparation for Resin Kits
Removing "print lines" is a delicate task. You don't want to lose rivet detail by over-sanding. A proactive solution is to use high-grit sanding sticks, starting at 400 grit and moving up to 1000 for a smooth finish. Before you apply any paint, wash the model in warm, soapy water to remove residual resin oils or dust. For more detailed advice on this stage, check out our guide on Painting 3D Printed Models.
Painting and Weathering for an Industrial Look
Choosing an industrial livery brings your shunter to life. Wasp stripes on the buffer beams are a classic choice for safety-conscious industrial lines, while bauxite or deep green suits a more traditional quarry setting. When applying decals, using a setting solution like Micro Sol ensures they conform to the resin texture for a "painted-on" look. Finish your model with weathering techniques like dry brushing rust onto the side skirts or soot around the exhaust. If you're ready to begin your next build, you can browse our selection of 3D printed locomotive kits to find your ideal industrial subject.
Why Narrow Minded Railworks is the Choice for OO9 Modellers
Narrow Minded Railworks focuses on lowering the barrier to entry for custom locomotive building. Many modellers feel intimidated by the traditional requirement for soldering and complex metal fabrication. A proactive solution is our use of precision 3D printed resin, which eliminates the need for specialized tools while maintaining high levels of rivet and panel detail. Choosing an oo9 steam outline diesel shunter kit from our range allows you to focus on the creative aspects of assembly and painting without the mechanical frustration of older kit-building methods.
Compatibility is often another constraint when selecting a body shell for your layout. We address this by designing our locomotive kits specifically for the Kato 11-109 chassis. This ensures a perfect fit every time, removing the guesswork and heavy modification often associated with freelance narrow gauge modelling. Our collection includes a wide variety of styles, from the classic WG Bagnall steam outlines discussed earlier to modern industrial diesel-mechanical designs. We prioritize transparency in our designs, ensuring that every kit is a reliable and smooth-running addition to your fleet.
We believe in supporting the hobby through more than just products. Our kits are backed by a commitment to the community, offering:
- Precision Engineering: Every kit is designed to snap or screw together with minimal cleanup.
- Reliable Shipping: We offer worldwide shipping to ensure narrow gauge enthusiasts can access our kits anywhere.
- Comprehensive Documentation: We provide guides to help you through the painting and finishing stages.
Designed by Modellers, for Modellers
You might worry that a 3D printed kit won't perform well on tight narrow gauge curves or steep gradients. We solve this by testing all our designs on real layouts before they're ever added to our catalog. This practical approach ensures that clearances and weights are optimized for the 4mm scale environment. If you're new to the hobby, it's helpful to check out our Beginner’s Guide to OO9 Loco Kits. This resource helps you choose a project that matches your current skill level while setting realistic expectations for the build process.
Expanding Your Fleet
Building a unique locomotive is a great achievement, but a railway needs rolling stock to feel complete. We provide a proactive solution for fleet building by offering matching OO9 wagon kits that complement our locomotive designs. You can also enhance your industrial dioramas with our specialized 3D printed scenery and tools. This integrated approach helps you create a cohesive and characterful scene that truly stands out. When you're ready to start your next project, browse our full range of OO9 Locomotive Kits today to see how we can help you grow your narrow gauge empire.
Bring Authentic Industrial Character to Your Layout
Building a unique locomotive often feels like a daunting task due to complex mechanical requirements. However, choosing an oo9 steam outline diesel shunter kit provides a proactive solution by combining the charm of vintage industrial design with modern reliability. We've explored how selecting the right Kato chassis and mastering simple resin finishing techniques can yield professional results without the frustration of traditional metalwork. These kits allow you to bridge the gap between ready-to-run convenience and the satisfaction of a custom build.
Narrow Minded Railworks is here to support your modeling journey with precision 3D printed details and kits specifically designed for easy Kato chassis fitment. We offer worldwide shipping for all narrow gauge enthusiasts, ensuring you have the tools needed to expand your fleet regardless of your location. It's time to move beyond standard models and create something truly your own. You don't need years of brass-building experience to achieve a high-quality finish on your industrial scene.
Shop our OO9 Steam Outline and Diesel Shunter Kits today and start building a locomotive that defines your layout's unique industrial spirit. We look forward to seeing what you create.
Frequently Asked Questions
What is the difference between OO9 and N gauge?
OO9 and N gauge share the same 9mm track width, but the scale of the models differs significantly. OO9 represents narrow gauge railways at a scale of 4mm to 1 foot, while N gauge uses 2mm to 1 foot for standard gauge. This allows modellers to use reliable N gauge track and mechanisms to create a realistic 4mm scale narrow gauge layout.
Do these kits come with a motor and wheels?
Most locomotive kits are supplied as body shells and don't include the motor, gears, or wheels. You'll need to purchase a separate "donor" mechanism, such as a Kato power bogie, to complete your oo9 steam outline diesel shunter kit. This approach ensures you have a high-quality, factory-tested mechanism for smooth running while allowing for a unique, custom-built body.
Is the Kato 11-109 chassis easy to install?
The Kato 11-109 chassis is very straightforward to install because it's a self-contained unit. Many 3D printed kits are designed with internal dimensions that allow the chassis to simply clip into place or be secured with a small amount of adhesive. It eliminates the need for complex mechanical assembly, making it a proactive choice for those new to kit building.
Can I paint these kits with standard acrylic model paints?
Standard acrylic model paints are perfectly suitable for finishing resin kits. Brands like Vallejo or Tamiya provide excellent coverage, though you must apply a high-quality primer first. The primer helps the paint bond to the resin surface and highlights any small imperfections that need sanding before you apply your final industrial livery.
What is a "Steam Outline" locomotive in real life?
A "Steam Outline" locomotive is an internal combustion engine designed to mimic the appearance of a steam engine. Historically, these were used on public roadside tramways or in urban areas. The enclosed motion and side skirts were a proactive solution to prevent horses from being startled by moving pistons and rods, while also protecting the mechanism from road debris.
Are 3D printed resin kits brittle?
Modern 3D printed resin is quite robust, though it remains more brittle than traditional injection-molded plastic. While the material holds incredible detail, it can snap if dropped or handled roughly. We recommend using flush cutters for support removal and avoiding excessive force when fitting the chassis to your oo9 steam outline diesel shunter kit to prevent stress fractures.
Do I need special tools to build an OO9 shunter kit?
You don't need specialized engineering tools to build these models. A basic kit-building set including a sharp hobby knife, flush cutters, and various grits of sandpaper is sufficient. Since the resin parts are joined with cyanoacrylate (super glue), you don't need a soldering iron for the bodywork, which simplifies the assembly process for beginners.
How do I add weight to such a small locomotive?
Adding weight is essential for improving traction and electrical pickup on small locomotives. Because the body shells are hollow, you can easily fill the "boiler" or side tanks with lead shot or Liquid Gravity. Secure the weight using a thin PVA glue or varnish to ensure it doesn't rattle or interfere with the moving parts of the chassis.