

Why does a 3D-printed model that looks perfect on the screen often feel like a fragile puzzle once it reaches your workbench? It's a common frustration to fear snapping a delicate stanchion or discovering that your usual glue won't bond with the resin surface. This step-by-step oo9 wagon kit assembly guide acknowledges these material constraints and provides a proactive solution to ensure your build is both sturdy and successful.
You likely agree that a narrow gauge layout only truly shines when the rolling stock moves with effortless precision. While resin kits require more preparation than injection-molded plastic, the level of prototype-specific detail they offer is worth the extra care. We'll help you master these techniques, turning raw prints into professional, free-rolling wagons. This guide previews the essential stages of the process, from safe support removal and choosing the right adhesives to final weighting for reliable performance on your track. By following this structured approach, you will gain the confidence to tackle even the most complex locomotive kits in the future.
Key Takeaways
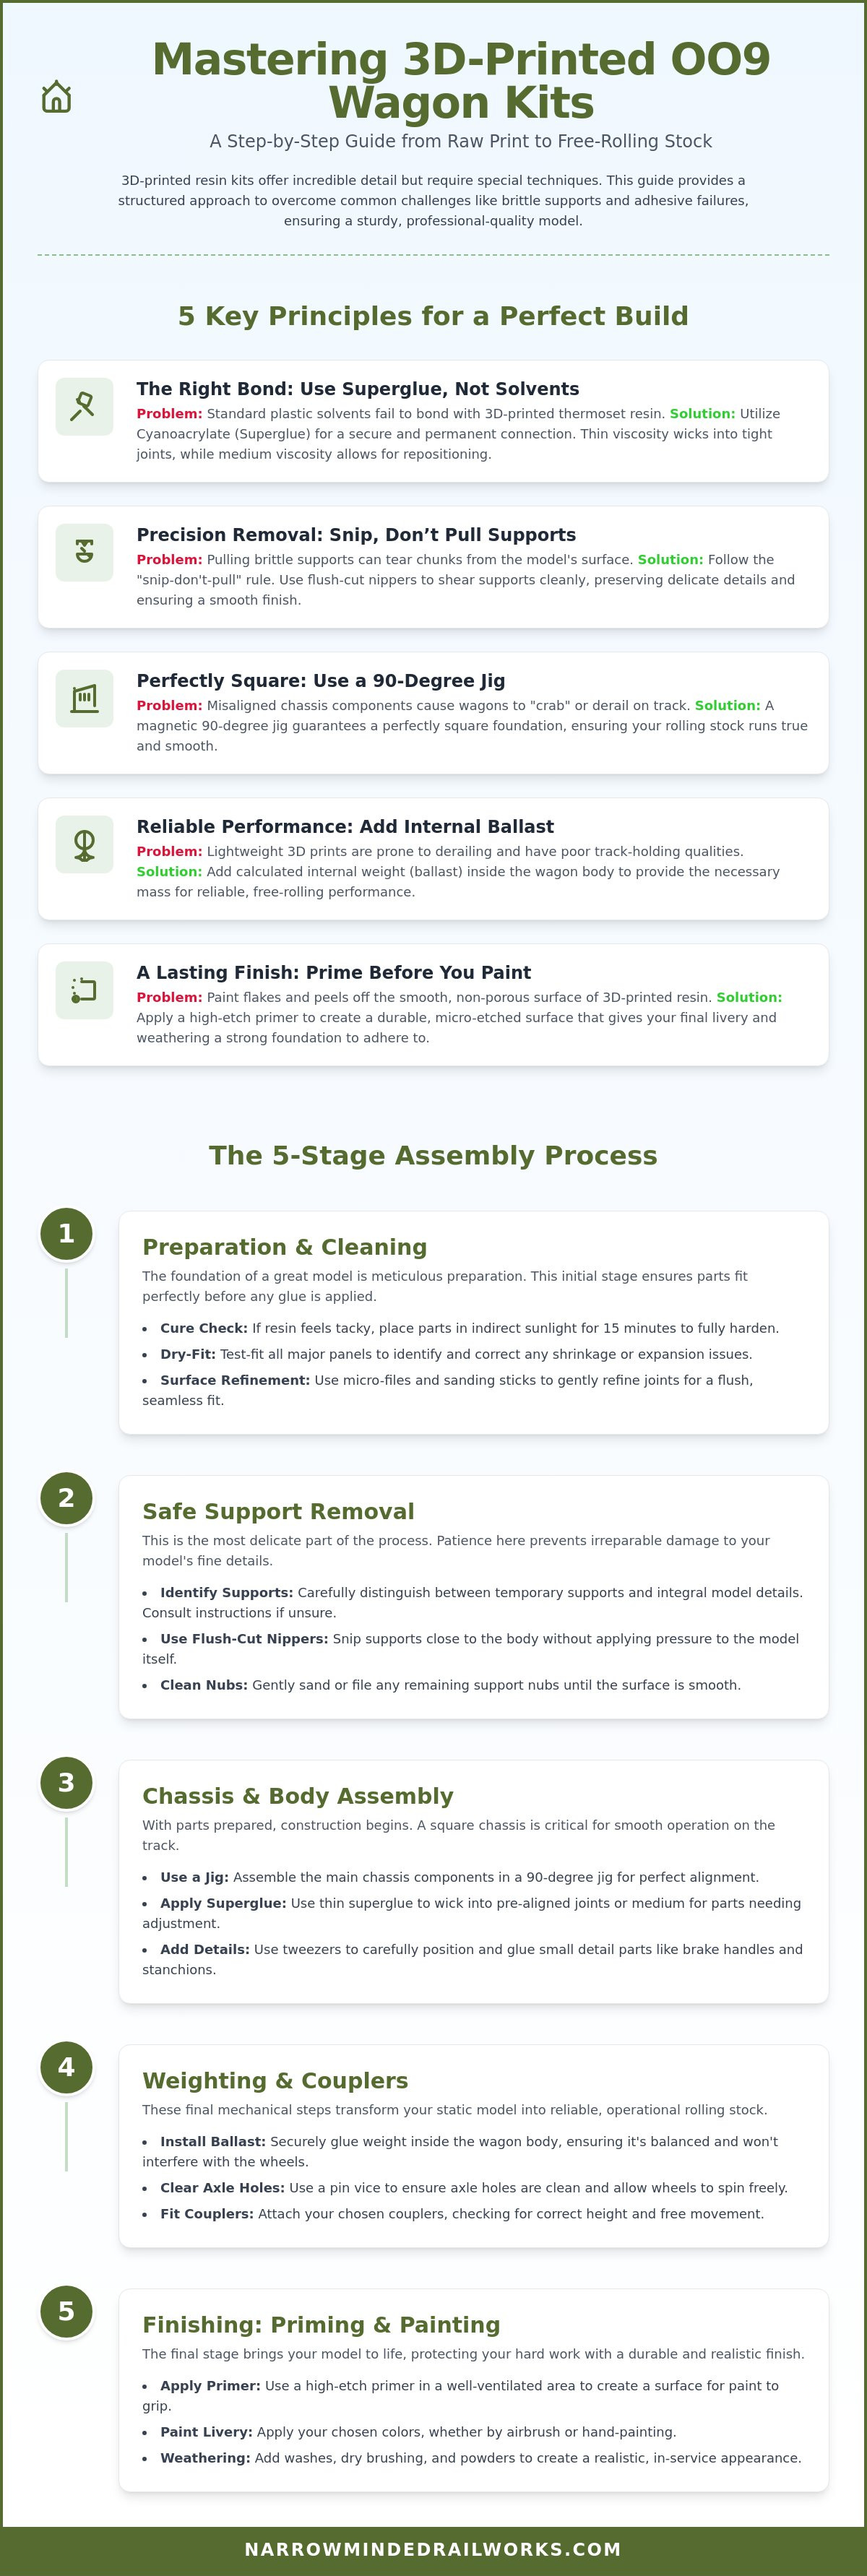
- Standard plastic solvents fail to bond with 3D-printed resin, but utilizing Cyanoacrylate (Superglue) provides a secure and permanent connection for your model components.
- Resin supports are often brittle, yet following the "snip-don’t-pull" rule ensures you preserve the integrity of delicate wagon walls and fine surface details.
- A wagon that "crabs" along the track is a common issue, though you can achieve a perfectly square foundation for your step-by-step oo9 wagon kit assembly by using a magnetic 90-degree jig.
- Lightweight 3D prints may struggle with consistent track holding, but adding calculated internal ballast provides the necessary weight for reliable, free-rolling performance.
- Direct paint application often leads to flaking, so applying a high-etch primer is essential to create a durable surface for your final livery and weathering.
Essential Tools and Workspace Setup for OO9 Wagon Assembly
Success in narrow gauge modeling begins long before the first part is glued. Working in the OO9 model railway scale involves managing components that are often smaller than a fingernail. While standard workbenches might suffice for larger scales, the 1:76 scale on 9mm track demands a dedicated, clutter-free zone. A high-contrast cutting mat provides a proactive solution to the risk of losing tiny components against a wooden surface, as resin parts are often translucent or grey.
Proper illumination is equally critical for a professional step-by-step oo9 wagon kit assembly. 3D prints often have "ghost" supports that are nearly invisible in dim light. Utilizing a daylight-balanced LED lamp provides a proactive solution to spot these imperfections before they interfere with the fit of your wagon panels. Setting up your space with these visual aids ensures you don't miss the fine details that define high-quality narrow gauge models.
To better understand this concept, watch this helpful video:
The Precision Toolkit for Narrow Gauge
Standard side cutters often crush delicate resin, which leads to fractures in the main wagon body. Utilizing flush-cut nippers provides a proactive solution by shearing the supports away with minimal pressure. For clearing resin flash from axle holes, a pin vice equipped with micro-drill bits is indispensable. Resin can be brittle, so you should avoid forcing parts together. Instead, use micro-files and fine-grit sanding sticks to gently refine surfaces until they seat perfectly. Tweezers are not optional; they're the only way to position small detail parts like brake handles or coupling hooks without loss.
Choosing the Right Adhesives for Resin
One of the most common mistakes is attempting to use traditional plastic solvent on a resin model. Because 3D-printed resin is a thermoset material, it won't melt or bond with standard cements. Utilizing Cyanoacrylate (Superglue) provides a proactive solution for a secure and permanent connection. Thin-viscosity superglue is excellent for "wicking" into tight joints once parts are aligned, while medium-viscosity versions offer a few seconds of repositioning time for larger panels.
For structural components that may face stress during running, some modelers prefer a two-part epoxy resin. While these adhesives take longer to cure, they provide a bond that withstands the rigors of layout operation. Always work in a well-ventilated area when using these chemicals. Investing in high-quality, dedicated materials ensures your hard work doesn't fall apart during its first trip around the layout. Using the correct tools and adhesives is the first step toward a sturdy, professional-grade model.
Preparing 3D Printed Parts: Support Removal and Surface Cleaning
Unlike injection-molded plastic kits, 3D-printed resin components arrive with a forest of sacrificial supports. Distinguishing between a structural stanchion and a temporary support pillar requires a keen eye. A common mistake is assuming every vertical line is part of the wagon detail. If you are ever unsure, consult the kit instructions or prototype photos before cutting. This stage is the most delicate part of the step-by-step oo9 wagon kit assembly process.
If the resin feels slightly tacky to the touch, the model may not be fully cured. While this is a common constraint of the printing process, placing the parts in indirect sunlight for fifteen minutes provides a proactive solution for a hardened, sandable surface. Once cured, perform a dry-fit of all major panels. Resin can experience minor shrinkage or expansion during production. Identifying these fit issues now allows you to sand joints for a flush fit before any glue is applied.
Safe Support Removal Techniques
The "snip-don’t-pull" rule is the golden standard for resin models. Pulling supports often tears away chunks of the actual wagon wall, leaving unsightly pits that are difficult to fill. Start by snipping the outermost supports to relieve tension, then work your way toward the center of the model. This outside-in approach prevents internal stress fractures in the brittle resin. Be cautious. Brittle parts can snap under the slightest torsional pressure.
Stubborn nibs that remain after clipping should be removed with a fresh surgical scalpel blade. Use a light, scraping motion rather than a heavy cut to avoid gouging the material. When preparing 3D printed parts, you must work around fine details like rivets. To sand support marks without flattening rivets, use a narrow sanding stick and move parallel to the rivet line rather than across it.
Degreasing and Cleaning the Resin Surface
Resin prints often carry a residue of liquid resin or release agents that prevent adhesives and paint from bonding. A warm soapy water bath is the non-negotiable first step of every build. Use a soft toothbrush to gently scrub the interior and exterior of the wagon body. If you encounter stubborn residues, a cotton bud dipped in isopropyl alcohol (IPA) can be used sparingly. Avoid soaking the model. Prolonged exposure to IPA can make resin brittle.
Ensure the parts are totally dry before you begin assembly. Even a microscopic layer of moisture will cause Cyanoacrylate glue to "bloom," creating a brittle and messy bond. If you are looking for your next challenge, browsing our collection of OO9 Locomotive & Wagon Kits offers a variety of prototype-accurate models ready for preparation.
Step-by-Step Assembly: From Wagon Body to Rolling Chassis
A wagon that "crabs" or wobbles down the line is a common frustration for narrow gauge modelers. This behavior usually stems from a twisted body or misaligned axle guards. While 3D-printed components are designed for a tight fit, the assembly process requires precision to ensure the model remains square. This phase is the heart of a successful step-by-step oo9 wagon kit assembly.
Establishing a square foundation is the secret to reliable running. Resin parts can be difficult to align perfectly by hand, but utilizing a magnetic 90-degree jig provides a proactive solution for a square foundation. By securing the panels against the metal faces of the jig, you eliminate the risk of a "lozenge-shaped" wagon body that would otherwise cause tracking issues on your layout.
Constructing the Wagon Body
Aligning the ends and sides requires a patient, tack-gluing method. Start by positioning one end and one side panel in your jig. Apply a tiny drop of medium-viscosity superglue to the top and bottom of the joint. Once you've confirmed the alignment is correct, let a thin bead of glue wick into the rest of the seam. This two-stage gluing process prevents the parts from shifting while the adhesive cures.
The floor must sit flush within the body to provide a level surface for internal weighting. If the floor feels too tight, sand the edges lightly rather than forcing it into place. Excessive pressure can easily split delicate resin walls. After the floor is secure, reinforce the internal corners with small fillets of glue. This extra step creates a robust, "layout-ready" model capable of withstanding years of operation.
The Rolling Gear: Axles and Wheels
The secret to free-rolling performance lies in the axle guards, or W-irons. Misaligned guards cause friction and poor tracking. When you attach the solebars and axle guards to the underframe, ensure they're perfectly parallel. Resin pinpoint bearings can sometimes contain microscopic printing artifacts that hinder movement. Utilizing a specialized bearing reamer or a small drill bit provides a proactive solution for friction-free running.
Before you consider the chassis finished, check for wheel wobble. Use a back-to-back gauge to verify that the wheels are set to the correct width. Even a fraction of a millimeter can cause derailments on complex pointwork. Testing the chassis on a piece of narrow gauge track is the final validation. If the wagon rolls freely down a gentle incline without stalling, your mechanical assembly is complete.
Weighting and Coupler Fitting for Reliable Running
3D-printed resin is significantly lighter than die-cast or white metal alternatives. This lack of mass is a constraint that often leads to frequent derailments, especially when your train traverses complex pointwork. Adding internal ballast provides a proactive solution to ensure consistent track holding and improved inertia. During your step-by-step oo9 wagon kit assembly, you should calculate an ideal weight-to-length ratio to maintain stability without overstressing your locomotives. A well-weighted wagon stays on the rails even when pushed at the rear of a long train.
Sourcing the right materials is essential for small-scale kits where space is at a premium. You have several effective options for adding mass:
- Lead shot: Ideal for filling irregular voids within the resin body.
- Liquid gravity: Tiny steel balls that can be poured into small cavities and sealed with glue.
- Steel or brass plates: Best for flat-bottomed wagons where weight can be glued directly to the floor.
These modifications transform a featherweight print into a reliable piece of rolling stock that handles like a professional-grade model.
Strategic Weight Placement
Hiding weights is a creative challenge that rewards careful planning. For open wagons, you can disguise ballast as prototypical loads of coal, slate, or timber. If you are building a closed van, secure the weight directly to the floor interior. You must ensure the center of gravity remains as low as possible. If the weight is placed too high, the wagon will tip on sharp narrow gauge curves. Always secure the ballast with PVA glue or epoxy to prevent it from rattling or shifting during transit, as a moving weight can cause unpredictable derailments.
Fitting Couplers for Operational Success
Standardizing coupler heights is the final hurdle for a functional fleet. OO9 models often utilize different standards, which can lead to frustrating uncoupling on gradients. While fitting the Quarry Hunslet coupler, you may find the buffer beam requires slight modification. Trimming a small recess into the resin provides a proactive solution for a flush, secure fit at the correct height.
Testing the coupler swing is just as important as the height. Narrow gauge railways often feature tight radii that demand significant lateral movement from the couplers. If the swing is restricted, the wagon will pull its neighbor off the rails in a curve. Once you've achieved smooth, reliable operation, your wagon is ready for the paint shop. Explore our range of OO9 Locomotive & Wagon Kits to find your next project and put these weighting techniques into practice.
Finishing Your Wagon: Priming, Painting, and Weathering
The final stage of your step-by-step oo9 wagon kit assembly transforms a grey resin shape into a realistic piece of rolling stock. Many builders discover that standard hobby paints often flake off 3D prints because the resin surface is non-porous. Utilizing a high-etch primer specifically designed for resins provides a proactive solution for a long-lasting finish. This non-negotiable step creates a chemical bond that ensures your livery remains durable during layout operation.
Whether you choose prototypical narrow gauge colors or a freelance design, the goal is to enhance the fine details of the print. 3D-printed surfaces can sometimes have microscopic textures that make decal application difficult. Applying a localized gloss varnish over the area first provides a proactive solution for a smooth surface, allowing transfers to sit flush without silvering. Once the decals are set, a final matte or satin coat protects the work and prepares the model for weathering.
Priming and Base Coating
Applying thin, multiple coats of primer is the only way to preserve the 3D-printed rivets and bolt heads. If you apply a single heavy layer, the paint will pool in the recesses and soften the crisp edges of the model. For more advanced techniques on achieving a professional look, you should consult our guide on painting 3D printed models. Masking is equally important. Use low-tack tape to cover the wheels and axles before spraying. This prevents paint from entering the pinpoint bearings, which would ruin the free-rolling performance you established during the chassis assembly.
Weathering for Realism
Narrow gauge wagons were hardworking tools that faced harsh environments. Dry-brushing is a powerful technique for highlighting the wood grain on resin wagon planks. By using a light grey or tan color on a nearly dry brush, you can catch the raised edges of the print to simulate aged timber. To add depth, apply "frame dirt" washes to the underframe and wheels. These thin, dark pigments settle into the recesses, emphasizing the mechanical details of the solebars. Finally, adding rust effects to metal strapping and bolt heads with a fine-tipped brush provides a proactive solution for breaking up large blocks of color. These small touches ensure your kit looks like a hardworking piece of history rather than a static model.
Take Your Narrow Gauge Modeling to the Next Level
Mastering a step-by-step oo9 wagon kit assembly requires a shift in mindset from traditional plastic modeling to resin-specific techniques. While the fragility of 3D-printed parts can seem daunting at first, utilizing the correct tools and adhesives provides a proactive solution for a durable build. You've seen that success depends on more than just glue. It requires careful support removal, precise mechanical alignment, and strategic weighting to ensure reliable running on narrow gauge track. These steps ensure your models don't just look good on a shelf but perform flawlessly during operation.
Finishing your model with high-etch primers and realistic weathering transforms a raw print into a convincing replica of narrow gauge history. Our kits are designed by modellers for modellers, featuring high-detail 3D resin prints that bring prototype accuracy to your workbench. We offer worldwide shipping to support the community wherever your layout is located. Ready to apply these masterclass techniques? Explore our range of 3D-printed OO9 Wagon Kits and start your next project with confidence. Your layout deserves rolling stock that looks and performs with professional precision.
Frequently Asked Questions
What is the best glue for 3D-printed OO9 wagon kits?
Cyanoacrylate, commonly known as superglue, is the only effective adhesive for 3D-printed resin. Standard plastic solvents are designed to melt polystyrene and will not bond with resin surfaces. Utilizing a medium-viscosity superglue provides a proactive solution for parts that require slight adjustment, while thin-viscosity glue is perfect for wicking into tight joints once they are aligned.
Do I need to wash my 3D printed kit before I start building?
Yes, washing your kit is a non-negotiable step to ensure paint and glue adhesion. 3D prints often carry a microscopic layer of oily residue or uncured resin from the manufacturing process. A warm soapy water bath followed by a gentle scrub with a soft toothbrush provides a proactive solution for a clean, bondable surface.
How much weight should I add to an OO9 wagon?
While there are no formal published standards for OO9 weight, adding enough mass to ensure reliable track holding is essential. Lightweight resin models often derail on pointwork because they lack the inertia of heavier kits. Hiding lead shot or liquid gravity under the floor or within a load provides a proactive solution for consistent running without overloading your locomotive.
Can I use standard N gauge wheels in my OO9 wagon kits?
You can certainly use N gauge wheels because OO9 utilizes the same 9mm track gauge. However, you must verify that the axle length and wheel diameter are compatible with the specific wagon kit you are building. Checking the back-to-back measurements with a gauge provides a proactive solution to prevent derailments on tight narrow gauge curves.
Why are there small holes or marks on the bottom of my 3D printed kit?
These marks are usually drainage holes or contact points from the 3D printing supports. Because resin prints are often hollow to prevent warping, drainage holes are necessary to remove internal liquid during production. Sanding these marks flush or filling them with a small amount of modeling putty provides a proactive solution for a professional finish on the underframe.
How do I fix a wobbly wagon that doesn’t sit flat on the track?
A wobbly wagon is typically caused by a twisted body or misaligned axle guards. This is a common constraint when assembling four-sided kits by hand without a guide. Utilizing a magnetic 90-degree jig during your step-by-step oo9 wagon kit assembly provides a proactive solution to ensure every corner is square and all four wheels touch the rails simultaneously.
What is the best primer to use on 3D resin models?
A high-etch primer specifically formulated for plastics or resins is the best choice for a durable finish. Standard automotive primers can sometimes be too thick and may obscure the fine rivet detail found on narrow gauge models. Applying multiple thin coats of a hobby-specific primer provides a proactive solution for a smooth, high-grip surface that won't flake off over time.
Can I build these kits if I have never built a model railway kit before?
You can absolutely build these kits as a beginner, though you should start with a simple open wagon before attempting a locomotive. Resin kits require more careful preparation and different adhesives than traditional plastic models. Following a structured step-by-step oo9 wagon kit assembly guide provides a proactive solution for building your skills and gaining the confidence to tackle more complex projects.