

Imagine spending weeks perfecting a OO9 locomotive kit, only to watch the paint rub off its sharpest corners after a single afternoon of handling. While intricate 3D-printed details provide unmatched realism, they remain highly susceptible to snapping or environmental wear without the right safeguards. Mastering the art of protecting finished models from damage is just as critical as the assembly process itself. It's a reality every modeller faces, but it doesn't have to limit the longevity of your craftsmanship.
You likely agree that there's nothing more disheartening than seeing a prized narrow gauge model succumb to dust or accidental breakage. This guide provides professional techniques to shield your collection from paint chips and structural failure. We will explore a three-tier system involving chemical sealing with modern products like the 2025 WWScenics Matt Varnish, mechanical handling protocols for safe transport, and environmental isolation based on current Smithsonian standards of 45% relative humidity. We'll show you how to move from fragile prototypes to a bulletproof finish that stands the test of time.
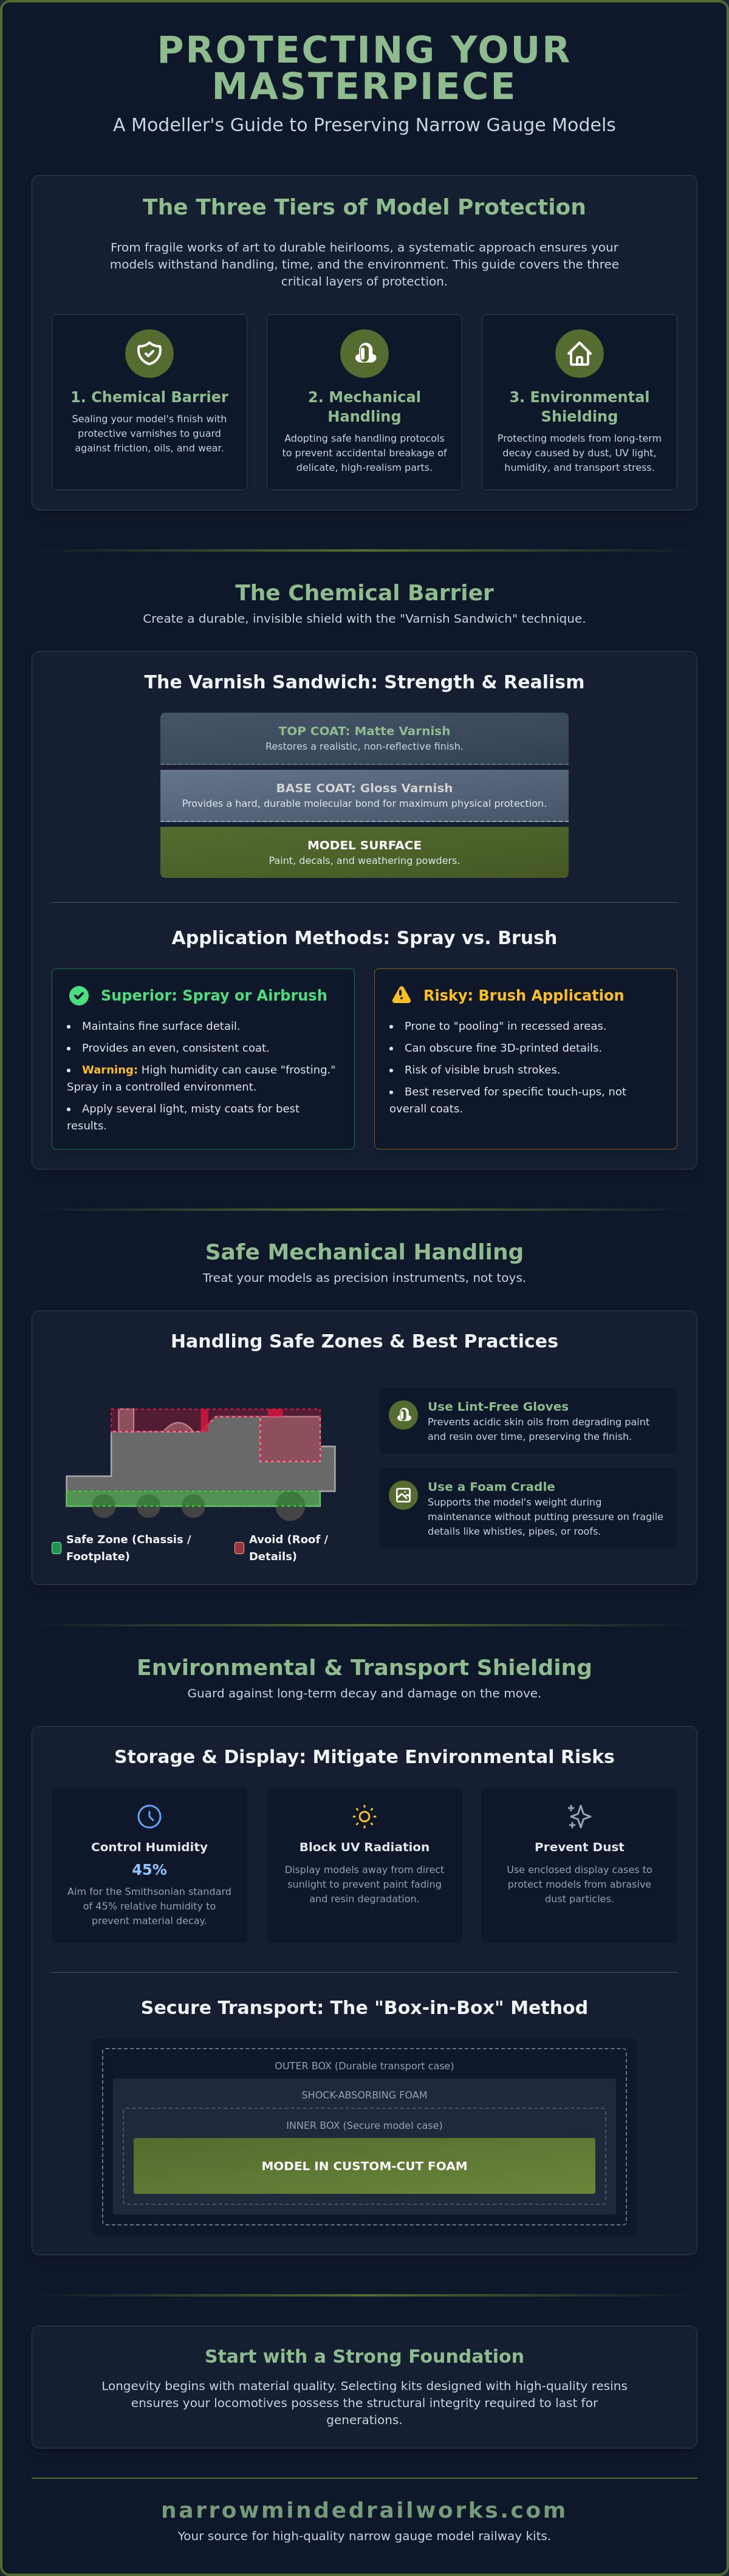
Key Takeaways
- While paint finishes are naturally delicate, applying a "gloss-to-matte" varnish sandwich creates a durable chemical barrier against skin oils and friction.
- Handling risks are constant, but identifying "safe zones" on your OO9 or GN15 models and using lint-free gloves prevents accidental detail breakage.
- Environmental factors like UV radiation and humidity can cause decay, though implementing active shielding is an effective way of protecting finished models from damage.
- Transporting models to club meets often leads to stress, yet the "box-in-box" method with custom-cut foam provides a secure environment for transit.
- Material quality varies across the industry, but selecting kits designed with high-quality resins ensures your locomotives possess the structural integrity required for longevity.
The Chemical Barrier: Choosing the Right Varnish for Narrow Gauge
Varnish serves as the first line of defense for any narrow gauge project. It acts as a sacrificial layer, absorbing the friction and acidic oils from your fingertips that would otherwise strip away paint or lift delicate decals. This practice aligns with broader preventive conservation activities used to maintain historical artifacts in museums. When you are protecting finished models from damage, the goal is to create a barrier that is tough enough to withstand handling but thin enough to preserve intricate rivet patterns. While applying a clear coat might slightly darken your weathering powders, you can mitigate this risk by testing the finish on a spare 3D-printed support piece before committing to the locomotive body.
To better understand the mechanics of sealing your work, watch this helpful video:
Gloss vs. Matte: The Modeller’s Dilemma
Gloss varnish typically provides a stronger molecular bond than matte alternatives. It creates a smooth, hard surface that is highly resistant to physical wear. However, a high-gloss steam engine rarely looks prototypical on a rugged GN15 or OO9 layout. The proactive solution is the "sandwich" technique. Modellers often apply a hard gloss coat first for maximum structural protection, followed by a high-quality matte topcoat like the WWScenics Matt Varnish Spray to restore a realistic appearance. This method is particularly effective when painting 3d printed models. The initial gloss layer fills microscopic gaps in the resin surface; the matte finish then ensures the final result looks like weathered steel rather than plastic.
Application Methods: Spray vs. Brush
The method of application determines the clarity of your final protection. Brushing varnish onto a small scale wagon often leads to "pooling" in recessed areas, which can obscure the fine detail characteristic of modern 3D-printed kits. Using an aerosol or airbrush is usually the superior choice for maintaining detail. If you use a spray, you must account for external constraints like temperature and humidity. High moisture levels can cause "frosting," where the varnish dries with a white, opaque haze. You can prevent this by spraying in a climate-controlled room and applying several light, misty layers rather than one heavy coat. Airbrushing provides the highest level of control, allowing you to seal the model with minimal impact on the underlying paint's texture and depth.
Mechanical Handling: How to Touch Your Models Safely
Narrow gauge modelling focuses on fine details that are often out of scale in larger gauges. While this provides unmatched realism, it creates a significant vulnerability during operation. Protecting finished models from damage requires a shift in how you physically interact with your collection. Standard gauge models might survive being gripped by the boiler, but a GN15 or OO9 locomotive often features delicate 3D-printed plumbing that will snap under minimal pressure. You must treat these pieces as precision instruments rather than toys.
Identifying "Safe Zones" is the first step toward long-term preservation. The chassis or the lower frame usually offers the most structural integrity for lifting. Always pick up a model by the footplate or the solid parts of the underframe rather than the roof or chimney. To maintain museum-quality standards, many modellers adopt preventive conservation guidelines. These standards suggest using lint-free cotton gloves to prevent the transfer of acidic skin oils. These oils can degrade paint finishes and react with resin over time, causing irreversible surface damage.
Maintenance and cleaning pose another significant risk. Placing a locomotive upside down on a hard workbench can easily crush whistles, safety valves, or cab roofs. You should utilize a foam cradle or a dedicated service stand to support the weight of the model without putting pressure on delicate protrusions. This proactive approach ensures that mechanical work doesn't result in cosmetic disasters.
The "No-Touch" Protocol
Minimizing direct contact is the most effective strategy for preserving your work. When placing figures or small accessories on a layout, use precision tweezers rather than fingers to avoid disturbing nearby details. For moving rolling stock onto the track, a dedicated railer or carriage tool prevents the side-to-side squeezing that often dislodges brake gear. If you exhibit at club meets, establish a clear protocol for guests. A polite sign or a physical barrier ensures your hard work remains intact while still allowing others to appreciate the craftsmanship.
Protecting Delicate Protrusions
Vulnerability often starts at the assembly stage. When building oo9 locomotive kits, consider reinforcing handrails and vacuum pipes with a drop of high-strength resin or specific adhesives. Fragile couplers, such as the Quarry Hunslet type, require specific handling strategies. Instead of pulling stock apart by hand, use a small uncoupling tool to relieve tension. This reduces the mechanical stress on the 3D-printed mounts and prevents accidental snapping. If you're looking for a new project designed with these preservation needs in mind, our beginner-friendly kits offer a great starting point for durable modelling.
Environmental Shielding: Dust, Light, and Humidity
Environmental stressors represent a silent but persistent threat to any collection. Protecting finished models from damage involves more than just careful handling; it requires a controlled atmosphere. UV radiation is perhaps the most significant concern for modern modellers. High-quality resins and fine paint pigments are susceptible to photochemical degradation, which leads to brittleness and fading. While you cannot stop time, you can drastically slow its effects by managing the light and air around your models.
Humidity and chemical compatibility also play vital roles in long-term preservation. Excessive moisture promotes oxidation on metal chassis components, while extremely dry air can cause wooden kits to warp or glue joints to fail. High humidity levels can even cause lead weights inside wagons to swell, potentially cracking locomotive shells from the inside out. A proactive solution is to maintain a stable environment, ideally around 45% relative humidity. Additionally, you should avoid standard plastic storage containers that may off-gas harmful chemicals. Utilizing acid-free, archival-quality materials ensures that your paint finish remains chemically stable for decades.
The Ideal Display Environment
Displaying your work is the reward for hours of construction, yet the wrong location can be destructive. Direct sunlight is the primary source of UV damage. If you must place a layout near a window, installing UV-filtered acrylic covers provides a necessary shield. Even interior lighting carries risks. Traditional bulbs and some high-output LEDs generate localized heat that can soften delicate parts. Positioning your models at least 12 inches away from light sources and choosing "cool" LED spectrums prevents heat-related warping while keeping the details crisp.
Safe Cleaning Practices
Dust accumulation is inevitable, but the cleaning process itself often causes more harm than the dirt. Prevention through enclosed display cases is always the superior strategy. When cleaning becomes necessary, avoid compressed air canisters. The sudden burst of pressure can easily dislodge tiny 3D-printed details or sand-cast fittings on narrow gauge stock. Instead, use a soft, anti-static makeup brush to gently lift particles. This is the safest way to maintain 3d printed locomotive bodies without risking surface scratches or structural failure. By lifting the dust rather than blowing it, you ensure the debris doesn't simply settle back into the intricate crevices of the model.
Transporting Models: Preventing Damage on the Move
Moving your collection to a club meet or exhibition is the moment of highest risk. Protecting finished models from damage during transit requires a strategy that goes beyond simple padding. While many modellers rely on standard plastic tubs, these offer little protection against high-frequency vibrations or sudden impacts. A proactive solution is the "Box-in-Box" method. This involves placing your stock in a dedicated storage case, which is then nested inside a larger, foam-lined container to provide a secondary layer of shock absorption. This double-wall approach isolates the model from the kinetic energy of a moving vehicle.
The choice of padding material is equally critical. Pluck foam is a popular, accessible option, but its jagged edges can snag on fine 3D-printed details. Custom-cut polyethylene foam provides a smoother surface and better structural support for delicate narrow gauge locomotives. You must also be aware of "foam rot," where older polyurethane foams break down into a sticky residue that ruins paint. If you're using older cases, check the foam's integrity by pressing it; if it feels brittle or doesn't spring back, replace it immediately. Modern modellers are increasingly turning to magnetic base systems. By fixing a small magnet to the chassis and a steel sheet to the box, you eliminate the need for friction-based packing entirely.
Securing Stock for Travel
Internal movement, or "shunting," inside a box causes most transport-related paint chips. Even a millimeter of play can result in corner wear over a long car journey. Acknowledge that tight foam can sometimes rub against decals. A proactive solution is to wrap each model in acid-free tissue paper before placing it in the foam. This creates a smooth barrier that prevents the foam from gripping the paintwork. This is especially important for o-16.5 wagon kits and white metal parts, where the weight of the model increases the risk of friction damage during transit.
The Exhibition Survival Kit
Accidents can happen despite your best efforts, so you shouldn't travel without an emergency repair kit. When handling gn15 scale items with large footprints, the risk of snagging a detail part on a sleeve or a layout edge is high. Your kit should include precision tweezers, a small bottle of canopy glue, and a spare set of couplers. Canopy glue is a proactive choice because it dries clear and won't attack your finished paintwork. If a part does snap, don't rush the repair in a crowded hall. Acknowledge the pressure of the show, then use a tiny dab of temporary adhesive to secure the part until you can perform a permanent fix in your workshop.
If you need durable rolling stock designed to handle the rigours of travel, explore our full range of narrow gauge kits and scenery.
Built-in Protection: How Narrow Minded Railworks Designs for Longevity
While external factors like UV light and handling are critical, the most effective strategy for protecting finished models from damage begins at the design stage. A model's ability to survive the years is often determined by its material composition and structural engineering. We acknowledge that narrow gauge kits are inherently delicate due to their fine scales. Our proactive solution is to integrate durability directly into our 3D-printed designs, ensuring that fine detail doesn't come at the cost of structural failure.
We utilize high-quality, engineering-grade resins for our locomotive bodies. Standard hobbyist resins can become overly brittle over time, but our material choices prioritize long-term stability. By selecting resins with higher impact resistance, we provide a foundation that withstands the minor bumps and vibrations of layout operation. This material choice is a fundamental part of protecting finished models from damage before they even reach your workbench.
One often overlooked benefit of building from a kit is the deep understanding you gain of the model's anatomy. We acknowledge that accidental damage is a statistical certainty over a long enough timeline. The proactive solution is that you, as the builder, possess the skills and knowledge to perform seamless repairs. Unlike mass-produced models where a broken part might mean a total loss, a Narrow Minded Railworks kit is designed to be accessible for maintenance and part replacement. Creating a safe environment also extends to the scenery surrounding your stock. Our range of diorama tools and scenery allows you to build layouts with clearances and textures that minimize the risk of snagging or scratching your finished work.
Strength Through Design
We optimize wall thicknesses for our OO9 and GN15 wagons to balance scale accuracy with physical strength. Reinforced mounting points for chassis integration ensure that the locomotive body remains securely attached during heavy use. This prevents the "shell lift" or warping that can occur with poorly designed 3D prints. Every kit in our range undergoes a design review to identify and strengthen potential "snap points" without compromising the prototypical look of the narrow gauge prototype.
Modeller Support and Resources
We provide access to replacement parts for our OO9 and GN15 kits to ensure your investment lasts. If a specific detail part snaps during a move or a club meet, you don't need to scrap the entire project. Our community of modellers also shares tips on preserving these specific builds, creating a collective knowledge base for long-term care. This support system ensures that your craftsmanship remains a centerpiece of your collection for years to come.
Explore our range of robust narrow gauge kits today and begin building a collection designed for the long haul.
Securing the Future of Your Narrow Gauge Collection
We acknowledge that the fragility of 3D-printed details can make operation feel risky. The proactive solution is to adopt a three-tier system of chemical barriers, mechanical handling protocols, and environmental isolation. Protecting finished models from damage isn't just about a final coat of varnish; it's a commitment to maintaining stable humidity and using safe transport methods like the box-in-box technique. These professional standards ensure your craftsmanship remains as sharp on its tenth exhibition as it was on its first day.
We understand that transport and display present constant hazards to your stock. Our proactive solution is to design kits with high-quality 3D-printed resins and reinforced structures that resist the rigours of regular use. As specialist narrow gauge designers, we ensure every kit is fit for the journey, supported by worldwide shipping for all orders. Browse our durable OO9 and GN15 locomotive kits today. Your hard work deserves a finish that stands the test of time.
Frequently Asked Questions
Does varnish always change the colour of my model?
Varnish can alter the saturation of paint and weathering powders, often making colours appear darker or more vivid. We acknowledge that matte finishes can sometimes leave a faint white haze if applied in high humidity. The proactive solution is to apply several light, misty layers and test the finish on a spare 3D-printed part before committing to your completed locomotive.
What is the safest way to remove dust from a delicate OO9 locomotive?
The safest method for cleaning fine narrow gauge detail is using a soft, anti-static makeup brush to lift particles away. We acknowledge that compressed air canisters are a popular choice, but the sudden pressure can easily snap 3D-printed handrails or chimneys. The proactive solution is to use gentle, circular brush strokes that remove debris without putting mechanical stress on the model.
Can UV light damage 3D-printed resin models?
UV radiation is a primary cause of long-term damage, leading to brittle resin and faded paint pigments. We acknowledge that displaying models in natural light is aesthetically pleasing, but direct sunlight accelerates photochemical decay. The proactive solution is to position your layout away from windows or utilize UV-filtered acrylic covers to shield your collection from harmful rays.
How do I prevent my models from sticking to foam in storage boxes?
Paint finishes can react with certain types of foam over time, leading to "foam rot" or permanent surface marks. We acknowledge that friction is necessary to keep models secure during transport. The proactive solution is to wrap each model in acid-free tissue paper before placing it into the foam cradle. This creates a chemically neutral barrier that prevents the foam from gripping the paintwork.
Is it better to store models in a cold garage or a warm room?
A climate-controlled room is always superior to a garage for protecting finished models from damage. We acknowledge that space constraints often lead modellers to use outbuildings, but these areas suffer from high humidity and temperature swings that cause warping or corrosion. The proactive solution is to store your kits in an environment maintained at approximately 45% relative humidity to ensure material stability.
What should I do if a small detail part snaps off a finished kit?
If a detail part snaps, the first step is to avoid using standard superglue, which can fog the surrounding paint. We acknowledge that a broken part is frustrating, but a rushed repair often causes more cosmetic harm. The proactive solution is to use a tiny amount of clear-drying canopy glue. This adhesive provides a strong bond and allows you to wipe away any excess before it dries, preserving your finish.
How often should I re-apply protective coatings to my models?
You don't need to re-apply varnish regularly if the model is stored and handled correctly. We acknowledge that the protective layer can wear down on frequently touched areas like cab sides or roofs. The proactive solution is to inspect your stock annually for signs of paint rub. If you notice thinning, a single light coat of matte varnish is enough to restore the chemical barrier without obscuring fine detail.