

The success of your next narrow gauge project isn't determined by how well you glue the parts together, but by how much material you're willing to remove from the inside. Many modellers struggle with the transition from a static kit to a working model, often fearing they'll damage intricate 3D-printed details while trying to fit a donor chassis. It's a common challenge to find that perfect balance where the body sits level and the gears run without interference. While resin can be brittle and unforgiving, adopting a methodical approach to clearance engineering ensures your model remains intact and functional.
By focusing on the technical steps of preparing a loco kit for motorisation, you'll transform a delicate shell into a robust, smooth-running locomotive. This guide provides the clarity you need to modify resin bodies with confidence, ensuring they fit perfectly onto commercial units like the Kato 11-109. We'll examine the essential tools for safe modification and the precise techniques required to achieve a professional finish on your OO9 or GN15 layouts.
Key Takeaways
- Learn how to evaluate internal clearance and wheelbase dimensions to select a donor chassis that preserves the realism of your OO9 or GN15 model.
- Master the specific techniques for preparing a loco kit for motorisation by safely removing internal 3D-printed supports and identifying resin high spots.
- Discover the benefits of using temporary alignment methods like Blue-Tack before committing to permanent adhesive or screw-based mounting solutions.
- Gain the skills to diagnose and fix common issues like mechanical binding or electrical shorts that occur when fitting metallic ballast.
- Develop a structured workflow that ensures your narrow gauge locomotive runs smoothly and reliably on your diorama or layout.
The Fundamentals of Locomotive Motorisation
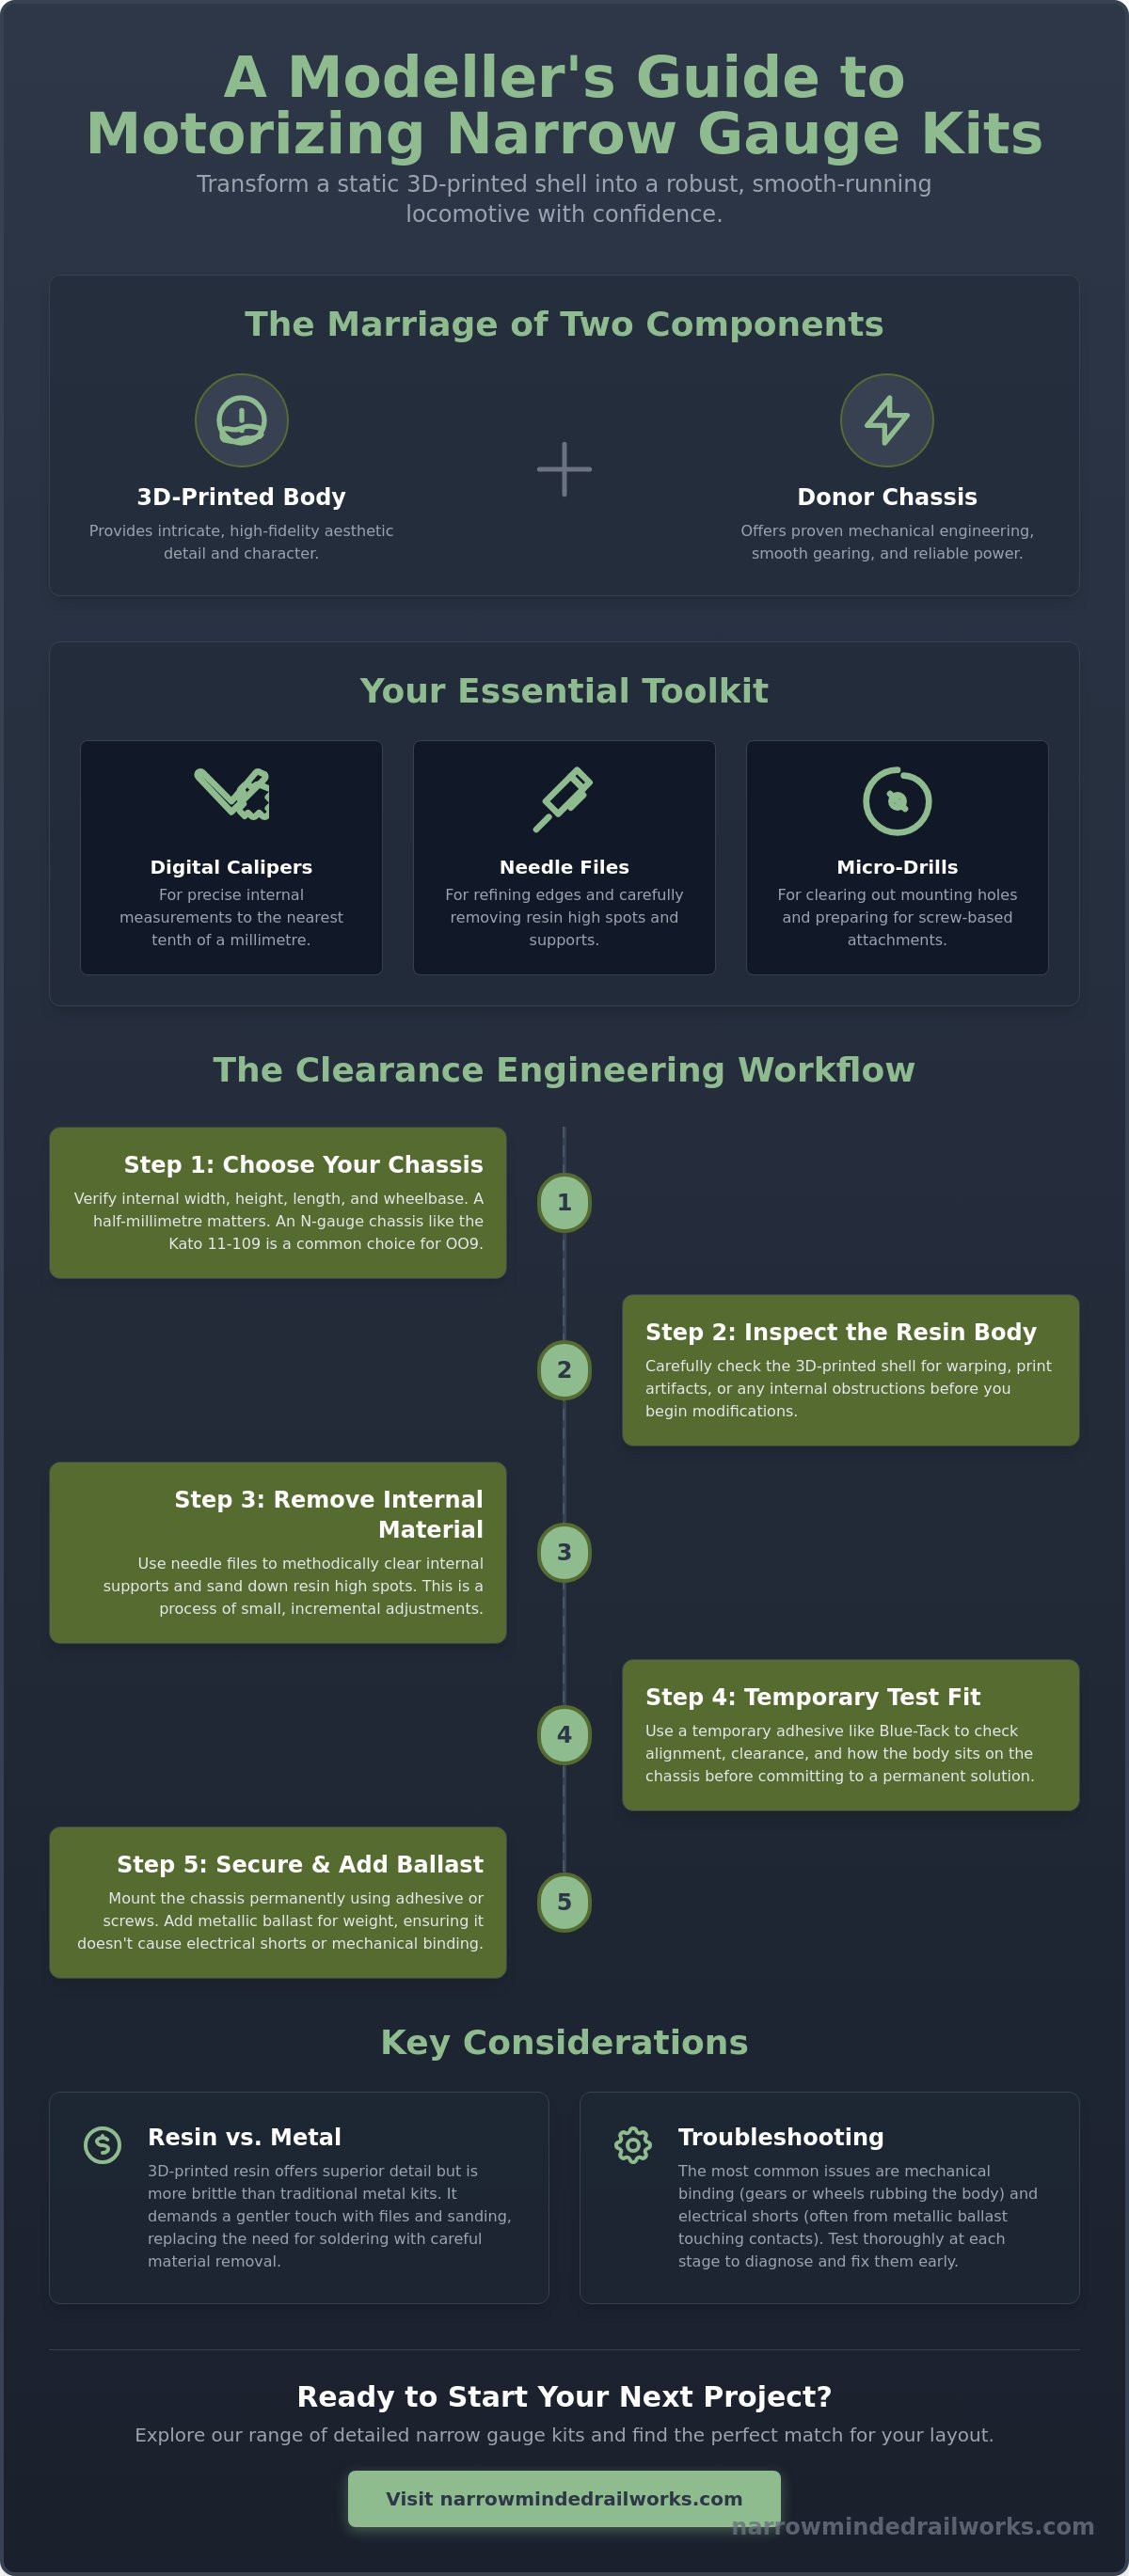
Motorisation is the heart of narrow gauge modelling for enthusiasts working in OO9 and GN15. It bridges the gap between a static 3D-printed shell and a functional piece of rolling stock. While the process of preparing a loco kit for motorisation might seem daunting, it's essentially a marriage of two distinct components: the detailed body kit and the commercial donor chassis. This approach allows you to focus on the aesthetic character of the locomotive while relying on proven mechanical engineering for movement.
To better understand the basic principles of this process, watch this introductory video:
To achieve a professional result, you'll need a specific set of tools. Digital calipers are indispensable for measuring internal voids to the nearest tenth of a millimetre. You'll also rely on needle files for refining edges and micro-drills for clearing out mounting holes. Success with your first kit depends on patience. You shouldn't expect a perfect fit immediately; instead, view the process as a series of small, incremental adjustments. Preparing a loco kit for motorisation is as much about what you remove from the resin as what you add to it.
The Role of the Donor Chassis
Narrow gauge modelling often utilizes chassis from other model railway scales, specifically N gauge, to provide reliable power. Using a pre-built unit from established brands like Kato, Bachmann, or Graham Farish ensures your model has consistent electrical pickup and smooth gearing. We don't sell these motors ourselves, but we design our kits to accommodate their specific footprints. Selecting a high-quality donor unit means you won't have to build complex gearboxes from scratch, which is a significant advantage for most builders.
Why 3D Printed Resin Changes the Process
Modern 3D-printed resin offers a level of detail that traditional white metal or etched brass struggle to match. It allows for intricate boiler fittings and cab interiors to be printed as a single, cohesive unit. However, resin is more brittle than metal. Your initial inspection is vital. You must check for any slight warping or print artifacts that might obstruct the motor. While metal kits require soldering, resin kits demand careful sanding and filing. This material shift makes the assembly cleaner, though it requires a gentler touch to avoid snapping delicate parts during the fitting stage.
Choosing the Right Donor Chassis for Your Kit
Selecting a chassis is the most critical decision in the build process. It dictates the locomotive's performance, height, and overall stance on the track. While we design our kits with specific clearances in mind, you must verify the fit before you begin the physical work of preparing a loco kit for motorisation. The success of your project relies on precision. A motor that is even half a millimetre too wide can cause the resin shell to bulge or crack, so accuracy at this stage is non-negotiable.
When measuring for clearance, focus on three primary dimensions: the internal width between the tanks or side sheets, the height from the railhead to the top of the motor, and the total length of the chassis block. Digital calipers are the best tool for this job. While wheel diameter is important for visual accuracy, the wheelbase (the distance between the axles) matters more for realism. If the wheelbase is too long, the locomotive will look disproportionate and may struggle with tight industrial curves. You can find a detailed breakdown of compatible motors in this Ultimate Guide to Powering Your Narrow Gauge Locos.
OO9 Scale Chassis Selection
Most OO9 kits rely on N gauge drivetrains because they share the same 9mm track gauge. The Kato 11-109 is a staple for many small industrial designs due to its compact size and smooth running. If you're just starting out, reviewing Your First OO9 Loco Kit will help you match a specific body to a compatible donor unit. For very small locomotives, "Shorty" chassis options provide the necessary power without protruding from the ends of the body shell.
GN15 and Larger Scale Options
GN15 models run on 16.5mm track, which allows you to use standard OO or HO gauge donors. For tram engines or small freelance diesels, power bogies are often the most practical choice because they're easy to conceal within a 3D-printed body. If you're moving into this larger scale, our guide on Getting Started in GN15 Scale provides further advice on drivetrain selection. Once you've secured your donor unit, you can browse our collection of OO9 Locomotive & Wagon Kits to find a project that matches your chosen mechanism.
Preparing the 3D-Printed Body for Fitment
Once you've selected your chassis, the physical work of preparing a loco kit for motorisation begins with internal cleanup. 3D-printed bodies often arrive with internal support structures that must be removed before the motor can sit flush. It's best to use sharp flush-cutters to snip these supports near the base rather than pulling them. Pulling can tear into the visible exterior surfaces, leaving pits that are difficult to fill. While these supports are necessary for a successful print, they're the first obstacle to a smooth-running model.
Dry-fitting is a repetitive but essential phase. You'll need to slide the chassis into the shell and identify "high spots" where the resin prevents a flush fit. A simple trick is to coat the top of the motor block with a dry-erase marker or a soft pencil. When you press it into the shell, it will leave a mark exactly where material needs to be removed. You can then use needle files to target these specific areas. This methodical approach ensures you don't thin the walls unnecessarily, which maintains the structural integrity of the locomotive.
Creating secure mounting points is the final step in the preparation phase. While some modellers prefer a simple friction fit, adding small resin tabs or drilling holes for micro-screws provides better long-term stability. If the kit doesn't have pre-formed screw bosses, you can carefully glue small plasticard blocks inside the tanks to create a solid anchor for the chassis. This ensures the body won't shift during heavy haulage or when you're navigating complex pointwork on your layout.
Internal Clearance Engineering
Achieving the correct ride height requires careful clearance engineering. You must ensure there's enough vertical space for the gear tower to rotate freely without hitting the underside of the boiler or bonnet. While using a rotary tool like a Dremel speeds up the process, you should always operate it at the lowest possible speed. High-speed friction can melt the resin, creating a sticky mess that's difficult to clean and may ruin the part. Focus your efforts on the "critical zones" around the motor cradle, checking frequently with your digital calipers to maintain symmetry across the longitudinal axis.
Cleaning and Degreasing
Before you proceed to the final assembly, you must remove any residual oils or dust from the resin. 3D-printing processes can leave behind a thin film that prevents adhesives from bonding securely to the chassis. A quick wash in warm, soapy water followed by a thorough drying is usually sufficient. Once the shell is degreased and the mechanical fit is perfect, you'll be ready for the aesthetic stages of the build. Following these steps ensures a clean foundation for Painting 3D Printed Models, which is best handled after the chassis fit is fully confirmed.
Securing the Chassis and Adding Ballast
Once you've finished the internal clearance work, you must decide how to join the body to the mechanism. While many builders reach for superglue, this often creates a barrier to future maintenance. If the motor requires cleaning or the gears need lubrication, a permanent bond makes servicing nearly impossible. Using Blue-Tack is a professional way to test the alignment before committing to a final fix. It allows you to run the model and check for "crabbing," where the locomotive doesn't sit square on the track. If the body is slightly skewed, the gears will wear unevenly and the model will look unprofessional.
While resin shells lack the natural mass of metal, adding strategic ballast provides the necessary traction. Preparing a loco kit for motorisation involves more than just a physical fit; it requires you to engineer the weight distribution for optimal performance. A locomotive that is too light will spin its wheels on the slightest incline and suffer from poor electrical pickup. By carefully placing weight, you ensure the model remains stable and reliable during operation.
Mechanical Mounting Methods
Removable mounts are the gold standard for high-quality builds. You can drill and tap the resin to accept M2 machine screws, which provides a secure and professional finish. If the resin walls are too thin to hold a thread, you can glue a small block of plasticard inside the shell to increase the depth. This proactive solution ensures that you can always disassemble the model for servicing. You should also use plasticard spacers to bridge any gaps between the chassis top and the internal roof of the shell. This prevents the body from wobbling or tilting when the locomotive is under load.
Weighting for Performance
3D-printed resin is significantly lighter than traditional white metal. You need to find the "sweet spot" where the locomotive is heavy enough to grip the rails but not so heavy that it strains the motor. Placing tungsten putty or liquid lead in the side tanks and smokebox is the most effective strategy. This keeps the center of gravity low and ensures all wheels maintain constant contact with the railhead. To help with these modifications, you can browse our range of diorama tools and scenery to find the precision equipment needed for your build. Proper weighting directly impacts electrical pickup reliability, especially on complex pointwork where light models often stall.
Troubleshooting and Final Testing
Testing is the final hurdle in any narrow gauge project. Many modellers rush this stage, but it's where you ensure the hours spent preparing a loco kit for motorisation actually result in a reliable runner. Mechanical binding is the most common issue you'll face. This occurs when the internal resin shell makes contact with moving parts like gears or wheels. If you hear a rhythmic clicking or notice the motor running hot, it's a clear sign that your internal clearances need further refinement. You must address these physical obstructions before they cause permanent damage to the donor chassis.
Electrical shorts are another frequent problem, especially when using metallic ballast. If your lead or tungsten weights touch the motor terminals or the pickup strips, the locomotive will stop immediately. A proactive solution is to insulate any ballast near electrical components with a thin layer of Kapton tape or electrical varnish. This small step prevents frustrating intermittent failures. Once the electronics are safe, apply a tiny drop of plastic-safe oil to the gear tower. This helps the mechanism settle and ensures the gears operate quietly under load.
Diagnosing Poor Running
If your locomotive wobbles or stutters, you need to determine if the fault lies with the chassis or the body fitment. The simplest test is to run the donor unit on its own. If it runs smoothly without the shell, the problem is your internal clearance. You might find the body is pressing down on the wheels, or the weight distribution is uneven. You should also check the ride height at this stage. If the loco sits too high or too low, your couplings won't align with your wagons, leading to frequent derailments during shunting. Adjusting the internal spacers is the most effective way to correct this and ensure a level stance.
Preparing for the Layout
Every new locomotive requires a "running in" period to seat the motor brushes and gears properly. We recommend the "30-minute rule": run the model at a moderate speed for 15 minutes in each direction. This process smooths out any minor manufacturing burrs in the donor unit. While the loco is running, watch for any parts that might have vibrated loose. Once you're satisfied with the mechanical performance, you can apply final details like handrails and vacuum pipes. Preparing a loco kit for motorisation is a technical challenge, but it's the foundation for creating a unique model. After testing is complete, you'll be ready to move on to painting, transforming your bare resin shell into a professional masterpiece for your OO9 or GN15 layout.
Advance Your Narrow Gauge Modelling Today
While resin can be challenging to modify, adopting the systematic approach detailed in this guide ensures a professional fit every time. You've learned how to manage internal clearances, select compatible donor units, and apply strategic weighting for better traction. The process of preparing a loco kit for motorisation is a technical journey that transforms a detailed 3D-printed shell into a functional, reliable locomotive. These skills allow you to create a unique fleet that standard ready-to-run models simply cannot match.
Our kits are designed by modellers for modellers, utilizing precision 3D-printed resin to achieve maximum detail. We provide worldwide shipping to support your workshop needs, regardless of your location. Explore our range of 3D-printed Loco Body Kits to discover your next OO9, GN15, or O-16.5 project. You now possess the confidence and the technical roadmap to build a smooth-running narrow gauge masterpiece. We look forward to seeing your progress on the rails.
Frequently Asked Questions
What is the best donor chassis for an OO9 locomotive kit?
The Kato 11-109 is widely considered the best donor for small industrial OO9 kits due to its reliability and compact size. While other units from Bachmann or Graham Farish are viable, the Kato chassis is a standard choice for many 3D-printed designs. It offers a smooth coreless motor that fits within tight boiler dimensions, making it an excellent starting point for your first motorised project.
Can I use a standard N gauge chassis for my narrow gauge loco?
You can certainly use a standard N gauge chassis because OO9 scale operates on the same 9mm track gauge. While the track gauge is identical, you must ensure the chassis wheelbase and wheel diameter match the proportions of your narrow gauge locomotive. Reviewing the internal dimensions of your shell with digital calipers is essential before purchasing a donor unit to avoid clearance issues.
How do I remove 3D print supports from inside the boiler?
You should use sharp flush cutters to snip internal supports near the base rather than pulling them by hand. Resin is a brittle material, and pulling supports can cause "pitting" on the exterior surfaces of your model. Once the bulk of the support is removed, use a long needle file to smooth the internal walls of the boiler. This provides the necessary clearance for the motor block.
Do I need to glue the chassis into the 3D-printed body?
We don't recommend gluing the chassis permanently into the body because it prevents future maintenance and lubrication. While a permanent bond seems secure, it makes cleaning the motor or adjusting pickups nearly impossible. Instead, use small M2 machine screws or a friction-fit mounting system. This proactive approach ensures your locomotive remains serviceable for years to come.
What type of glue should I use for resin-to-metal joints?
Cyanoacrylate (Superglue) or two-part epoxy are the most effective adhesives for joining resin to metal components. While these glues provide a strong bond, you must degrease the resin and the metal chassis with isopropyl alcohol first to remove any manufacturing oils. For temporary testing during the phase of preparing a loco kit for motorisation, Blue-Tack is a safer alternative that allows for easy realignment.
Why does my kit-built loco stutter on points and curves?
Stuttering is usually caused by insufficient weight or mechanical binding where the wheels hit the internal resin shell. While the chassis might run perfectly on its own, the added weight of the body can sometimes shift the center of gravity. Check that your pickups are clean and that the internal walls are filed back sufficiently to allow the wheels to move freely through their full range of travel.
How much weight should I add to a 3D-printed locomotive?
You should add enough weight to ensure all wheels maintain constant contact with the railhead, typically between 15 and 30 grams for a small OO9 locomotive. While resin is light, over-weighting can strain the small motors used in donor chassis. Placing tungsten putty or lead shot in the side tanks or smokebox keeps the weight low, which improves electrical pickup and traction on steep gradients.
Can I motorise a kit if I have never built a model before?
You can absolutely motorise a kit as a beginner, provided you choose a design specifically intended for a commercial donor chassis. Preparing a loco kit for motorisation is a logical process that requires patience rather than advanced engineering skills. By starting with a simple industrial design and following a structured workflow, you'll gain the confidence to tackle more complex narrow gauge models in the future.