

A sprawling model railway doesn't require a converted basement or a massive budget to feel truly immersive. Many beginners feel overwhelmed by the confusing alphabet soup of scales like OO9 and GN15, or they worry that a small footprint means settling for a repetitive circle of track. It's a common hurdle, yet planning a narrow gauge layout actually offers more creative freedom than standard gauge modeling because of its ability to navigate tight spaces with character. While the technical terms might seem daunting at first, the solution lies in a structured approach to design.
This guide will help you master the art of layout planning to create a railway that fits your home and your specific modeling goals. We'll provide a clear breakdown of scale choices and functional track plans that go beyond basic ovals. You'll also gain the confidence to start building using 3D printed kits, ensuring your first project is as rewarding as it is space-efficient. By the end of this article, you'll have a clear roadmap to transform a small shelf or corner into a living, breathing narrow gauge scene.
Key Takeaways
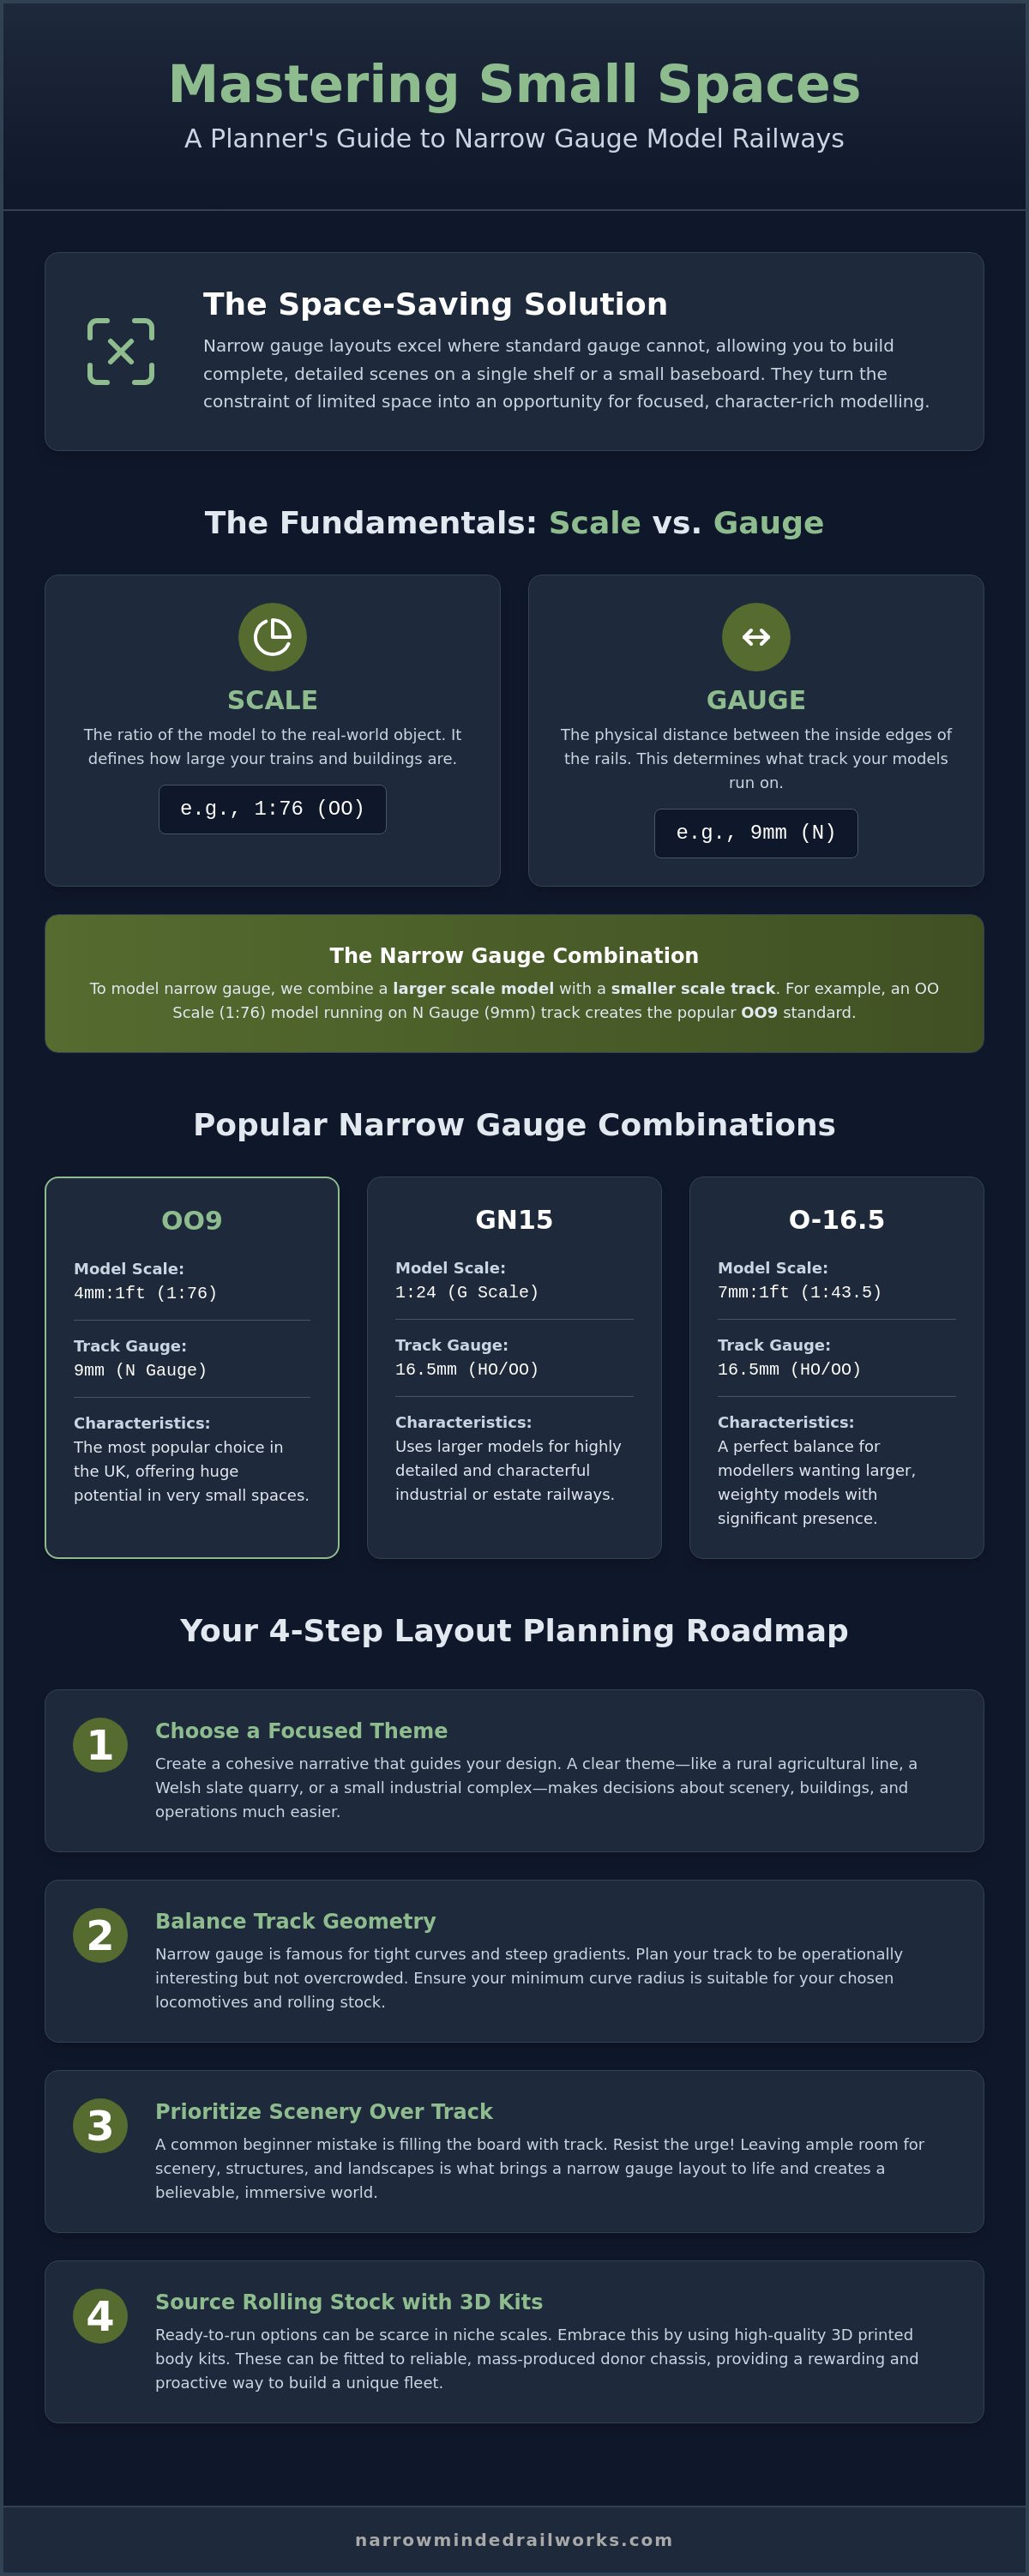
- While space constraints often limit traditional designs, planning a narrow gauge layout enables you to integrate detailed industrial or rural scenes into compact home environments.
- Differentiate between scale and gauge to understand how OO9 or GN15 systems utilize standard track widths for unique narrow gauge applications.
- Determine the ideal track geometry for your space by balancing minimum curve radii with the specific needs of your chosen prototype.
- Select a focused theme, such as an agricultural line or slate quarry, to create a cohesive narrative that informs every aspect of your layout design.
- Address the scarcity of specialized rolling stock by utilizing 3D printed locomotive and wagon kits, which provide a proactive solution when paired with reliable donor chassis.
What is Narrow Gauge Layout Planning? Defining Your Vision
Many modellers find themselves restricted by the footprint required for a realistic standard gauge railway. However, planning a narrow gauge layout provides a proactive solution by scaling down specific industrial or rural prototypes that naturally fit into tight spaces. At its core, this planning process involves designing a railway where the track is narrower than the standard 4 feet 8.5 inches. To fully grasp the history behind these unique lines, it's helpful to understand What is a Narrow Gauge Railway? and how they were originally engineered to navigate difficult terrain. These railways weren't built for speed; they were built for utility in places where full-sized trains simply couldn't go.
Narrow gauge modelling prioritizes character over complexity. While standard gauge layouts often demand wide, sweeping curves to maintain a sense of realism, narrow gauge lines are famous for their ability to handle sharper curves and steeper gradients. This allows you to create a dynamic, vertical landscape that would be impossible with larger equipment. Much like how specialized residential design firms like NOORICO focus on maximizing the potential and utility of home interiors, narrow gauge modeling allows you to squeeze a bustling industrial scene into a corner that would barely accommodate a single siding in standard scale. This flexibility is what makes the planning stage so exciting for beginners.
To better understand the potential of small-scale design, watch this helpful video:
The Advantages of Narrow Gauge for Home Layouts
The primary constraint for most hobbyists is available room. Narrow gauge solves this by allowing a complete, detailed scene to exist on a single shelf or a small baseboard. Because the real-world prototypes were often utilitarian and quirky, you'll find there's less pressure to follow strict mainline rules. You can learn more about what is a narrow gauge railway to see how these lines served everything from remote farms to busy quarries. This flexibility means you can focus on the atmosphere of the railway without needing a converted basement.
Establishing Your Modelling Goals
Before you begin planning a narrow gauge layout, you must define your desired outcome. Some modellers strive for exhibition-quality detail, while others prefer the simple operational fun of moving wagons from point A to point B. You might choose to model a specific prototype, such as a Welsh slate line, or create a freelance design that fits your own narrative. It's vital to balance track density with realistic scenery. Overcrowding a small space with too much track can diminish the sense of scale, so prioritize a layout that leaves room for the landscape to breathe and tells a coherent story.
Selecting Your Scale: OO9, GN15, and O-16.5 Explained
Choosing a scale is often the first point of confusion for newcomers. While the variety of options can feel overwhelming, understanding the relationship between scale and gauge provides a clear path forward. Scale refers to the ratio of the model to the real world, such as 1:76 or 4mm to the foot. Gauge refers specifically to the distance between the rails. When you are planning a narrow gauge layout, the most critical decision involves balancing your available room with the visual impact you desire. For broader context on the hobby, the NMRA provides a comprehensive guide on Getting Started in Model Railroading which clarifies these foundational concepts.
Narrow gauge modelling frequently utilizes track from other scales to represent smaller track widths. For instance, OO9 uses 9mm track, which is the standard for N gauge. This allows modellers to benefit from existing track systems while building models in a larger scale. While ready-to-run options are less common in these niche categories compared to standard gauge, the availability of specialized kits ensures you can still build a highly detailed and functional railway.
OO9 and HOn30: Small Scale, Big Potential
OO9 is the most popular choice for UK modellers because it allows for extensive scenery in a very small footprint. It uses a 4mm scale on 9mm track, representing a two foot prototype. Many enthusiasts find that OO9 loco kits offer the perfect entry point because they are compatible with widely available Peco track. If you have limited space but want a complex track plan, this scale is your best solution. It provides the flexibility to create winding mountain paths or tight industrial yards that would be impossible in larger scales.
GN15 and O-16.5: Larger Scales for Small Spaces
If you prefer working with larger figures and more "chunky" models, 7mm or 1:24 scales might be a better fit. These scales often use 16.5mm track, which is the standard for OO and HO gauge. You can explore getting started in GN15 scale to see how large models can still work on small baseboards. O-16.5, also known as 7mm narrow gauge, provides a satisfying building experience with a high level of physical presence. For those interested in North American prototypes, an introduction to On30 gauge reveals how O scale models can run on HO track to represent rugged, narrow tracks. Choosing these larger scales often makes the assembly of detailed wagon kits easier for those who find small parts difficult to handle.
Track Planning Strategies for Narrow Gauge Geometry
When you begin planning a narrow gauge layout, you'll likely face the challenge of fitting a realistic scene into a compact area. While standard gauge requires generous curves to look convincing, narrow gauge thrives on tighter geometry. However, you shouldn't ignore the physical limitations of your rolling stock. Every locomotive has a minimum radius it can safely traverse without derailing. By establishing this measurement early, you ensure that your design remains functional rather than just decorative. For those seeking a deeper technical foundation, the NMRA Beginner's Guide to Narrow Gauge offers essential standards for track spacing and curve radiuses that help prevent operational frustrations.
Choosing between an "Out and Back" or a "Continuous Run" layout dictates your entire operational experience. A continuous run allows trains to circulate indefinitely, which is ideal for display purposes. Conversely, an out-and-back design focuses on realistic movement from a station to a hidden fiddleyard. These fiddleyards act as the "rest of the world," allowing you to swap trains or re-order wagons out of sight. While a loop might seem more entertaining, many modellers find that the purposeful shunting of an out-and-back plan provides longer-lasting engagement. Regardless of the style you choose, reliable track geometry is the proactive solution to the common fear of stalling or derailments on small layouts.
The Industrial Siding Logic
Industrial themes provide the perfect excuse for complex track work in small spaces. When you plan sidings for a quarry or a factory, you can utilize shunting puzzles like the "Inglenook Sidings" or the "Timesaver." These designs turn a small footprint into a challenging game of logistics. To maintain reliability in these tight corners, select turnouts with a radius that matches your most demanding locomotive. Using "Setrack" points can save space, but "Streamline" points often offer better electrical contact and smoother running for smaller kits. This careful selection ensures that your shunting operations remain fluid and enjoyable.
Baseboard Design and Portability
If you don't have a dedicated railway room, a lightweight shelf layout provides a proactive way to pursue the hobby. Modern materials like extruded polystyrene or high-quality birch plywood offer strength without excessive weight. For those who need to maximize space in a bedroom or study to accommodate their hobby, Wardrobe Door Studio offers bespoke cabinetry that can help integrate a layout into your home’s design. Modular planning is another excellent strategy; it allows you to build a single small scene now and expand it with additional boards in the future. To save even more space, consider using a sector plate. A sector plate is a single length of track that pivots at one end, allowing a train to move between different sidings without the need for multiple expensive points. This simple mechanical solution keeps your planning a narrow gauge layout efficient and budget-friendly.
Building the Narrative: Choosing a Theme and Prototype
A model railway becomes more than just track and wood when you establish a narrative. While many beginners worry about strictly following a prototype, planning a narrow gauge layout actually encourages a "What If" mindset. You might imagine a world where a local quarry never closed or a private estate needed a dedicated line for timber transport. This backstory provides the proactive solution to design paralysis by guiding every decision from track placement to building style. If you don't have a specific real-world line in mind, creating a fictional history is a rewarding alternative.
Common themes for narrow gauge lines include:
- Slate quarries: These lines feature steep inclines and rugged rock faces typical of North Wales.
- Agricultural lines: These are often found in flat, marshy areas for moving crops and heavy machinery.
- Estate railways: These were built for the convenience of landowners to move supplies, timber, or guests across private grounds.
In these designs, the landscape should dictate the track. Because narrow gauge railways weren't built with huge budgets, they often wind around hills rather than cutting through them. This creates the charming, serpentine curves that define the aesthetic. When you let the terrain lead the way, your layout gains an organic feel that straight mainline tracks often lack. It's this relationship between the rails and the earth that makes narrow gauge modelling so visually distinct.
Scenery and Structures that Tell a Story
Buildings must be scale-appropriate to maintain the illusion of size. Using unique scenery kits helps differentiate your layout from generic standard gauge designs that often feel repetitive. Figures and small details, such as old petrol pumps or stacks of weathered sleepers, add a sense of lived-in reality. These elements tell the story of the people who work on your fictional line. Don't underestimate how much a single well-placed figure can transform a static scene into a snapshot of history.
Weathering and Realism
Realism comes from the details. Since many narrow gauge lines operated on shoe-string budgets, equipment was rarely pristine. You can learn about painting 3D printed models to achieve a finish that matches your environment. Grime, rust, and wear contribute to the rugged aesthetic. Natural materials like real crushed stone or dried moss provide authentic textures for the ground. By applying these techniques, you ensure your models look like they belong in the landscape rather than on a shelf.
If you're ready to start planning a narrow gauge layout with unique character, browse our range of narrow gauge locomotive kits to find your perfect prototype.
From Plan to Prototype: Using 3D Printed Kits
A significant hurdle in planning a narrow gauge layout is the limited availability of ready-to-run models for specialized prototypes. While mass-produced locomotives exist for the most famous lines, they often fail to capture the unique character of a small agricultural railway or a specific industrial quarry. 3D printed locomotive and wagon kits provide a proactive solution by offering a vast range of rare designs that were previously only available to master scratch-builders. By utilizing a "donor chassis" from a standard manufacturer, you can ensure reliable running qualities while enjoying the distinct appearance of a custom-built model. This approach allows your fleet to match the specific narrative you've designed for your layout.
Choosing kits over pre-assembled models is also a highly cost-effective strategy for developing a comprehensive fleet. Instead of paying a premium for a single standard model, you can invest in multiple OO9 locomotive and wagon kits to create a realistic variety of rolling stock. Narrow Minded Railworks maintains a professional and transparent approach to the hobby by providing clear support for all our products. We acknowledge that assembly requires a new set of skills, so we set realistic expectations and provide the guidance needed for you to succeed. Our goal is to simplify the transition from a paper plan to a fully operational miniature railway.
Selecting Your First Kit
If you're new to the assembly process, starting with a simple wagon kit is the most effective way to build your confidence. These smaller projects allow you to practice cleaning, priming, and painting 3D printed resin before you attempt a more complex locomotive body. When you're ready to move to powered models, it's vital to identify the correct donor chassis specified for the kit to ensure a perfect fit. You'll need a basic checklist of tools to begin, including:
- A sharp craft knife or scalpel for removing support structures.
- Fine-grit sandpaper for smoothing join lines.
- High-quality cyanoacrylate (superglue) for strong bonds.
- An automotive-grade primer to prepare the surface for final painting.
Final Assembly and Operation
There's a unique satisfaction in seeing a model you've built yourself traverse a layout you designed from scratch. Watching your handiwork navigate the tight curves and industrial sidings mentioned earlier in this guide validates the effort put into planning a narrow gauge layout. We encourage you to share your progress with the wider narrow gauge community, as the shared experience of building is a core part of the hobby's appeal. Once your first kit is operational, the initial fear of complex building usually fades, replaced by the drive to expand your line with even more characterful stock.
Explore our range of OO9 and GN15 kits to start your journey.
Transform Your Vision Into a Miniature Reality
You now possess the foundational knowledge required to move from initial concepts to a functional railway. While limited space or technical scale differences often discourage new modellers, planning a narrow gauge layout provides a proactive way to build a characterful railway in any home environment. You've learned how to select the right scale for your space and how to design track geometry that balances operational reliability with visual interest. By establishing a clear narrative for your line, you ensure that every building and wagon serves a specific purpose.
The transition from a paper plan to a physical model is the most rewarding step in this hobby. We offer professional 3D printed quality kits designed for standard donor chassis, featuring specialist designs for OO9, GN15, and O-16.5. We provide worldwide shipping for all model kits to ensure modellers everywhere can access these unique prototypes. Start your layout with our 3D printed locomotive and wagon kits. It's time to clear a shelf and start building your unique vision today.
Frequently Asked Questions
How much space do I really need for a narrow gauge layout?
You can build a functional narrow gauge layout in a space as small as three or four feet in length. While larger rooms offer more scope, the proactive solution for most modellers is to utilize a shelf or a small baseboard. Planning a narrow gauge layout allows you to create a complete industrial scene where a standard gauge equivalent would be physically impossible.
Is OO9 the same as N gauge?
OO9 uses the same 9mm track width as N gauge, but the models are built to a larger scale. While N gauge represents standard trains at 1:148 or 1:160, OO9 represents narrow gauge prototypes at 4mm to the foot. This means OO9 trains are significantly larger and taller than N gauge models despite running on the same rails.
What is the best track to use for a narrow gauge railway?
Dedicated narrow gauge track from manufacturers like Peco is the most suitable choice for realism. While standard N gauge track functions, the sleeper spacing is incorrect for narrow gauge prototypes. Utilizing specialized OO9 or O-16.5 track provides the proactive solution for achieving an authentic, rugged appearance on your permanent way.
Can I run narrow gauge trains on standard gauge track?
You cannot run narrow gauge models on standard gauge track because the rail widths don't match. For instance, OO9 models are too narrow for the rails used by OO gauge trains. However, some scales are designed to use track from other gauges; On30 models are specifically built to run on standard HO gauge track to represent 30-inch narrow gauge lines.
Are 3D printed kits suitable for a beginner?
3D printed kits are an excellent entry point if you begin with simple wagon models. Acknowledging that locomotive assembly requires more precision, the proactive solution for a beginner is to master painting and basic assembly on rolling stock first. These kits offer unique prototypes that aren't available in ready-to-run formats.
What is a donor chassis and where do I find one?
A donor chassis is a pre-assembled motor and wheel unit taken from a mass-produced model. Since we don't sell motors or chassis, you'll need to source these from hobby retailers or manufacturers like Kato. Using a proven chassis ensures your 3D printed model has reliable running qualities without the need for complex mechanical engineering.
What is the minimum radius for narrow gauge locomotives?
Most small narrow gauge locomotives can navigate curves with a radius as tight as 9 inches. While standard gauge trains require much wider turns, the proactive solution when planning a narrow gauge layout is to use these tight radii to create compact, winding track plans. Always check the specific requirements of your locomotive before finalizing your design.
How do I choose between a quarry or an estate theme?
Choosing a theme depends on whether you prefer rugged industrial scenes or manicured landscapes. A quarry theme allows for steep gradients and rocky textures, while an estate railway focuses on elegant structures and woodland scenery. If you can't decide, a freelance design combining elements of both provides the proactive solution for maximum creative freedom.