

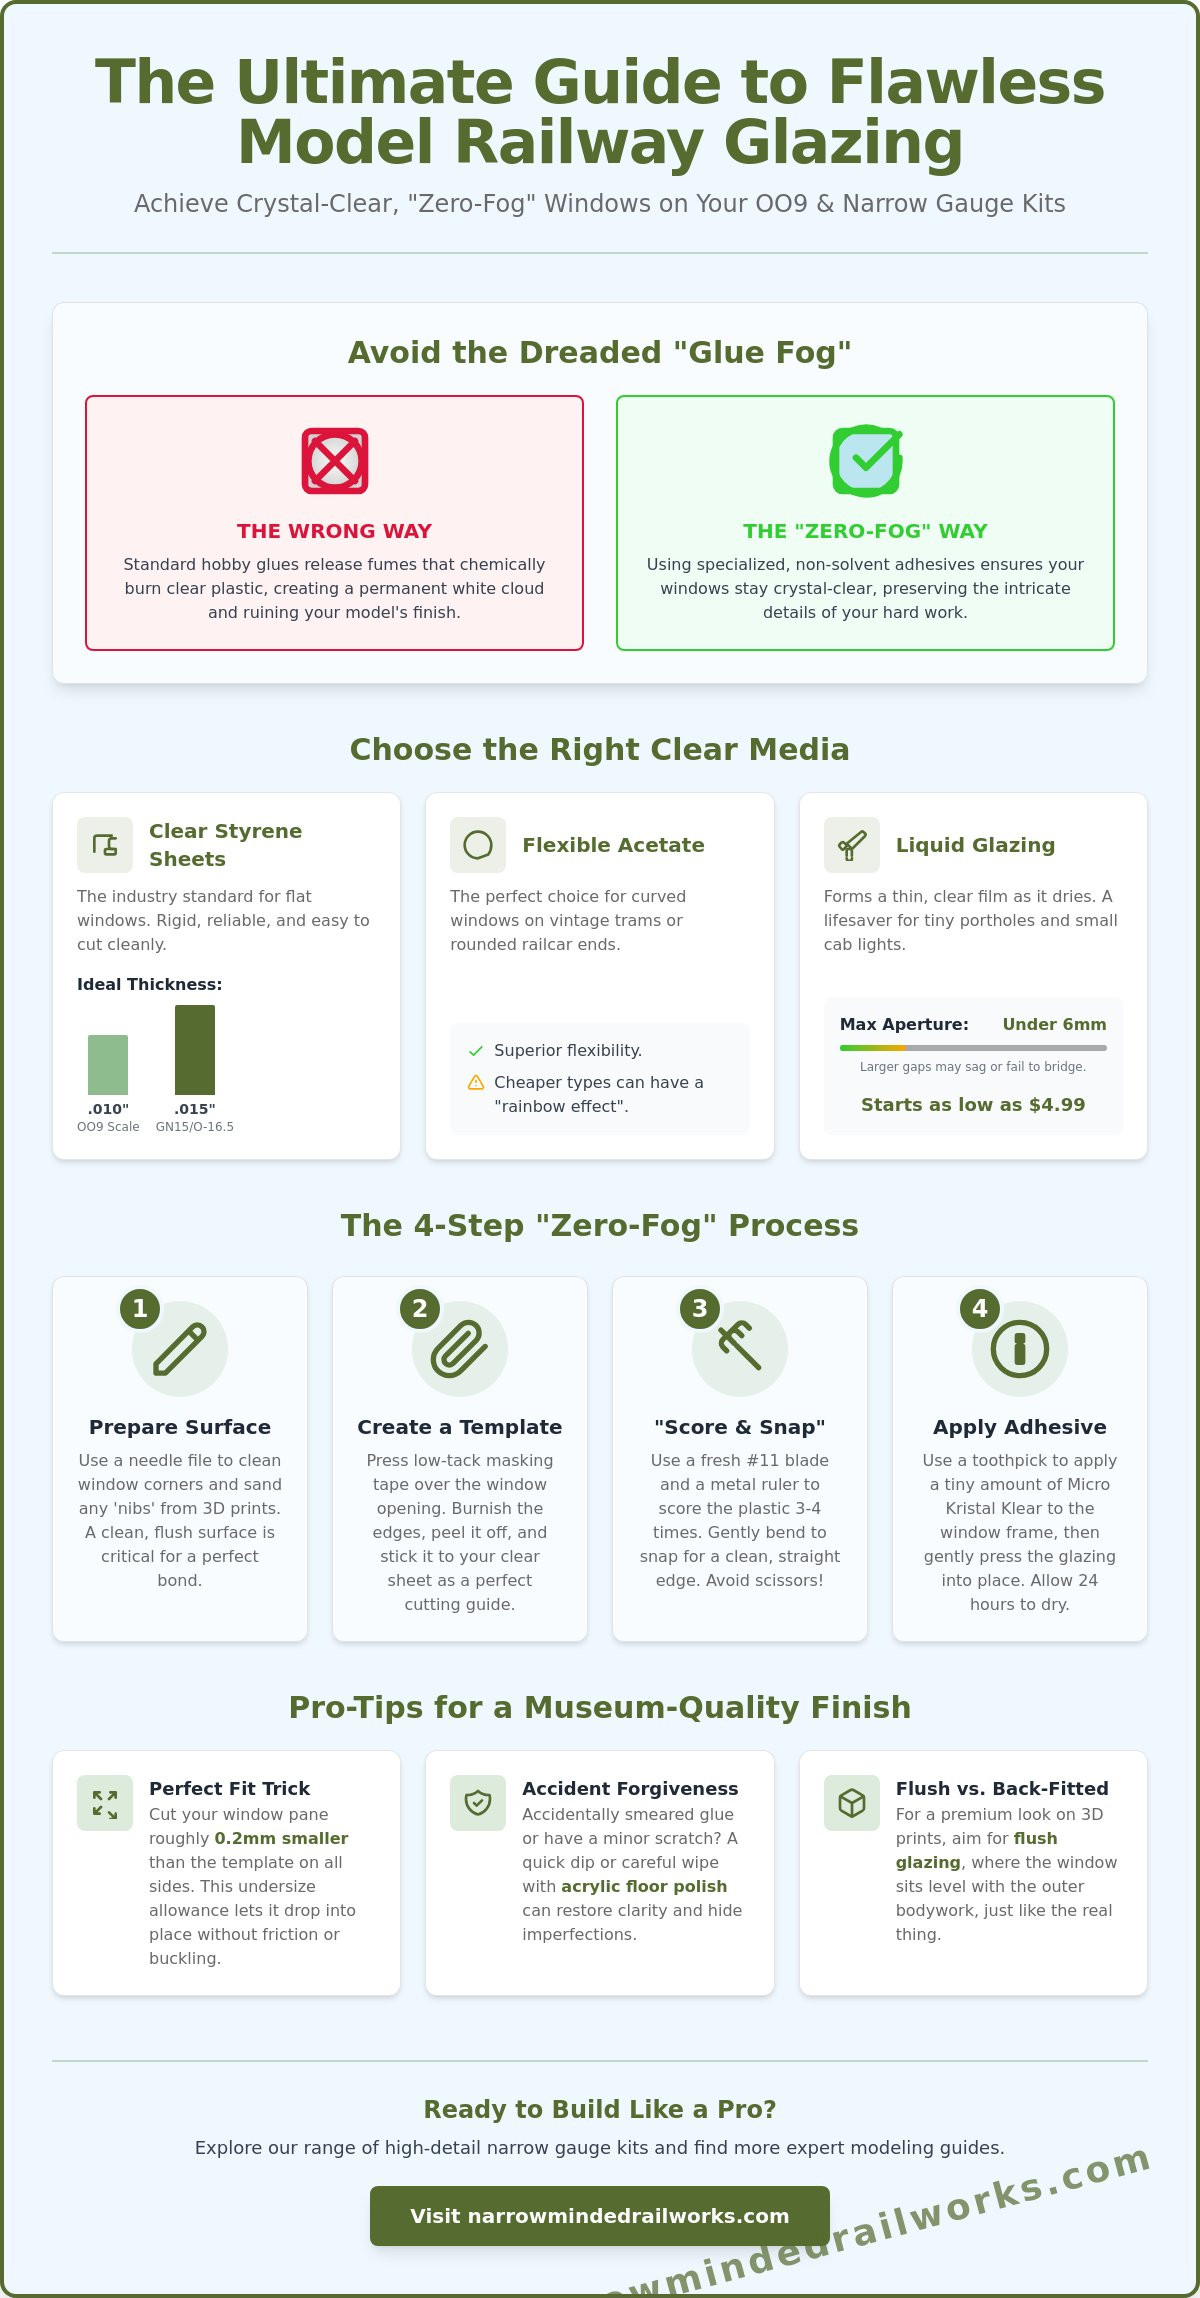
You've spent forty hours detailing your latest OO9 locomotive, but as you apply that final dab of glue, a white cloud blooms across the windshield, ruining the finish. It's a heartbreaking moment that many narrow gauge modelers know too well. Fitting glazing in model kits shouldn't feel like a high-stakes gamble where one wrong move destroys your hard work. You want windows that stay put, look perfectly flush, and remain crystal clear for the life of your rolling stock.
We agree that dealing with tiny 3D-printed apertures and fickle clear plastic is often the most frustrating part of a kit build. This guide promises to change that by teaching you the "Zero-Fog" preparation method and the exact adhesive strategies used by professional builders. We'll explore why specialized options like Micro Kristal Klear, which currently retails for as low as $4.99, are superior to standard hobby glues. You'll also learn how to handle modern 3D-printed clear resins versus traditional .010 inch Evergreen styrene sheets to ensure every window on your model looks like real glass.
Key Takeaways
- Learn how to select the perfect material thickness to ensure your windows look scale-accurate rather than bulky or toy-like.
- Discover why specialized adhesives are essential for fitting glazing in model kits to prevent permanent fogging and "blooming" on clear parts.
- Master the use of paper templates to get a perfect, gap-free fit for the intricate window shapes found in narrow gauge locomotive cabs.
- Understand the difference between back-fitted and flush glazing to elevate your 3D-printed kits to a museum-quality finish.
- Learn a simple restoration trick using floor polish to fix accidental glue smears and minor surface scratches on your glazing.
Understanding Glazing Materials: Choosing the Right Clear Media
Selecting the right clear media is the foundation of a professional finish. While many plastic model kits come with pre-cut windows, narrow gauge modelers working with OO9 or GN15 resin and 3D-printed kits often need to source their own. The thickness of the material dictates the realism. For OO9 scale (4mm to the foot), a sheet that is .010 inches thick is usually ideal. If you go thicker, you risk a "bottle bottom" effect that distorts the interior detail of your locomotive cab. In larger scales like GN15 or O-16.5, you can step up to .015 inch sheets to provide better structural integrity for larger window spans.
If you're on a budget, high-quality packaging waste can be a goldmine. The clear plastic from "blister packs" used for electronics is often high-grade acetate or PETG. Just ensure the surface is free of scuffs and glue residue before you start fitting glazing in model kits using these materials. Always test a small scrap with your chosen adhesive first, as some packaging plastics react poorly to solvent-based glues.
To better understand the practical side of selecting and handling these materials, watch this helpful video:
Rigid vs. Flexible Glazing
Clear styrene sheets, such as those from Evergreen Scale Models, are the industry standard for flat windows. They're rigid enough to stay flat when glued into a recess. Acetate, often found in thicknesses like .005 inches, is the superior choice for curved windows. You'll often find these on vintage tram locomotives or rounded railcar ends. One downside of cheaper plastics from packaging is the "rainbow effect" or birefringence. This occurs when light refracts through low-quality polymers. To avoid this, stick to dedicated modeling brands or high-clarity clear oriented polystyrene.
Specialized Liquid Glazing Products
This is where many modelers miss a trick. You don't always need to cut sheet plastic. Liquid glazing products, like Micro Kristal Klear or Testors Clear Parts Cement, rely on surface tension to create a pane. You dip a toothpick into the fluid and draw it across the window aperture. As it dries, it forms a perfectly clear, thin film. This technique is a lifesaver for tiny portholes in OO9 wagons or small cab side lights where cutting a microscopic square of plastic is nearly impossible. Just keep in mind that liquid glazing works best for apertures under 6mm; anything larger may sag or fail to bridge the gap during the 24-hour drying period.
Preparation and Cutting: Ensuring a Precision Fit
Before you pick up the plastic, look closely at the window reveal of your model. 3D-printed kits often have tiny "nibs" or support marks left over from the manufacturing process. If you don't sand these flush, your glazing will sit at an awkward angle or fail to seat properly. Use a fine needle file to clean the corners of the window frame. This step is often overlooked, but it's the difference between a window that looks like it belongs and one that looks like an afterthought. Fitting glazing in model kits requires a clean surface so the adhesive has a consistent area to bond with.
Don't just "eyeball" the size and hope for the best. This approach usually leads to gaps that let light leak through the cab, ruining the scale effect. The "Scriber and Snap" method is your best friend for straight edges on clear styrene. Use a metal ruler and a fresh blade to score the surface three or four times with light pressure. Then, gently bend the plastic away from the score line until it snaps cleanly. Heavy-duty scissors might seem easier, but they often crush the edge of the plastic, creating a white, opaque line that destroys the clarity of your windows.
The Template Method
For complex arched windows or the multi-pane shapes found on narrow gauge locos, use masking tape to create a perfect pattern. Press a piece of low-tack tape over the window opening from the outside of the model. Use a toothpick to burnish the edges so the exact shape of the aperture is visible on the tape. Peel it off, stick it to your clear sheet, and cut around the outline with sharp precision. To ensure a smooth installation, aim for an undersize allowance of roughly 0.2mm on all sides so the pane drops into place without friction.
Tools for Clean Cuts
Always use a brand new #11 blade when working with clear media. A dull blade won't cut; it will plow through the plastic, causing splintering and micro-cracks. Once you've cut your piece, use a 400-grit sanding stick to lightly dress the edges. This removes any tiny burrs that could prevent a flush fit against the window frame. When you're happy with the dry fit, you're ready to select the that will keep the pane secure without the risk of fogging or crazing.
Taking the time to prep your apertures ensures your finished model looks professional and museum-quality. If you're looking for high-quality components to practice these techniques on, check out our range of oo9 locomotive kits to help start your next project with the right foundation.
Adhesives and the "No-Fog" Rule
The choice of adhesive is the single most important decision when fitting glazing in model kits. You can cut the most perfect window pane, but if you use the wrong glue, you'll end up with a permanent white fog that ruins the look of your cab. This "blooming" effect is a chemical reaction that occurs when vapors from standard adhesives settle on the plastic surface. Understanding the chemistry behind your glue bottle is the only way to ensure a crystal-clear result every time.
For beginners, standard PVA or white wood glue is the safest starting point. It's water-soluble, meaning you can wipe away mistakes with a damp cloth, and it dries completely clear. However, it lacks the "grab" needed for larger windows. This is why many professional builders turn to specialist products like Formula 560 Canopy Glue or Micro Kristal Klear. These products, which typically range in price from $4.99 to $6.00 for a one-ounce bottle as of May 2026, provide a stronger bond without the risk of outgassing. If you need an instant set, UV-cure resins are a modern alternative. They stay liquid until you hit them with a UV light, giving you infinite time to position the glazing perfectly.
Why Traditional Glues Fail
Cyanoacrylate, or superglue, is the primary enemy of clear plastic. As it cures, it releases vapors that react with the moisture on the glazing, creating that dreaded white haze. Plastic cement is equally dangerous; it works by melting the surfaces together. If even a microscopic amount touches the visible part of the window, it will permanently scar the plastic. Always test a new adhesive on a scrap piece of your clear media before you apply it to your model. This five-minute test can save you hours of restoration work later.
Applying Adhesive with Precision
Never apply glue directly from the bottle to the model. Instead, squeeze a small drop onto a scrap piece of cardboard and use a cocktail stick or a piece of fine 0.5mm wire to pick up microscopic dots. Apply the glue to the "reveal" or the inner ledge of the window frame rather than the glazing itself. This prevents the glue from being pushed onto the clear face when you press the pane into place. If you're working with tight recesses, you can use capillary action by placing the glazing in first and then touching a tiny drop of thin glue to the edge. It's vital to manage any squeeze-out before it sets on your painting 3d printed models, as removing dried glue from a finished paint job often requires a complete strip and repaint.
Advanced Techniques: Flush Glazing and 3D Print Integration
Achieving a museum-quality finish often comes down to how you handle the transition between the bodywork and the glass. Most standard builds rely on back-fitting, where the clear plastic is simply glued to the interior wall. While easy, this creates a deep recess that looks unrealistic in narrow gauge scales. True flush glazing involves fitting the window so it sits level with the exterior surface. This is particularly challenging when fitting glazing in model kits produced via 3D printing, as wall thicknesses are often exaggerated to ensure structural integrity. In many oo9 locomotive kits, the resin walls might be 1mm or 1.5mm thick, creating a "tunnel" effect if you don't use advanced placement techniques.
If your hand-cut pane has a microscopic gap around the edge, don't panic. You can use a tiny bead of Krystal Klear to bridge the space between the plastic and the window frame. Because it dries clear and shrinks slightly, it acts as both a filler and a realistic rubber window seal. For open-cab locomotives, protecting the interior is vital. You should fit the glazing only after all interior painting and detailing are complete. This prevents dust and paint overspray from trapped inside the cab, which is nearly impossible to clean later without dismantling the model.
Achieving the Flush-Fit Look
To get that perfect "push-fit" look, use a slightly thicker clear styrene sheet, such as .015 or .020 inches. Carefully chamfer the back edges of the plastic with a fine sanding stick. This allows the front face of the window to sit flush with the bodywork while the wider back section provides a ledge for the glue to grab. For narrow gauge wagons with glazing bars, it's often easier to glaze the entire window opening as one piece and then paint the bars over the top of the plastic using a fine-tipped paint pen or a steady brush. This creates a much cleaner look than trying to fit tiny individual panes between the bars.
Glazing in 3D-Printed Kits
3D-printed models often feature internal "steps" or ridges where support structures were attached during production. You must file these steps perfectly flat before you attempt fitting glazing in model kits made from resin. Failure to do so will cause the window to sit crookedly. Always wait until your final matte or satin varnish coat is completely dry before installing clear parts; varnish can cloud clear plastic just as easily as the wrong glue. Finally, check that your glazing doesn't extend too far into the body. You don't want the plastic to foul the chassis or motor unit, which can cause vibrations or prevent the body from seating correctly on the frame.
Ready to put these professional techniques to the test? Explore our range of high-quality narrow gauge locomotive and wagon kits to find your next detailing project.
Troubleshooting and Final Finishing Touches
Even the most seasoned builders occasionally face setbacks when fitting glazing in model kits. A slipped tweezer or a microscopic bead of glue in the wrong place doesn't have to mean the end of your project. If you've accidentally "bloomed" a window with superglue vapors, the damage isn't always permanent. The secret lies in high-gloss acrylic floor polish. By carefully brushing a thin layer over the fogged area, you can often fill the chemical pitting and restore the pane to near-perfect clarity. This technique is a lifesaver for those working on intricate narrow gauge locomotives where replacing a window might require dismantling the entire cab.
Before you call the project finished, conduct a "light leak" test. Place a small LED inside the locomotive cab in a dark room. If you see shards of light escaping from the edges of the windows, it means the glazing isn't seated perfectly. These gaps are common in 3D-printed kits with slightly irregular apertures. They can be easily fixed without removing the glass. Simply use a fine-tipped brush to apply a tiny amount of thick black acrylic paint or a specialized gap-filling glue to the interior seam to block the light.
Correcting Common Mistakes
If a window is misaligned, don't try to pry it from the outside. Instead, use a soft wooden dowel to apply gentle, even pressure from the inside of the model until the bond breaks. This protects your exterior paintwork from chips and scratches. You can then clean the edges with a high-grit sanding stick and try again. Use a dedicated canopy glue to fill tiny perimeter gaps, as it shrinks as it dries and leaves a clear, rubbery seal that looks like a realistic window gasket.
Adding Realism with Weathering
Once your windows are secure and clear, the final step is to make them look like they belong in a working environment. Real narrow gauge engines are rarely pristine. Use your diorama tools to apply a very fine "dirt" wash into the corners of the frames where grime naturally accumulates. For a truly professional touch, create a "wiper arc" by masking a semi-circle with a piece of tape and lightly spraying the rest of the window with a highly diluted earth-tone paint. If you're modeling a winter scene, a light dusting of matte varnish around the edges of the pane can simulate the look of condensation or frost, adding another layer of depth to your fitting glazing in model kits process.
Elevate Your Next Narrow Gauge Build
You now have the skills to turn a basic window opening into a realistic focal point of your model. By choosing the correct material thickness and avoiding the chemical pitfalls of standard superglues, you've cleared the most difficult hurdle in the hobby. Success in fitting glazing in model kits comes down to patience and using the right tools for the job. Whether you're filling tiny portholes with liquid glazing or chamfering the edges of styrene for a flush-fit look, these professional techniques ensure your rolling stock stands out on any layout.
Our specialist 3D-printed designs for OO9, GN15, and O-16.5 are designed by modellers for modellers. We understand the specific needs of narrow gauge enthusiasts and provide the high-quality foundations your projects require. With worldwide shipping available, it's never been easier to upgrade your workbench with professional-grade kits. Browse our range of high-quality narrow gauge kits and accessories and start your next build with confidence. Your locomotives deserve a crystal-clear finish that lasts for years to come.
Frequently Asked Questions
What is the best glue for model kit windows?
Specialist canopy glues like Formula 560 or Micro Kristal Klear are the most reliable choices for a professional finish. These adhesives dry crystal clear and don't release the harmful vapors that cloud plastic. For those just starting with fitting glazing in model kits, standard white PVA glue provides a safe, water-soluble alternative that allows for easy cleanup if you make a mistake.
Can I use superglue to fit glazing if I am careful?
It's best to avoid superglue entirely for clear parts. Even if you apply a tiny amount, the cyanoacrylate outgassing process can occur up to 24 hours after application, leaving a permanent white haze. This reaction is often triggered by humidity levels in your workspace, making it nearly impossible to control consistently even for experienced builders.
How do I cut clear styrene without it cracking?
The score and snap method is the most effective way to prevent splintering or micro-cracks. Use a metal ruler and a fresh #11 blade to score the plastic three times with light, even pressure. Gently bend the sheet away from the line until it snaps. This creates a much cleaner edge than scissors, which often crush and whiten the plastic perimeter.
What is flush glazing and how do I do it?
Flush glazing is a technique where the window pane sits perfectly level with the exterior body of the model. You achieve this by cutting the glazing to the exact size of the aperture rather than gluing a larger piece to the inside wall. It's a hallmark of high-end modeling that eliminates the unrealistic "thick wall" look common in many 3D-printed kits.
How do I fix a window that has gone foggy?
You can often restore clarity by brushing a thin coat of high-gloss acrylic floor polish over the affected area. The liquid fills the microscopic pits caused by glue vapors and levels out to a clear, shiny finish. If the fogging is on the internal face, you'll need to pop the window out using a soft wooden dowel before attempting the repair.
Can I use liquid glazing for large windows in O-16.5 scale?
Liquid glazing is generally unsuitable for windows larger than 6mm in diameter. In 7mm or O-16.5 scale, the surface tension isn't strong enough to bridge large gaps, which leads to sagging or a burst film during the drying process. For these larger apertures, always use rigid sheet materials like .015 inch clear styrene to ensure a flat and stable surface.
Should I fit the windows before or after painting my model?
Always fit your windows after you've finished all painting and applied your final varnish coat. Varnish and paint overspray are the leading causes of ruined glazing in model kits. By waiting until the model is 100% dry, you ensure the clear parts remain pristine and free from the dusty texture that matte sprays can leave behind.
What thickness of clear plastic is best for OO9 scale?
A thickness of .010 inches (0.25mm) is the industry standard for 4mm scale or OO9 modeling. This size provides enough rigidity to stay flat while remaining thin enough to look scale-accurate. Using thicker material can cause optical distortion, making your locomotive cab look like it's fitted with heavy armored glass rather than standard window panes.