

What if the difference between a toy-like sticker and a museum-quality livery was simply a single bottle of chemical solution? Many modellers experience genuine anxiety when a decal begins to wrinkle or refuses to settle over the intricate rivet detail of a 3D-printed kit. It's common to feel frustrated when trapped air causes silvering, but using micro sol offers a reliable way to overcome these common finishing hurdles. These imperfections often detract from the hard work put into a narrow gauge build, yet they're entirely avoidable with the right technique.
While 3D-printed surfaces present unique challenges for traditional transfers, this guide provides a proactive solution for achieving a professional, painted-on appearance. You'll learn how to master the art of decal application to ensure your liveries conform perfectly to even the most complex geometries. We'll show you how to handle chemical softening solutions with confidence, moving from the initial placement to a seamless finish on your OO9 or O-16.5 models. This overview covers the step by step process of softening decals until they melt into the textures of your locomotive, providing the high-quality results your kits deserve.
Key Takeaways
- Distinguish between the "Red" and "Blue" bottles to establish a reliable application sequence for narrow gauge kits.
- Apply a gloss base coat to eliminate trapped air, ensuring your decals achieve a seamless bond with the 3D-printed surface.
- Use micro sol to soften the carrier film, allowing the decal to conform perfectly to intricate rivet detail and panel lines.
- Recognize that temporary wrinkling is a sign of a successful chemical reaction and must be left undisturbed to dry for a flat finish.
- Protect your completed livery with a sealing varnish to integrate the decals into the final weathering stages of your build.
What is Micro Sol? Understanding Decal Softening Solutions
Modellers often face a significant hurdle when trying to make flat transfers look realistic on curved or textured surfaces. A standard water-slide transfer is essentially a thin layer of printed ink on a carrier film. To understand the basics of these graphics, one might ask, What is a decal? At its simplest, it's a graphic that needs to transition from a paper backing to a model. However, standard water application often leaves the decal sitting on top of details rather than in them. This is where micro sol becomes an essential part of the toolkit.
While water allows for basic positioning, it doesn't solve the issue of air pockets or rigid carrier films. For professional railway modelling, especially on highly detailed 3D-printed kits, a "good enough" finish isn't sufficient. This solvent-based solution is designed specifically to soften that carrier film, allowing it to stretch and shrink into every microscopic valley of the model's surface. It's the second part of a two-stage system that bridges the gap between a stuck-on sticker and a professional livery.
To better understand this concept, watch this helpful video:
The Chemistry of Decal Softening
The effectiveness of this solution lies in its chemical composition. It temporarily "melts" the acetic acid within the carrier film. This process makes the decal extremely pliable, almost like a thin layer of wet paint. By reducing surface tension, the liquid pulls the decal down into panel lines and around rivets. For a Narrow Minded Railworks kit, where rivet detail is dense and condensed into OO9 or O-16.5 scales, this chemical reaction is the only way to avoid silvering. Silvering is the unsightly look of trapped air beneath the film. When you apply this solution, you're essentially removing the physical gap between the model and the graphic.
When to Use Micro Sol vs. Micro Set
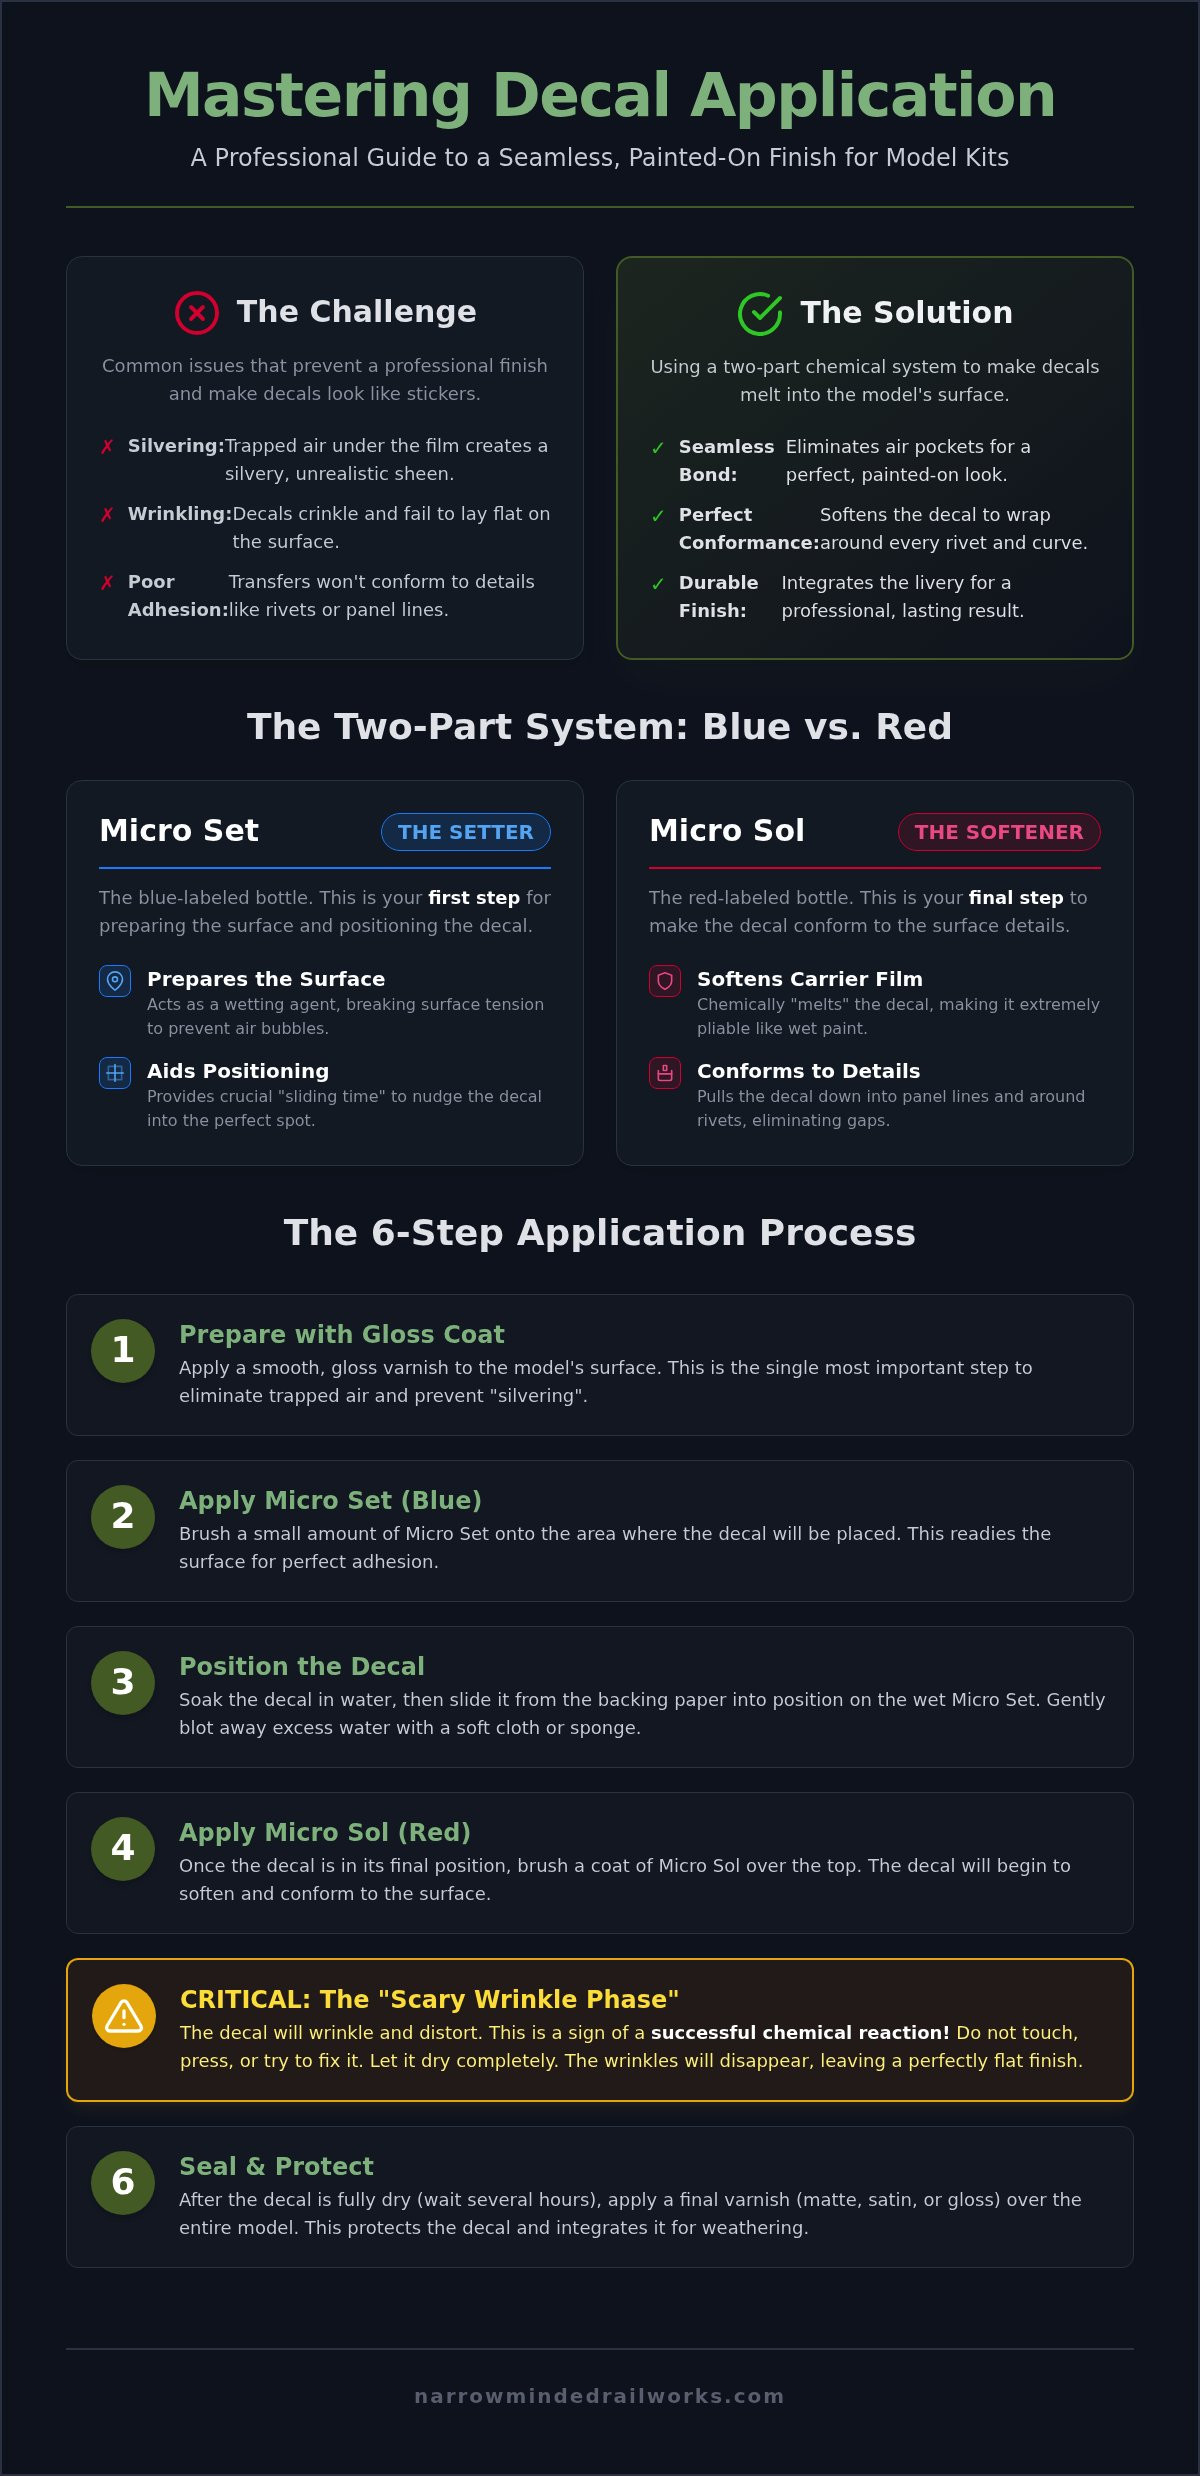
A common constraint for many modellers is the confusion between the two Microscale bottles. The solution is to follow the "Red vs Blue" rule. Micro Set (the blue label) is the setting agent. You apply it to the model surface first to help with positioning and initial adhesion. It acts as a lubricant and a mild softener. micro sol (the red label) is the softening agent. You apply it only once the decal is in place and the excess water is blotted away. It's the final stage that ensures the decal conforms to the complex contours of your locomotive or wagon. If you try to use the red bottle for positioning, you'll likely find the decal becomes too fragile to move, leading to tears.
The Microscale System: Comparing Micro Set and Micro Sol
Success in decal application relies on understanding the specific roles of the two-bottle system produced by Microscale Industries. Modellers often find themselves confused by the similar packaging, yet the chemical properties of each are distinct. The industry standard follows a colour-coded "Red vs Blue" distinction that dictates the order of operations. To achieve a professional finish, the workflow must always follow this sequence: Micro Set (Blue) first, then the decal, followed by micro sol (Red) to finish.
Using these solutions in isolation often leads to suboptimal results. Without the setting agent, decals may struggle to stick to the paint. Without the softening agent, decals will bridge over rivets instead of settling around them. This unified system ensures the carrier film becomes virtually invisible once dry, which is essential when finishing high-detail narrow gauge locomotive kits.
Micro Set: The Preparation Stage
Micro Set is the blue-labelled bottle and acts as a versatile wetting agent. Its primary role is to prepare the surface of your model by breaking down surface tension. This provides the modeller with crucial "sliding time," allowing you to nudge a locomotive number or crest into the exact position without the decal sticking prematurely. For flat surfaces, such as the sides of a simple wagon, Micro Set is often sufficient on its own to ensure a strong bond between the transfer and the gloss coat. It acts as a mild adhesive improver that helps the decal bite into the paint surface.
Micro Sol: The Conforming Stage
When your model features complex 3D-printed textures like hinges, panel lines, or heavy rivet detail, you must escalate to the red-labelled bottle. micro sol is a much more aggressive solvent. It's designed to soften the decal to the point where it physically drapes over obstructions. Because this solution is chemically stronger, you should observe basic safety precautions for handling decal solutions, such as working in a ventilated space and washing your hands after use.
It's important to be cautious with your base paint. While this solution is generally safe for most modern hobby paints, it can occasionally react with certain solvent-based enamels if applied too heavily. Acrylics are typically more resilient, but testing on a hidden area of your kit is always a wise proactive step. Once applied, the solution does the heavy lifting, allowing the decal to shrink-wrap itself around every detail for that coveted painted-on look. You don't need to brush it on vigorously; a single, gentle pass is usually enough to start the reaction.
Step-by-Step Guide: Applying Decals to 3D Printed Narrow Gauge Kits
Applying decals to a narrow gauge model requires more precision than larger scales. The condensed detail on an OO9 or GN15 loco means there's less room for error. You'll need a steady hand and a methodical approach to ensure the graphic integrates perfectly with the model's surface. While the process is straightforward, skipping a single step can lead to visible edges or trapped air that ruins the final look of your Narrow Minded Railworks kit.
Surface Preparation for 3D Prints
3D-printed kits often possess microscopic layer lines that can trap air. If you apply a decal directly to a matte or raw 3D-printed surface, silvering is almost guaranteed. This constraint is easily solved by applying a high-quality gloss varnish to create a smooth, glass-like bed. For more on this initial stage, see our guide on Painting 3D Printed Models: A Beginner’s Guide. This smooth surface allows the decal to sit flush, preventing the tiny air pockets that cause the film to look like a sticker rather than a painted livery.
The Application Sequence
Once your gloss coat is dry, you can begin the application. Start by brushing a small amount of Micro Set onto the specific area where the decal will sit. Dip your decal in lukewarm water for approximately 10 to 15 seconds until it begins to slide on the backing paper. Use a soft brush or a cocktail stick to nudge the decal into position. These tools are far more precise than your fingers, especially for tiny numbering on O-16.5 or OO9 models. After the decal is aligned, blot the excess liquid with a clean tissue or a cotton bud, ensuring the decal is flat against the surface.
Working Around Rivets and Panel Lines
Rivets are the biggest challenge in narrow gauge modelling. Once the decal is blotted, apply a single, generous coat of micro sol over the entire graphic. You can use the "wicking" technique by touching the brush to the edge of a panel line and letting the solution pull itself underneath the film. This draws the decal into the recesses. If the film bridges over a rivet, wait about 30 seconds for the chemical to react, then gently press a damp cotton bud vertically onto the rivet head. This forces the softened film down. For particularly stubborn textures or thick carrier films, you might need a second coat of micro sol after the first has dried for at least 15 minutes. This ensures the decal completely shrink-wraps around the 3D detail.
Handling the "Scary" Wrinkle Phase and Common Decal Mistakes
Many modellers experience a moment of panic roughly 30 to 60 seconds after applying micro sol. The once-flat decal begins to distort, bubble, and wrinkle aggressively. It often looks as though the solvent has permanently destroyed the graphic. While this sight is visually alarming, it's actually a sign that the chemical is working correctly. The film is becoming pliable so it can eventually shrink-wrap itself around the model's textures.
The Golden Rule during this stage is simple: never touch the decal while it is wrinkled. Because the carrier film is temporarily "melted" by the solvent, it's incredibly fragile. Any attempt to smooth out the wrinkles with a brush or a finger will result in a smeared or torn decal that cannot be fixed. Typically, the decal will begin to settle and flatten out on its own after 15 to 30 minutes. However, you should allow at least 12 hours for the solution to fully react and cure before handling the model or applying a finishing coat.
The Science of the Wrinkle
This phenomenon occurs because the solvent causes the carrier film to expand as it absorbs the liquid. This expansion is what allows the film to stretch over rivets and into panel lines. Decal brands react differently to this process. For example, high-quality aftermarket options like Fox Transfers often have very thin carrier films that wrinkle and recover quickly. In contrast, thicker kit-supplied decals may require a more aggressive reaction to achieve the same result. The wrinkle phase is a temporary chemical expansion necessary for a permanent bond.
Troubleshooting Common Issues
Even with a careful application, you might encounter minor imperfections once the model is dry. If you notice small air bubbles trapped under the film, you can use the "pin-prick" technique. Gently pierce the bubble with a sharp needle and apply a tiny drop of micro sol over the hole. The solvent will wick inside and pull the film down to the surface. To fix silvering that appears after drying, you can often re-apply a small amount of the solution to "melt" the edges of the film back into the gloss coat.
If a decal is significantly misaligned and the solvent has already started to work, removal becomes difficult. You can try to flood the area with water to dilute the chemical, but if the film has already softened, it's usually safer to let it dry completely and then gently scrape it away with a wooden cocktail stick. For those looking to start their next project with the best possible foundation, explore our latest narrow gauge locomotive kits which are designed specifically for high-detail finishing techniques.
Finishing Your Narrow Minded Railworks Kit to a Professional Standard
Once you've successfully used micro sol to conform your transfers to the model's surface, the project moves into the final finishing phase. While the decal is now chemically bonded to the paint, it's still a thin layer of ink and film that can be easily scratched during operation or handling on a layout. A proactive solution is to apply a protective barrier that locks the livery in place while unifying the surface texture. This final step transitions your work from a collection of parts into a cohesive, professional scale model.
The chemical softening process ensures that your decals survive the rigours of a working layout. Because the film has been "melted" into the rivets and panel lines, there are no raised edges for a fingernail or a piece of scenery to snag. This durability is vital for narrow gauge models, which are often handled more frequently than their larger counterparts. By taking the time to let the solution cure, you ensure the graphic becomes a permanent part of the locomotive body.
Sealing and Protecting the Livery
Choosing the right final coat is essential for a realistic narrow gauge appearance. A high-gloss finish is rarely appropriate for working steam or diesel locomotives, so most modellers opt for a satin or matt varnish. This final layer serves a dual purpose: it protects the delicate film from physical wear and hides the edges of the carrier film entirely. When the varnish hits the surface, it levels the slight height difference between the decal and the paint, making the graphic look truly "painted on." If you're just starting your journey into kit building, our Your First OO9 Loco Kit guide provides excellent context for selecting the right materials for these final stages.
Weathering Over Decals
A frequent constraint in narrow gauge modelling is that factory-fresh decals look too clean and vibrant for a hard-working quarry or plantation locomotive. To solve this, you can integrate the lettering into the rest of the model using various weathering techniques. However, you must ensure the micro sol has had at least 24 hours to fully cure before you apply any weathering powders, oils, or washes. If you apply solvent-based weathering products too early, you risk reacting with the softened decal film and ruining your hard work.
By applying a light wash or a dusting of powders over the sealed decal, you pull the graphic into the history of the locomotive. The result is a piece of machinery where the numbering looks like it has faded and gathered grime at the same rate as the surrounding paintwork. This level of integration is what defines a professional finish on a Narrow Minded Railworks kit. You've moved beyond simply assembling a kit. You've mastered the chemical tools and artistic techniques required to create a convincing, miniature representation of narrow gauge history.
Mastering Your Next Narrow Gauge Livery
Achieving a professional, painted-on look for your locomotive numbering is a skill that rewards patience and the right chemical toolkit. By applying a gloss base coat and trusting the "scary" wrinkle phase, you can ensure your decals conform to every intricate rivet on your model. Using micro sol transforms a standard transfer into a seamless part of your livery, providing the high-quality finish that precision 3D-printed details require. While the process involves chemical reactions that can seem unpredictable, following a structured workflow leads to consistent, museum-quality results.
Our kits are designed by modellers, for modellers, ensuring that every panel line and hinge is optimized for these advanced finishing techniques. We provide worldwide shipping on all OO9 and GN15 kits, utilizing precision 3D printing for maximum detail on every build. If you're ready to apply these techniques to your next project, browse our range of high-detail 3D printed narrow gauge kits to find your next locomotive or wagon. With these steps mastered, you can approach your workbench with confidence and create a truly cohesive narrow gauge scene.
Frequently Asked Questions
Do I really need both Micro Set and Micro Sol?
You should use both solutions to achieve professional results on complex 3D-printed textures. Micro Set provides the initial bond and crucial sliding time for accurate positioning on your locomotive. micro sol then acts as the finishing agent to melt the decal into panel lines and over rivets. Skipping the setting agent can lead to poor long-term adhesion, while skipping the softening agent prevents the decal from conforming to the model's complex geometry.
Why did my decal wrinkle after I applied Micro Sol?
Wrinkling is a sign that the chemical softening process is working correctly. The solvent causes the carrier film to expand temporarily so it can eventually shrink-wrap itself around the model's details. You must resist the urge to touch the decal during this phase, as the film is extremely fragile. Once the liquid evaporates, the decal will flatten out and pull tight against the surface, leaving a seamless finish.
Can Micro Sol damage the paint on my model railway kit?
Most modern acrylic hobby paints are completely resistant to these solutions. However, certain solvent-based enamels or poorly cured paints may react if the liquid is applied too heavily. A proactive solution is to apply a gloss acrylic clear coat before decalling. This protects the underlying paint and provides the smooth surface necessary for the chemical reaction to occur without affecting your livery.
How long should I wait before varnishing over a decal treated with Micro Sol?
You should wait a minimum of 24 hours before applying any varnish or weathering products. Even if the decal looks dry after an hour, the chemical reaction continues beneath the surface as the solvent evaporates. Applying a sealing coat too early can trap moisture and chemicals, leading to clouding or bubbling. Allowing a full day of curing ensures the decal is permanently bonded and stable for the final finishing stages.
Will Micro Sol work on old or thick decals?
Yes, micro sol is highly effective on thicker or older decals that have become brittle. While thin aftermarket transfers might only need one pass, older kit decals often require two or three applications to fully soften. Apply the first coat and let it dry completely before assessing the results. If the film hasn't fully settled into the recesses, simply apply another layer to continue the softening process.
What is the best type of brush to use for applying decal solutions?
A soft, synthetic round brush is the best choice for applying these solutions. You want a brush that can hold a decent amount of liquid without being so stiff that it scratches the delicate carrier film. Many modellers dedicate a specific brush to their decal solutions to prevent contamination from paint or glue. Avoid using natural hair brushes that might shed, as a single stray hair trapped under a decal is difficult to remove.
My decal is silvering even after using Micro Sol; how can I fix it?
You can often fix silvering by piercing the affected area with a sharp needle or the tip of a new hobby blade. Once you've created a small hole, apply a tiny drop of the softening solution directly over the silvered spot. The liquid will wick underneath the carrier film, softening it from the inside and allowing it to collapse onto the paint surface. This removes the trapped air that causes the silvering effect.
Does Micro Sol work on 3D-printed resin kits?
It works exceptionally well on resin kits, including the 3D-printed bodies produced by Narrow Minded Railworks. Resin is a non-porous material, which means the solution doesn't soak into the model itself. Instead, it focuses entirely on the decal film. As long as you have prepared the resin with a smooth gloss coat, the softening solution will pull the decal into every fine detail of the 3D print without damaging the material.