

With 65% of model train collectors now demanding perfect scale accuracy as of March 18, 2026, the margin for error on your layout has never been thinner. You've likely spent hours detailing a narrow gauge locomotive only to have a bond fail, or watched in horror as your epoxy resin water feature turned yellow and cloudy over time. It's frustrating when micro-bubbles ruin a diorama or the heat from curing damages your expensive 3D printed parts. You want professional results, but choosing between a $34.50 bottle of AK Interactive AK8232 and a $15.90 Bob Smith Quick Cure feels like a gamble when your hard work is on the line.
We agree that your layout deserves better than "good enough" adhesives. This guide will help you master specialized resin applications to create flawless water effects and structural bonds that stand the test of time. You'll learn how to navigate the upcoming EU 2025/2509 safety regulations and utilize 2026 innovations like Deluxe Materials' 3D Weld for 3D printed components. We're covering everything from bubble-free pouring techniques to selecting the right viscosity for high-strength locomotive kits so you can achieve a museum-quality finish every time.
Key Takeaways
- Learn the "Double Mix" technique to eliminate sticky spots and ensure a perfect, crystal-clear cure for every scenic feature.
- Discover how to match resin viscosity to your specific project, from water-thin liquids for surface ripples to deep-pour formulas for canal beds.
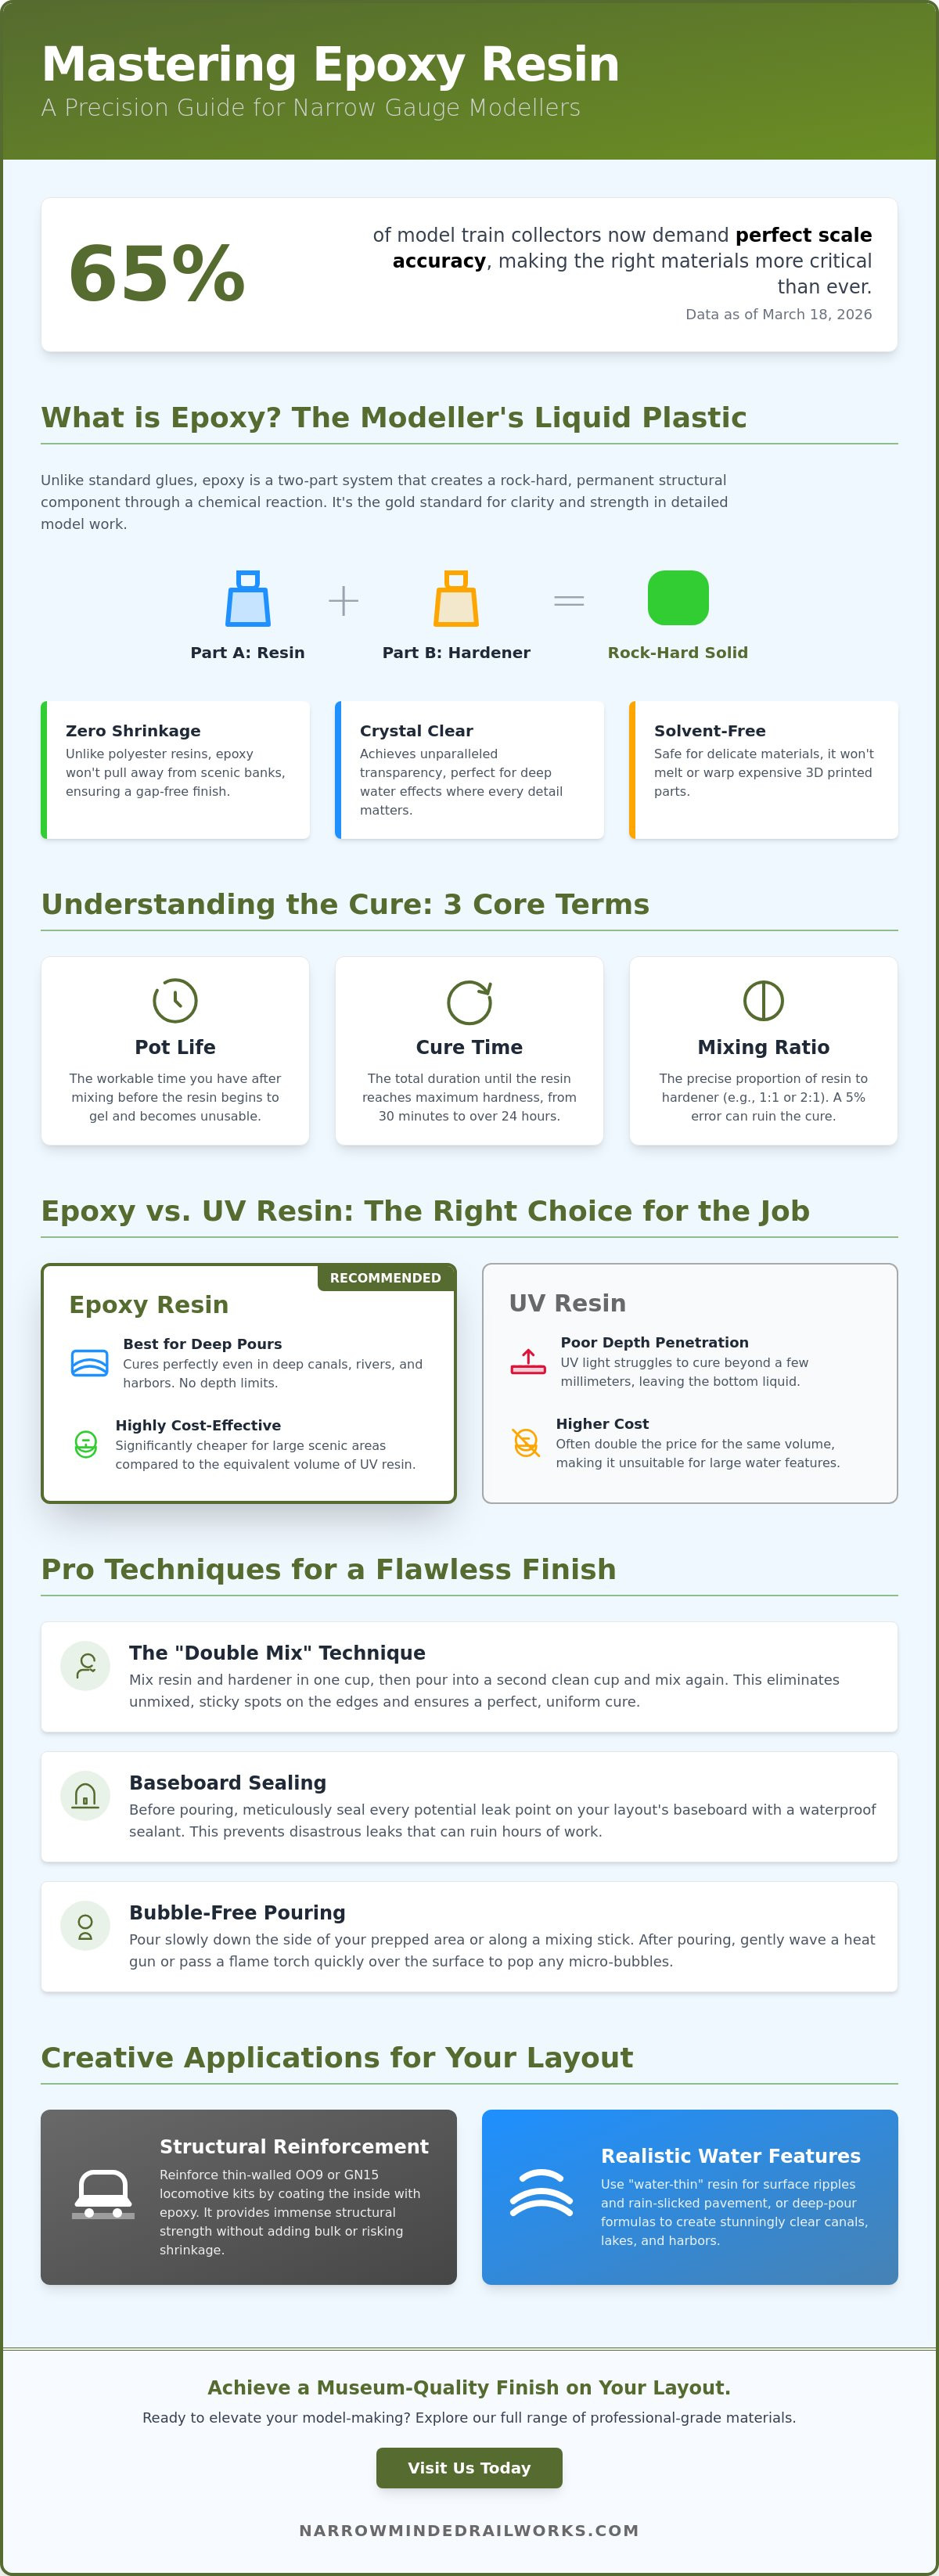
- Use epoxy resin to reinforce thin-walled OO9 or GN15 locomotive kits, providing immense structural strength without the risk of shrinkage.
- Master baseboard sealing techniques that prevent expensive leaks and ruined dioramas during the pouring process.
- Restore professional-grade clarity to your water features using specific sanding and priming methods designed for resin-enhanced models.
What is Epoxy Resin and Why Do Modellers Need It?
For narrow gauge modellers, precision isn't just a preference; it's a requirement. To understand what is epoxy resin, you have to look past the industrial labels and see it as a liquid plastic tool. Unlike standard glues or single-part fillers, epoxy resin consists of two distinct parts: a resin and a hardener. When you mix these components, they trigger a chemical reaction that transforms the liquid into a rock-hard, durable solid. This isn't just a bond; it's a structural change that creates a permanent part of your diorama.
Modellers choose this system over polyester resins because it offers zero shrinkage. If you pour a river on your layout using polyester, it might pull away from the banks as it cures, leaving unsightly gaps. Epoxy stays exactly where you put it. It's also remarkably clear, making it the gold standard for deep water effects where you need to see every pebble on the riverbed. Because it doesn't contain the harsh solvents found in other plastics, it's safer for delicate 3D printed kits that might otherwise melt or warp.
To get a visual sense of how these components interact and the best ways to handle them, watch this helpful video:
Before you start mixing, you need to master three core terms. Pot life is the amount of time you have to work with the liquid before it begins to gel and becomes unworkable. Cure time is the full duration until the resin reaches its maximum hardness, which can range from 30 minutes to 24 hours. Finally, the mixing ratio is the exact proportion of resin to hardener required. Most hobby brands like Bob Smith Industries or Z-Poxy use a 1:1 or 2:1 ratio by volume. Getting this right is the difference between a crystal-clear stream and a sticky, ruined mess.
The Chemistry of a Perfect Cure
The hardening process is an exothermic reaction, which means it generates its own heat as it cures. This is a critical consideration for thin-walled 3D printed locomotive kits. If the reaction happens too fast or the pour is too deep, the heat can actually warp delicate plastic parts. Maintaining a consistent room temperature of around 20 to 22 degrees Celsius in your workshop ensures the reaction proceeds at a predictable rate. Following the manufacturer’s ratio is non-negotiable; even a 5% error in your measurements can prevent the resin from ever reaching its full strength.
Epoxy vs. UV Resin: Which Should You Choose?
UV resins are popular for small details because they cure in seconds under a UV torch. However, they struggle with depth. If you're creating a deep canal or a large harbor, epoxy resin is the superior choice. UV light often can't penetrate deeper than a few millimeters, leaving the bottom of your pour liquid. For large scenic areas, epoxy is also significantly more cost-effective. While a 180ml kit of AK Interactive AK8232 epoxy costs between $34.50 and $38.00, the equivalent volume in UV resin would often double that price while offering less structural integrity for your layout.
Choosing the Right Epoxy Resin for Your Layout
While industrial guides often focus on massive "river tables," the model railway enthusiast faces a much more delicate challenge. You aren't pouring five liters of plastic; you're trying to simulate a stagnant canal or a muddy station path in 1:76 or 1:48 scale. Choosing the right epoxy resin starts with understanding viscosity. A "water-thin" resin is vital for creating surface ripples or simulating rain-slicked pavement. If the resin is too thick, surface tension will cause it to bead up rather than flow into the fine textures of your diorama. Unlike industrial resins that might wick into every tiny gap and leak through your baseboard, a well-chosen modelling resin offers the control needed for fine scale work.
UV stability is another non-negotiable factor for long-term hobbyists. Standard resins often turn yellow after 24 to 36 months of exposure to layout lighting. You should look for products specifically labeled as UV-resistant to ensure your water features don't look like tea within a few years. Surface hardness also matters because scenery inevitably gets dusty. You need a resin that cures hard enough to withstand a soft brush or a vacuum without scratching. Choosing a high-quality brand like Bob Smith Industries or Z-Poxy ensures the surface remains clear and durable for decades.
Coating Resins for High-Gloss Finishes
Coating resins are designed to sit on the surface rather than fill a cavity. They are perfect for simulating wet mud or damp station platforms. By applying a very thin layer, you can create a "wet look" without obscuring the fine rivets or planking details on your 3D printed kits. For a realistic effect, use a "flood coat" technique on small areas. This involves pouring a slightly larger amount and letting it self-level. Be careful on sloped terrain. Coating resins will naturally pool at the lowest point, so you may need to apply multiple thin layers with a brush to maintain a "damp" look on a gradient.
Casting Resins for Water and Parts
When your scene requires depth, such as a deep pond or a riverbed, casting resins are the correct tool. These are formulated to be poured in thicker layers without the "pull-away" effect where the resin shrinks away from the banks. This is especially useful when creating details for a narrow gauge railway, where the scenery is often as characterful as the locomotives themselves.
If you're pouring more than 10mm deep, heat management becomes vital. High-speed resins like the $15.90 Bob Smith 5-minute epoxy generate significant heat and can warp 3D printed parts. For deep water, opt for a slow-cure product like the Bob Smith 30-minute epoxy, priced between $11.99 and $19.16, or AK Interactive’s AK8232. These cure more slowly, allowing heat to dissipate safely without damaging your diorama. If you're looking to start your next project with the right materials, you can explore our collection of professional modelling supplies to find the perfect match for your layout.
Mastering the Pour: How to Avoid Bubbles and Mess
Pouring epoxy resin is often the most nerve-wracking stage of a diorama project. One measurement error or a hasty stir can result in a sticky mess that refuses to cure or a riverbed filled with unsightly "froth." Success in this phase requires a disciplined workflow that starts long before the resin leaves the bottle. You aren't just pouring plastic; you're managing a chemical reaction that is sensitive to air, temperature, and cleanliness.
The Double Mix method is your best defense against failure. Most modellers make the mistake of mixing in one container and pouring immediately. This often leaves unmixed resin or hardener on the sides of the cup, which then creates soft, tacky spots on your layout. Instead, stir your components thoroughly in one cup, pour the mixture into a second clean container, and mix again with a fresh stick. This ensures a 100% consistent chemical bond. When you're ready to pour, do so from a height of at least six inches in a very thin stream. This "long pour" technique stretches the liquid, which helps to pop internal bubbles before they ever reach your scenery.
Once the pour is complete, you must protect the surface from the environment. Dust is a constant presence in a modelling shed, and a single speck of sawdust or a stray hair will be permanently entombed if it lands during the 24-hour cure. Cover your work with a large plastic tub or a foil tent. Ensure there is enough clearance so the cover doesn't touch the wet resin, but keep it tight enough to block airflow that might carry contaminants onto your pristine water feature.
Sealing Your Scenery Before the Pour
Porous materials like plaster, timber, and certain foams are filled with microscopic air pockets. When the resin hits these surfaces, it displaces the air, causing "burping" bubbles that rise to the surface for hours. You must seal your riverbed or canal base with a layer of PVA glue or an acrylic sealer. Allow this barrier to dry for at least 12 hours before introducing the resin. This prevents the epoxy resin from wicking into the baseboard and creates a leak-proof "tub" for your scenic water.
The Hairdryer and Torch Technique
Surface bubbles are inevitable, but they're easy to manage with a little heat. Passing a butane torch or a hairdryer on a low setting quickly over the surface will pop bubbles instantly. However, you must be extremely cautious when working near 3d printed locomotive bodies. The heat required to clear the resin is often high enough to warp thin-walled resin prints or melt fine plastic details. If heat feels too risky, use a fine mist of Isopropyl Alcohol (IPA) from a spray bottle. The IPA breaks the surface tension and pops the bubbles without any thermal risk to your models.
3 Creative Ways to Use Epoxy Resin on Your Layout
Narrow gauge modelling often requires creative solutions for small-scale problems. While most people see epoxy resin as a tool for filling a riverbed, its utility extends far into the finer details of OO9 and GN15 layouts. You aren't limited to large water features; this material is a multi-tool for everything from optical effects to structural repairs. For instance, creating realistic headlight lenses or window glazing on small locomotives is remarkably simple. By using a toothpick to place a tiny drop of clear resin into a headlight housing, the surface tension naturally forms a convex shape. Once cured, it mimics glass much more effectively than a flat piece of plastic ever could.
You can also use resin to simulate wet weather effects that bring a scene to life. A thin, brushed-on layer of resin can turn a dusty road into a rain-slicked thoroughfare or make a workshop floor look like it's covered in spilled oil. Because epoxy doesn't shrink, these "wet" spots won't disappear or crack as they dry. This level of detail is what separates a standard train set from a professional-grade diorama. If you're ready to start building your own fleet with these advanced techniques, browse our range of scale models to find your next project.
Tinting and Colouring for Depth
Achieving a realistic look in a model pond or canal requires more than just painting the baseboard blue. You need to tint the resin itself to create a sense of volume. Use transparent, alcohol-based inks to simulate the murky, peat-stained water often found on rural narrow gauge lines. By layering different tints, you can make a pond look deeper in the center and shallower at the edges. Never use water-based acrylic paints to tint your epoxy resin. The water content in the paint can interfere with the chemical reaction, leading to cloudy patches or a sticky finish that never fully hardens.
Resin as a Structural Adhesive
Structural integrity is a common challenge when you're building kit-009 locomotives. While superglue is a hobby staple, it's often too brittle for heavy white metal parts or large resin castings. Epoxy provides a much stronger, more flexible bond that won't snap if the model is accidentally bumped. It's also an excellent gap filler. You can mix a small amount of resin with a thickening agent, like talcum powder or micro-balloons, to create a structural paste. This is perfect for filling seams in locomotive bodies or even creating custom "weld beads" on industrial rolling stock for a more rugged, prototypical appearance.
Finishing and Painting Resin-Enhanced Models
The final stage of working with epoxy resin is where your technical skill meets your artistic vision. Once the material has fully cured, which typically takes 24 to 72 hours depending on the ambient temperature in your workshop, you may find imperfections like support marks or slight overspills. Unlike softer plastics, cured epoxy is dense and requires a patient approach. You should begin sanding with 400-grit wet and dry paper to level the surface, gradually working your way up to finer grits. This is vital when integrating structural repairs into painting 3d printed models; any ridge between the resin and the print will be magnified once the primer is applied.
Priming is a non-negotiable step for any resin-enhanced model. Epoxy is non-porous, meaning standard hobby paints often struggle to grip the surface without a proper base. Use a high-quality automotive-grade primer or a specialized hobby primer to create a "key" for your topcoats. If you've already poured a scenic water feature, masking is your next challenge. Use a low-tack painter's tape to cover the resin surface before airbrushing the surrounding terrain. This prevents overspray from dulling your carefully achieved clarity. For larger rivers or harbors, a layer of cling film secured with tape at the edges provides a reliable barrier against scenic dust and paint mist.
Polishing to a Mirror Finish
If you've used resin for glazing or deep water, sanding will initially leave the surface looking cloudy and opaque. To restore that "liquid" look, you must follow a strict polishing regimen. Progress through wet and dry papers up to 7000 grit, ensuring you change the direction of your sanding with each grade to remove the previous scratches. After the 7000-grit stage, apply a fine liquid polishing compound with a microfiber cloth. For small lenses on OO9 locomotives, a single drop of high-gloss clear varnish can often save time by filling micro-scratches and providing an instant shine without the need for mechanical polishing.
Long-term Maintenance of Resin Scenery
Maintaining your layout's appearance requires ongoing care, especially as the global model train market continues its projected growth toward a USD 3.2 billion valuation by 2034. Dust is the primary enemy of resin water. Use a soft, anti-static brush or a camera lens blower to clean the surface. Never use a stiff brush, as even cured resin can develop fine micro-scratches over time. While modern resins are more stable than older formulas, you should still position your layout away from direct sunlight to minimize UV exposure. If a water feature becomes cloudy after several years, a light buffing with a polishing compound or a fresh "glaze" coat of thin epoxy resin can restore its original depth and clarity.
Bring Professional Realism to Your Next Layout
You now have the technical foundation to transform your diorama from a static display into a living, breathing scene. By mastering the "Double Mix" method and selecting the correct viscosity for your specific scale, you can ensure your epoxy resin features remain clear and bubble-free for decades. With the global model train market projected to grow at a CAGR of 6.7% as of 2026, the demand for scale accuracy has never been higher. Whether you're reinforcing a delicate 3D printed locomotive or pouring a deep canal bed, your attention to heat management and surface preparation will set your work apart from the rest.
Ready to put these skills to the test on a new project? Browse our range of Narrow Gauge Kits and Diorama Tools to find expert-designed 3D printed kits in OO9 and GN15 scales. We are specialists in narrow gauge modelling and provide worldwide shipping for all supplies to help you achieve a professional finish. Your layout deserves the best materials and techniques; it's time to start building your most realistic scene yet.
Frequently Asked Questions
Is epoxy resin safe to use on 3D printed locomotive kits?
Yes, epoxy resin is safe for 3D prints as long as you manage the heat generated during the cure. High-speed resins can reach temperatures exceeding 60 degrees Celsius, which is high enough to warp thin-walled 3D printed parts. You should use a slow-cure formula to ensure the exothermic reaction stays within safe limits for your delicate locomotive bodies and fine details.
How do I stop epoxy resin from leaking through my model railway baseboard?
You must create a watertight barrier using PVA glue, acrylic sealer, or hot glue along every joint and screw hole. Even a microscopic gap in your baseboard will allow the liquid to drain away completely within minutes. It's best to perform a "leak test" with a tiny amount of resin or a thick sealer before committing to the full scenic pour.
Can I use acrylic paint to colour my epoxy resin water?
You shouldn't use standard acrylic paints because their water content can ruin the chemical cure. Water often causes the mixture to become cloudy or remain permanently tacky and soft. Stick to specialized resin pigments or alcohol-based inks. These integrate perfectly without compromising the structural integrity or the crystal-clear finish of your river or canal features.
How long does it take for epoxy resin to fully cure in a cold shed?
Curing times vary significantly with temperature, and a shed at 10 degrees Celsius can triple the standard 24-hour window. If the temperature drops below 15 degrees Celsius, the chemical reaction in your epoxy resin may stall entirely. Use a small space heater to maintain a consistent 20 to 22 degrees Celsius for the first 12 hours to ensure a rock-hard finish.
Why did my resin water turn cloudy or milky?
Cloudiness usually happens because of high humidity or moisture contamination during the mixing process. If the air is more than 50% saturated with water, the resin can develop a milky "amine blush" on the surface. Always mix your components in a dry environment and keep the project covered with a tub to prevent condensation from settling on the wet surface.
How do I remove bubbles from a deep pour in a GN15 diorama?
For deep dioramas, use a butane torch or a fine mist of 99% Isopropyl Alcohol (IPA) to pop bubbles as they rise to the surface. Pouring in multiple layers no thicker than 10mm also helps trapped air escape before the liquid begins to gel. This prevents the "frothy" look that often ruins deep harbor or mountain lake features in larger scales.
Can I pour epoxy resin over painted scenery?
You can pour over painted scenery, but the paint must be fully dry and sealed with an acrylic varnish first. Unsealed paint can release tiny air bubbles or react with the resin, causing unsightly discoloration. A quick coat of clear sealer acts as a vital buffer, ensuring your colors stay vibrant and crisp under the clear water effect.
What is the best way to clean my mixing tools after a session?
The most efficient way to clean tools is to wipe them with a paper towel soaked in Isopropyl Alcohol while the resin is still liquid. If the resin has already started to gel, it's often easier to let it cure completely on silicone tools and peel it off the next day. Don't wash liquid resin down the sink, as it will harden and clog your plumbing.