

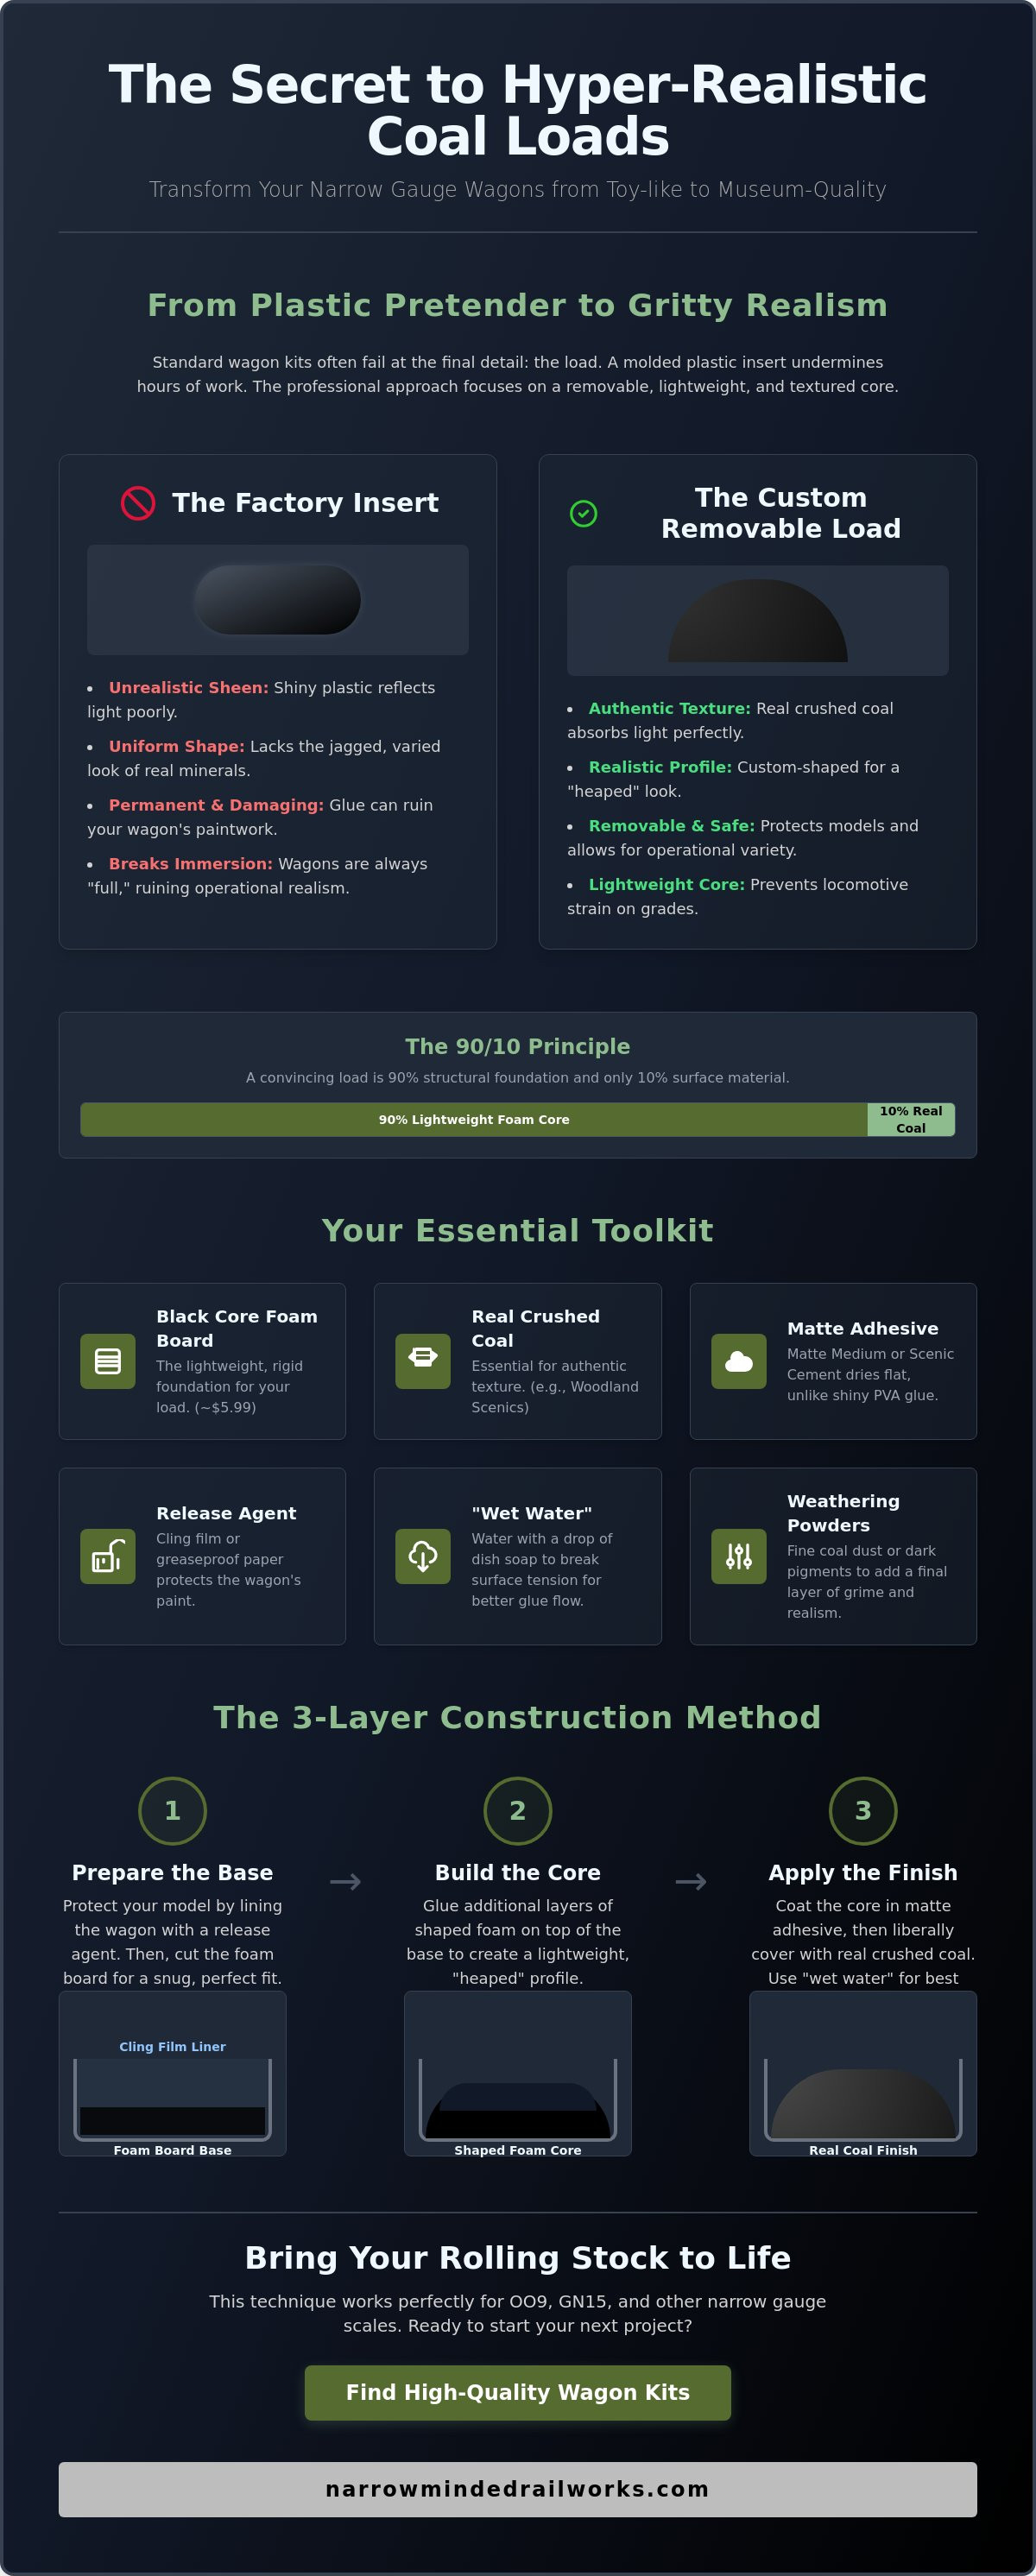
The most convincing narrow gauge layouts rely on a secret that most modellers overlook: realistic coal loads are 90% structural foundation and only 10% material application. You've likely spent hours perfecting a wagon kit only to have it feel like a toy because of a shiny, molded plastic insert. Creating realistic coal loads for wagons shouldn't mean risking your paintwork with permanent glue or adding so much weight that your small locomotive can't pull the grade. We all want that perfect, gritty texture without sacrificing the operational flexibility of our layouts.
You're about to master the techniques for crafting authentic, removable coal loads that bring your rolling stock to life. This guide shows you how to use $5.99 black core foam board to build lightweight bases that protect your models and keep haulage manageable. We'll explore the best grades of real crushed coal, from Peco Scene to Woodland Scenics, and show you how to achieve a professional weathered finish. We're going to walk through the exact steps to build scale-accurate loads that give your OO9 or GN15 wagons the character they deserve.
Key Takeaways
- Discover why removable sub-bases are essential for realistic operations and how they protect your wagon's paintwork from permanent damage.
- Identify the best materials for creating realistic coal loads for wagons, including the use of real crushed anthracite for authentic texture.
- Master the sizing and shaping of lightweight foam inserts to create the perfect "humped" profile for full narrow gauge wagons.
- Apply the "wet water" secret to ensure adhesives bond every layer of coal for a durable finish that won't flake during transit.
- Learn how to balance your rakes by matching load types to specific narrow gauge prototypes for a visually convincing train.
The Fundamentals of Creating Realistic Coal Loads for Wagons
Factory-supplied plastic loads are often the weakest link in a high-quality kit build. These inserts usually feature uniform, rounded shapes that lack the jagged edges and varying luster of real minerals. When you're creating realistic coal loads for wagons, you're looking for that specific light-absorbing quality that only carbon-based materials provide. A painted plastic surface will never catch the light with the same grit and depth as a piece of real anthracite.
Beyond aesthetics, consider the operational logic of your layout. Realism isn't just about how a single wagon looks; it's about how the whole railway functions as a system. In the historical era of Wagonload freight, wagons were constantly moving between loaded and empty states. Fixed plastic loads force your locomotives to pull "full" wagons back to the mine or wharf, which breaks the immersion of a working line. Removable loads allow you to run empty rakes in one direction and loaded rakes in the other, doubling the play value of your rolling stock.
To better understand the visual impact of these techniques, watch this helpful video:
Weight management is a critical factor for narrow gauge modellers. Many OO9 or O-16.5 kits are lightweight by design, and their small motors have specific haulage limits. Filling a wagon entirely with real coal can make it top-heavy or simply too heavy for a small locomotive to haul up a steep gradient. By using a lightweight core, you get the visual benefit of a heaped load without the physical mass that causes stalling or motor wear.
Anatomy of a Realistic Model Load
A convincing load is a three-part structure. It starts with a base that fits the wagon's interior perfectly, followed by a bulk core to create the "heaped" profile, and finally the finish layer. Real coal interacts with light by creating deep, velvet-black shadows in the crevices. Adding a fine dusting of coal wash or crushed fines around the edges of the wagon rave suggests years of heavy industrial use, grounding the model in its environment.
Why Scale Matters in Coal Selection
Scale is where many modellers stumble. A lump of coal that looks correct in a GN15 (1:24) wagon will look like a massive, un-crushed boulder in an OO9 (1:76) skip. Crushed real coal remains the gold standard because it fractures naturally into scale-appropriate shapes. It's vital to avoid cheap synthetic substitutes; these often contain reflective plastic particles that create a "glitter effect" rather than the dull, heavy sheen of industrial fuel.
Essential Materials for Authentic Model Coal Loads
Selecting the right ingredients is the second step in creating realistic coal loads for wagons. While many modellers assume any black rock will do, the choice between anthracite and bituminous coal significantly changes the character of your train. Anthracite is hard and shiny; it's perfect for representing high-grade fuel. Bituminous coal is softer and creates more dust, which is ideal for an industrial or "work-worn" narrow gauge look.
Don't just reach for standard white glue. While PVA is a hobby staple, it often dries with a slight sheen that ruins the look of raw coal. Matte medium is a superior choice because it dries completely flat. For those looking to integrate these loads into their narrow gauge wagon kits, using a high-quality scenic cement ensures the load stays intact during heavy shunting without adding unnecessary weight.
Using a release agent is the most important step when creating realistic coal loads for wagons that you intend to swap during operation. Line the wagon with a small piece of cling film or greaseproof paper before building the base. This prevents the adhesive from bonding to your paintwork. For the sub-base itself, 20" x 30" Black Core Foam Board is an excellent choice. It retails for about $5.99 and provides a lightweight, rigid foundation that won't warp under wet glue.
Choosing Your Bulk Material
Sourcing real coal is the gold standard for authenticity. If you can't find raw lumps locally, products like Woodland Scenics Lump Coal (B93) cost approximately $5.99 and offer a consistent starting point. To get the best results, use an old pepper mill to grind larger chunks into fine "slack." This dust is perfect for filling gaps between larger pieces and creating the appearance of a settled, heavy load. If you're working on a budget for a massive fleet, graded stone ballast painted with a matte black wash can serve as a convincing alternative.
The Modeller’s Toolkit for Loading
Precision is vital when applying adhesives. You'll need a "Mist Bottle" filled with "wet water," which is simply water mixed with a drop of dish soap to break surface tension. This allows your glue to soak through the entire load rather than pooling on the top. Use precision pipettes to drop your adhesive into the heap once it's saturated with wet water. For those new to finishing techniques, the NMRA weathering guide offers professional insights into how coal grime interacts with different surfaces, helping you blend your new load perfectly with your wagon's finish.
Building Removable Sub-Bases for Narrow Gauge Wagons
The foundation of any removable load is a sub-base that fits perfectly without binding against the wagon walls. When you're creating realistic coal loads for wagons, precision measurement is your first task. Use a digital caliper to measure the internal length and width of your wagon's body. Subtract roughly 0.5mm from these dimensions to ensure the base can be lifted out without scratching the interior paintwork. While some modellers suggest folding card into a V-shape, this often warps under the moisture of scenic cement. A rigid sub-base made from the $5.99 black core foam board mentioned earlier provides a much more stable platform that maintains its shape for years.
Protecting the wagon during construction is non-negotiable. Even with a removable base, stray glue can seep down the sides. Line the interior with a single layer of thin cling film or greaseproof paper before inserting your sub-base. This creates a temporary barrier, allowing you to build the load directly in the wagon for a perfect fit without risking a permanent bond. If you're working with lightweight OO9 wagons, this is also the ideal time to add weight. Glue a few small lead shots or a 10mm steel washer to the bottom of the sub-base. This extra mass lowers the center of gravity, significantly improving tracking on uneven trackwork.
The Foam Block Method
Shaping a block of high-density extruded polystyrene is the most effective way to mimic the natural "angle of repose" found in real coal heaps. Use a sharp hobby knife to carve a gentle mound that peaks in the center and tapers toward the wagon edges. It's vital to paint this foam matte black before adding any coal. This ensures that if a few grains of coal flake off later, the bright foam won't peek through. To make removal easy, embed a small 3mm neodymium magnet into the foam or leave a tiny, inconspicuous "finger hole" near one end of the load.
The False Floor Technique
For wagons that aren't fully loaded, a false floor made of plasticard or mounting board works best. This technique is particularly useful for 3D printed wagon kits where the internal detail might be delicate. You can adjust the height of the false floor by gluing small "legs" of scrap plastic to the underside. This allows you to vary the load depth between different wagon types; for instance, a slate wagon might only have a thin layer of waste, while a coal hopper requires a deep, substantial heap. This method keeps the wagon light while still creating realistic coal loads for wagons that look full from a distance.
Techniques for Gluing, Layering, and Weathering
Once your foam sub-base is shaped and painted, you're ready for the most delicate part of creating realistic coal loads for wagons: the bonding process. Many modellers make the mistake of dripping glue directly onto dry coal. This almost always results in surface tension causing the glue to bead and roll off the sides, leaving you with ugly clumps and loose grains underneath. The secret to a professional finish lies in breaking that surface tension before any adhesive touches the model. This ensures the bond reaches the very bottom of the load, creating a durable, removable insert that won't crumble during a busy operating session.
Layering is equally important for a convincing 3D effect. Instead of dumping all your coal at once, build the heap in two or three stages. Start with a thin layer of medium-grade coal to cover the base, then add finer "slack" or dust to fill the voids. This mimics how real coal settles during loading at a colliery. If you're working with a large fleet, remember that drying times can vary. A typical 50/50 mix of water and matte medium takes approximately 24 hours to cure completely. Avoid cheap, bulk-buy PVA glues; these often contain fillers that leave a "milky" residue or a rubbery texture that ruins the sharp edges of your coal grains.
The Capillary Action Method
Begin by misting your coal pile with "wet water" until it's thoroughly damp but not swimming in liquid. Use a precision pipette to drop your adhesive onto the highest point of the heap; the liquid will naturally pull itself through the gaps between the grains. Once finished, perform a "gravity check" by gently tilting the wagon. If any grains shift, apply a second round of adhesive to that specific area. Matte medium is superior to gloss PVA for coal because it dries with a flat, non-reflective finish that doesn't look like frozen liquid on the surface.
Adding the Final Realistic Touches
Realism comes from the small details added after the glue has cured. Use a soft brush to apply dry black pigments to the top of the load to simulate the dull, weathered appearance of coal that has been sitting in a depot. For high-grade anthracite, a light rub with graphite powder or a 4B pencil adds a subtle metallic glint that catches the light. Don't forget to integrate the load with the wagon itself. A light "coal wash" of thinned black acrylic paint applied to the wagon sides suggests years of dust seepage. If you're looking for high-quality accessories to finish your build, explore our range of diorama tools and scenery to find the perfect weathering supplies.
Integrating Custom Loads with Your Narrow Gauge Kits
The final step in creating realistic coal loads for wagons is ensuring they match the specific narrow gauge railway prototype you're modelling. Industrial lines in North Wales often carried different grades of fuel compared to a colonial sugar cane line or a localized quarry railway. For a visually balanced rake, you don't necessarily need every wagon to be full. A mix of 60% loaded and 40% empty wagons creates a more dynamic, "working" appearance on your layout. This variety reflects the reality of railway operations where wagons were often staged for loading or awaiting pick-up.
Maintaining your custom loads is straightforward but necessary. Over time, real coal can shed a few grains, especially if the wagons are handled frequently during shunting. If you notice "shedding," simply apply a single drop of matte medium to the affected area to re-seal it. For dust removal, a soft makeup brush or a low-suction computer vacuum is better than a damp cloth, which might leave fibers behind. Taking these small steps ensures your hand-crafted fleet remains a highlight of your layout for years to come.
OO9 Scale Considerations
When working with OO9 wagon kits, scale fidelity is your biggest challenge. At 1:76 scale, a standard lump of coal would be roughly the size of a grain of sand. Using "fine grade" coal is essential here; anything larger will look like massive boulders that would never fit in a real skip. Be particularly careful when fitting loads into 3D printed stock. These models often have delicate rivet or planking detail that can be obscured if your sub-base is even 1mm too wide. Always test fit your foam base before applying any adhesive.
GN15 and Larger Scales
Layouts in GN15 scale offer more room for artistic expression. At 1:24 scale, you can actually place individual, hand-selected lumps of coal on top of your heap to create a rugged, uneven look. This scale is perfect for interactive industrial dioramas where you might want to show a wagon being partially unloaded. Using coarser materials like Arizona Rock & Mineral Co. real coal, which retails for approximately $6.00 to $7.00 per bag, provides the necessary bulk and texture for these larger models. Creating realistic coal loads for wagons at this size allows you to highlight the specific mineral characteristics of the fuel being transported.
Elevate Your Narrow Gauge Operations Today
Transforming your rolling stock doesn't require expensive tools or complex engineering. By focusing on the rule that a load is 90% structural foundation and only 10% material application, you can finally move past the limitations of shiny, factory-supplied plastic inserts. Creating realistic coal loads for wagons is about finding the perfect balance between lightweight foam sub-bases and the authentic grit of real crushed anthracite. You now have the techniques to use $5.99 black core foam to protect your paintwork while ensuring your locomotives can handle the haulage on steep grades.
Now that you've mastered these loading and weathering skills, it's time to expand your fleet with models designed for this level of detail. We offer expertly designed 3D prints in specialist narrow gauge scales, including OO9, GN15, and O-16.5. With worldwide shipping available for all our kits, your next project is only a few clicks away. Browse our range of 3D printed narrow gauge wagon kits and start your next project today! Your layout is a living history; every hand-finished wagon brings that industrial atmosphere one step closer to reality.
Frequently Asked Questions
Can I use real coal from my fireplace for model wagons?
Yes, you can use fireplace coal, though it requires significant preparation to look scale-accurate. Raw coal often contains oils or soot that can interfere with your adhesive's bond. You'll need to wash the pieces thoroughly and crush them inside a heavy canvas bag to reach a size suitable for your specific scale. This is a cost-effective way of creating realistic coal loads for wagons if you have a large fleet of thirty or forty wagons to fill.
How do I make a coal load removable without it falling out during transit?
A snug friction fit is the most reliable way to keep a load secure without permanent glue. When building your base, aim for a gap of approximately 0.5mm between the load and the wagon walls. This allows the load to be lifted out easily while providing enough resistance to stay put during shunting. For extra security on wagons with metal weights, you can embed a tiny 3mm neodymium magnet into the bottom of the foam base.
What is the best glue for securing coal loads?
Matte medium is the gold standard for securing coal because it dries without any artificial sheen. Standard white PVA often leaves a rubbery or slightly glossy finish that ruins the look of raw minerals. Matte medium also has better capillary action, meaning it will flow more easily into the small gaps between coal grains. This results in a much stronger bond that won't become brittle over time.
Will adding real coal make my wagons too heavy for my locomotive?
Real coal is dense, and a solid load can easily exceed the pulling capacity of small 12V narrow gauge motors. By using a carved foam core, you reduce the volume of real mineral needed by approximately 80%. This is a vital step when creating realistic coal loads for wagons that need to be hauled in long rakes across layouts with gradients as steep as 1 in 40.
How do I prevent the glue from making the coal look shiny or grey?
The grey or shiny look usually happens when glue dries on the surface rather than soaking into the pile. Always mist your coal with "wet water" (water mixed with a single drop of dish soap) before applying your adhesive. The soap breaks the surface tension, allowing the matte medium to pull deep into the heap. This ensures the coal retains its natural deep black luster instead of looking like it's encased in plastic.
How do I get the "heaped" shape of a coal load to stay in place while gluing?
Carving a high-density foam sub-base into a "mound" shape is the best way to maintain a heaped profile. Don't rely on loose coal to form the heap, as it will likely slump once it gets wet with adhesive. By carving a 30-degree slope into your foam base first, you create a stable foundation. The coal will then sit naturally on this surface, maintaining its shape throughout the drying process.
Do I need to prime the wagon before adding a permanent coal load?
You should always prime the interior of the wagon if you aren't using a removable base. A quick coat of matte black primer provides a "key" for the scenic cement to grab onto. Without primer, the moisture in the glue can cause the entire load to peel away from the smooth plastic or resin floor. This is especially important for 3D printed kits where the surface might still have trace amounts of release agent.
What scale of coal should I buy for OO9 gauge wagons?
Fine grade coal, often labeled as "N gauge" or "Slack," is the correct choice for 1:76 scale OO9 wagons. The individual grains should ideally be between 0.5mm and 1mm in diameter. If you use "Large" or "O gauge" coal, the lumps will look like massive, un-crushed boulders that would never be found in a real narrow gauge skip. Always check the grain size on the packaging to ensure it matches your prototype's requirements.