

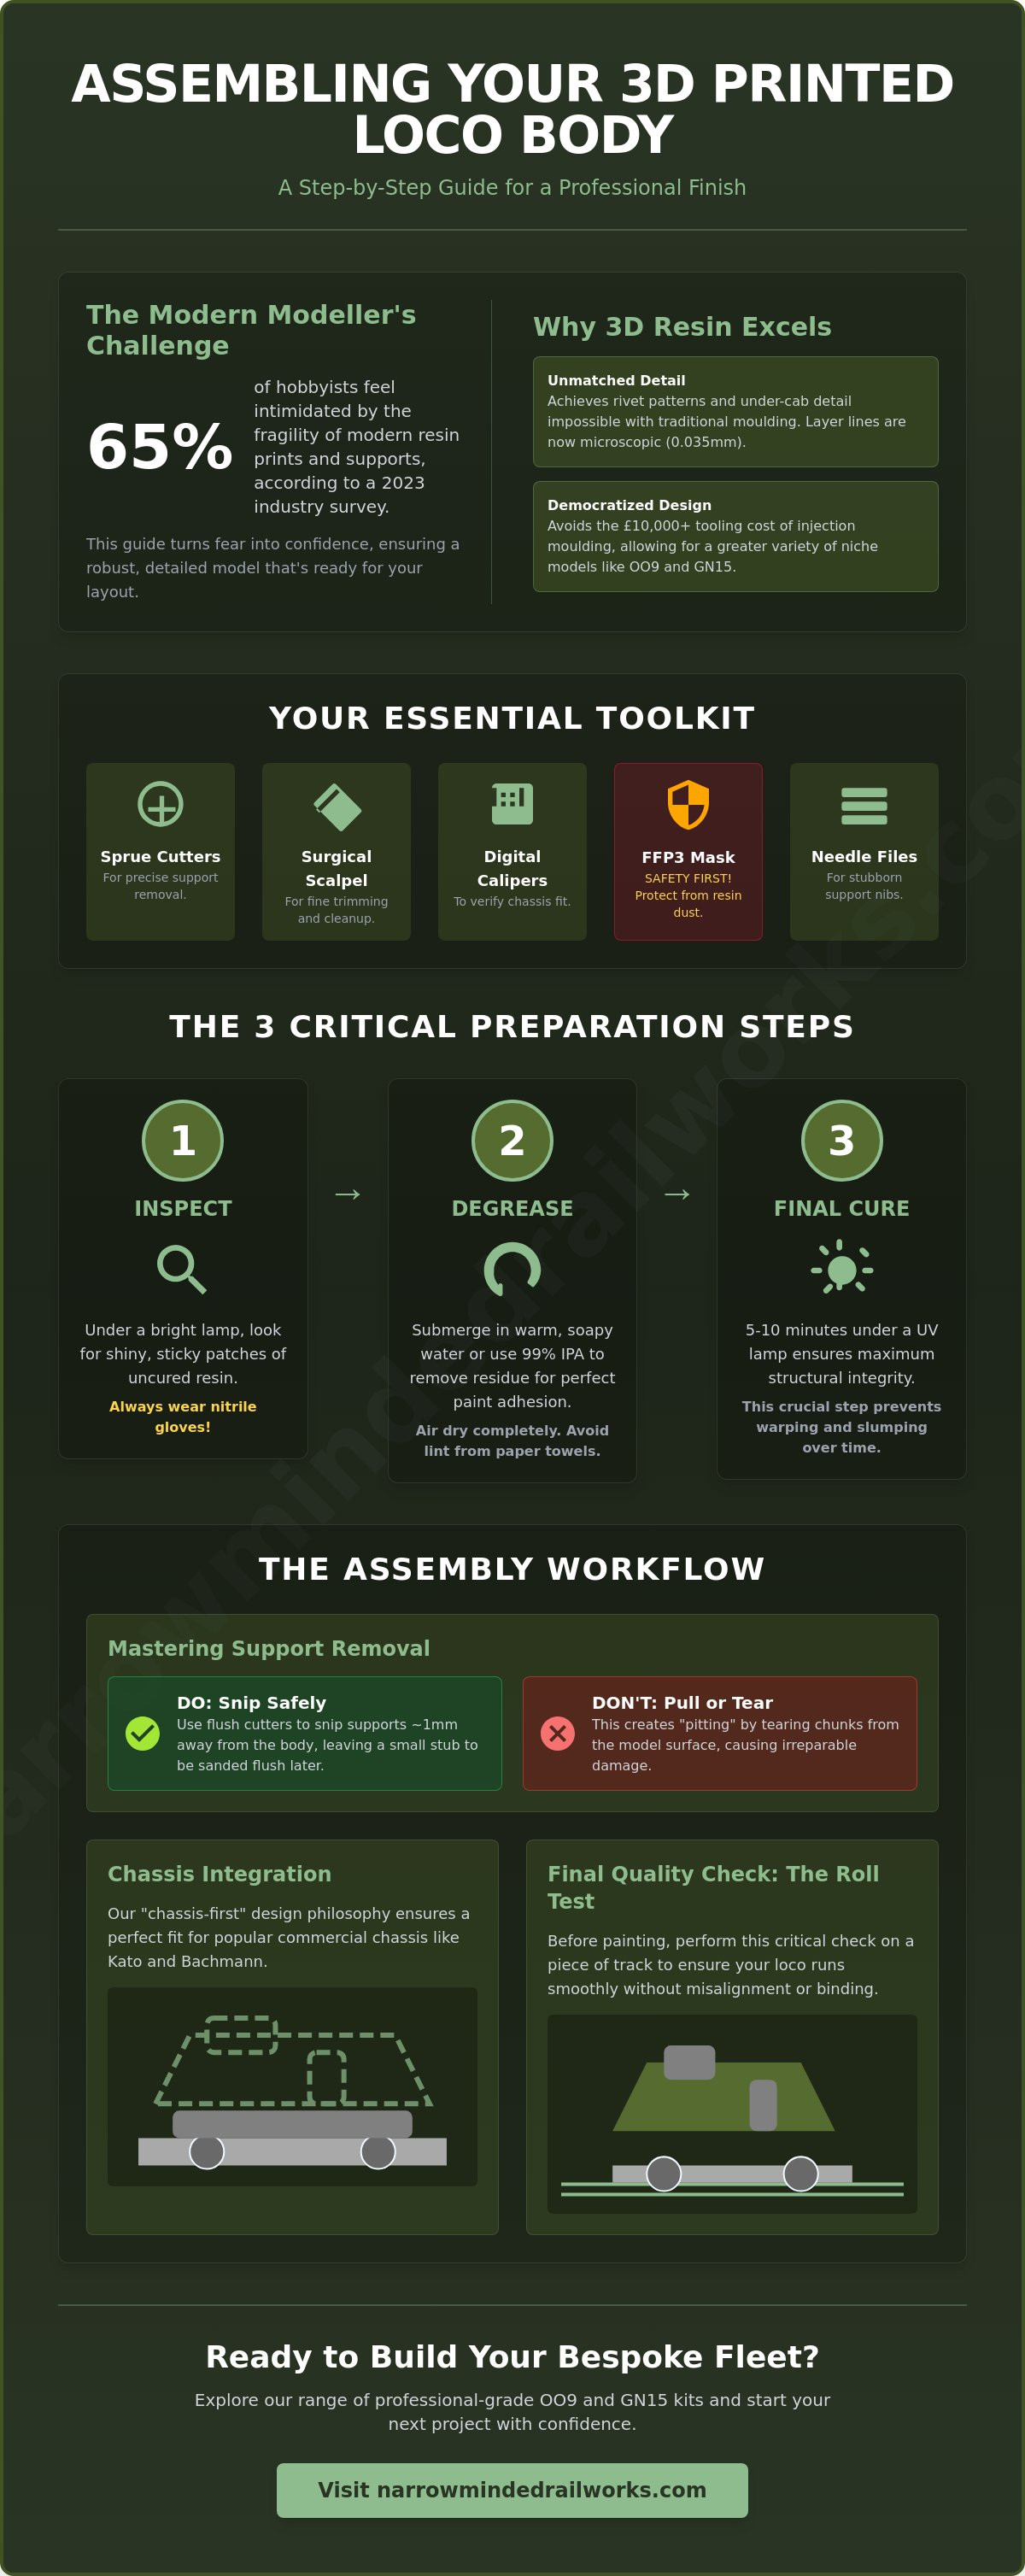
What if the only thing standing between you and a bespoke fleet of pre-grouping stock is the fear of a £45 resin print shattering in your hands? It's a common worry among UK enthusiasts, especially when a 2023 industry survey revealed that 65% of hobbyists feel intimidated by the fragility of modern resin supports. You likely agree that while the detail is breathtaking, the thought of snapping a delicate buffer beam or struggling with stubborn print lines is enough to keep the kit in its box.
We're here to change that. This guide ensures you'll master the process of assembling a 3d printed loco body while achieving a professional finish that stands up to close inspection. You won't have to guess which glue to use or how to align your model with a commercial chassis. We'll show you how to remove supports safely, hide layers effectively, and create a robust locomotive that's ready for the heaviest mineral trains on your layout.
Key Takeaways
- Learn the essential degreasing and inspection steps required to prepare resin shells for a professional, long-lasting finish.
- Discover the best techniques for assembling a 3d printed loco body onto popular commercial chassis like Kato and Bachmann for a perfect fit.
- Master the integration of multi-media components, including brass etchings and white metal castings, to enhance the realism of your model.
- Understand the unique properties of 3D resin compared to traditional injection-moulded plastic to avoid common assembly pitfalls.
- Implement critical quality control checks, such as the "Roll Test," to ensure your locomotive runs smoothly and without misalignment on the track.
Understanding 3D Printed Locomotive Bodies
The landscape of UK narrow gauge modelling has undergone a radical shift since the mid-2010s. For decades, enthusiasts relied on heavy white metal kits or scratch-building to populate their layouts. Today, 3D printing technology has democratised the hobby, allowing for complex, accurate models that were previously impossible to produce at an affordable price point. Narrow Minded Railworks focuses on OO9 and GN15 scales because these niche gauges benefit most from the high-fidelity detail resin provides.
To better understand how these components come together, watch this helpful video:
When you start assembling a 3d printed loco body, you'll notice it differs significantly from a mass-produced plastic kit. Traditional injection-moulded plastic relies on steel moulds that can cost over £10,000 to manufacture. This high entry cost often limits variety. 3D resin allows for intricate under-cab detail and rivet patterns without the massive tooling overhead. We follow a chassis-first philosophy. This means the body is engineered around a specific motor block, ensuring your locomotive runs as well as it looks.
The Anatomy of a 3D Printed Kit
A typical kit consists of a main bodyshell and various detail parts like chimneys, domes, or sandboxes. You'll likely see "print grain" or layer lines on the surface. These are microscopic steps created as the machine cures resin in layers, often just 0.035mm thick. While these lines are becoming nearly invisible with modern 8K and 12K printers, a light sand is usually required. In OO9 scale, this process allows for wall thicknesses as thin as 0.8mm, providing a scale-accurate appearance that traditional moulding cannot match.
Essential Tools for Resin Assembly
You don't need a massive workshop to begin assembling a 3d printed loco body successfully. A pair of fine-toothed sprue cutters and a fresh surgical scalpel are your primary tools. Digital callipers are vital for checking the internal dimensions of the shell against your chassis, which often measures between 10mm and 12mm wide for narrow gauge prototypes. Safety is the most important factor. Always wear a FFP3 rated mask when sanding resin. The fine dust is a respiratory irritant and shouldn't be inhaled. Use needle files for stubborn support nibs, and always work in a well-lit area to avoid over-sanding the delicate details.
Preparing Your 3D Printed Shell for Assembly
Before you begin the process of assembling a 3d printed loco body, the preparation stage dictates the quality of your final finish. Resin prints often arrive with a slight film or "tackiness" that indicates uncured material. You must inspect the shell under a bright desk lamp. Look for shiny patches in recessed areas like the boiler underside or inside the cab. If you find sticky residue, the resin hasn't fully stabilised. Handling these parts with bare skin is unwise because liquid resin is a sensitiser; always wear nitrile gloves during this initial inspection.
Degreasing is your next priority. Even if the print feels dry, microscopic amounts of resin or cleaning chemicals can linger in the detail. Submerge the body in a bath of warm water mixed with a degreasing detergent. Alternatively, use a 99% Isopropyl Alcohol (IPA) wipe for stubborn areas. This ensures that your chosen adhesives and primers bond directly to the material rather than a layer of grime. Once washed, let the shell air dry completely. Avoid using paper towels that leave lint behind, as these fibres will become permanent fixtures once you apply glue or paint.
Final curing is the last step before you reach for the glue. Most 3D printed kits require an extra 5 to 10 minutes under a UV lamp to reach maximum structural integrity. If you skip this, the resin may remain slightly soft, making it prone to warping when you add heavy white metal fittings or brass details. Ensure the light reaches the interior of the shell to prevent "slumping" over time. If you're looking for high-quality components to start your next project, you can find professional-grade kits at Narrow Minded Railworks.
Mastering Support Removal
Support structures are a necessity of the printing process, but removing them requires patience. Never pull or tear supports away from the body. This creates "pitting," where a chunk of the actual model snaps off with the support. Instead, use a pair of high-quality flush cutters. Snip the support wire about 1mm away from the body, leaving a small stub. You can sand this stub flush later with a 400-grit sanding stick. For delicate parts like lamp irons or handrail knobs, use a hairdryer to apply gentle heat for 30 seconds. This softens the resin just enough to make it slightly pliable, which significantly reduces the risk of brittle fractures during the snip.
Adhesives: What Works and What Doesn’t
Standard liquid poly cement, the staple of Airfix or Hornby kit building, is useless here. Poly cement works by chemically melting polystyrene to "weld" parts together. Resin is a thermoset plastic and won't react to these solvents. You must use Cyanoacrylate (CA), commonly known as superglue.
- Thin CA: Best for tight-fitting seams where capillary action can pull the glue into the joint.
- Gel CA: Ideal for larger parts where you need 5 to 10 seconds of "wiggle room" to align the footplate or cab.
- Two-Part Epoxy: Use brands like Araldite for structural joints. If you're adding lead weights inside the boiler to increase traction, epoxy provides the strength needed to hold that mass securely during a derailment.
When assembling a 3d printed loco body, remember that less is more. Excess CA glue is difficult to remove and will obscure the fine rivet detail that makes 3D printing so effective for modellers.
Mounting the Body to the Powered Chassis
The success of assembling a 3d printed loco body depends on how well the shell integrates with its motor. Most UK modellers rely on reliable donor units like the Kato 11-109 or Bachmann 0-6-0 chassis, though bespoke 3D printed bogies are becoming more common for narrow gauge projects. Before reaching for the glue, you must perform a dry-fit. This allows you to identify where the internal resin might foul the motor housing or gears. If you find a conflict, always prioritise modifying the 3D print over the chassis. A replacement resin shell might cost £20, but a ruined Bachmann motor is a far more expensive setback.
Securing the body requires a balance between stability and accessibility. Friction fits work well for lightweight industrial shunters, but heavier locomotives benefit from mechanical fasteners. Blu-Tack is a useful temporary solution during testing; however, for permanent running, small self-tapping screws are the gold standard. These ensure the body doesn't "walk" off the chassis during high-speed running or over uneven pointwork. A secure fit also reduces vibration, which can lead to noise or even structural cracks in the resin over time.
Clearing Internal Obstructions
Resin prints often have thicker walls than injection-moulded plastic. Use a rotary tool like a Dremel at a low speed, ideally below 5,000 RPM, to thin down internal sections. High speeds generate heat that melts the resin and clogs your burr. You must also consider thermal management. Electric motors generate heat; if the shell is too tight, it can't dissipate. Leave at least a 1mm gap around the motor to prevent overheating. Finally, check the wheel arches. On tight 9-inch radius curves, wheels need extra lateral clearance to swing without rubbing against the bodywork.
Creating Secure Mounting Points
To create a robust connection, drill pilot holes into the internal mounting lugs using a 1mm or 1.2mm bit. Without a pilot hole, the pressure of a screw can split a brittle resin print. If the locomotive sits too high on the tracks, it'll look toy-like. You can adjust this ride height by adding small shims of 0.5mm plasticard between the chassis and the body mounts. This fine-tuning ensures the buffers or couplings align perfectly with your rolling stock. For more advice on matching bodies to drivetrains, see our guide on choosing a chassis for GN15. This step is the final hurdle in successfully assembling a 3d printed loco body that performs as well as it looks.
Adding Fine Details and Multi-Media Parts
Once the main structure is secure, the process of assembling a 3d printed loco body shifts toward character and performance. While resin allows for incredible detail, it's often too light for practical use on a layout. A standard OO scale resin print might weigh less than 40g, which leads to poor electrical contact and wheel slip. To fix this, you should add internal weight. Using self-adhesive lead weights or "liquid lead" pellets secured with PVA can bring a small tank engine up to a more respectable 120g. This 200% increase in mass significantly improves traction and prevents stalling over points.
Handrails are another area where multi-media parts outshine pure plastic. While some designers include printed handrails, they're notoriously fragile. Removing them and drilling 0.45mm holes for brass wire provides a much sturdier finish. You can use a dedicated bending jig to ensure both sides of the boiler are symmetrical. Using 0.45mm nickel silver wire is a popular choice for UK modellers because it's stiffer than copper and doesn't require painting if you want a "polished" look for certain eras.
Working with Different Materials
Integrating white metal castings or brass etchings requires a different approach than resin-to-resin bonding. Resin is non-porous, so traditional plastic cement won't work. Cyanoacrylate (CA) is the standard, but it can be brittle. To ensure a bond that lasts for years, always clean metal parts with a fibreglass scratch brush to remove oxidation. If you're fixing a heavy chimney or dome, use a "kicker" or CA accelerator. This sets the glue in under 2 seconds, preventing the part from sagging while you hold it. It's a vital technique when assembling a 3d printed loco body that features heavy metal accessories.
Refining the Surface
Even with modern 8K printers, faint layer lines can appear after the first coat of primer. Wet-sanding is the best way to achieve a professional finish without losing detail. Use 600-grit wet and dry paper for initial levelling, then move to 1200-grit for a smooth surface. If you find small pits or "pockmarks" from support removal, don't reach for thick filler. Instead, apply a tiny drop of UV-cure resin with a cocktail stick, then zap it with a UV torch for 15 seconds. This creates a bond identical to the original print material. For larger gaps, "Green Stuff" epoxy putty remains a reliable choice for UK modellers since its introduction to the hobby over 30 years ago. Once the surface is perfect, you can move on to our guide on painting 3D printed models to start the livery application.
Looking for high-quality components to finish your build? Browse our latest range of detail parts and accessories to complete your locomotive.
Final Quality Checks and Next Steps
Completing the physical build is a major milestone, but the process of assembling a 3d printed loco body isn't quite finished until you've verified the mechanical alignment. Start with the "Roll Test." Place your locomotive on a level piece of track, such as a 1-metre length of Peco Streamline. Push the model gently to see if it wobbles or "limps" as it moves. If the body rocks from side to side, the chassis likely isn't sitting flush against the internal mounting points. You'll need to check for stray resin supports or uneven glue spots that might be tilting the shell.
Perform a close visual inspection under a bright desk lamp. Look for "silvering" or white fogging around join lines, which happens when cyanoacrylate (CA) glue vapours react with moisture in the air. Check that small details like handrails or whistle positions are symmetrical. Once you're happy with the alignment, give the entire model a final degrease. Use a soft toothbrush and a drop of mild dish soap, like Fairy Liquid, to wash away finger oils and mould release agents. This step is vital because even a tiny amount of skin oil will cause your expensive paint to bead or peel later.
If you aren't moving straight to the paint booth, store your model in a light-proof box. Standard UV resin remains reactive even after curing. Leaving an unpainted model on a sunny windowsill for 48 hours can cause the resin to become brittle or even warp, potentially ruining the precise fit you worked hard to achieve during the stage of assembling a 3d printed loco body.
Troubleshooting Common Assembly Issues
Resin can be brittle, and it's common for a small part like a lamp iron to snap. Don't just add more glue, as it won't hold under tension. Instead, use the pinning technique. Use a pin vice to drill a 0.5mm hole into both sides of the break, insert a short length of 0.45mm brass wire, and bond it with CA glue. This creates a structural skeleton that's much stronger than a surface bond. If the body sits too high on the chassis, check the internal corners of the print. 3D prints often have slight "fillets" in corners that prevent a square chassis from seating fully. A few strokes with a square needle file usually solves this in under two minutes. To remove excess glue without scarring the resin, use a fresh No. 11 scalpel blade to gently flake the dried glue away rather than sanding it.
Ready for the Paint Shop
A high-quality primer is essential for 3D printed models because the surface is non-porous. Avoid cheap automotive primers that might go on too thick and obscure fine rivet detail. Many UK modellers swear by Halfords Plastic Primer, which costs approximately £8.50 and provides a superb "key" for acrylic paints. Once the primer is dry, any tiny print layers or scratches will become visible, giving you one last chance to sand them back before the final colour coats go on. If you're just starting your journey into narrow gauge modelling, check out our beginner’s guide to choosing your first OO9 kit to find your next project.
Bring Your Narrow Gauge Vision to Life
Mastering the art of assembling a 3d printed loco body transforms a collection of resin parts into a reliable centrepiece for your layout. Success relies on meticulous preparation and using the correct adhesives. By focusing on clean surfaces and precise alignment with your power unit, you ensure your model runs smoothly from the first trial. Many builders find that dedicating 2 or 3 hours to the finishing stages significantly improves the final aesthetic. Adding fine-scale details is exactly where your locomotive gains its unique personality.
At Narrow Minded Railworks, we provide highly detailed resin prints that are specifically optimized for standard chassis like Kato or Bachmann units. Our kits are designed by modellers for modellers, ensuring every rivet is crisp and every fit is snug. We offer worldwide shipping to enthusiasts across the globe. Whether you prefer OO9 or GN15 scale, our designs help you achieve professional results without the guesswork. Your workbench is waiting, and it's time to start your next masterpiece.
Browse our range of 3D printed OO9 and GN15 locomotive kits and start your next project today. You've got the skills to create something truly special for your railway.
Frequently Asked Questions
Is 3D printed resin safe to sand and file?
Yes, sanding 3D printed resin is safe provided you wear a P3-rated respirator and use wet sanding techniques to suppress dust. Resin particles are hazardous if inhaled and can cause skin irritation in 15 percent of modellers who are sensitised. Always work in a ventilated area and clean your workbench with a damp cloth afterward to ensure no micro-particles remain on your surfaces.
What is the best glue for a 3D printed locomotive kit?
Cyanoacrylate, commonly known as super glue, is the most effective adhesive for assembling a 3d printed loco body. High-viscosity thick super glues like Gorilla Glue or Vital Bond work best because they fill small gaps between the printed layers. For heavy metal parts or chassis mounting, a 5-minute two-part epoxy provides a stronger mechanical bond that resists the vibrations of a running motor.
How do I remove the "sticky" feeling from a new 3D printed body?
A sticky surface indicates uncured resin, which you should remove by bathing the model in 99 percent Isopropyl Alcohol (IPA) for 3 minutes. If the tackiness persists, place the body in direct sunlight or under a 405nm UV lamp for 2 to 5 minutes. This process completes the polymerisation. It ensures the surface is hard and safe to handle without leaving fingerprints or ruining your final paint finish.
Can I use a standard N gauge chassis for an OO9 locomotive body?
You can use standard N gauge chassis for OO9 models because both systems share the 9mm track gauge. The Kato 11-103 and 11-109 power units are the industry standard for narrow gauge kits in the UK due to their reliability. You might need to trim 1 or 2 millimetres from the plastic chassis frame to fit the 3D printed shell, depending on the specific locomotive prototype you're building.
Do I need to prime a 3D printed model before painting?
You must use a high-quality primer to ensure paint adheres to the non-porous resin surface. A dedicated plastic primer like Halfords Grey Primer or Tamiya Surface Primer works best for assembling a 3d printed loco body successfully. Applying two thin coats helps identify minor print defects or layer lines that need extra sanding before you commit to applying the final livery colours.
What should I do if the 3D printed body is warped?
Submerge the warped part in water heated to 60 degrees Celsius for approximately 30 seconds until the resin becomes slightly pliable. Gently straighten the part by hand or jig it against a flat surface while it cools under a cold tap. This technique fixes approximately 90 percent of minor warping issues caused by uneven curing or heat exposure during shipping from the 3D print service.
How do I add weight to a 3D printed loco for better pulling power?
Glue small amounts of lead shot or tungsten putty into the hollow spaces of the boiler and water tanks using PVA glue. Since 3D printed resin is roughly 50 percent lighter than traditional white metal, adding 20 to 30 grams of weight significantly improves electrical pickup and traction. Ensure the weights don't interfere with the motor's movement or the rotation of the drive gears inside the shell.
Why won’t my plastic cement work on this 3D printed kit?
Standard plastic cements like Humbrol Liquid Poly don't work because they rely on a chemical reaction to melt polystyrene plastic. 3D printed resins are thermoset polymers that don't melt when exposed to these solvents. You'll need to switch to super glue or epoxy resins to create a permanent bond. These adhesives create a mechanical grip rather than a chemical weld, which is necessary for resin materials.